With the advent of the 5G era, the role of the Internet of Things (IoT) is becoming increasingly important, along with more security risks. IoT security covers a wide range of topics. This series of articles will discuss the author’s understanding of IoT vulnerability research from a technical perspective. The author will explore five dimensions: firmware, web, hardware, IoT protocols, and mobile applications. Due to limited capabilities, any inaccuracies or omissions are welcome for correction and supplementation.
Basics of IoT Firmware
The reason for choosing firmware as the first topic of discussion is that it is relatively fundamental, and IoT vulnerability research generally cannot bypass it. The following will introduce four parts: firmware decryption (if encrypted), unpacking and repacking, simulation, and overall security assessment of firmware.
1.1 Firmware Decryption
Some IoT devices encrypt or even sign firmware to increase research thresholds and security during upgrades. Since encryption and decryption are resource-intensive, such devices generally have higher configurations, such as some routers and firewalls.
1.1.1 Determining Firmware Encryption
Determining whether firmware is encrypted is relatively simple. Experienced individuals can use a binary editor to identify certain characteristics. Generally, the following features may exist.
Except for the firmware header, there are no visible characters in the data (excluding the header), the bit frequency of the data is basically consistent, and binwalk (-e) cannot parse the firmware structure, and (-A) does not recognize any CPU architecture instructions.
If the above characteristics are met, it can be suspected that the firmware is encrypted. Firmware decryption generally starts from these angles, but is not limited to the following methods.
1.1.2 Obtaining Keys from Hardware
This method is limited to firmware existing in an encrypted state at all times, where the system only decrypts and unpacks it into flash during startup, and the device lacks dynamic debugging means (UART/JTAG, etc.). Since the complete decryption process is in flash, a programmer can read the flash, reverse engineer the decryption algorithm and key, and achieve the purpose of decrypting the firmware. For example, the readout of flash memory from a certain device is distributed as follows:
0x000000-0x020000 boot section
0x020000-0x070000 encrypt section
0x070000-0x200000 encrypt section
0x200000-0x400000 config section
Clearly, the encryption process we need is in the boot section, where we need to find the encryption algorithm and key. Generally, encryption uses public block algorithms like AES, and the key is to find the block mode, IV (non-ECB), and key. Loading the boot into IDA Pro did not automatically recognize: 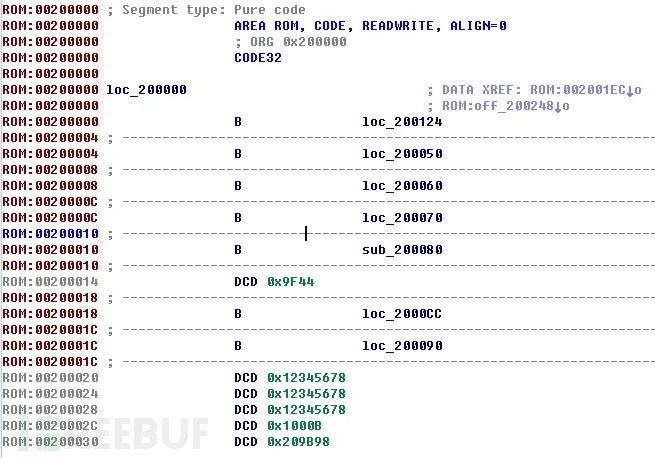 The structure of the interrupt vector table at the beginning of the ARM code can be manually identified. The common entry code is as follows:
.globl _start
_start:
    b       reset
    ldr     pc, _undefined_instruction
    ldr     pc, _software_interrupt
    ldr     pc, _prefetch_abort
    ldr     pc, _data_abort
    ldr     pc, _not_used
    ldr     pc, _irq
    ldr     pc, _fiq
...
_irq:
        .word irq
After this, the reverse engineering can reveal that the encryption algorithm is AES, and the key is obtained through the SHA256 hash of the device’s serial number. 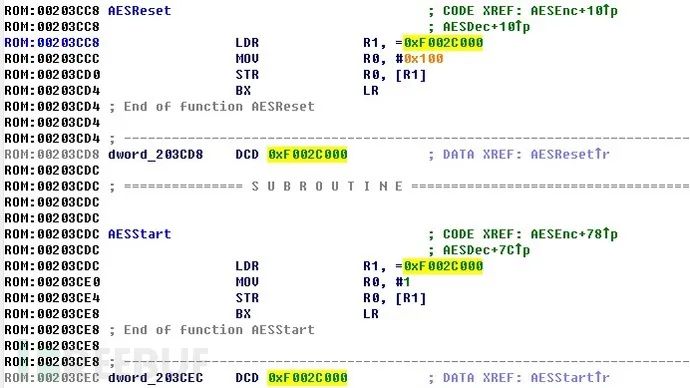 The structure recognized by IDA Pro will be discussed later when introducing RTOS. Devices using this firmware encryption method have a high level of security, and generally only decrypt during upgrades for verification.
1.1.3 Debugging with Direct Read
This method is the easiest to understand, which is to use UART, JTAG, Console, or network means to send back the firmware (packed) after the device starts, thus bypassing the decryption stage. It is worth noting that the device must provide these interfaces, and the specific methods vary by device. The use of these interfaces will be introduced in the hardware section.
1.1.4 Comparing Boundary Versions
This method is applicable when the manufacturer initially did not use encryption, i.e., the old firmware was unencrypted, and a decryption program was added during a certain upgrade, subsequently using encrypted firmware for upgrades. This way, we can find the boundary version between encrypted and unencrypted firmware from a series of firmware, unpack the last unencrypted version to reverse engineer the upgrade program, and restore the encryption process. 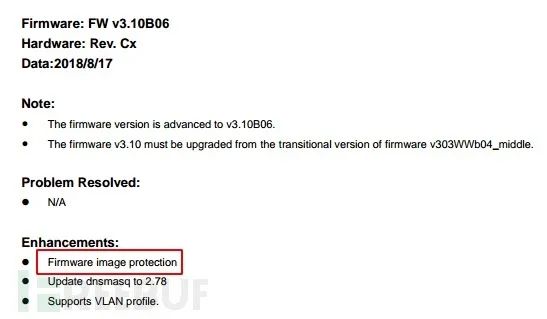 By downloading the firmware of a certain router as shown in the picture, unpacking it, and searching for keywords like “firmware,” “upgrade,” “update,” “download,” etc. to locate the upgrade program. Of course, if debugging means are available, we can also use ps to view the process during the upgrade to locate the upgrade program and parameters:
/usr/sbin/encimg -d -i <fw_path> -s <image_sign>By reverse engineering the encimg program with IDA Pro, we quickly obtain the code for the encryption and decryption process, which uses the AES CBC mode:
AES_set_decrypt_key (
   // user input key
   const unsigned char *userKey,
   // size of key
   const int bits,
   // encryption key struct which will be used by
   // encryption function
   AES_KEY *key
)

AES_cbc_encrypt (
   // input buffer
   const unsigned char *in,
   // output buffer
   unsigned char *out,
   // buffer length
   size_t length,
   // key struct return by previous function
   const AES_KEY *key,
   // initializatin vector
   unsigned char *ivec,
   // is encryption or decryption
   const int enc
)
1.1.5 Reverse Engineering the Upgrade Program
This method is applicable when the upgrade program has been obtained through interfaces or boundary versions. A tool for detecting encryption algorithms and locating positions can be used with a block algorithm’s box detection tool. Of course, binwalk can also parse certain simple cases, such as certain industrial control HMI firmware:
iot@attifyos ~/Documents> binwalk hmis.tar.gz
DECIMAL       HEXADECIMAL     DESCRIPTION
--------------------------------------------------------------------------------
34       0x22        OpenSSL encyption, salted, salt:0x5879382A7
By loading the upgrade program directly and locating the OpenSSL call, it is easy to obtain the decryption command:
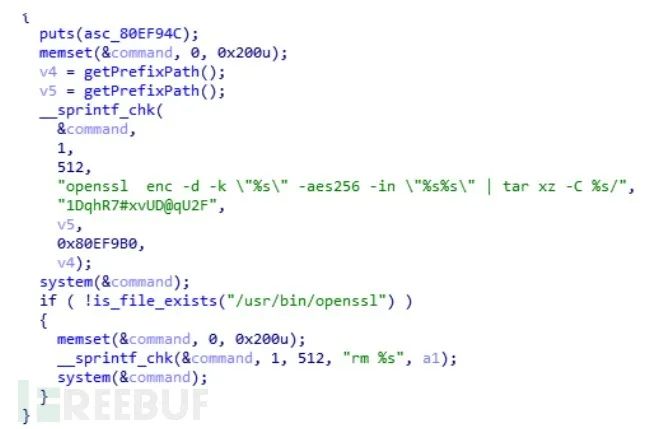 1.1.6 Exploiting Vulnerabilities to Obtain Keys
If boundary versions cannot be found, and debugging interfaces are unavailable or hardware debugging is unfamiliar, one can consider using historical version vulnerabilities to gain control over the device, then obtain the upgrade program to reverse engineer the encryption algorithm. This method is somewhat opportunistic, requiring the device to have a historical firmware with RCE vulnerabilities. By downgrading, one can implant vulnerabilities to gain permissions, download the required upgrade program, and then reverse engineer the encryption algorithm.
1.2 Firmware Unpacking
Beginners in IoT security research may find firmware unpacking simple, as it can be done directly with binwalk -Me, but the reality is often more complex. After extensive firmware testing, one will find that binwalk fails to unpack in many cases. IoT firmware generally falls into two categories: one with a file system, mostly based on Linux/BSD, and the other is an integrated firmware, which we refer to as RTOS (Real-time operating system).
1.2.1 Firmware with File System
Binwalk is well known, and using binwalk can directly obtain the rootfs file system, which will not be elaborated here. The author believes that the power of binwalk lies in its ability to parse and identify multiple header formats, providing references for unpacking. The following are a few situations that require some detours. Of course, firmware varies widely, depending on the designer’s design, and cannot be listed exhaustively.
1.2.1.1 UBI (Unsorted Block Image)
UBI format firmware is relatively common, and binwalk cannot directly unpack it. However, there are ready-made tools online like ubi_reader. One point to note:
For UBI_reader unpacking, the UBI file must be a multiple of 1024 bytes, and content must be added or removed to align.
For example, by analyzing a certain router, it was found that its rootfs is in UBI format:
# binwalk ROM/wifi_firmware_c91ea_1.0.50.bin
DECIMAL       HEXADECIMAL     DESCRIPTION
--------------------------------------------------------------------------------
684           0x2AC           UBI erase count header, version: 1, EC: 0x0, VID header offset: 0x800, data offset: 0x1000
First install ubi_reader:
$ sudo apt-get install liblzo2-dev
$ sudo pip install python-lzo
$ git clone https://github.com/jrspruitt/ubi_reader
$ cd ubi_reader
$ sudo python setup.py install
Or directly:
$ sudo pip install ubi_readerThen extract the UBI structure according to the address, using ubireader_extract_files [options] path/to/file to unpack.
1.2.1.2 PFS
Some firmware can have headers recognized by binwalk, but cannot be unpacked. For example, the following firmware:
iot@attifyos ~/Documents> binwalk -Me v2912_389.all

Scan Time:     2020-11-04 18:39:13
Target File:   /home/iot/Documents/v2912_389.all
MD5 Checksum:  180c60197aae7e272191695e906c941e
Signatures:    396

DECIMAL       HEXADECIMAL     DESCRIPTION
--------------------------------------------------------------------------------
1546799       0x179A2F        gzip compressed data, last modified: 2042-04-26 20:13:56 (bogus date)
1717744       0x1A35F0        LZ4 compressed data
4171513       0x3FA6F9        SHA256 hash constants, little endian
4179098       0x3FC59A        Copyright string: "Copyright (c) 1998-2000 by XXXXX Corp."
4214532       0x404F04        Base64 standard index table
4224780       0x40770C        HTML document header
4232369       0x4094B1        SHA256 hash constants, little endian
4307839       0x41BB7F        SHA256 hash constants, little endian
4314017       0x41D3A1        XML document, version: "1.0"
4702230       0x47C016        Base64 standard index table
4707197       0x47D37D        Certificate in DER format (x509 v3), header length: 4, sequence length: 873
4727609       0x482339        Base64 standard index table
4791281       0x491BF1        PFS filesystem, version 1.0, 12886 files
4807401       0x495AE9        Base64 standard index table
...
iot@attifyos ~/Documents> ls _v2912_389.all.extracted/pfs-root/000/
WEBLOGIN.HTM  _WEBLOGIN.HTM.extracted/
After running binwalk and checking the results, it is found that nothing recognizable was discovered. At this point, one can manually analyze or search for some related tools. Online, relevant tools can be found, and using the command according to the prompts can unpack the firmware.
iot@attifyos ~/D/draytools> python draytools.py -F v2910_61252.all
v2910_61252.all.out written, 12816484 [0x00C39064] bytes
FS extracted to [/home/iot/Documents/draytools/fs_out], 429 files extracted
Here is a brief look at the key code for firmware unpacking. The key is to find headers like ‘
\xA5\xA5\xA5\x5A\xA5\x5A’ and then unpack and decompress according to the specific format. Thus, firmware unpacking ultimately boils down to data format analysis.
def decompress_firmware(data):
    flen = len(data)
    sigstart = data.find('\xA5\xA5\xA5\x5A\xA5\x5A')
    if sigstart <= 0:
        sigstart = data.find('\x5A\x5A\xA5\x5A\xA5\x5A')
    if sigstart > 0:
        if draytools.verbose:
            print 'Signature found at [0x%08X]' % sigstart
        lzosizestart = sigstart + 6
        lzostart = lzosizestart + 4
        lzosize = unpack('>L', data[lzosizestart:lzostart])[0]
        return data[0x100:sigstart+2] \
            + pydelzo.decompress('\xF0' + pack(">L",0x1000000) \
                + data[lzostart:lzostart+lzosize])
    ...
1.2.1.3 Openwrt Lua
Parsing Lua structures may not be entirely appropriate here, but given the large user base of Openwrt, it is briefly mentioned. Lua is a lightweight scripting language that is easy to embed and extend, used in Openwrt development. It is worth noting that some devices’ Lua are not plain text and are obfuscated, requiring the use of luadec for decompilation. The Lua scripts in Openwrt differ slightly from those compiled with traditional luajit, and several patches are needed for luadec to work correctly. The commands are as follows:
$ cd ..
$ mkdir luadec
$ cd luadec/
$ git clone https://github.com/viruscamp/luadec
$ cd luadec/
$ git submodule update --init lua-5.1
$ cd lua-5.1
$ make linux
$ make clean
$ mkdir patch
$ cd patch/
$ get https://dev.openwrt.org/export/HEAD/trunk/package/utils/lua/patches/010-lua-5.1.3-lnum-full-260308.patch
$ wget https://dev.openwrt.org/export/HEAD/trunk/package/utils/lua/patches/030-archindependent-bytecode.patch
$ wget https://dev.openwrt.org/export/HEAD/trunk/package/utils/lua/patches/011-lnum-use-double.patch
$ wget https://dev.openwrt.org/export/HEAD/trunk/package/utils/lua/patches/015-lnum-ppc-compat.patch
$ wget https://dev.openwrt.org/export/HEAD/trunk/package/utils/lua/patches/020-shared_liblua.patch
$ wget https://dev.openwrt.org/export/HEAD/trunk/package/utils/lua/patches/040-use-symbolic-functions.patch
$ wget https://dev.openwrt.org/export/HEAD/trunk/package/utils/lua/patches/050-honor-cflags.patch
$ wget https://dev.openwrt.org/export/HEAD/trunk/package/utils/lua/patches/100-no_readline.patch
$ wget https://dev.openwrt.org/export/HEAD/trunk/package/utils/lua/patches/200-lua-path.patch
$ wget https://dev.openwrt.org/export/HEAD/trunk/package/utils/lua/patches/300-opcode_performance.patch
$ mv patch/ patches
$ for i in ../patches/*.patch; do patch -p1 <$i ; done
$ for i in ./patches/*.patch; do patch -p1 <$i ; done
$ make linux
Modify lua-5.1/src/MakeFile:
# USE_READLINE=1
  +PKG_VERSION = 5.1.5
  -CFLAGS= -O2 -Wall $(MYCFLAGS)
  +CFLAGS= -fPIC -O2 -Wall $(MYCFLAGS)
  - $(CC) -o $@ -L. -llua $(MYLDFLAGS) $(LUA_O) $(LIBS)
  + $(CC) -o $@ $(LUA_O) $(MYLDFLAGS) -L. -llua $(LIBS)
  - $(CC) -o $@ -L. -llua $(MYLDFLAGS) $(LUAC_O) $(LIBS)
  + $(CC) -o $@ $(LUAC_O) $(MYLDFLAGS) -L. -llua $(LIBS)
Then execute:
$ make linux
 $ ldconfig
 $ cd ../luadec
 $ make LUAVER=5.1
 $ sudo cp luadec /usr/local/bin/
Using luadec to display the code structure:
$ luadec -pn squashfs-root/usr/lib/lua/luci/sgi/uhttpd.lua
0
  0_0
    0_0_0
    0_0_1
    0_0_2
It is important to note that luadec compilation is architecture-dependent, and the official luadec cannot parse Lua files under the ARM environment. However, there are relevant tools available online, which will not be elaborated here.
1.2.2 RTOS
Many IoT devices adopt RTOS (Real-time Operating System) architecture, where the firmware itself is an executable file and does not contain a file system, loading and running directly upon startup. The most important points for RTOS analysis are:
(1) Firmware program entry (2) Firmware program symbols
1.2.2.1 VxWorks
First, let’s start with VxWorks, which is widely used and has recognizable patterns. VxWorks is a real-time operating system launched by Wind River Systems, widely used in communication, military, aerospace, and embedded devices. Due to its standards, it is easy to identify. The following is an example of such firmware:
iot@attifyos ~/Documents> binwalk image_vx5.bin

DECIMAL       HEXADECIMAL     DESCRIPTION
--------------------------------------------------------------------------------
335280        0x51DB0         PEM certificate
...
3721556       0x38C954        GIF image data, version "89a", 10 x 210
8518936       0x81FD18        VxWorks operating system version "5.5.1" , compiled: "Mar  5 2015, 15:56:18"
9736988       0x94931C        SHA256 hash constants, little endian
...
13374599      0xCC1487        Copyright string: "Copyright  1999-2001 Wind River Systems."
13387388      0xCC567C        VxWorks symbol table, big endian, first entry: [type: function, code address: 0xF4A09A00, symbol address: 0xF813C800]
13391405      0xCC562D        VxWorks symbol table, little endian, first entry: [type: function, code address: 0xB8BD, symbol address: 0xD000C800]
Binwalk has already identified the firmware as Vxworks 5.5.1 and provided the symbol table location. First, we need to identify the firmware entry point. If the firmware is packaged in ELF format, we can directly use readelf to obtain the base address. Here, it is clearly not applicable.
iot@attifyos ~/Documents> readelf -a image_vx5_arm_little_eniadn.bin
readelf: Error: Not an ELF file - it has the wrong magic bytes at the start
iot@attifyos ~/Documents> binwalk -A image_vx5.bin |more

DECIMAL       HEXADECIMAL     DESCRIPTION
--------------------------------------------------------------------------------
244           0xF4            ARM instructions, function prologue
408           0x198           ARM instructions, function prologue
440           0x1B8           ARM instructions, function prologue
472           0x1D8           ARM instructions, function prologue
608           0x260           ARM instructions, function prologue
Using binwalk -A we find that the firmware architecture is ARM, then directly load it into IDA Pro: 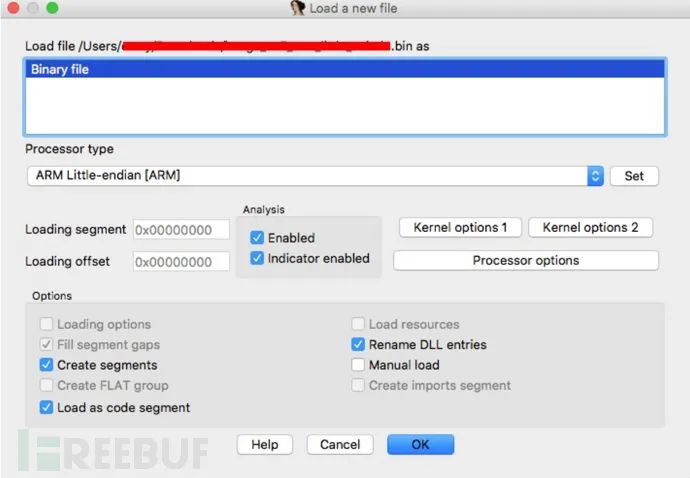
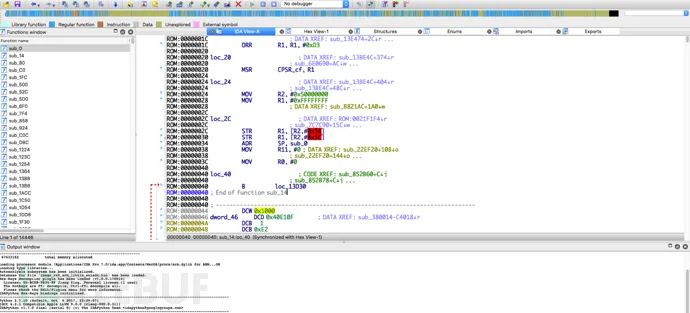 Analyzing the firmware’s initial jump determines that the loading address is 0x1000. For VxWorks, common methods to determine the base address include:
Analyzing the initialization code at the firmware header to find the first function usrInit of VxWorks, and finding the BSS boundary based on BSS initialization characteristics to calculate the firmware loading address.
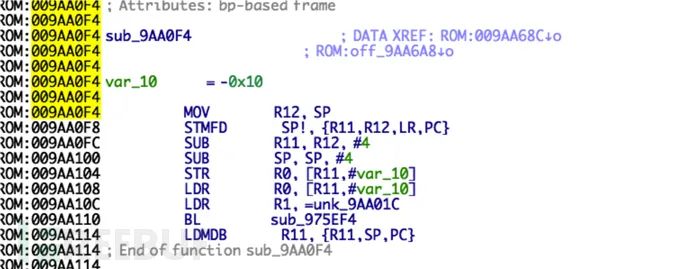
Then, according to the position indicated by binwalk, repair the symbol table name.  The function table stores the function names and function addresses, and by locating both, we can also verify the correctness of the base address. For example, the function name shown in the image at 0x00c813f8 is:
  and the function address is 0x009aa0f4:
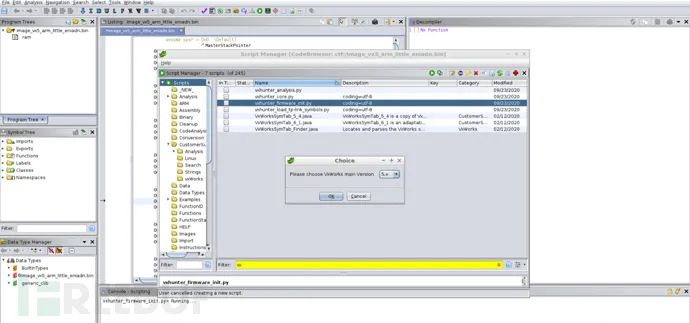
 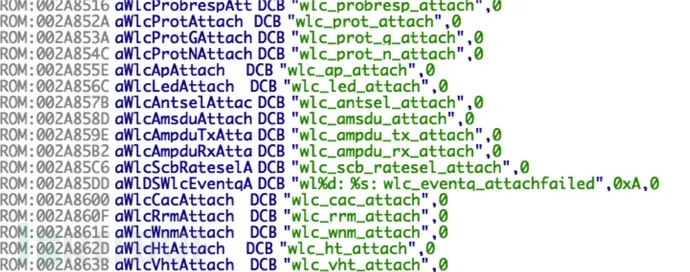 Since the base address is architecture-dependent, it will not be elaborated here. For VxWorks analysis, we can use a plugin that can automate the repair of entries and symbols—vxhunter. Taking Ghidra as an example, after loading the firmware, directly select the vxhunter_firmware_init.py plugin and the version of VxWorks to automatically repair the entries and symbols:
 1.2.2.2 U-boot
Boot-type firmware is also a common type of firmware without a file system. For example, many IoT devices use U-boot as the bootloader. Since U-boot is open-source, we can analyze it based on the source code. For some architectures, U-boot can also follow fixed patterns, such as MIPS based on the $gp register, etc.
 1.2.2.3 Chip Firmware
Some IoT firmware lacks documentation, making reverse engineering difficult. For example, the firmware of a certain ARM chip, when loaded into IDA Pro, shows no recognized functions: 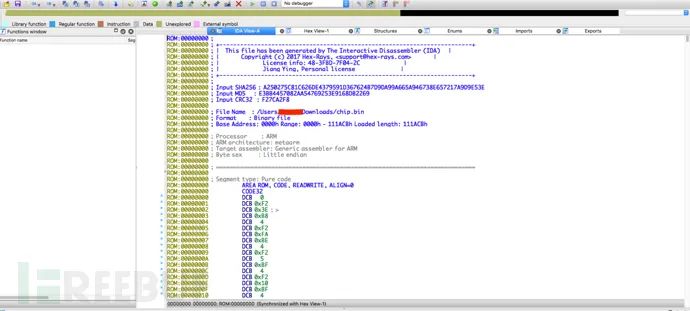 Thus, we need to conduct an overall analysis of the firmware. We see that the position at 0x100 in the firmware is quite interesting:
 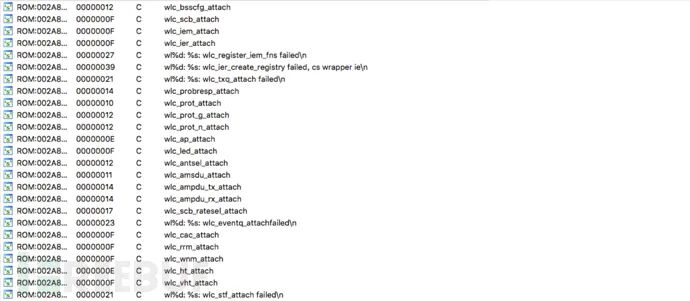 After arranging in 4-byte order, they all start with 0x2. This is neither code nor data, so it is very likely an address. This should be a table, so the base address is likely 0x200000. After rebasing, we can check the strings:
 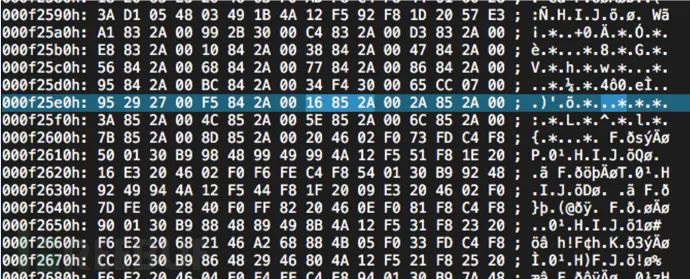 We see many strings resembling function names. After finding the specific location, we can conduct a binary search in the firmware for the address 0x16852A, which is wlc_probresp_attach address (little-endian).
 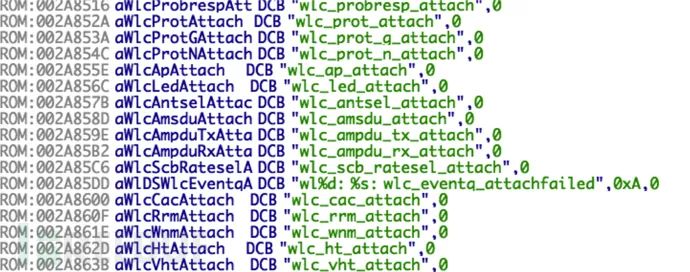 We can see that we have indeed found it, and it is also a table structure:
 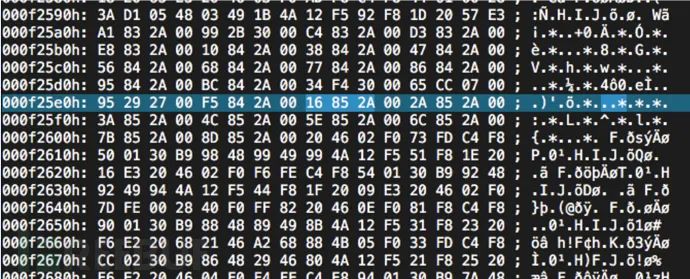 By locating the base address in IDA Pro:
  We can see that some cross-references have been completed. Further analysis is quite complex, and will not be elaborated here. In fact, the 0x100 position is a function address table, and there are many such tables in this firmware.
1.3 Firmware Repacking
Unpacking is easy, but repacking is difficult. This principle also applies to firmware repacking. If the device has debugging interfaces, generally no repacking operation is needed, as security research is primarily based on reverse thinking. Sometimes, lacking debugging means, we need to manually add in the unpacked firmware. Generally, we put cross-compiled telnetd, dropbear (sshd), gdb into the firmware file and replace the startup script for packaging. There are many startup script patterns in Linux, especially in IoT devices. The author generally adopts a relatively clever method, such as confirming that /sbin/xxxd service will run at startup, we can replace it:
# mv rootfs/sbin/xxxd sbin/xxxdd
# touch rootfs/sbin/xxxd
# chmod +x rootfs/sbin/xxxd
Then add to sbin/xxxd:
#!/bin/sh

/usr/sbin/telnetd -F -l /bin/sh -p 1234 &/
/sbin/xxxdd &
Thus, when starting xxxd, telnetd will run first.
1.3.1 Cross-compilation
If we can package from a forward development perspective, it is certainly the most convenient, which is the matter of cross-compilation. In some devices I have researched, mainly router firmware partially adheres to GPL, which means that some code software is open-sourced (generally based on open-source tools), and provides the remaining software in binary form along with the entire firmware packaging tool (method). For example, a certain router device I researched previously provided open-source downloads: 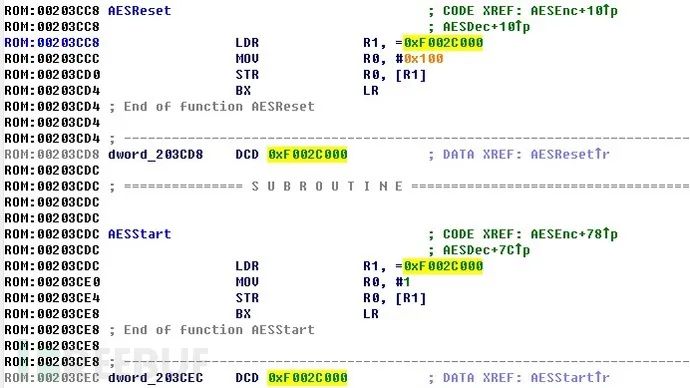 Downloading this zip package, we compile rootfs according to our needs, and finally use the tools provided in the zip package for packaging:
./packet -k %s -f rootfs -b compatible_r6400.txt
        -ok kernel -oall image -or rootfs -i ambitCfg.h
1.3.2 Firmware-mod-kit
Firmware-mod-kit (fmk) may be the most commonly used unpacking and repacking tool based on binwalk. However, since it has not been updated for a long time, its usage scenarios are limited. The installation and usage of fmk are relatively simple, as follows:
# For ubuntu
$ sudo apt-get install git build-essential zlib1g-dev liblzma-dev python-magic bsdmainutils autoconf
# For redhat/centos
$ yum groupinstall "Development Tools"
$ yum install git zlib1g-dev xz-devel python-magic zlib-devel util-linux
# Usage
$ ./extract-firmware.sh firmware.bin // unpack
$ cp new-telnetd fmk/rootfs/usr/sbin/telnetd // modify as needed
$ ./build-firmware.sh // repack
1.3.3 Manual Analysis
The difficulty of repacking lies in ensuring that the firmware matches the original firmware and passes various checks; otherwise, it may fail to flash lightly or brick the device severely. The author previously wrote an article about the Netgear UPnP vulnerability, which involves the Netgear firmware packing process. Interested readers can take a look. Firmware is generally divided into many sections, and for convenience of parsing, each section has an indicator header, which may store flags, sizes, and CRC checksums, etc. These pieces of information provide the basis for unpacking. For example, one can first obtain the firmware size (in hexadecimal), split the bytes based on the firmware size, generally 4 bytes, and then search for similar bytes on the firmware header (the indicator length on the firmware header will be reduced by the header length). Then analyze from the bytes indicated by size to clarify the format, which is very similar to analyzing network protocols.  Of course, most headers have standards, and one can correspond to them according to standard formats. It is worth noting that some manufacturers will sign the firmware, which increases the difficulty of repacking. In this case, we can look for official packing tools that comply with the GPL, or use OpenSSL to generate public and private keys to overwrite the verification public key in the device. Of course, there must be vulnerabilities; otherwise, it would fall into a chicken-and-egg situation. There is also a relatively good and cost-effective method—firmware simulation.
1.4 Firmware Simulation
Firmware simulation may have the following three scenarios depending on the need:
(1) Only need to simulate a certain application, such as web, upnpd, dnsmasq, etc., with the aim of debugging that application. In this case, one can directly run the program with simulation tools, only considering whether the dynamic libraries can load. (2) Need to simulate the firmware shell, interacting with the entire system. Here, one can use chroot to change the root path and use simulation tools to execute /bin/sh. At the same time, /proc can be mounted, so that it appears more realistic when viewing processes with ps. (3) Need to simulate the entire firmware startup, and ensure that network cards and other components can function normally. Here, one needs to use tools that can simulate the img system to directly load the whole system, or use the