0 Introduction
Hello everyone! My name is Lechuang IoT, and I mainly focus on industrial automation and the Internet of Things (IoT). I am familiar with the industrial automation field and have developed products related to IoT. My original intention was to work on industrial IoT, but the system is too vast, and I will learn more about it on my own later. So, I started with smaller systems, such as building a complete smart home system, covering both hardware and software. Let’s begin to explore how this smart home system is built on the foundation of IoT. Here, you can start from 0 and achieve a qualitative change at 1, just by learning the IoT architecture with me.
To review the previous section “Introduction to Arduino Middleware in IoT Architecture”, we covered what Arduino is, Arduino Create, the types of Arduino boards, and Arduino IDE (which introduced compiling a simple Blink example using the online IDE), and finally, what Arduino can do. This section will discuss the middleware Arduino language at the hardware layer beneath the perception layer. The perception layer is the most fundamental part of IoT, just like human senses that perceive the world.
1 C Language
The Arduino language is built on the foundation of C/C++, which is essentially the basic C language. The Arduino language encapsulates some parameter settings related to the AVR microcontroller into functions, allowing users to accomplish tasks without needing to understand the underlying details, simply by calling easy-to-use functions.
For further reading, refer to the recently updated series of articles “C Language in Linux System for Embedded Development”! Here, I will briefly introduce it.
1) Data Types in C Language

Data Types

Data Types
2) Constants in C Language
short, int, long, char, float, double are six keywords representing the six basic data types in C language.
The constants frequently used in Arduino include:
HIGH / LOW represents the digital I/O pin levels, HIGH indicates high level (1), LOW indicates low level (0).
INPUT / OUTPUT indicates the direction of the digital I/O pin, INPUT indicates input (high impedance), OUTPUT indicates output (AVR can provide 5V voltage and 40mA current).
true / false true indicates true (1), false indicates false (0).
3) Variables in C Language
<storage type> <data type> <variable name>
The storage type determines the scope (visibility) and lifetime of the variable/function in a C program. Available storage classes in C include: auto, register, static, extern.
Data types can be basic data types or user-defined data types.
Note: Global variables: If declared in the declaration area at the beginning of the program or in a declaration area without braces, the variable’s scope is the entire program. Local variables: If declared in a declaration area within braces, the variable’s scope is limited to those braces. If a variable with the same name is declared in both the main program and various functions, it will automatically disappear when leaving the main program or function.
4) Operators in C Language
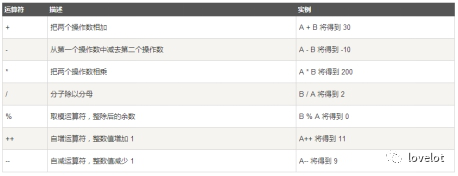
Arithmetic Operators
+ (addition) For example: A=x+y adds the values of variables x and y, storing the sum in variable A;
– (subtraction) For example: B=x-y subtracts the value of variable y from x, storing the difference in variable B;
* (multiplication) For example: C=x*y multiplies the values of variables x and y, storing the product in variable C;
/ (division) For example: D=x/y divides the value of variable x by y, storing the quotient in variable D;
% (modulus) For example: E=x%y stores the remainder of the division of x by y in variable E;
++ (increment) For example: x++ increments the value of variable x by 1; (the increment happens after using i);
— (decrement) For example: x– decrements the value of variable x by 1. (the decrement happens after using i).
Arithmetic Operators
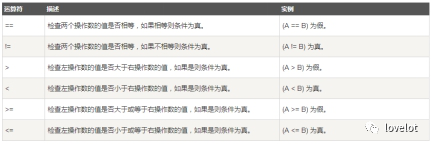
Relational Operators
== (equal) For example: x==y compares the values of variables x and y, returning 1 if equal and 0 if not;
!= (not equal) For example: x!=y compares the values of variables x and y, returning 1 if not equal and 0 if equal;
< (less than) For example: x<y returns 1 if the value of variable x is less than that of y, otherwise returns 0;
> (greater than) For example: x>y returns 1 if the value of variable x is greater than that of y, otherwise returns 0;
<= (less than or equal) For example: x<=y returns 1 if the value of variable x is less than or equal to that of y, otherwise returns 0;
>= (greater than or equal) For example: x>=y returns 1 if the value of variable x is greater than or equal to that of y, otherwise returns 0;
Relational Operators
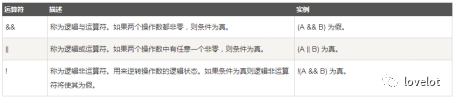
Logical Operators
&& (AND operation)
Example: (x>y)&&(y>z) returns 1 if the value of variable x is greater than that of y, and y is greater than z, otherwise returns 0.
|| (OR operation)
Example: (x>y)||(y>z) returns 1 if the value of variable x is greater than that of y, or y is greater than z, otherwise returns 0.
! (NOT operation) Example: !(x>y) returns 0 if the value of variable x is greater than that of y, otherwise returns 1.
Logical Operators
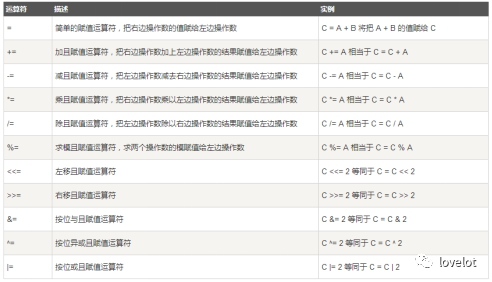
Assignment Operators
= (assignment) For example: A=x assigns the value of variable x to A;
+= (addition assignment) For example: B+=x adds the value of B to x, storing the sum back in B, which is the same as B=B+x.
-= (subtraction assignment) For example: C-=x subtracts the value of x from C, storing the difference back in C, which is the same as C=C-x.
*= (multiplication assignment) For example: D*=x multiplies the value of D by x, storing the product back in D, which is the same as D=D*x.
/= (division assignment) For example: E/=x divides the value of E by x, storing the quotient back in E, which is the same as E=E/x.
%= (modulus assignment) For example: F%=x divides the value of F by x, storing the remainder back in F, which is the same as F=F%x.
&= (AND assignment) For example: G&=x performs AND operation between G and x, storing the result back in G, which is the same as G=G&x.
|= (OR assignment) For example: H|=x performs OR operation between H and x, storing the result back in H, which is the same as H=H|x.
^= (XOR assignment) For example: I^=x performs XOR operation between I and x, storing the result back in I, which is the same as I=I^x.
<<= (left shift) For example: J<<=n left shifts the value of J by n bits, which is the same as J=J<<n.
>>= (right shift) For example: K>>=n right shifts the value of K by n bits, which is the same as K=K>>n.
Assignment Operators
Operator Precedence
The precedence of operators from high to low is as follows:
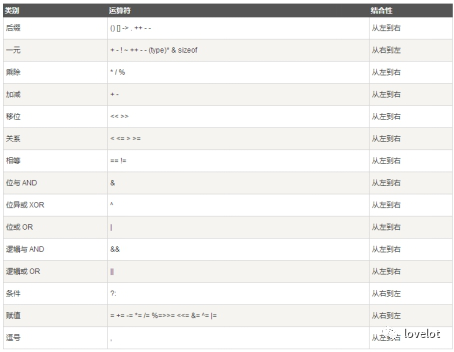
Operator Precedence
5) Control Statements in C Language
Sequential Structure
Program statements are executed in order.
Conditional Structure
Next actions are determined based on conditions.
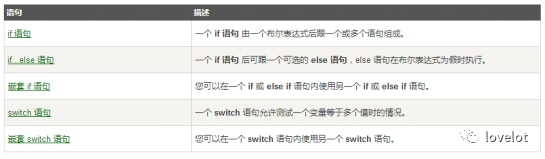
Conditional Structure
Loop Structure
Repeats a section of code multiple times.

Loop Structure
Auxiliary Control Statements

There is also a return statement as an auxiliary control statement.
2 Structure of Arduino
void setup() Initializes variables, pin modes, calls library functions, etc.
void loop() Continuously executes statements within the function.
3 Functions of Arduino
1) Digital I/O
pinMode(pin, mode) Defines the input/output mode for the digital I/O pin, where pin ranges from 0 to 13, and mode is INPUT or OUTPUT.
digitalWrite(pin, value) Defines the output level for the digital I/O pin, where pin ranges from 0 to 13, and value is HIGH or LOW. For example, defining HIGH can drive an LED.
int digitalRead(pin) Reads the input level of the digital I/O pin, where pin ranges from 0 to 13, and value is HIGH or LOW. For example, it can read digital sensors.
2) Analog I/O
int analogRead(pin) Reads from the analog I/O pin, where pin ranges from 0 to 5 (Arduino Diecimila from 0 to 5, Arduino Nano from 0 to 7). For example, it can read analog sensors (10-bit AD, 0-5V represented as 0-1023).
analogWrite(pin, value) – PWM Defines the PWM output function for the digital I/O pin, where the Arduino digital I/O pins marked with PWM can use this function, pin can be 3, 5, 6, 9, 10, 11, and value ranges from 0 to 255. For example, it can be used for motor speed control or music playback.
3) Extended I/O
shiftOut(dataPin, clockPin, bitOrder, value) SPI external I/O expansion function, typically using the 74HC595 with SPI interface to expand 8 I/O pins, where dataPin is the data pin, clockPin is the clock pin, bitOrder is the data transmission direction (MSBFIRST for high bit first, LSBFIRST for low bit first), and value represents the data to be sent (0-255). Additionally, another I/O pin is needed to control the enable of the 74HC595.
unsigned long pulseIn(pin, value) Records the pulse length, returning the time parameter (us), where pin ranges from 0 to 13, and value is HIGH or LOW. For example, if value is HIGH, timing starts when the pin is high, and stops when it goes low, returning that time.
4) Time Functions
unsigned long millis() Returns the time function (in ms), indicating that when the program runs, it starts timing and returns the recorded parameter, which overflows approximately every 50 days.
delay(ms) Delay function (in ms).
delayMicroseconds(us) Delay function (in us).
5) Mathematical Functions
min(x, y) Returns the minimum value
max(x, y) Returns the maximum value
abs(x) Calculates the absolute value
constrain(x, a, b) Constrains function, with lower limit a and upper limit b, x must be between a and b to return.
map(value, fromLow, fromHigh, toLow, toHigh) Constrains function, value must be between fromLow and toLow and fromHigh and toHigh.
pow(base, exponent) Power function, base raised to the exponent.
sq(x) Square
sqrt(x) Square root
6) Trigonometric Functions
sin(rad)
cos(rad)
tan(rad)
7) Random Number Functions
randomSeed(seed) Defines the random number seed function, where seed represents the read from analogRead(pin) function.
long random(max) Random number function, returning data greater than or equal to 0 and less than max.
long random(min, max) Random number function, returning data greater than or equal to min and less than max.
8) External Interrupt Functions
attachInterrupt(interrupt, , mode) External interrupts can only be used on digital I/O pins 2 and 3, where interrupt indicates the initial interrupt pin 0 or 1, representing a function, and mode: LOW for low-level interrupt, CHANGE for any change interrupt, RISING for rising edge interrupt, FALLING for falling edge interrupt.
detachInterrupt(interrupt) Interrupt switch, interrupt=1 to enable, interrupt=0 to disable.
9) Interrupt Enable Functions
interrupts() Enables interrupts
noInterrupts() Disables interrupts
10) Serial Communication Functions
Serial.begin(speed) Defines the baud rate for serial communication, where speed can be 9600, 19200, etc.
int Serial.available() Checks the status of the buffer.
int Serial.read() Reads from the serial port and returns the received parameter.
Serial.flush() Clears the buffer.
Serial.print(data) Outputs data to the serial port.
Serial.println(data) Outputs data to the serial port with a newline character.
4 Arduino Language Library Files
The early Arduino core library was written in C language, later adopting object-oriented concepts, and the latest Arduino core library is now a mix of C and C++. The Arduino language typically refers to the collection of various Application Programming Interfaces (APIs) provided by the Arduino core library. These APIs are a secondary encapsulation of lower-level microcontroller support libraries. For example, the core library of Arduino using AVR microcontrollers is a secondary encapsulation of AVR-Libc (the AVR support library based on GCC).
In traditional development, you need to understand the meaning of each register and their relationships, then configure multiple registers to achieve your goals.
Adding library files:
A Download the library files;
B Import the .zip file;
C Extract in bulk to the libraries folder.
Library files must be downloaded to the compilation environment (in the following directory: \libraries) to be usable.
Acknowledgments
Introduction to Arduino Language
https://www.cnblogs.com/xczr/p/7831343.html
5 Conclusion
These have been tested in practice. I initially intended to wait until I opened a column to place them there, but since it’s not profitable, let’s be friends! Join me in entering the world of IoT!