●Mastering the HarmonyOS Development BoardHow to get started with HarmonyOS hardware development? How should the development board be utilized? Can beginners quickly get started?The HarmonyOS developer public account’s column 【Mastering the HarmonyOS Development Board】 is here! Each issue provides hands-on teaching, allowing you to start with the development board from scratch, and conveniently provides source code download links to help you easily access resources without getting lost.Do you often make mistakes when typing on your phone due to the subtlety of switching between uppercase and lowercase?Is it really necessary to log into a computer just to send a comment?Are you confused by switching between multiple keyboards while operating multiple devices simultaneously?In such cases, developers need an enhanced peripheral keyboard that not only connects easily to phones but also supports simultaneous connections to multiple devices.In previous posts, we introduced a DIY guide for converting a wired keyboard into a Bluetooth keyboard based on the Neptune development board, version 0.1, which allows a single keyboard to be recognized and used by multiple operating systems/terminal devices. This time, we are bringing you a more powerful version 0.3, featuring several significant updates:1.Support for ‘Tap and Connect’ with HarmonyOS system phones2.Support for one-stop compilation and flashing with HUAWEI DevEco Device Tool3. In addition to supporting 4 operating systems (HarmonyOS, Windows, Linux, Android), preliminary support for iOS has been added4. The previous limit of supporting up to 2 devices has been increased to now support up to 5 devices for easy switchingFor more project update details, please check the link below:https://gitee.com/openharmony-sig/vendor_oh_fun/tree/master/hihope_neptune-oh_hidSince we have already covered the hardware environment setup in previous versions, this time let’s focus on the developers’ most concerned aspects: the implementation of ‘Tap and Connect’ and the one-stop compilation and flashing steps using HUAWEI DevEco Device Tool. Let’s dive in!Implementation of ‘Tap and Connect’Explaining the implementation of ‘Tap and Connect’ from a user experience perspectiveThe diagram below illustrates the process of connecting the Bluetooth keyboard using ‘Tap and Connect’: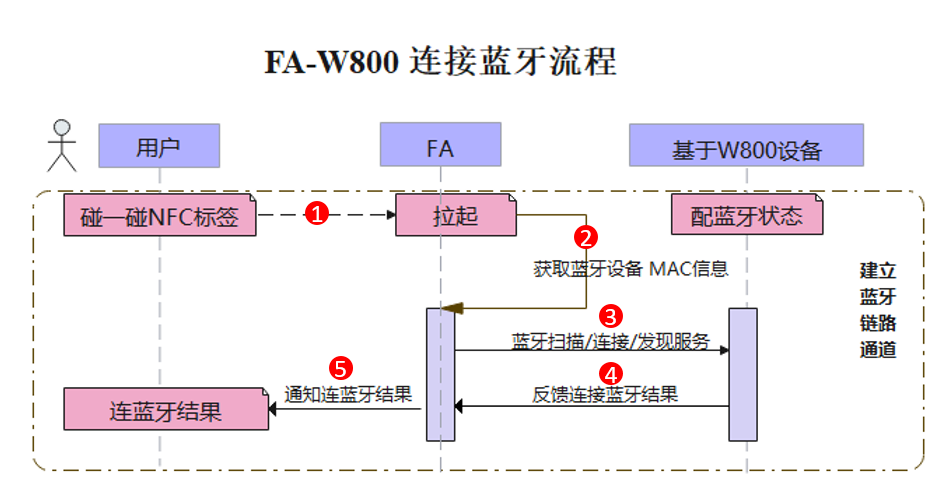 Figure 1: Process of connecting the Bluetooth keyboard using ‘Tap and Connect’1.The user activates the FA application by tapping the NFC tag;2.Obtains the MAC information of the Bluetooth device (development board);
3.Simultaneously, the Bluetooth scan on the phone compares the obtained Bluetooth list with the MAC information of the development board;
4.When the matching MAC information of the development board is found, the connection result is returned, and the Bluetooth device is connected;
5.The successful connection result will be notified to the user through the activated FA application, and the user will see a success message on the interface.
The effect is shown in the video below:Explaining the implementation of ‘Tap and Connect’ from a principle perspective
The key point for the ‘Tap and Connect’ NFC tag to activate the FA application and obtain the development board’s MAC address is that the FA application information and the development board’s MAC address have been written into the NFC tag. When the user turns on the NFC switch on their phone and taps the NFC tag, the phone can read the relevant information to activate the FA application and obtain the development board’sMAC address for matching.
In fact, what is written into the NFC tag is the Product ID of the FA application (which needs to be applied for in Huawei’s official “Application Debugging Assistant” app). After the application is completed, the FA service is created and published on Huawei’s Smart Service platform (hereinafter referred to as HAG), associating the Product ID with the FA application package name. The developer writes the Product ID into the NFC tag, and when the user taps the NFC tag, the HAG side queries the corresponding package name through the Product ID and activates it.The Bluetooth device obtains the device’s MAC address through a tool, writes the MAC address into the NFC tag, and when the user taps the NFC tag, it retrieves the written MAC address, matches it with the current Bluetooth list on the phone, and connects to the Bluetooth device with the same MAC address.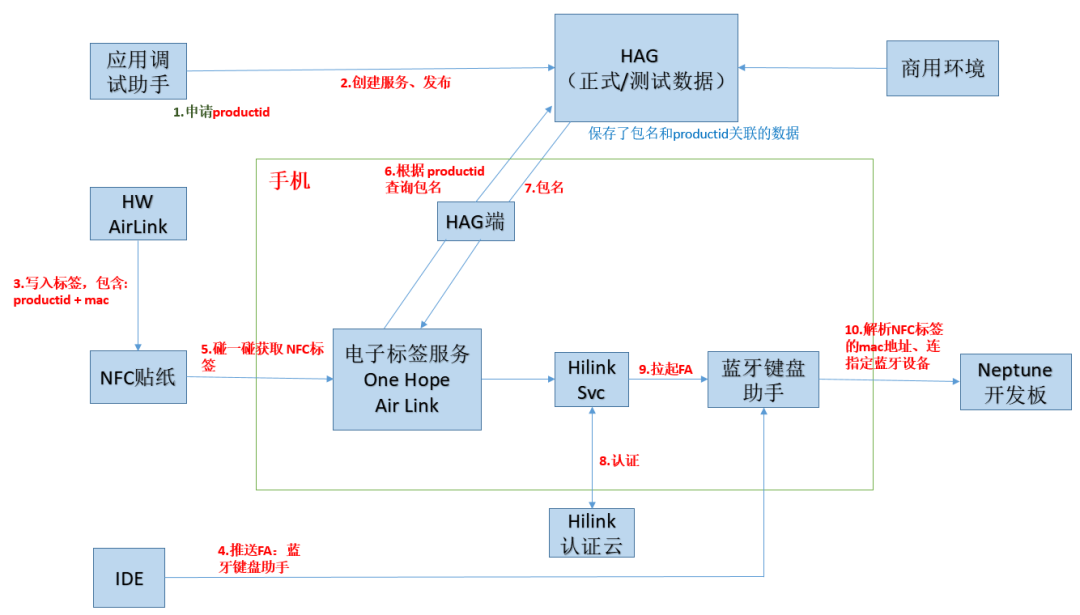 Figure 2: Technical analysis of the Bluetooth keyboard ‘Tap and Connect’
Now let’s analyze this process in detail. Since we have already applied for the Product ID (9953) and the service has been published, we will focus on how to write the FA application information and the development board’s MAC address into the NFC tag.
Hands-on process to learn the implementation of ‘Tap and Connect’Let’s take a detailed look at the process of writing the FA application information and the development board’s MAC address into the NFC tag.1Understanding the data sample structure for writing to NFCWe will provide a data sample structure for developers to write to the NFC tag, requiring only minor modifications to directly write to the NFC tag.The data sample structure string is as follows:D20C1A6170702F68776F6F6E65686F702001004800393935330081060005200685919106286DCD824FEFWhere39393533 represents the ASCII code for 9953, which is the Product ID we have applied for for this FA application;286DCD824FEF is used to represent the hardware encoding of the BLE device (MAC address), which we will replace with the target device’s MAC address later;2Obtaining the BLE device’s MAC addressInstall the “BLE Debugging Assistant” from the “Huawei App Market” (this tool is used to obtain the target device’s MAC address), open the tool, find the Bluetooth keyboard, and obtain the Bluetooth keyboard’s MAC address: 286DCD7C0E67: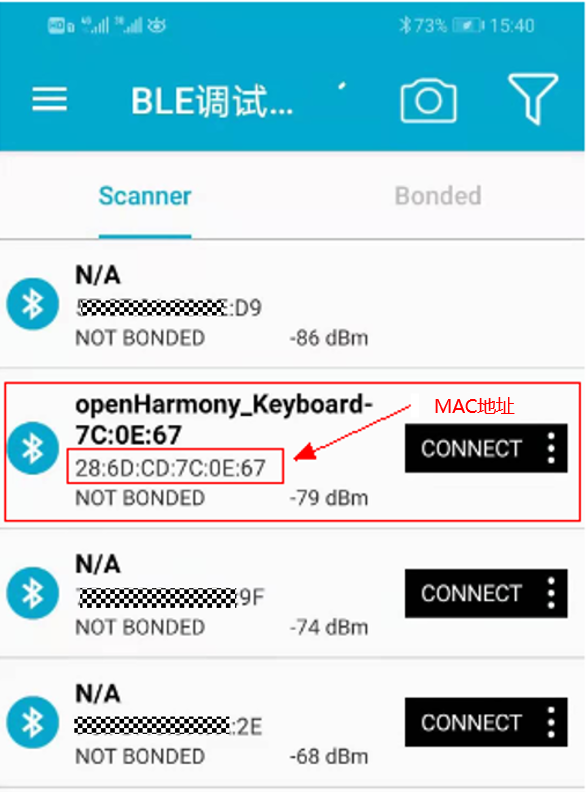 3Replacing the target device’s MAC addressReplace the MAC address 286DCD824FEF in the sample with the MAC address obtained in step 2.3: 286DCD7C0E67, resulting in the assembled string:D20C1A6170702F68776F6F6E65686F702001004800393935330081060005200685919106286DCD7C0E674Using HW AirLink tool to write to NFC
Install the HW AirLink tool
We will download the NFC writing tool HW AirLink, the download link is as follows.
● HW AirLink download link
https://developer.huawei.com/consumer/cn/doc/development/smarthome-Library/download-0000001050287714#ZH-CN_TOPIC_0000001056845319__section17953112220224After downloading and extracting, use the cmd command line tool on a Windows device (ensure that the Windows device has the adb tool installed) to install it by executing the following command:adb –r –d hilinkcert-tool-1.0.0.3.apkAs shown: After installation, as shown:

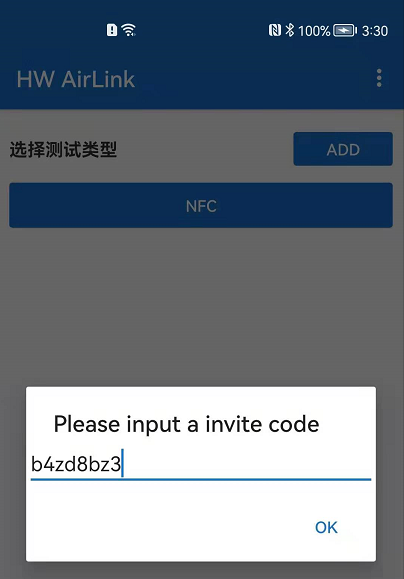
Input invitation codeAfter opening the tool, click “add”, and you will be prompted to enter an invitation code. Enter “b4zd8bz3” to proceed:
Select NFC WRITE
Click on NFC, select NFC WRITE, and enter the NFC data input area,check “byte code”, input the previously assembled string:D20C1A6170702F68776F6F6E65686F702001004800393935330081060005200685919106286DCD7C0E67into it, and click “Place in Cache”. The status will show “Written to Cache”.

Writing to NFC stickerInstall the developed FA application on your phone, turn on the NFC function on your phone, and bring the back of the phone (NFC sensor) close to the designated NFC tag to complete the writing.Please note that the phone’s network should be turned off during writing, and it is advisable to use a blank NFC tag for writing.After writing, HW AirLink will pop up a “Write Successful” dialog at the bottom, indicating that the writing was successful.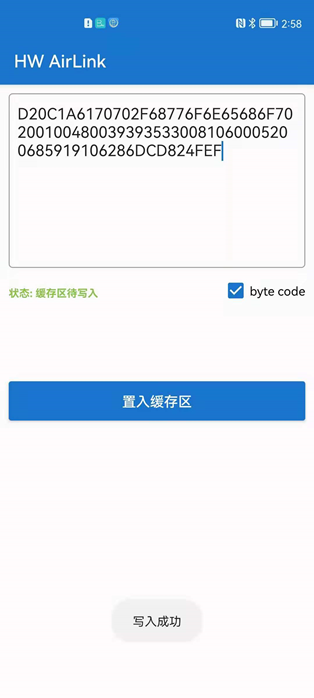
At this point, we have clearly understood how ‘Tap and Connect’ NFC activates the FA application and completes the pairing of the Bluetooth keyboard. Next, let’s move on to the second key update—how to use the HUAWEI DevEco Device Tool (hereinafter referred to as DevEco Device Tool) to complete compilation and flashing in a Linux environment.
One-stop Compilation and Flashing ImplementationThis time we will compile and flash the Bluetooth keyboard module corresponding to the W800 development board using Huawei DevEco Device Tool (V2.2.0 Beta1) in a Linux environment.Compilation1Setting up the HPM environment
HPM (HarmonyOS Package Manager) is the component package manager launched by Huawei for HarmonyOS, which allows easy access to required components from the official website, downloading only the components needed for the current project, making the project files more streamlined.
We will set up the environment and compile in a Linux environment, choosing to install the tools on Ubuntu and preparing the necessary software for the development environment. For preparing the Ubuntu development environment, please refer to the following link; we will not elaborate further here.● Preparing the Ubuntu Development Environmenthttps://device.harmonyos.com/cn/docs/ide/user-guides/install_ubuntu-0000001072959308
[Note] If some steps fail, please restart Ubuntu and try again..
2Pulling source code with HPMAfter setting up the HPM development environment, first enter the following command in Ubuntu:
hpm init -t distto initialize the directory, as shown: Then enter:
hpm i @hihope/neptune_bluetoothkeyboard(Swipe left and right to see more)
to download the corresponding components and dependencies, as shown: After execution, if it shows “Installed”, it indicates successful download, as shown:
 Finally, execute the compilation command as follows:
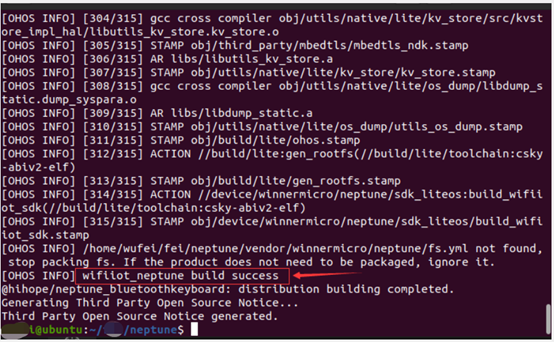
hpm distThe image shows as follows: After execution, if it shows “Build success!”, it indicates successful compilation, as shown:
The compiled img file is located in the out directory, as shown: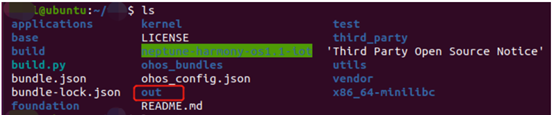 Open the “out/neptune/wifiiot_neptune/” folder to find the “w800.img” file, which is the generated firmware, as shown:
 Flashing1Obtaining the compiled firmware
Similarly, we will complete the flashing in a Linux environment. We will flash the “w800.img” file in the “out/neptune/wifiiot_neptune/” folder. We also provide developers with pre-compiled firmware, which can be obtained at the following link.
● Firmware download linkhttps://gitee.com/openharmony-sig/vendor_oh_fun/tree/master/hihope_neptune-oh_hid2Flashing the firmwareTaking the example of flashing firmware in a virtual machine running Linux, the detailed steps are as follows:Connect the Neptune development board to the virtual machine via serial portConnect the Neptune development board to the USB port of the computer. As shown: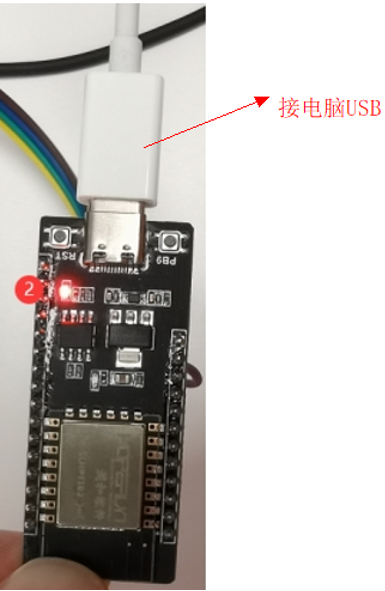 In the pop-up window “New USB Device Detected”, select to connect to the virtual machine, choose the virtual machine name as Ubuntu 64-bit, and click confirm:
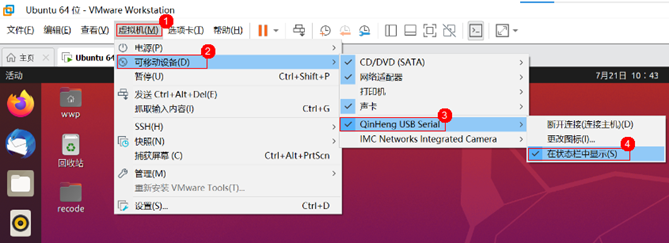
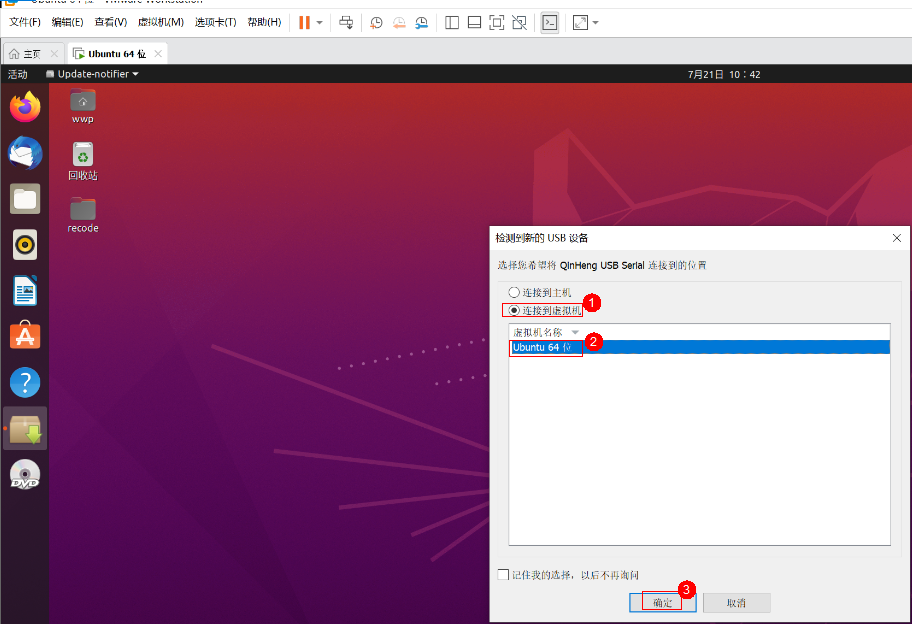 Open VMware, and sequentially click:Virtual Machine -> Removable Devices -> QinHeng USB Serial -> Check if it is displayed in the status bar, as shown:
At this point, the Neptune development board is successfully connected to the virtual machine via serial port.Create a new Device Tool projectThe DevEco Device Tool is deployed as a plugin in Visual Studio Code, so we first need to open the “Extensions” in Visual Studio Code, find and open the DevEco Device Tool, and click “New DevEco Project” to create a new project, entering the relevant information for the project:Project Name: Name (custom)Development Board Model: Board (select w800), currently we are using the W800 development boardBundle (select @hihope/neptune_iot), as shown: Setting the firmware flashing locationClick on Partition Configuration (step ①), click the folder icon (step ②), as shown:
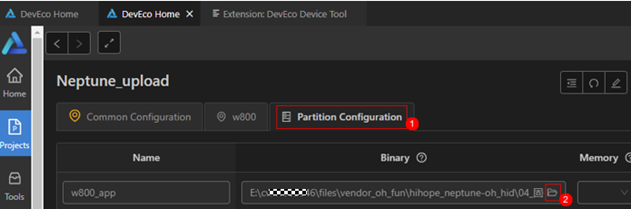 Find the location of the firmware folder (you can customize the path, please copy the target firmware to this location in advance), as shown:
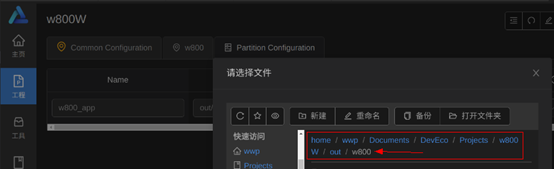 Select the target firmware “OpenHarmony_HID_V0.3.img” (step ①), click the button: “Open “OpenHarmony_HID_V0.3.img” (step ②), as shown:
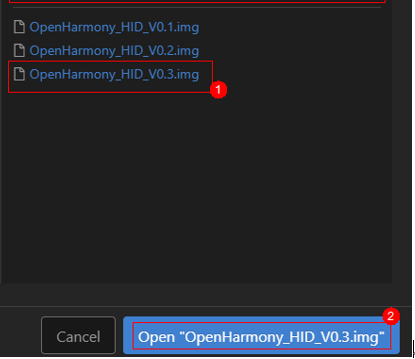 Click Save to save.After selecting the board and setting the firmware flashing location, we need to configure the port and flashing protocol.Setting the port and flashing protocolClick: “w800”, as shown:
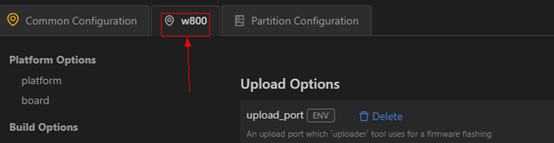 Setting the flashing port, upload_port, select the default value “/dev/ttyUSB0”, if not available, you can enter “/dev/ttyUSB0”.Filling in the flashing protocol, upload_protocol, select “xmodem”, which is the file transfer protocol for serial communication.Setting upload_partitions, select “partition:w800_app”, which indicates which file needs to be flashed. The selection result is shown in the image:
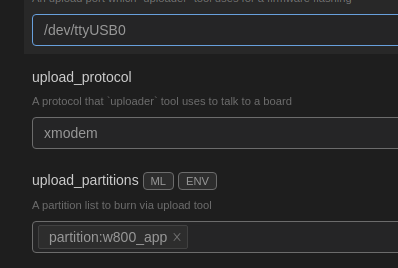 After configuration, click Save to save the configuration.Viewing the opened projectClick Open to open the project. Click the Explorer icon in the upper left corner of Visual Studio Code to view the opened project:
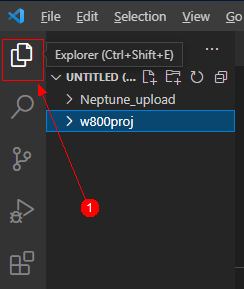 Remove unrelated items to prevent compilation errors, as shown:
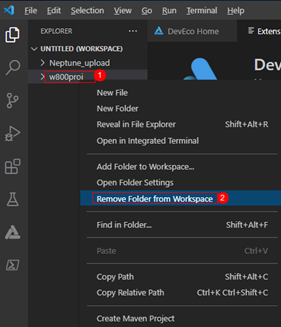 Flashing the firmwareClick DevEco, and in the pop-up PROJECT TASKS, select Upload, as shown:
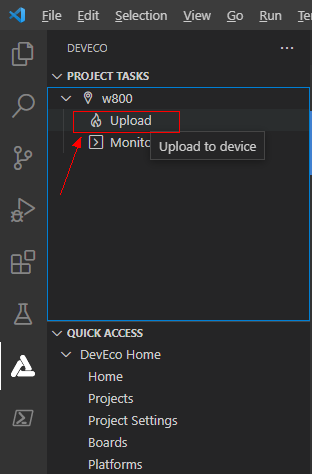 According to the prompt “Please reset the board”, press the RST button on the development board, as shown:
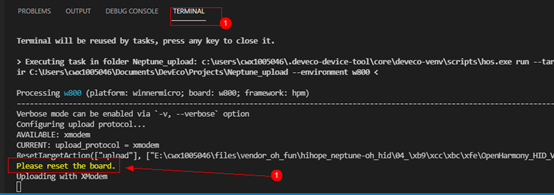 At this point, it will show that flashing is in progress, and when the progress bar shows 100% and “SUCCESS” appears below, it indicates that flashing was successful, as shown:
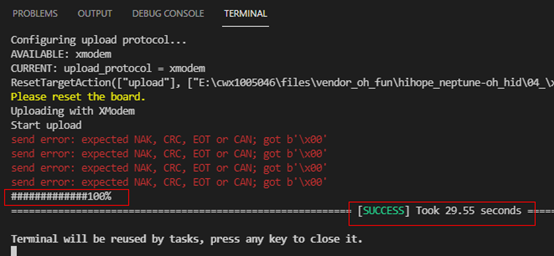 After multiple version updates, this time the Bluetooth keyboard module version 0.3 based on the Neptune development board will bring developers the ‘Tap and Connect’ feature, allowing the phone to connect to the keyboard via Bluetooth, making the keyboard a peripheral for the phone to control input. The program for this version has already been flashed, and the NFC tag writing has also been completed.Everyone can check the link on gitee for detailed operation and purchase address~ At the same time, developers can use the DevEco Device Tool in a Linux environment to compile and flash the development board (W800). Interested developers should quickly try this new version~
END
Want to learn more about HarmonyOS technology?Leave a message to us in the backgroundWe will arrange it immediately!Click 【Read the original text】 to get related operation materials and development board programs▼