ESXi Meets Rocky Linux 10: A Comprehensive Installation Guide
Follow the author for more technical sharing
1. Introduction
In the fast-paced evolution of technology, we often face various challenges in system maintenance and updates. The news of CentOS 7 reaching its end of life has left many users who rely on it in a difficult position. For those in need of a stable and reliable Linux operating system, finding a suitable alternative has become urgent.
At this time, Rocky Linux has come into the spotlight. Created by Gregory Kurtzer, the founder of CentOS, it aims to fill the gap left by CentOS’s discontinuation, providing users with a community-driven alternative that is compatible with Red Hat Enterprise Linux (RHEL). With its high compatibility with RHEL, Rocky Linux allows users to migrate easily from CentOS or RHEL without extensive modifications, and it also offers long-term support to ensure system stability and security, making it a preferred choice for many users.
Installing Rocky Linux 10 in an ESXi environment perfectly combines the advantages of both. As a powerful virtualization management program, ESXi provides an efficient and stable operating environment for Rocky Linux 10, enabling flexible resource allocation and efficient utilization. Whether setting up servers, conducting development tests, or building cloud computing environments, this combination showcases excellent performance and outstanding stability. Next, let us embark on the exciting journey of installing Rocky Linux 10 on ESXi!
2. Preparations
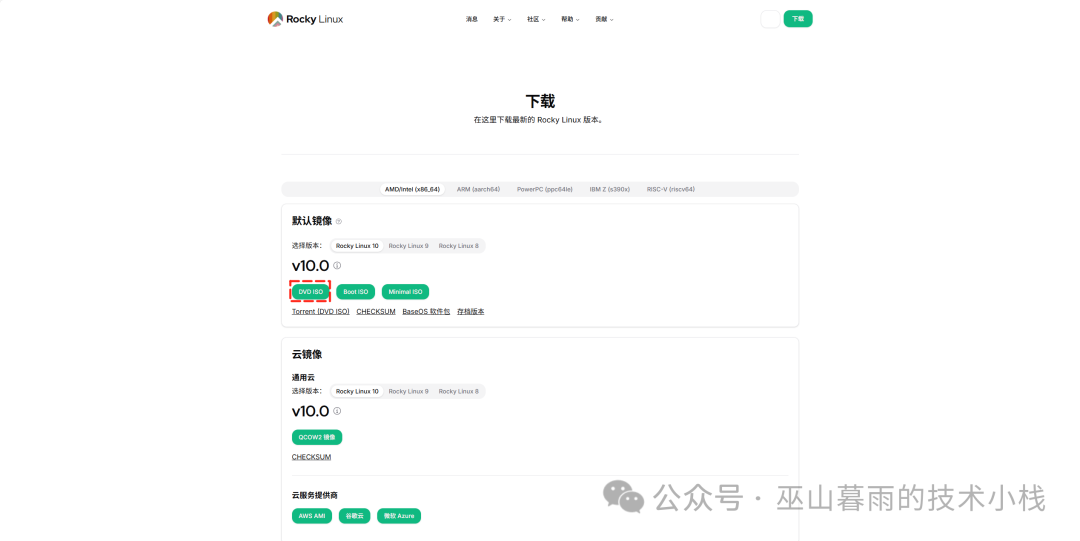
Downloading the Rocky Linux 10 Image
The Rocky Linux 10 image can be downloaded from its official website (https://rockylinux.org/download/). On the download page, you will see various versions of the image, each with its own characteristics. The Minimal version is the smallest installation version, containing only the basic components necessary for system operation, occupying little space, making it suitable for server environments, maximizing resource efficiency and enhancing server performance; the DVD version includes more software packages and tools, suitable for users who require a complete system functionality and need to install various applications and development environments.
If you are just setting up a simple server, such as a web server or file server, the Minimal version will suffice; however, if you need to develop, test, or run complex applications on the system, the DVD version would be more appropriate.
Other Essential Tools
A browser that can connect to ESXi is essential during the installation process. We can access the ESXi management interface through the browser to perform various configurations and operations, such as creating virtual machines and setting up networks. Common browsers like Chrome, Firefox, and Edge can meet these needs.
Additionally, an SSH tool is also a valuable assistant for subsequent configuration optimizations. Tools like Putty and Xshell are commonly used SSH tools that allow us to remotely connect to the installed Rocky Linux 10 system for command-line operations, executing system configurations, software installations, service management tasks, and improving operational efficiency.
3. Detailed Installation Process
(1) Creating a New Virtual Machine
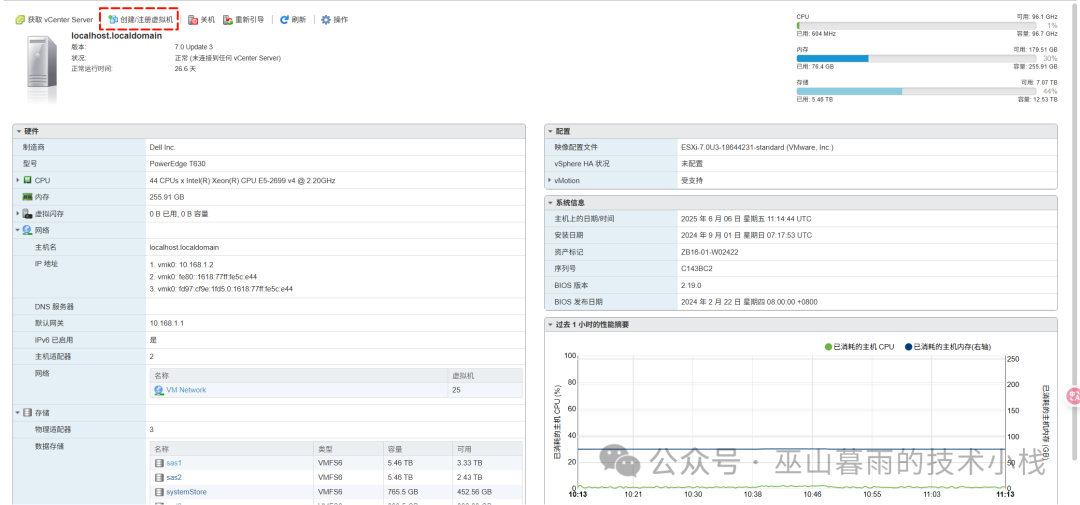
- Select Creation Type: After entering the ESXi web management interface, select “Virtual Machines” in the left navigation bar, then click the “Create/Register VM” button in the right operation bar, as shown in the figure. In the pop-up create virtual machine wizard, select “Create a new virtual machine” and click “Next”.
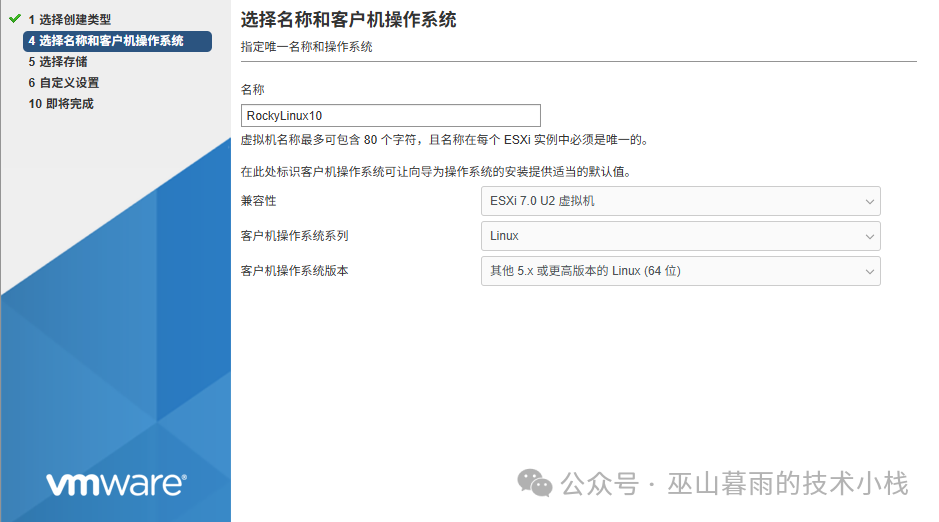
- Fill in System Name and Select Guest OS: On the “Select Name and Guest OS” page, you can freely fill in the “Name” field. It is recommended to use a name that reflects the purpose of the virtual machine for easier management later, such as “RockyLinux10-Server”. The “Compatibility” can generally be kept as default. In the “Guest OS” dropdown menu, select “Linux” and for “Version” select “Other Linux 64-bit”, as shown in the figure, then click “Next”.
-
Select Storage Location: On the next “Select Storage” page, the storage devices on the ESXi host are listed. If you have multiple storage devices, you can choose based on actual needs. Generally, selecting a storage device with better performance and sufficient space will allow the virtual machine to run more smoothly. For example, SSDs have much faster read and write speeds than traditional hard drives; if SSD storage is available, placing the virtual machine on it can enhance I/O performance. After selecting the storage location, click “Next”.
-
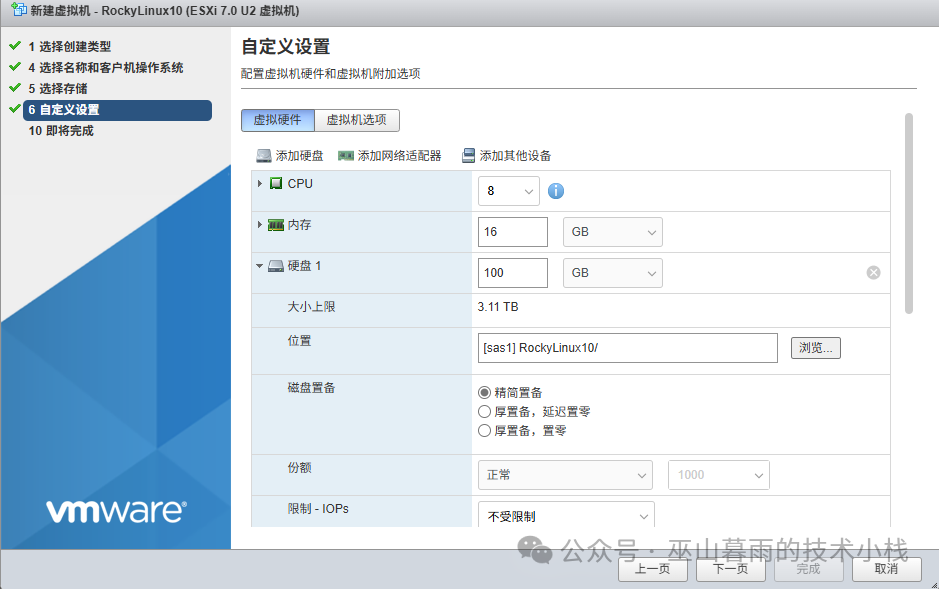
Set Virtual Machine Performance Parameters: On the “Custom Settings” page, we need to set various performance parameters for the virtual machine.
-
CPU Settings: Set the number of CPU cores based on the usage scenario of the virtual machine. If it is only for simple testing or personal learning, 1-2 cores will suffice; if it is to be used as a server in a production environment running multiple applications, it is recommended to set 4 or more cores. For example, setting a 4-core CPU for a web server running a database and applications can ensure the system’s responsiveness under high concurrency.
-
Memory Settings: Similarly, allocate memory based on the usage scenario. For a general testing environment, 2GB of memory is usually sufficient; if running memory-intensive applications, such as big data processing programs, it is recommended to allocate 4GB or more. For instance, running a data analysis program that needs to process a large amount of data would benefit from 4GB of memory to avoid slowdowns or crashes due to insufficient memory.
-
Disk Settings: When setting the disk size, consider the system being installed and the amount of data to be stored. Installing Rocky Linux 10 requires a minimum of about 10GB of space; if you also need to store a large number of files and data, you should increase the disk capacity based on actual conditions. For example, as a file server storing a large number of documents and images, setting 50GB or more of disk space would be appropriate. Additionally, there are different disk provisioning types: thick provision lazy zeroed, thick provision eager zeroed, and thin provisioned. Thick provision lazy zeroed allocates space at creation but does not wipe data until the first write operation; thick provision eager zeroed allocates space and clears data at creation, providing high security and good initial write performance; thin provisioned allocates space dynamically based on actual usage, initially occupying less space but may incur performance penalties. Generally, thick provision eager zeroed is recommended for production environments, while thin provisioned can be chosen for testing environments to save storage space.
-
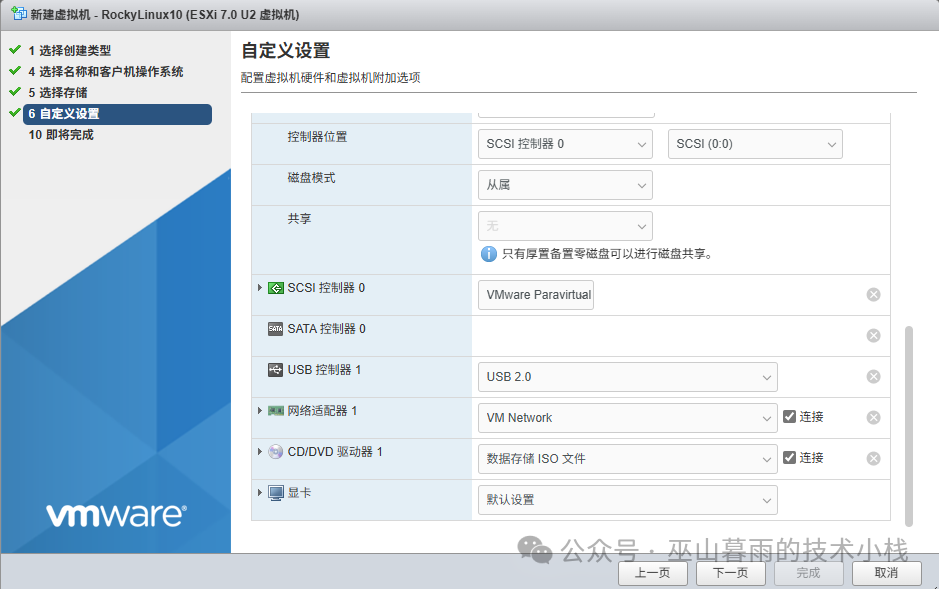
Network Card Settings: The network card type is generally selected as VMXNET3, which has high network performance. The number can be set based on needs; usually, one network card is sufficient for most scenarios. If you need to implement multiple network environments or improve network redundancy, you can add multiple network cards. For example, if you are setting up a server that needs to connect to both the internal and external networks, you will need to add two network cards, each connecting to a different network.
- Mount System Image: In the “Custom Settings” page under the “CD/DVD Drive 1” option, select “Datastore ISO File”, click the “Browse” button, and in the pop-up file selection window, find the Rocky Linux 10 system image file previously uploaded to the ESXi disk, select it and click “Select”, then check “Connect at power on”, and finally click “Finish” to create the virtual machine.
(2) Start the Virtual Machine for Installation
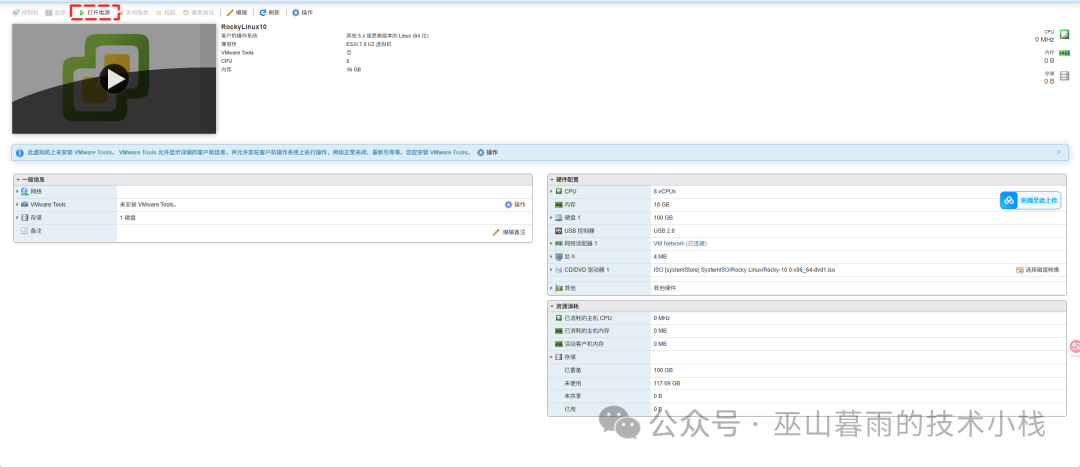
- Power On: Return to the ESXi “Virtual Machines” interface, find the virtual machine you just created, and click the “Power On” button in the operation bar to power on the virtual machine. During the startup process, the virtual machine’s boot status will be displayed, and you need to wait patiently for a while.
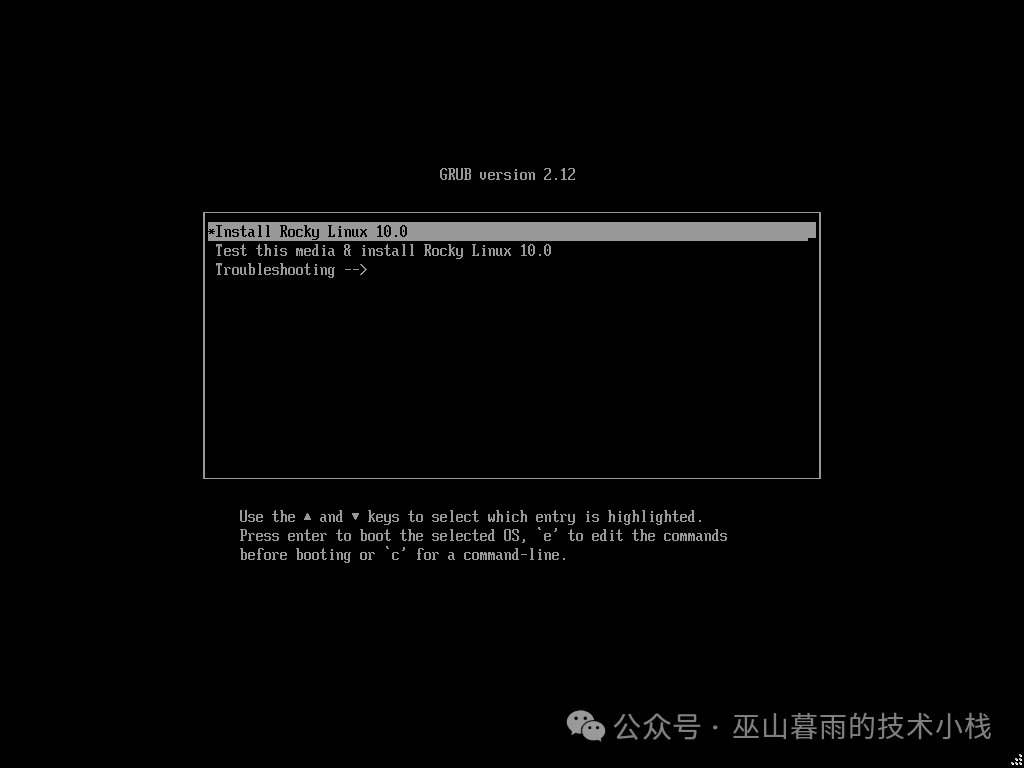
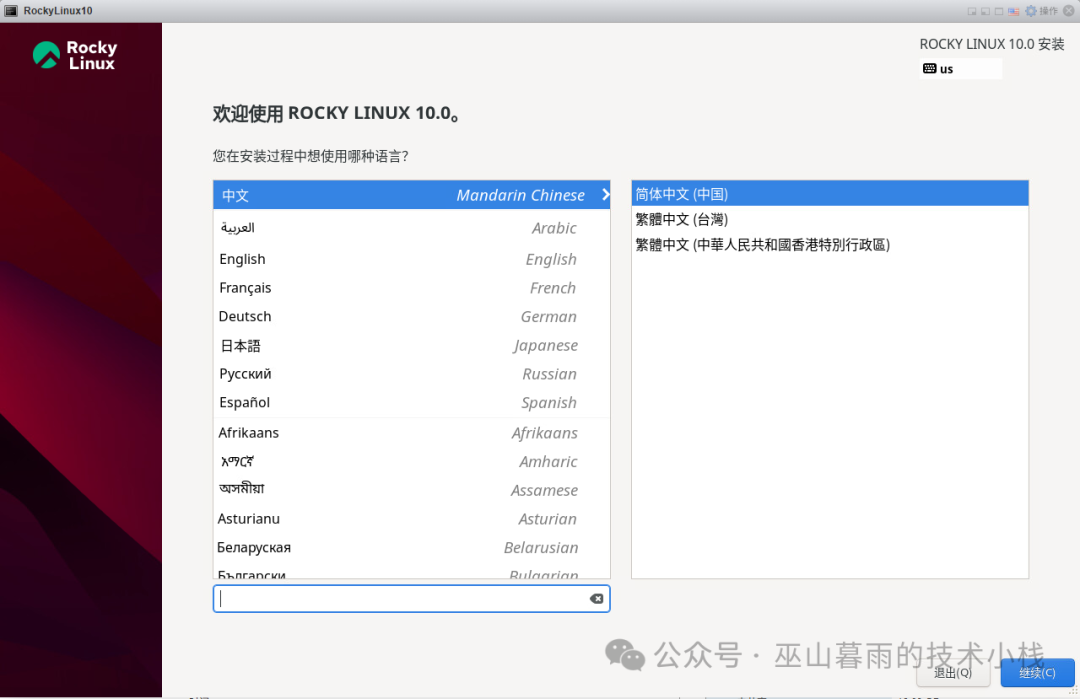
- Select Installation Language: After the virtual machine starts, it enters the installation interface. First, select the installation language; here we choose [Chinese] – [Simplified Chinese (China)], and after making the selection, click [Continue]. Choosing Chinese will make subsequent installation and operation prompts easier to understand, facilitating various settings.
- Installation Summary Settings
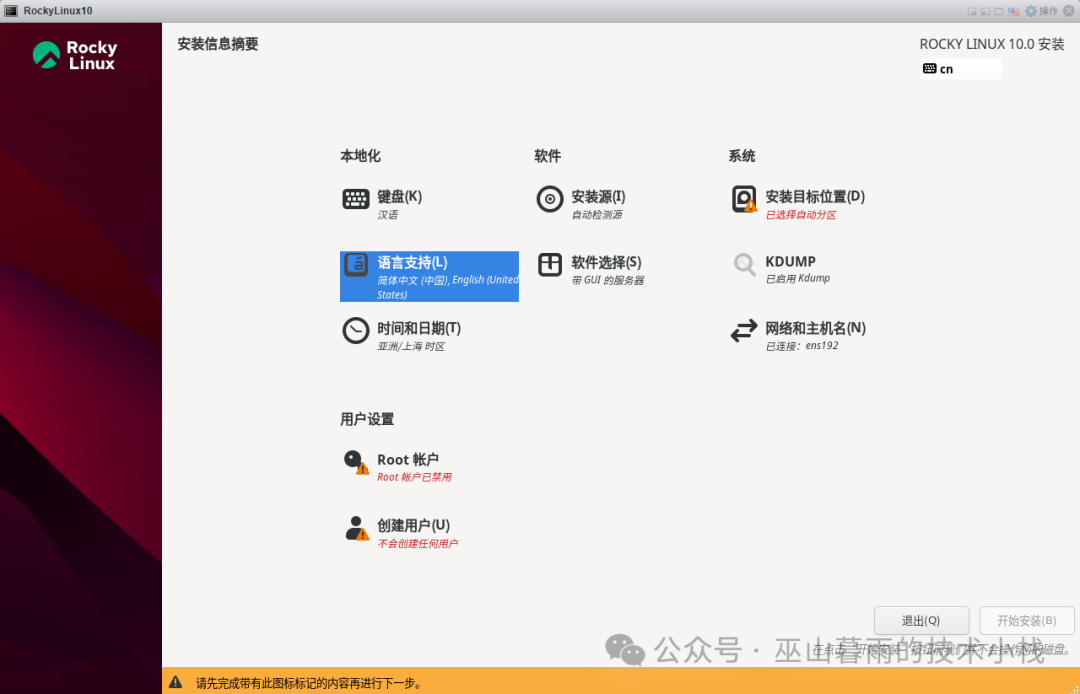
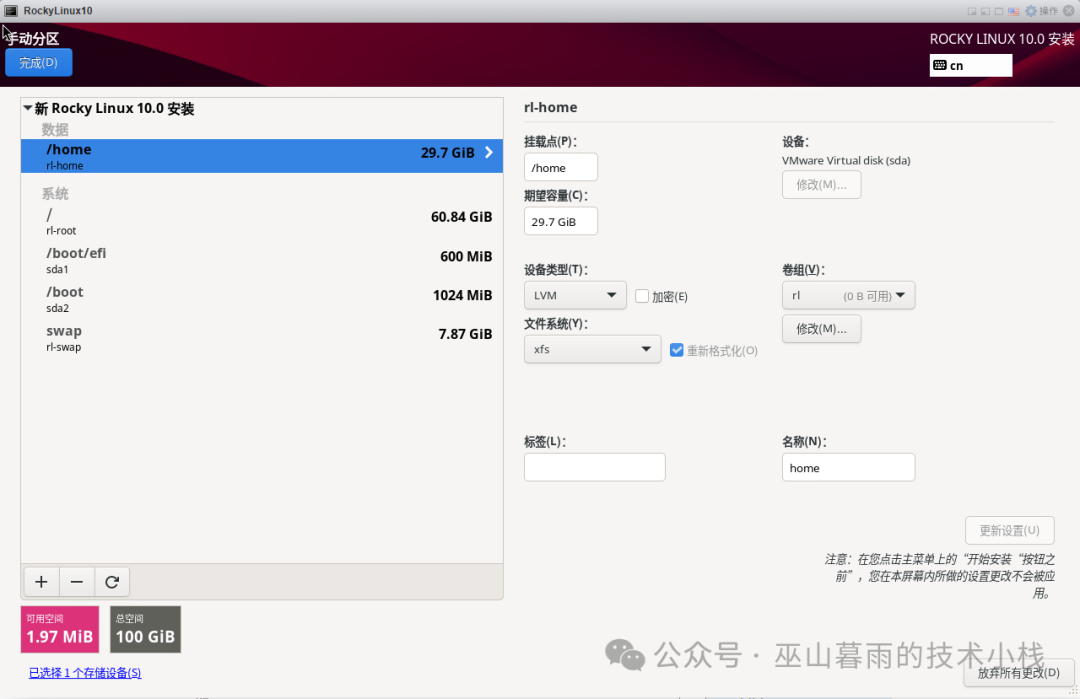
- Installation Destination: On the “Installation Summary” page, click [Installation Destination]. By default, the system will automatically select a hard drive for installation; if you want to customize partitions, click [Custom Partitioning]. For example, if you want to store the system, data, and temporary files in different partitions, you will need to customize the partitions. When customizing partitions, you generally need to create a /boot partition for storing system boot files, with a size of 200MB – 1GB; the / partition as the root partition for storing the system and most files, with size set based on the system and data volume; and a swap partition for swap space, generally 1-2 times the size of the memory, which the system will use to swap some memory data when memory is insufficient. After setting up the partitions, click [Done].
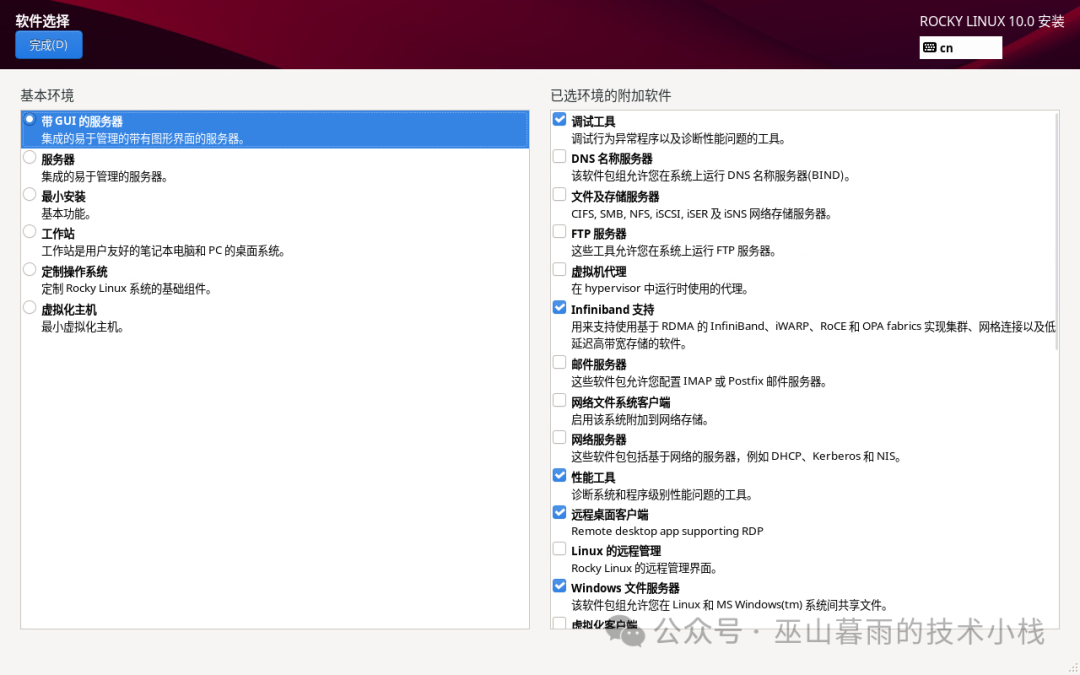
- Software Selection: Click [Software Selection] on the “Installation Summary” page, where there are various installation options. The Minimal installation includes only the basic components necessary for system operation, occupying little space, suitable for server environments with high resource requirements; if you need a graphical interface, development tools, and more features, you can choose other installation options, such as “Server with GUI”. Choose according to your needs and click [Done].
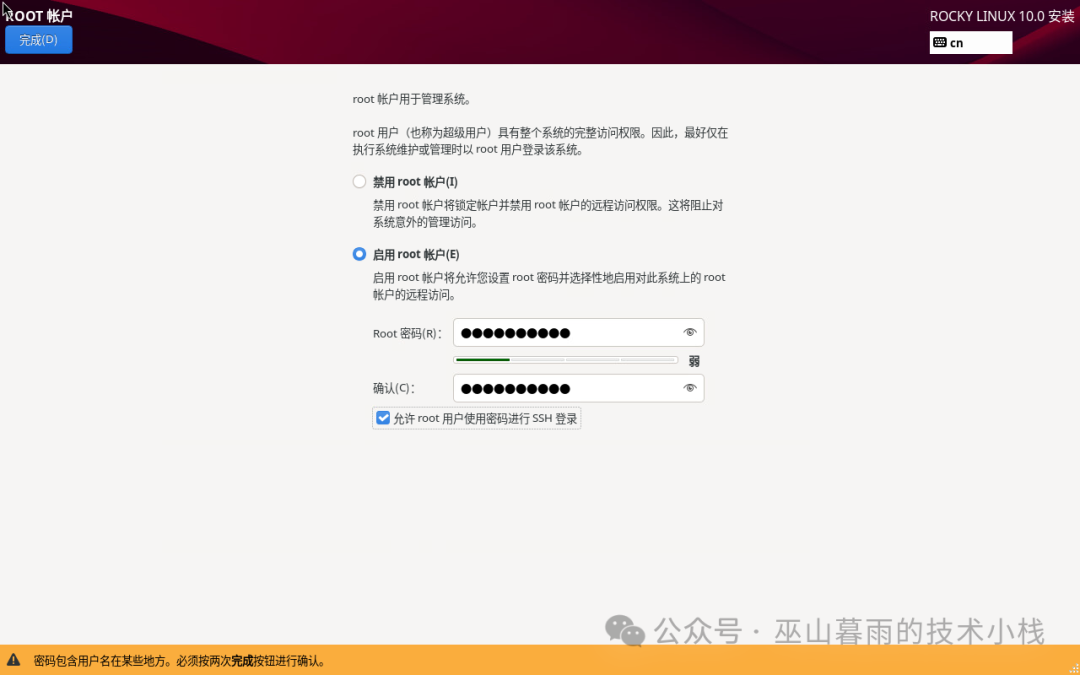
- Root Password Settings: Click [ROOT Password] on the “Installation Summary” page to set the password for the root user. The root password is very important; it is the system administrator’s password, so be sure to set a strong password that includes uppercase and lowercase letters, numbers, and special characters, and is of sufficient length. After setting, uncheck [Lock root user] and check [Allow root user to use password for SSH login], so that you can later use the root user to log in to the system remotely via SSH tools for management and operations.
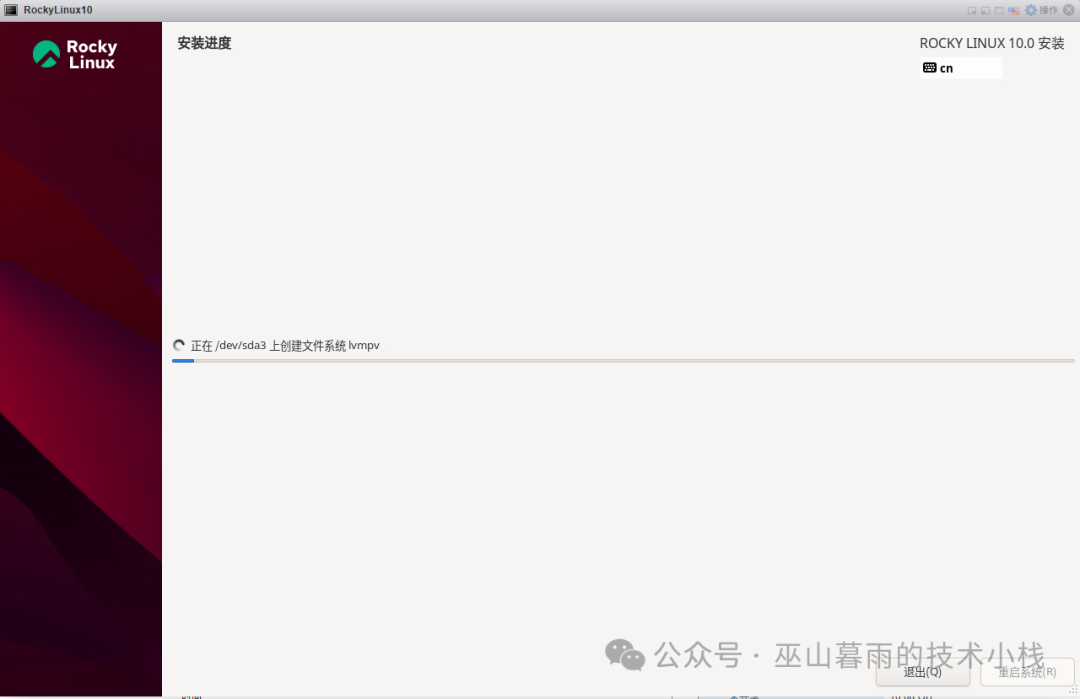
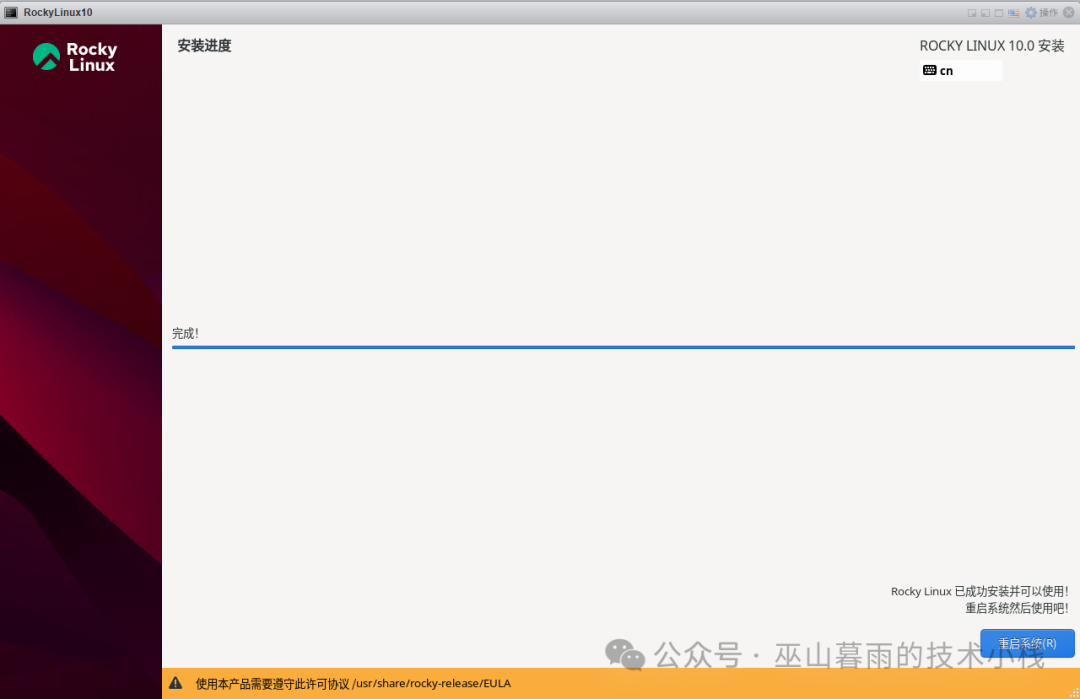
After completing all the above settings, click the [Begin Installation] button on the “Installation Summary” page, and the system will start installing Rocky Linux 10. The installation process will take some time, so please wait patiently for the installation to complete, and do not perform other operations during this time to avoid affecting the installation process.
(2) Start the Virtual Machine for Installation
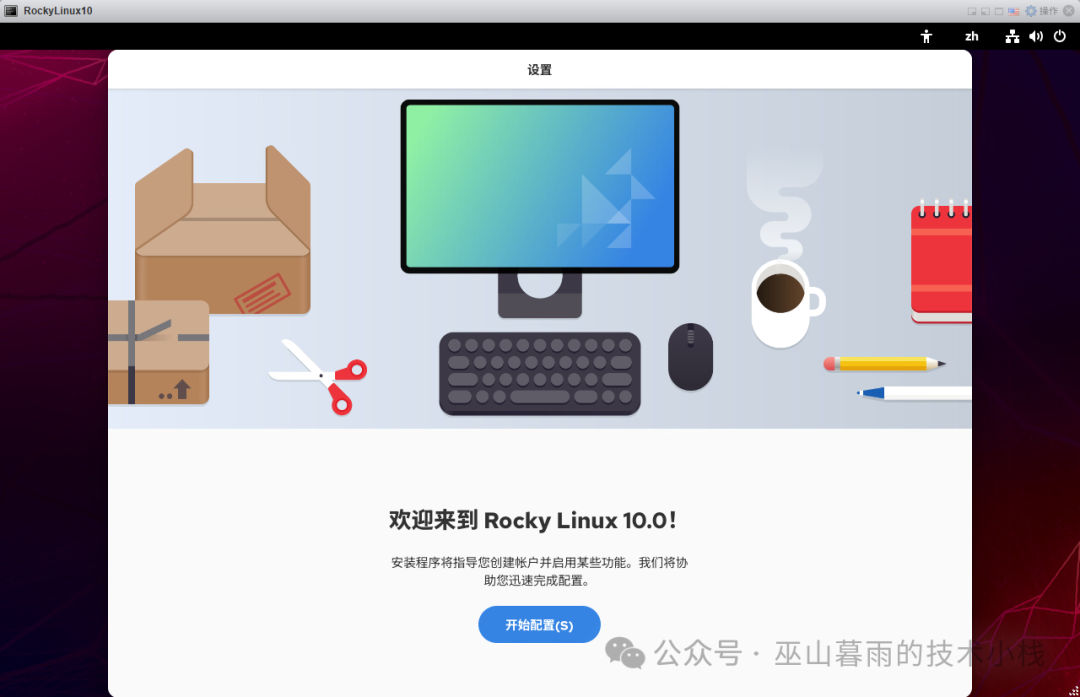
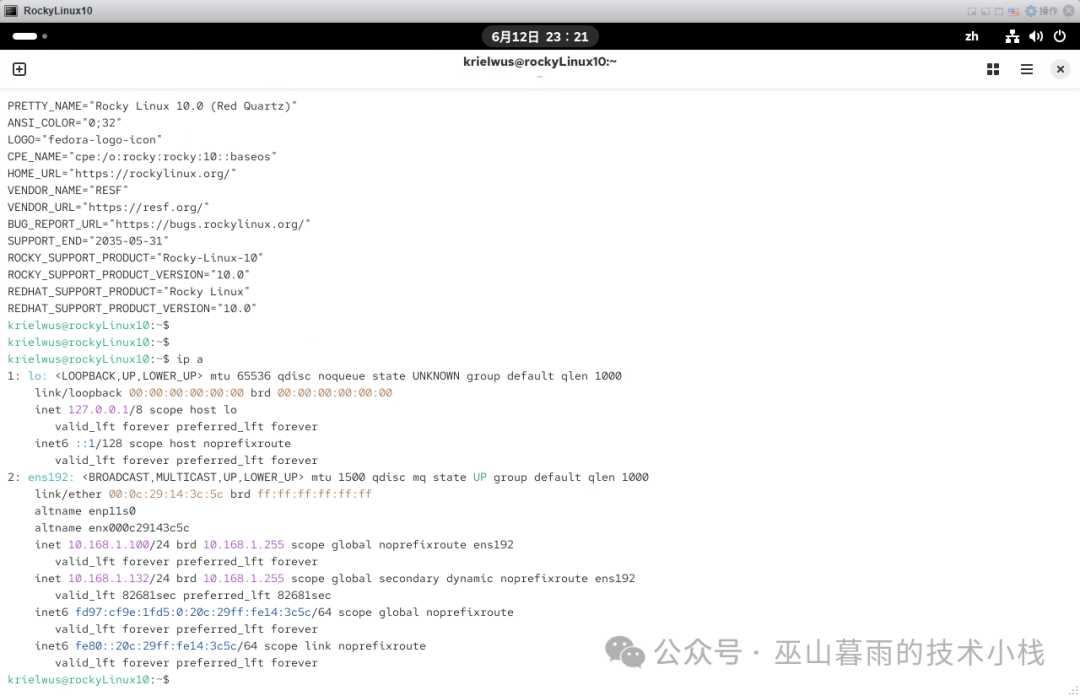
After installation, enter the system

Summary and Outlook
The process of installing Rocky Linux 10 on ESXi, although involving multiple steps, can be successfully completed as long as we proceed step by step, from the initial preparations, such as setting up the ESXi environment and downloading the image, to the various settings during the installation process, and finally to the configuration optimizations after installation. Each step requires careful operation to successfully establish a stable and efficient platform for subsequent work and learning.
Now that you have successfully installed Rocky Linux 10 on ESXi, feel free to explore its further applications. In server setup, you can use it to build high-performance web servers, file servers, or database servers, leveraging its stable performance and rich features to meet enterprise-level application needs; in development environment deployment, it is also your capable assistant, whether setting up a Python development environment, a Java development environment, or conducting big data development, Rocky Linux 10 can provide excellent support. I hope you can fully utilize your technical skills in this new system environment and create more valuable outcomes!
If you have any questions or experiences during the installation process, feel free to leave a comment to share, and let’s exchange and progress together!