Wishing everyone a Happy New Year! Thank you all for your continued support of the “Program Knowledge Road” public account and website!
This article introduces Privoxy, a powerful HTTP/HTTPS proxy server software with built-in content filtering for network traffic forwarding.
Privoxy has many features, but this article will only cover one of its functionalities: “network traffic forwarding”.
Today, we will achieve Privoxy’s “network traffic forwarding” function by forwarding local HTTP protocol traffic to Socks5 protocol traffic.
Using Privoxy, you can set up an HTTP proxy in the Linux Shell command line terminal. The http_proxy and https_proxy variables are used to set the HTTP proxy for the Shell terminal. After setting the proxy in the Shell, some network requests made by commands executed in the terminal will go through Privoxy’s HTTP proxy. This is also the last part of this tutorial.
Click the image to view the full size
Prerequisites
-
1. First, the Socks5 proxy used in this article can access the external network;
-
2. Secondly, through Privoxy’s forwarding and protocol conversion, the local area network can set the HTTP proxy
http://192.168.1.101:8118to access Privoxy’s network proxy function; then Privoxy will forward the HTTP traffic to the original Socks5 protocol traffic. Ultimately, the network traffic reaches the external server. -
3. Again, the IP address
192.168.1.101in this article is the IP address assigned to the testing machine within the local area network; the actual address may vary depending on the reader’s router settings.
Installing Privoxy
# For Fedora-based systems
sudo yum install -y privoxy
# For Debian-based systems
sudo apt install -y privoxy
Configuring Privoxy
Edit the configuration file:
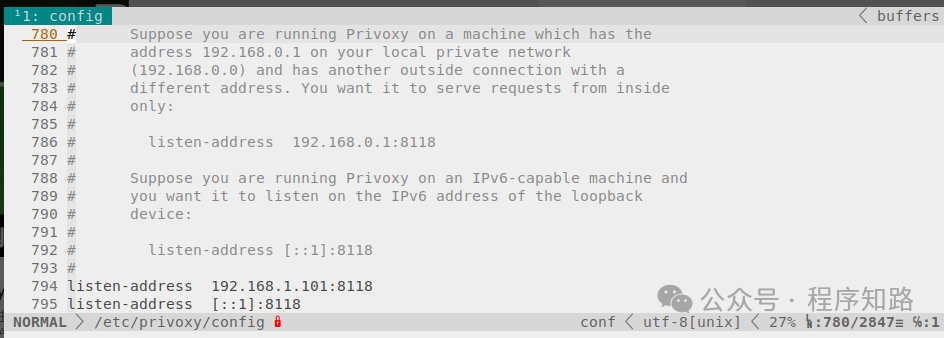
sudo vim /etc/privoxy/configSetting Privoxy’s Listening Address and Port
Search for listen-address in the editor:
The default value is: listen-address 127.0.0.1:8118, which can be changed as needed to:
listen-address 192.168.1.101:8118This line specifies the listening range and port for Privoxy, where the IP address can be set to 127.0.0.1 to indicate usage only on the local machine, making the HTTP proxy http://127.0.0.1:8118; the above setting allows it to be used within the same local area network.
Remove the comment to activate this line, and the port number 8118 can be specified as long as it does not conflict with other service ports.
Setting the Socks5 Traffic to Forward
Search for forward-socks5t:
The default line looks like this: # forward-socks5t / 127.0.0.1:9050 ., which can be modified as needed:
forward-socks5t / 192.168.1.101:1080 .Remove the comment, change forward-socks5t to forward-socks5 (if you do not remove the “t”, some Socks proxies may report an error. However, in some cases, keeping the “t” is necessary for normal operation; readers should try both), and specify the IP and port of the local Socks5 proxy, which is also set to 192.168.1.101.
The logic here is:
Set the HTTP proxy in the network proxy client (application software, browser, system-wide network proxy settings) to http://192.168.1.101:8118; then, when the client accesses the network, all or part of the client’s network traffic will go through Privoxy’s HTTP protocol proxy, and this specific network traffic will be forwarded by Privoxy to the Socks5 protocol proxy at socks5://192.168.1.101:1080, which will send the local network traffic to the remote proxy server and receive the proxy network traffic from the remote server in return.
In fact, remote Socks5 IP and domain names are also acceptable.
Save the file and exit.
This completes the basic configuration of Privoxy’s “traffic forwarding” function; restart Privoxy to start using it.
Restarting the Privoxy Service
sudo systemctl restart privoxyApplying the Set HTTP Proxy in Shell Command Line
-
1. Temporarily use the proxy
export http_proxy="http://192.168.1.101:8118" export https_proxy=$http_proxy -
2. Cancel the command line proxy settings (disable the previously set proxy)
unset http_proxy unset https_proxy -
3. To make it effective at user startup, add to /etc/profile or relevant files in the user directory:
export http_proxy="http://192.168.1.101:8118"
export https_proxy=$http_proxy
Log out of the system to make the configuration effective. It is best not to use it this way, as it may cause all terminal network traffic to go through the proxy. If you want to avoid using the proxy in a specific terminal window, you can use the
unsetoperation mentioned above.
Testing if the Shell HTTP Proxy is Effective
# For Fedora-based systems
sudo yum install -y curl
# For Debian-based systems
sudo apt install -y curl

# Get the current terminal IP address
curl ip.sb
Postscript
The author solemnly declares:
-
1. This article is solely intended to teach readers how to use Privoxy’s traffic forwarding function to convert HTTP protocol traffic into Socks5 protocol traffic, and does not promote any malicious intent;
-
2. For network proxies that can access the external network, please use them for legitimate purposes and do not abuse them for illegal activities.