1. Project Overview
This project is a machine learning-based Partial Discharge (PD) image recognition system that uses the Support Vector Machine (SVM) algorithm to automatically classify different types of partial discharge images. The system provides RESTful API services through the FastAPI framework, allowing it to receive uploaded images and return recognition results.
2. Features
- • Supports recognition of 5 different types of partial discharge images:
- • Corona discharge
- • Particle discharge
- • Floating discharge
- • Surface discharge
- • Internal discharge
- • Provides REST API interface for easy integration into other systems
- • Returns recognition results and confidence percentage
- • Lightweight design, easy to deploy
3. System Architecture
The system mainly consists of the following components:
- • Preprocessing module: Converts input images to standard format
- • Feature extraction module: Uses PCA dimensionality reduction technique
- • Classification module: Classifier based on SVM algorithm
- • API service: Web service based on FastAPI
4. Project Structure
.
├── svm_fastapi.py           # Main API service program
├── svm_pd_model/            # Pre-trained model directory
│   ├── svm_model.pkl        # SVM classifier model
│   ├── svm_scaler.pkl       # Standardizer
│   └── svm_pca.pkl          # PCA dimensionality reduction model
├── test_dataset/            # Test dataset
│   ├── corona/              # Corona discharge images
│   ├── particle/            # Particle discharge images
│   ├── floating/            # Floating discharge images
│   ├── surface/             # Surface discharge images
│   └── void/                # Internal discharge images
├── requirements.txt         # Dependency package list
└── svm_request_test.py      # API test script
5. Technical Details
- • Image Preprocessing: Converts input images to 64×64 grayscale images, then flattens them into one-dimensional vectors
- • Feature Processing: Uses StandardScaler to standardize data, then performs dimensionality reduction using PCA
- • Classification Algorithm: Uses SVM (Support Vector Machine) algorithm for multi-class classification
- • Web Framework: FastAPI provides high-performance asynchronous API services
6. Ubuntu System Deployment Guide
1. System Requirements
- • Ubuntu 18.04 LTS or higher (for both desktop and server versions)
- • Python 3.6+
- • At least 2GB of RAM
- • At least 1GB of available disk space
2. Deployment Preparation
2.1 Install System Dependencies
# Update system packages
sudo apt update
sudo apt upgrade -y

# Install Python and related tools
sudo apt install -y python3 python3-pip python3-dev
sudo apt install -y python3-venv
sudo apt install -y build-essential libssl-dev libffi-dev

# Install OpenCV dependencies
sudo apt install -y libsm6 libxext6 libxrender-dev libgl1-mesa-glx
2.2 Create Project Directory
# Create project directory (choose an appropriate path based on actual situation)
# Method 1: Create in user directory
mkdir -p ~/pd_recognition_system
cd ~/pd_recognition_system

# Method 2: Create under root user (not recommended, but may be needed in some cases)
sudo mkdir -p /root/pd_recognition_system
cd /root/pd_recognition_systemNote: The example uses the path
<span>~/pd_recognition_system</span>. If using a different path, subsequent commands need to be adjusted accordingly.
2.3 Create Python Virtual Environment
# Create virtual environment (customizable environment name)
python3 -m venv svm_venv  # Using svm_venv as the virtual environment name

# Activate virtual environment
source svm_venv/bin/activateImportant: All subsequent operations should be performed while the virtual environment is activated
3. Obtain and Install Project
3.1 Obtain Project Code
Method 1: Clone via Git (if the project is in a Git repository)
git clone <project Git repository URL> .Method 2: Manually upload files
Use SCP, SFTP, or other file transfer tools to upload project files to the server. Ensure the following content is uploaded:
svm_fastapi.py
requirements.txt
svm_pd_model/ (entire directory and all model files within)
test_dataset/ (optional, only for testing)
SCP example command (uploading from local to server):
# Execute the following command locally
scp -r svm_fastapi.py requirements.txt svm_pd_model/ username@server_IP:~/pd_recognition_system/
3.2 Install Project Dependencies
# Ensure the virtual environment is activated
pip install --upgrade pip
pip install -r requirements.txt
4. Test System
Before deploying as a service, first test whether the system can run normally:
# Run FastAPI application directly
python svm_fastapi.py
If everything is normal, you should see output similar to the following:
INFO:     Started server process [XXXX]
INFO:     Waiting for application startup.
INFO:     Application startup complete.
INFO:     Uvicorn running on http://0.0.0.0:9000 (Press CTRL+C to quit)
You can now access the API documentation interface in your browser:
http://<server_IP>:9000/docsAfter successful verification, press Ctrl+C to stop the test service.
5. Deploy as System Service (Three Solutions)
Solution A: Use Systemd Service (Standard Method)
This method is suitable for most modern Linux distributions, including Ubuntu 16.04 and above.
Step 1: Create systemd service file
sudo nano /etc/systemd/system/pd-recognition.serviceStep 2: Add the following content (modify paths and users as necessary)
[Unit]
Description=PD Recognition System API Service
After=network.target

[Service]
# Note: The paths and usernames below need to be modified according to the actual situation
WorkingDirectory=/home/username/pd_recognition_system
ExecStart=/home/username/pd_recognition_system/svm_venv/bin/python /home/username/pd_recognition_system/svm_fastapi.py
Restart=on-failure
RestartSec=5s

[Install]
WantedBy=multi-user.targetImportant: Replace the above
<span>/home/username/</span>with your actual path. If installed in the root directory, change it to<span>/root/</span>. The tested example for installing the system service on the Orange Pi development board with Ubuntu is as follows (successfully tested): I run as root (administrator). The added content is as follows:
[Unit]
Description=PD Recognition System API Service
After=network.target

[Service]
User=root
Group=root
WorkingDirectory=/root/pd_recognition_system
Environment="PATH=/root/pd_recognition_system/svm_venv/bin"
ExecStart=/root/pd_recognition_system/svm_venv/bin/python svm_fastapi.py

[Install]
WantedBy=multi-user.target
Step 3: Enable and start the service
sudo systemctl daemon-reload
sudo systemctl enable pd-recognition.service
sudo systemctl start pd-recognition.service
Step 4: Check service status
sudo systemctl status pd-recognition.serviceIf the service fails to start, check the detailed logs:
sudo journalctl -u pd-recognition.service -n 50Solution B: Use Startup Script (Recommended Solution)
If Solution A encounters issues, this solution is more reliable as it uses an explicit script to activate the virtual environment.
Step 1: Create startup script
nano ~/pd_recognition_system/start_service.shStep 2: Add the following content (modify according to actual installation path)
#!/bin/bash

# Enter project directory
cd /home/username/pd_recognition_system  # Modify to actual path

# Activate Python virtual environment
source svm_venv/bin/activate

# Start application
python svm_fastapi.py
Step 3: Grant execution permission to the script
chmod +x ~/pd_recognition_system/start_service.shStep 4: Create systemd service file
sudo nano /etc/systemd/system/pd-recognition.serviceAdd the following content:
[Unit]
Description=PD Recognition System API Service
After=network.target

[Service]
ExecStart=/bin/bash /home/username/pd_recognition_system/start_service.sh  # Modify to actual path
Restart=on-failure
RestartSec=5s

[Install]
WantedBy=multi-user.target
For the Orange Pi, to distinguish from Solution A, I named the service pd-python.service
sudo nano /etc/systemd/system/pd-python.service
Configuration content is as follows:

[Unit]
Description=PD Recognition System API Service
After=network.target

[Service]
ExecStart=/bin/bash /root/pd_recognition_system/start_service.sh
Restart=on-failure
RestartSec=5s

[Install]
WantedBy=multi-user.target
Step 5: Enable and start the service
sudo systemctl daemon-reload
sudo systemctl enable pd-recognition.service
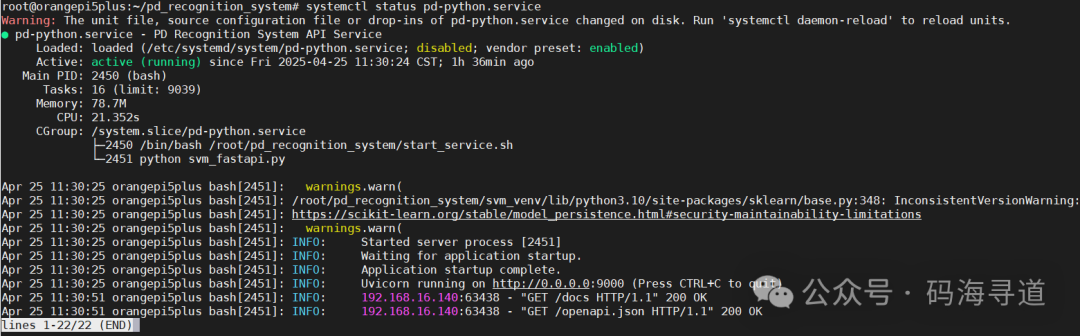
sudo systemctl start pd-recognition.serviceAt this point, enter the system path and check the created system service command:

Solution C: Use nohup to run in the background (Simple Method)
If you do not want to configure a systemd service, you can also use the nohup command to run the program in the background.
# Ensure you are in the project directory
cd ~/pd_recognition_system

# Activate virtual environment
source svm_venv/bin/activate

# Run in the background using nohup
nohup python svm_fastapi.py > app.log 2>&1 &

# Check if the program is running successfully
ps aux | grep svm_fastapi.py
The disadvantages of this method are:
- • The system will not automatically start after a reboot
- • Must manually manage processes
- • Will not automatically restart crashed programs
6. Configure Firewall
If the server has the UFW firewall enabled, you need to allow port 9000 through:
sudo ufw allow 9000/tcp
sudo ufw status
For other firewalls, please refer to the corresponding documentation for configuration.
7. API Testing
Method 1: Test using curl command
# Replace the path with the actual test image path
curl -X POST -F "file=@./test_dataset/corona/corona111.png" http://localhost:9000/api/v1/predict
Method 2: Test using Python script
Create a test script<span>test_api.py</span>:
import requests

url = 'http://localhost:9000/api/v1/predict'
file_path = './test_dataset/surface/surface57.png'  # Replace with actual image path
files = {'file': open(file_path, 'rb')}

response = requests.post(url, files=files)
print(response.json())
Execute the test:
python test_api.py8. System Maintenance
1. Service Management Commands
# Check service status
sudo systemctl status pd-recognition.service

# Restart service
sudo systemctl restart pd-recognition.service

# Stop service
sudo systemctl stop pd-recognition.service

# Start service
sudo systemctl start pd-recognition.service

# Disable auto-start on boot
sudo systemctl disable pd-recognition.service
2. View Logs
# View recent service logs
sudo journalctl -u pd-recognition.service -n 100

# View logs in real-time
sudo journalctl -u pd-recognition.service -f

# View logs for a specific time period
sudo journalctl -u pd-recognition.service --since "2025-04-24 14:00" --until "2025-04-24 15:00"
3. Update Deployment
After updating the project code, you need to restart the service:
# Update code (if using Git)
cd ~/pd_recognition_system
git pull

# If there are new dependencies, install them
source svm_venv/bin/activate
pip install -r requirements.txt

# Restart service
sudo systemctl restart pd-recognition.service
9. Common Issues and Solutions
1. Service Startup Failure (status=217/USER)
Problem: Error when starting the service using systemd<span>status=217/USER</span>
Solution:
- 1. Check the User and Group configuration in the service file to ensure it matches the actual running environment
- 2. If running under the root user, try removing the User and Group lines
- 3. Use Solution B (startup script method) instead
2. Dependency Installation Failure
Problem: Error when installing Python dependencies
Solution:
# Install compilation tools and development libraries
sudo apt install -y python3-dev build-essential

# Update pip to the latest version
pip install --upgrade pip

# If a specific package fails to install, try installing it separately
pip install <problematic_package_name> --no-cache-dir
3. OpenCV Import Error
Problem: Runtime errors related to OpenCV
Solution:
# Install OpenCV system dependencies
sudo apt install -y libsm6 libxext6 libxrender-dev libgl1-mesa-glx

# Reinstall opencv-python
pip uninstall -y opencv-python
pip install opencv-python
4. Insufficient Memory
Problem: Insufficient system memory causing service crashes
Solution:
- 1. Increase server memory
- 2. Configure swap space:
sudo fallocate -l 2G /swapfile
sudo chmod 600 /swapfile
sudo mkswap /swapfile
sudo swapon /swapfile
echo '/swapfile none swap sw 0 0' | sudo tee -a /etc/fstab
5. Service Accessible Locally but Not Externally
Problem: Service runs normally but cannot be accessed from other devices
Solution:
- 1. Ensure FastAPI is bound to
<span>0.0.0.0</span>instead of<span>127.0.0.1</span> - 2. Check firewall settings:
<span>sudo ufw status</span>and<span>sudo ufw allow 9000/tcp</span> - 3. Check cloud service security group/network ACL settings
- 4. Check firewall settings from the server provider
10. Performance Optimization Suggestions
1. Use Gunicorn as WSGI Server
For production environments, it is recommended to use Gunicorn:
# Install Gunicorn
pip install gunicorn

# Start service (modify app:app to the actual application instance and module name)
gunicorn -w 4 -k uvicorn.workers.UvicornWorker -b 0.0.0.0:9000 app:app
Then update the ExecStart command in the systemd service file.
2. Use Nginx as Reverse Proxy
Install Nginx:
sudo apt install -y nginxCreate Nginx configuration file:
sudo nano /etc/nginx/sites-available/pd-recognitionAdd the following content:
server {
    listen 80;
    server_name your_domain_or_IP;

    location / {
        proxy_pass http://127.0.0.1:9000;
        proxy_set_header Host $host;
        proxy_set_header X-Real-IP $remote_addr;
        proxy_set_header X-Forwarded-For $proxy_add_x_forwarded_for;
        proxy_set_header X-Forwarded-Proto $scheme;
    }
}
Enable configuration and restart Nginx:
sudo ln -s /etc/nginx/sites-available/pd-recognition /etc/nginx/sites-enabled/
sudo nginx -t
sudo systemctl restart nginx
11. Notes
- • The service runs on port 9000 by default, which can be modified in the code as needed
- • Uploaded images will be temporarily saved as
<span>temp_image.jpg</span> - • To achieve the best recognition results, it is recommended to upload clear partial discharge images
- • It is recommended to configure HTTPS for production environment deployment
- • Regularly back up model files (files in the
<span>svm_pd_model/</span>directory)