In embedded system development, developing device drivers is a crucial task. As a bridge connecting hardware and software, the quality of device drivers directly affects the correctness of system functions and the stability of operation. In the rapidly evolving open-source ecosystem, Zephyr RTOS is favored by developers for its lightweight, modular, and highly scalable features. However, in contrast to its wide application, there is relatively little detailed information and tutorials on developing Zephyr RTOS device drivers, which poses significant challenges for many developers in practical work.
To address this issue, the Technology R&D Center of the Provincial Key Laboratory of Embedded Computing will take the development of device drivers for Zephyr RTOS as an example, starting from basic knowledge and gradually delving into practical operations, guiding everyone through a complete process of writing a driver program. Through this article, you will not only understand the driver development mechanism of Zephyr RTOS, but also master the core skills from theory to practice, helping you to develop high-quality device drivers effortlessly in actual projects.
1.What is a Device Driver? Why Do We Need Device Drivers?
A device driver is the “translator” between the operating system and hardware devices. The driver abstracts the complexity of hardware, allowing the operating system to interact with devices in a unified manner. By using drivers, developers do not need to worry about hardware details and can simply call standard interfaces to use device functions.
In Zephyr, the composition of device drivers mainly includes Device Tree Files, Driver Model Files, Driver Code (Figure 1). Device tree files are used to define device information (such as address, clock), driver model files standardize driver interfaces (such as i2c.h), while driver code is the core implementation logic of the driver.
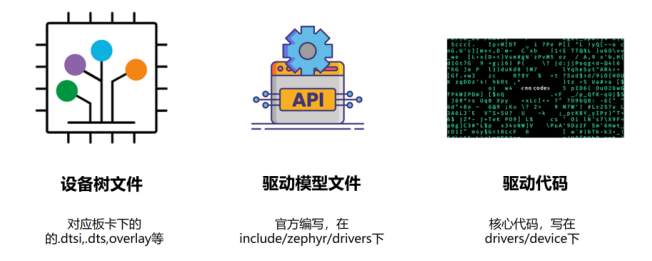 Figure 1: General Composition of Zephyr Drivers
2.Steps to Write a Zephyr RTOS Driver Program
Step 1: Familiarize Yourself with Device Functions and Features
The first step in driver development is to familiarize yourself with the target device. Only by understanding the functions and features of the hardware can you write a correct driver program. In this process, you need to understand the device’s usage, device composition, and device functions. We recommend reading the chip manual to understand the definitions and functional descriptions of device registers. Taking RK 3568 as an example, you can refer to the chip manual of RK3568 (Figure 2) to understand the register definitions for the driver you are going to write; you can also consult blogs, videos, and other online resources to quickly grasp the working principles of the device.
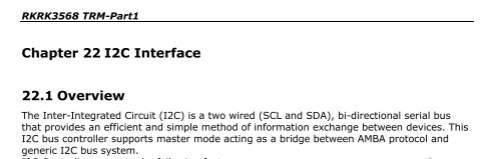
Figure 2: Functional Description of I2C in the RK3568 Chip Manual
Step 2: Familiarize Yourself with the Driver Framework of Zephyr RTOS
After familiarizing yourself with the device functions and features, the next step is to study how to control the device through software. The focus at this stage is to understand the driver framework of Zephyr RTOS, which can be referenced in the official documentation and driver examples of Zephyr as well as the corresponding Linux drivers. The official documentation of Zephyr provides a unified driver interface and clear driver logic; following its specifications can enhance driver reusability while strengthening the understanding of device functions. For example, the I2C driver model (include/zephyr/drivers/i2c.h) provides the standard API interface for I2C device drivers; while the driver logic in Linux is complex but relatively complete, it can serve as a reference for driver design and learning the logic of board drivers.
Step 3: Build the Driver Framework (Taking PWM Driver Development as an Example)
The first step in writing driver code is to build the framework. Once the framework is completed, the operating system will be able to recognize the device. The framework building process includes two stages:
(1) Configure the Device Tree Files. Write the binding file of the device in .yaml format to define node content, add device node information in .dtsi or .dts files, and allocate node space in mmu_region.c (Figure 3).
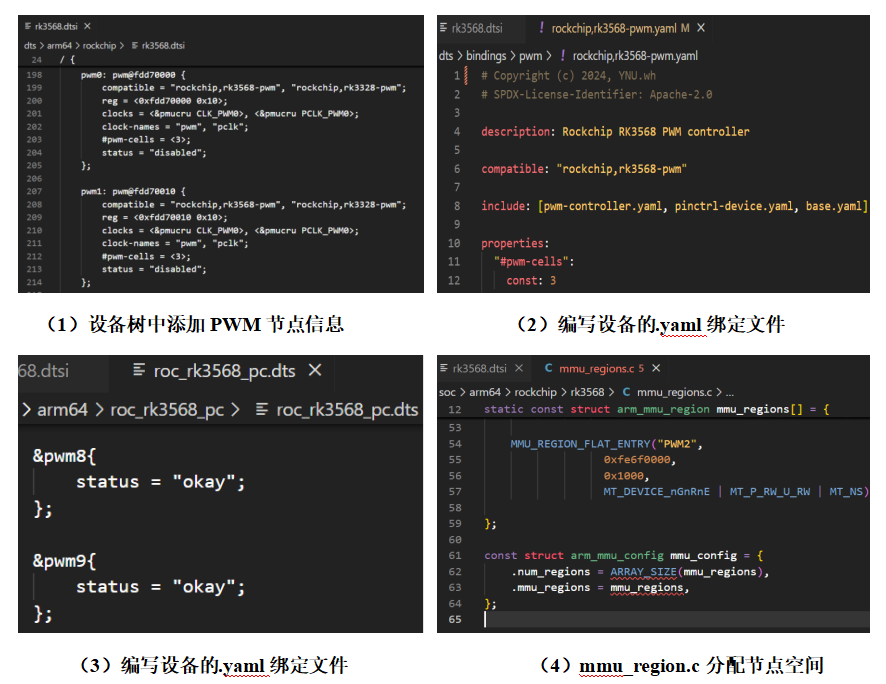 Figure 3: Process of Configuring Device Tree Files
(2) Register the Driver. Create the corresponding source code file in the driver folder, and register the driver in CMakeLists.txt and Kconfig to ensure that the driver you write can be correctly linked to the program (Figure 4).
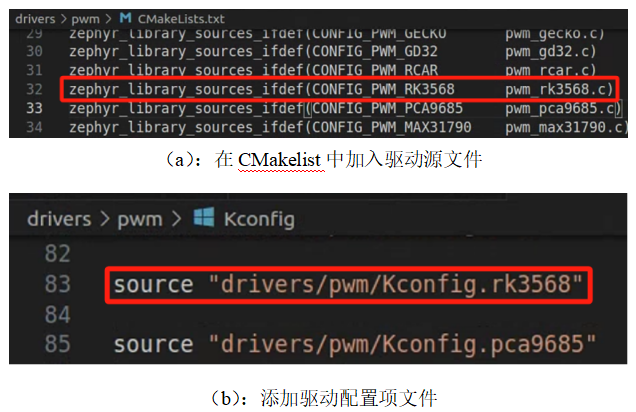
Figure 4: Process of Registering the Driver
Step 4: Write the Specific Driver Program (Taking PWM Driver Development as an Example)
After completing the framework, it’s time to write the specific driver program to implement the device functions. Based on the register descriptions in the device manual, implement the specific functional logic. Before formally writing, we need to clarify the overall logic of the driver, which can be organized and converted into Uboot, using the mw command to write values to the registers, checking if the device responds, or using the md command to read register values to verify if the configuration is effective.
Once the driver logic is verified, you can begin to write the specific driver code, including defining the device initialization function, completing the basic configuration of the driver based on the device tree content, and registering it to Zephyr RTOS. After that, configure the registers to their default state, provide device operation interfaces (such as read and write functions), and implement other advanced functions as needed. It is important to note that one of the core tasks of writing a driver program is to operate the hardware registers. The essence of driver development is to provide an abstraction layer for the hardware, interacting with the underlying hardware through reading and writing registers. At this stage, the clarity and standardization of the driver logic are very important. It is recommended to implement the code in modules for easier maintenance and debugging.
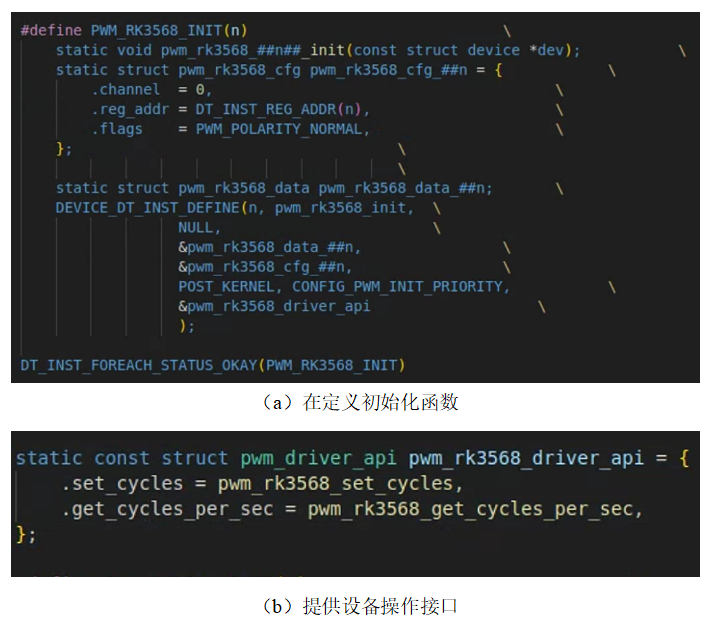
Figure 5: Writing Specific Driver Code
Step 5: Testing and Debugging
After writing the driver, you need to ensure that the functionality is correct through compilation and actual testing. During testing, first compile the code, using the toolchain provided by Zephyr, to check for syntax and logic errors based on the compilation information; then perform hardware testing, burning the code onto the hardware, and using an oscilloscope or logic analyzer to verify functionality. If any issues are found, you can gradually locate the errors by combining logs and hardware tools.
2. Precautions: Configuration Issues of CRU and SYSCON
In general device driver development, there will be corresponding settings for CRU (which focuses on managing clock and reset signals) and SYSCON (which provides global control for the system) (unless the devices require default states (Figure 6)). However, the manual and Linux drivers usually do not mention the need to configure CRU and SYSCON, which often leads to forgetting to configure them, resulting in the device not functioning properly.
Note that SYSCON does not need to be manually initialized, and most devices in CRU use a clock with a crystal oscillator of 24M, which also does not need manual initialization; you only need to select the corresponding function in the respective registers.
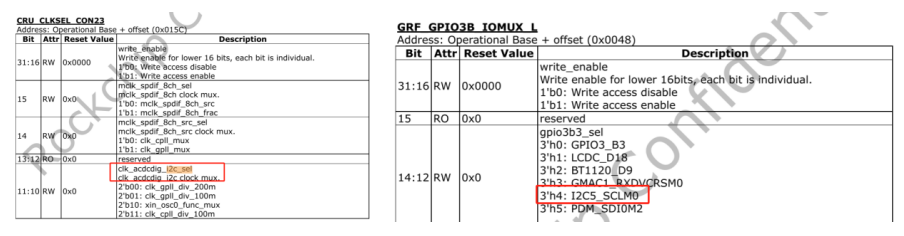 Figure 6: Initialization Settings of CRU and SYSCON
3. Conclusion:
Driver development is the intersection of software and hardware. Mastering the writing of Zephyr RTOS drivers can not only significantly enhance development skills but also provide an important guarantee for efficiently utilizing hardware resources. Through the above steps, from analyzing device characteristics, building the framework to functional implementation and testing, we have completed a complete Zephyr RTOS driver development process. Each step is crucial, requiring both a deep understanding of hardware and familiarity with and practice in the Zephyr driver framework.
We hope this article provides you with clear ideas and practical guidance, helping you to start writing high-quality Zephyr RTOS drivers from scratch. If you encounter any issues during development, feel free to leave a message in the comments, and we will discuss and share experiences together!

Follow “Voice of Embedded System Experts” for more excellent articles on Zephyr RTOS
【Click the above👆🏻 to search for more related content】


Follow us for more exciting content