1. Introduction

RT-Thread Env is a development assistant tool launched by RT-Thread that provides a compilation and build environment, graphical system configuration, and package management functions for projects based on the RT-Thread operating system. Its built-in menuconfig provides a user-friendly configuration trimming tool that allows for the free trimming of the kernel, components, and packages, enabling the system to be built in a modular fashion.
The newly released RT-Thread BSP v1.10 also supports convenient graphical configuration and trimming of applications through RT-Thread Env, completing compilation, generating cmake projects, and Segger Embedded Studio projects, among other operations.
This article begins with the setup of the RT-Thread development environment based on Ubuntu, and introduces how to use the following toolchains to develop RT-Thread applications in conjunction with the new features of Xianji RT-Thread BSP v1.10.
-
gcc
-
zcc
-
Segger Embedded Studio
2. Preparing the Development Environment
Follow the steps provided at https://gitee.com/RT-Thread-Mirror/env to install the development environment sequentially.
2.1 Install the RT-Thread Env Environment
Note: The following examples for configuring environment variables are aimed at novice users unfamiliar with Ubuntu. For those familiar with Linux environment variable configuration, you can configure it according to your habits to achieve the same effect.
1. Download and install
wget https://gitee.com/RT-Thread-Mirror/env/raw/master/install_ubuntu.shchmod 777 install_ubuntu.sh./install_ubuntu.sh –gitee
rm install_ubuntu.sh
2. Prepare the environment
Append the following line to the end of ~/.bashrc
source ~/.env/env.sh
3. Notes
Version matching requirements:
-
The Xianji RT-Thread BSP v1.10 is based on RT-Thread v5.0.2 and must use RT-Thread Env v1.5.2 for development.
Solutions for environment configuration issues:
-
If you encounter an abnormal scons –menuconfig command, please follow these steps:
· Check if a conflicting kconfiglib is installed
pip list | grep kconfiglib
· If installed (shows version information), then execute uninstall
pip uninstall kconfiglib
2.1 Install Toolchains
The following three toolchains can be installed according to personal preference
1. Install the gcc toolchain
-
Download the gcc toolchain from the following links:https://github.com/hpmicro/riscv-gnu-toolchain/releases/download/2022.05.15/riscv32-unknown-elf-newlib-multilib_2022.05.15_linux.tar.gz or https://gitee.com/hpmicro/riscv-gnu-toolchain/releases/download/2022.05.15/riscv32-unknown-elf-newlib-multilib_2022.05.15_linux.tar.gz
-
Extract to a specified directory, such as /opt/riscv32-unknown-elf-newlib-multilib
-
Add environment variables
Append the following line to the end of ~/.bashrcRTT_RISCV_TOOLCHAIN Assuming the toolchain is installed/extracted to /opt/riscv32-unknown-elf-newlib-multilib
export RTT_RISCV_TOOLCHAIN=/opt/riscv32-unknown-elf-newlib-multilib/bin
2. Install the zcc toolchain
-
Download the zcc 4.0.0 or zcc 4.1.1 and above versions of the toolchain from the official website of Zhaosong Technologyhttps://www.terapines.com/download/zcc
-
Install to a specified directory. Taking the current version of ZCC-Installer as an example, install as follows.
chmod 777 ZCC-Installer
sudo ./ZCC-Installer
In the pop-up window, click Install, select the installation path in the new interface, this article uses the default path /opt/Terapines/ZCC/4.0.0, continue to click Install, wait for the installation to complete and close the installation window.
-
Add to environment variables
Append the following line to the end of ~/.bashrcZCC_TOOLCHAIN_PATH
export ZCC_TOOLCHAIN_PATH=/opt/Terapines/ZCC/4.0.0/bin
3. Install Segger Embedded Studio
-
Download the Linux version of Segger Embedded Studio from the official Segger website.
-
Extract and install. Taking version 8.24 as an example, extract to segger_embedded_studio_v824_linux_x64, enter that folder via command line, and install with the following command:
cd segger_embedded_studio_v824_linux_x64
sudo ./install_segger_embedded_studio
Install to the default path /opt/SEGGER/segger_embedded_studio_8.24
-
Set environment variables Append the following line to the end of ~/.bashrcSEGGER_TOOLCHAIN_PATH
export SEGGER_TOOLCHAIN_PATH=/opt/SEGGER/segger_embedded_studio_8.24/bin
-
Apply for a License at the following link (skip this step for non-commercial use)https://license.segger.com/hpmicro.cgi
4. Install OpenOCD
-
Download OpenOCD from the following link and extract it to a specified directory, such as /opt/hpm-openocdhttps://github.com/hpmicro/riscv-openocd/releases/download/hpm_xpi_v0.3.0/openocd-linux.tar.gz- Set environment variables by appending the following line to ~/.bashrc:
export PATH=$PATH:/opt/hpm-openocd/bin
-
For users familiar with compiling openocd, you can also clone and compile based on the https://github.com/hpmicro/riscv-openocd repository tag hpm_xpi_v0.3.0, which will not be elaborated here.
5. Install JLink and Ozone
-
This step is optional; if you do not have JLink hardware, you can skip it.
-
Download the JLink and Ozone installation packages from the following link and install themhttps://www.segger.com/downloads/jlink/
3. Project Development Process
Based on the Xianji RT-Thread BSP package, the typical development model is as follows:
Preparation Work
-
Download the BSP package for a similar development board
-
Export similar examples
Project Configuration
-
Use RT-Thread Env to complete the corresponding project configuration
-
Manage newly added code according to scons syntax
-
Specify compiler, ARCH, ABI, and other information
Project Generation, Compilation, and Debugging
-
Use scons to compile, or generate the corresponding cmake or Segger Embedded Studio project
-
Use openocd + gdb for debugging, or use ozone + jlink for debugging
3.1 Preparation Work
Step 1: Download the Xianji BSP Package
Users can download the BSP package for the official Xianji development board from the following links.
|
Development Board |
Repository Link |
|
hpm6750evkmini |
http://git-mirror.rt-thread.com:12236/hpmicro/rtt-bsp-hpm6750evkmini/archive/v1.10.0.zip |
|
hpm6750evk2 |
http://git-mirror.rt-thread.com:12236/hpmicro/rtt-bsp-hpm6750evk2/archive/v1.10.0.zip |
|
hpm6300evk |
http://git-mirror.rt-thread.com:12236/hpmicro/rtt-bsp-hpm6300evk/archive/v1.10.0.zip |
|
hpm6200evk |
http://git-mirror.rt-thread.com:12236/hpmicro/rtt-bsp-hpm6200evk/archive/v1.10.0.zip |
|
hpm5300evk |
http://git-mirror.rt-thread.com:12236/hpmicro/rtt-bsp-hpm5300evk/archive/v1.10.0.zip |
|
hpm5301evklite |
http://git-mirror.rt-thread.com:12236/hpmicro/rtt-bsp-hpm5301evklite/archive/v1.10.0.zip |
|
hpm6800evk |
http://git-mirror.rt-thread.com:12236/hpmicro/rtt-bsp-hpm6800evk/archive/v1.10.0.zip |
|
hpm6e00evk |
http://git-mirror.rt-thread.com:12236/hpmicro/rtt-bsp-hpm6e00evk/archive/v1.10.0.zip |
|
hpm6p00evk |
http://git-mirror.rt-thread.com:12236/hpmicro/rtt-bsp-hpm6p00evk/archive/v1.10.0.zip |
|
hpm5e00evk |
http://git-mirror.rt-thread.com:12236/hpmicro/rtt-bsp-hpm5e00evk/archive/v1.10.0.zip |
Step 2: Export Examples
Extract the downloaded BSP package, in the root directory of the package, Xianji provides the bsp_utils.py script, the brief usage of which is as follows:
python bsp_utils.py -l to view the list of examples supported by the BSP packagepython bsp_utils.py -e -p=<project_name> -o=<absolute_output_path> to export the specified example. If the value of project_name is all, all supported examples will be exported.
Taking the blink_led example as an example, assuming the current user’s directory is /home/builder/, you can export this example with the following command.
python ./bsp_utils.py -e -p=blink_led -o=/home/builder
After executing this operation, you can find the example in the /home/builder/blink_led directory.
3.2 Configure the Project
Step 1: Configure the Project Based on RT-Thread Env
1. Configure the project using menuconfig Based on the above tutorial, taking the blink_led example, enter the /home/builder/blink_led directory via command line.
Open the scons –menuconfig to complete the following operations:
-
Board-level configuration
-
Kernel configuration
-
Component configuration
-
Online package configuration
-
Other user-added configurations, etc.
Operation examples are shown in the following image:
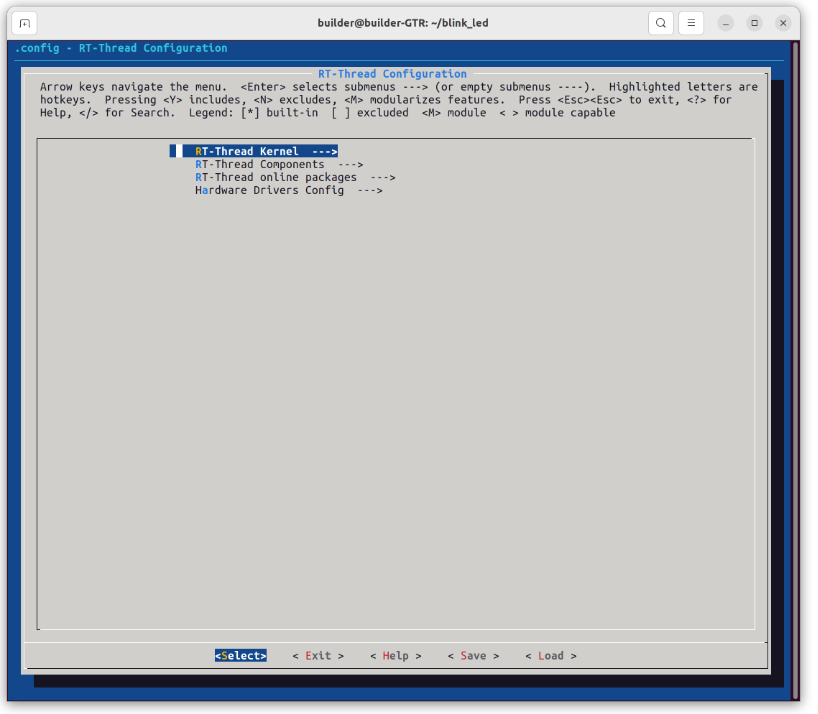
This operation is very similar to the graphical operation in RT-Thread Studio.
For background knowledge related to kconfig, please search through deepseek or a search engine.
For detailed usage of RT-Thread Env, please refer to the following links:
-
https://github.com/RT-Thread/rt-thread/blob/master/documentation/env/env.md#bsp-configuration-menuconfig
-
https://www.rt-thread.org/document/site/#/development-tools/env/env
2. Organize the project using scons scripts
See details at
https://www.rt-thread.org/document/site/#/development-tools/build-config-system/SCons
Step 2: Change Toolchain Parameters as Needed
1. Configure RV_ARCH and RV_ABI (not applicable for Segger Embedded Studio projects)
-
Users can execute the following operation in the project directory to complete the ABI configuration; if this operation is not performed, the default value is RV_ABI=ilp32.
export RV_ABI=<rv_abi>
-
Users can execute the following operation in the project directory to complete the ARCH configuration; if this operation is not performed, the default value is RV_ARCH=rv32imac.
export RV_ARCH=<rv_arch>
-
The supported combinations of RV_ARCH and RV_ABI are:
rv32imac + ilp32
rv32imafc + ilp32f
rv32gc + ilp32d
2. Configure RTT_BUILD_TYPE (not applicable for Segger Embedded Studio projects)
-
Users can complete the configuration of RTT_BUILD_TYPE through the following operation; if this operation is not performed, the default value is flash_debug.
export RTT_BUILD_TYPE=<build_type>
-
The commonly supported options for RTT_BUILD_TYPE are:
ram_debug
ram_release
flash_debug
flash_release
flash_hybrid_debug (only for HPM5E00 series)
flash_hybrid_release (only for HPM5E00 series)
Detailed supported options can be found in rtconfig.py.
3. Switch Toolchains Users can switch toolchains in the project directory using the following operation, or if this operation is not performed, the default toolchain is gcc.
export RTT_TOOLCHAIN_PLATFORM=<platform>
Where, the supported options for platform are:
-
gcc
-
zcc
-
segger
3.3 Step 3: Generate, Compile, and Debug the Project
Using scons scripts, users can directly complete compilation and other advanced functions in the command line.
1. Use scons to directly compile and generate executable files
scons -jN
Where: N represents the number of threads.
For command line experts, you can use openocd + riscv32-unknown-elf-gdb for command line debugging. If you have JLink, you can also use JLink + Ozone for debugging.
2. Generate cmake Project
When using gcc or zcc toolchains, you can generate a cmake project with the following command.
scons —target=cmake
After that, you can use your familiar IDE that supports cmake (such as vscode, CLion, etc.) to open the cmake project for subsequent development and debugging.
Note: In this mode, if you need to change RT-Thread related configurations again, you may need to repeatedly execute the following operations:
scons –menuconfig
scons –target=cmake
3. Generate Segger Embedded Studio Project
When using the segger toolchain, you can generate a Segger Embedded Studio project with the following command.
export RTT_TOOLCHAIN_PLATFORM=segger # Ensure this system variable is correct
scons —target=ses
Note: In this mode, if you need to change RT-Thread related configurations again, you may need to repeatedly execute the following operations:
scons –menuconfig
scons –target=cmake
After generating the project, you can open the project with the following command
xdg-open project.emProject
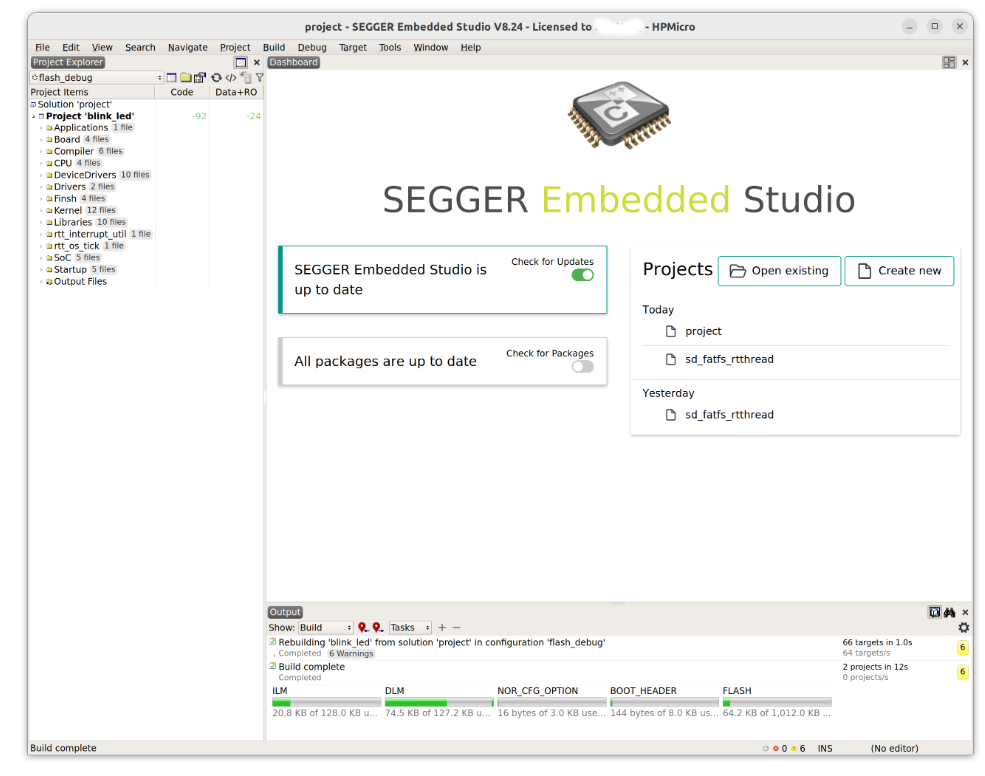
Note: The default combination of RISC-V ISA and RISC-V ABI in the generated project.emProject is rv32imac and ilp32, as shown in the following image. Users can adjust it to the corresponding configuration as needed.
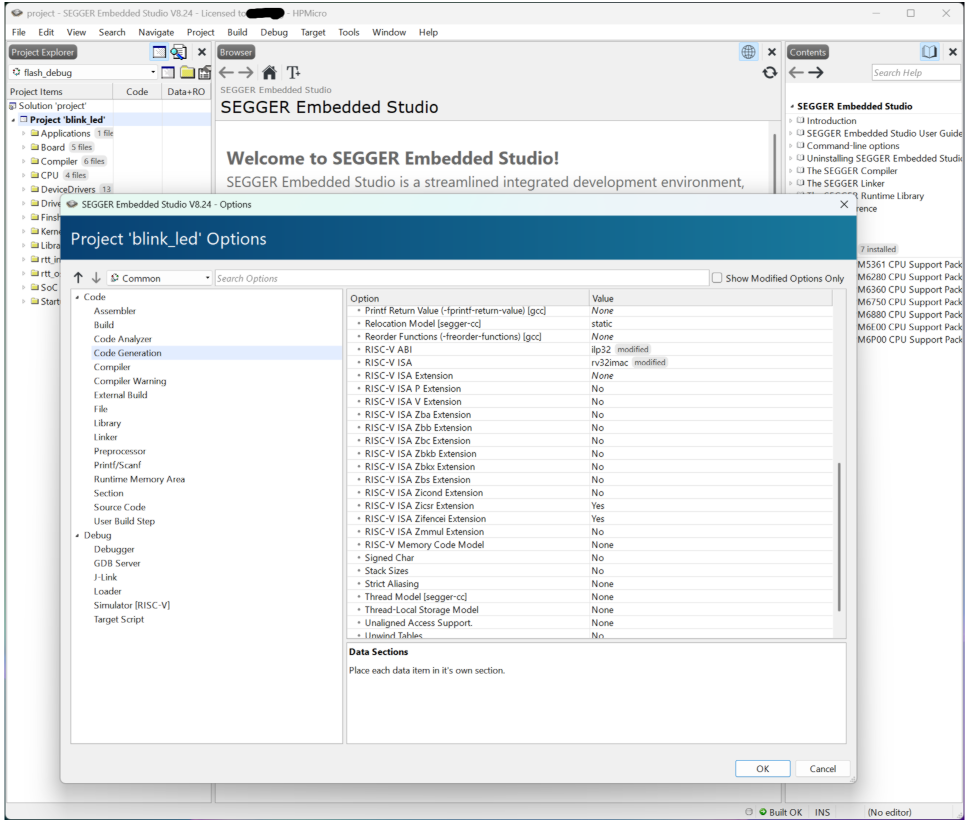
After that, you can use Segger Embedded Studio for development and debugging. The debugging experience is consistent with using hpm_sdk.
4. Typical Examples
4.1 Using rv32imac+ilp32 + gcc to Compile Code Based on scons as Shown in the Example Script:
export RTT_TOOLCHAIN_PLATFORM=gcc
export RV_ARCH=rv32imac
export RV_ABI=ilp32
scons -j16
4.2 Using rv32gc+ilp32d + gcc to Generate CMake Project Based on scons
As shown in the example script:
export RTT_TOOLCHAIN_PLATFORM=gcc
export RV_ARCH=rv32gc
export RV_ABI=ilp32d
scons —target=cmake
4.3 Using rv32imafc+ilp32f + zcc to Compile Code Based on scons
As shown in the example script:
export RTT_TOOLCHAIN_PLATFORM=zcc
export RV_ARCH=rv32imafc
export RV_ABI=ilp32f
scons -j16
4.4 Using rv32gc+ilp32d + zcc to Generate CMake Project Based on scons
As shown in the example script:
export RTT_TOOLCHAIN_PLATFORM=zcc
export RV_ARCH=rv32gc
export RV_ABI=ilp32d
scons —target=cmake
4. Summary
This article provides a brief process for developing RT-Thread applications based on Xianji MCU on Ubuntu. The entire process and experience are simple and intuitive. If you have any questions or suggestions during use, please feel free to leave a message on the public account or raise an issue in the corresponding GitHub repository.





“Xianji Semiconductor” (HPMicro) is a semiconductor company dedicated to high-performance embedded solutions, with products covering microcontrollers and their supporting development tools and ecosystems. The company is headquartered in the Pudong Software Park in Shanghai, with branches in Tianjin, Suzhou, and Shenzhen, and has been selected for the 2025 Forbes Asia Top 100 Most Promising Companies list. Xianji Semiconductor prioritizes product quality, with all products undergoing rigorous reliability testing. Currently, eight series of high-performance general-purpose MCU products have been mass-produced, leading in performance and versatility compared to international counterparts and passing AEC-Q100 certification. The company has completed dual certification for ISO9001 quality management and ISO 26262/IEC61508 functional safety management systems, fully committed to serving the industrial automation, robotics, energy, and automotive markets in China and globally. For more information, please visit https://hpmicro.com/