The content of Guyueju focuses on ROS, but we should not limit ourselves to software. We also need to advance in hardware learning. So today, I am opening a new topic to learn about the ESP8266 step by step, and I will share some interesting projects I completed recently.
Here, I would like to thank Guyueju for giving me this opportunity to share with everyone.
Here we mainly use the ESP8266EX chip, which has a complete and self-contained Wi-Fi network function. It can operate independently or serve as a slave connected to other host MCUs.
The ESP8266EX integrates an antenna switch, RF balun, power amplifier, low noise amplifier, filter, and power management module. This compact design requires minimal external circuitry and can reduce the PCB size to a minimum.
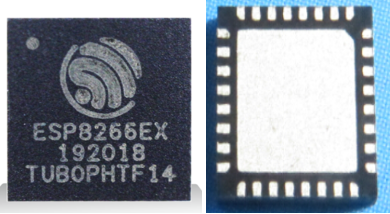
Illustration: ESP8266EX Package: QFN32
The ESP8266EX was developed by Espressif Systems, and the ESP8266 module was also developed by them.
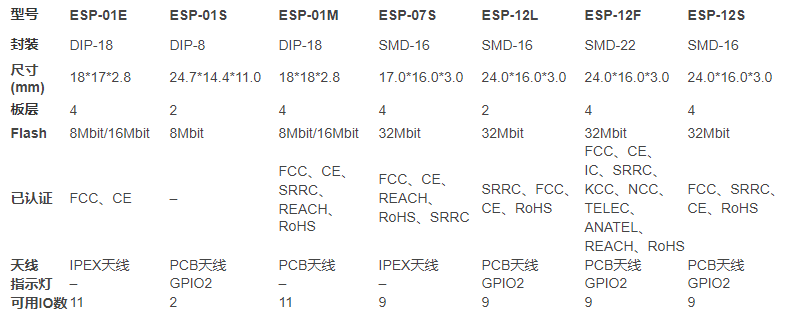
The ESP8266 module is developed by AiThinker, based on the ESP8266EX, optimizing the peripheral device layout and antenna for easy secondary development.
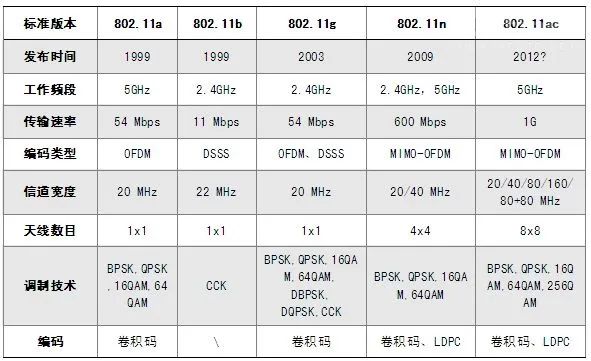
Supports 802.11 b/g/n (HT20)
802.11a/b/g/n refers to wireless network protocols, divided into 802.11a, 802.11b, 802.11g, 802.11n, etc. These different wireless protocols evolved from 802.11.
What does HT20 represent?
802.11n has two bandwidth modes: HT (High Throughput) 20 and HT 40.
HT20 refers to a 20MHz bandwidth in the network, while HT40 refers to a 40MHz bandwidth.
HT20 is used for compatibility: for example, if only 802.11b/g signals exist in an area, to minimize interference, it needs to be set to HT20 to reduce frequency overlap.
HT40 is for high performance: HT40 binds two adjacent 20MHz channels together to form a 40MHz channel, one as primary and the other as auxiliary. The primary channel sends beacon packets and some data packets, while the auxiliary channel sends other packets.
802.11n (2.4 GHz), speeds up to 72.2 Mbps
Here, I would like to annotate Mbps:
Mbps is equivalent to Mbit/s
Based on this calculation, the maximum speed given by the official source is 9MB/s
2 x Virtual Wi-Fi Interfaces
Virtual Wi-Fi is equivalent to a hotspot, allowing the creation of a separate network for other devices.
Beacon Auto Monitoring (Hardware TSF)
Supports Infrastructure Network (Infrastructure BSS) Station Mode/SoftAP Mode/Hybrid Mode
(1) SoftAP Mode (Soft Routing Mode)
(2) Station Mode (Client Mode)
(3) SoftAP + Station Coexistence Mode (Hybrid Mode)
-
The module can act as a router while connected to other devices, combining the applications of the above two modes, generally used in scenarios requiring network communication in a master-slave relationship.
Reasons for Choosing ESP8266
The ESP8266 chip costs about 5 RMB, while the module costs around 10 RMB. Some stores on Taobao have very low prices for ESP modules; I previously bought the ESP-12F for 5 RMB each. At such a low price, what more could you ask for?
Generally, Wi-Fi transmission distances are about 100 meters. However, an article released on the official WeChat of Espressif shared a test video from Germany’s AReResearch (on Youtube) using the NodeMCU development board, which showed that in open space, reliable connections can be maintained within 300m, and signal loss occurs beyond 400m.
This test video has circulated widely online, making many people who have never heard of or purchased the ESP8266 aware of its existence, greatly increasing its popularity.
3. Convenient Development Environment
There are many development environments for ESP8266 SDK. The official development environment configuration is relatively complex, but the integrated development environment ESP8266 IDE 2.0 produced by AiThinker simplifies it significantly. Later, Arduino IDE also supported ESP8266 (the author uses VScode for ESP8266 development, and I will explain why in the next issue).
On the other hand, its support for development languages is rich:
The NodeMCU project allows development of ESP8266 control programs using Lua.
The MicroPython project allows development of ESP8266 control programs using Python.
The Smart.js project allows development of ESP8266 control programs using Java.
Forth, LISP, Apple BASIC······
This further lowers the development threshold, allowing more software developers to join this industry.
Various suppliers have launched ESP8266 modules and boards, making applications quicker. For example, AiThinker has launched a series of ESP8266 modules with different functions, Seeed Studio’s Wio Link, and different solution providers have released ESP8266 development boards (like NodeMCU, etc.). Well-known makers abroad, such as Adafruit and SparkFun, have also released ESP8266 boards. Not to mention many engineers who have created their own ESP8266 modules and development boards.
5. Very Active Developer Community
Both official and unofficial developer communities are very active in sharing and discussing, and their abundant development resources are a testament to this. Espressif can gather more user demands through this active community to develop better products (the recently launched ESP32 Wi-Fi + Bluetooth dual-mode chip has caused a stir in the industry).
This chapter serves as the opening chapter for the ESP8266, where I aim to provide everyone with a wealth of knowledge and practical experience.I hope to contribute to the ESP8266 family.Next, let’s step into the world of ESP8266 based on Arduino development.
The Guyueju website has launched a forum function (guyuehome.com/forums). Everyone is welcome to ask questions and communicate in various sections. The next person to be replied to by Guyuejun could be you~
The Open Course “How to Get Started with Webots Robot Simulation Tool” has been updated!This course will guide everyone to understand this simulation tool and provide a brief comparison with Gazebo, giving you a reason to choose it! Finally, through two cases, we will help everyone familiarize themselves with the modeling ideas of Webots.
Free Course Registration! Scan the code to watch: