
New Intelligence Source Compilation
Author: Adrian Rosebrock
Translator: Rudolf
[New Intelligence Source Guide]The popular American drama “Silicon Valley” features characters creating an app that determines whether the input photo is “a hot dog” or “not a hot dog”. This article introduces how to run a deep neural network that recognizes Santa Claus on Raspberry Pi using Keras, with only 130 lines of code, successfully lighting up the Christmas tree and playing Christmas songs when Santa comes to your house! Give it a try~

Today’s article is a complete guide to running a deep neural network on Raspberry Pi using Keras.
I treat this project as a “Not Santa” detector, teaching you how to implement it practically (and have endless fun in the process).
In the first part, we will discuss what a “Santa detector” is (you may not be familiar with the “not hot dog” recognition app from the hit series “Silicon Valley”, but it has already been implemented).
Then, we will configure the Raspberry Pi for deep learning by installing TensorFlow, Keras, and some other dependencies.
Once the Raspberry Pi is set up for deep learning, we will continue to build a Python script that can:
-
Load Keras models from disk
-
Access the Raspberry Pi camera module/USB webcam
-
Apply deep learning to detect if Santa Claus is within the frame
-
If Santa is found, access the GPIO pin and play music
So let’s get started!

Figure 1: The “not hot dog” recognition app from HBO’s “Silicon Valley”
The “Not Santa” detector is inspired by HBO’s “Silicon Valley”. The characters created an app that determines whether the input photo is “hot dog” or “not hot dog”:
This show clearly mocks the startup culture of Silicon Valley in the USA:
-
The hype around machine learning and deep learning
-
Satirizing the countless mobile apps that are utterly useless (but the inventors believe their apps will “change the world”).
Today, we decided to create a “Not Santa” detector that can detect whether Santa Claus is in an image/video frame.
For those unfamiliar with Santa Claus, he is a jolly, overweight, white-bearded, fictional character from Western culture who delivers gifts to children on Christmas Eve.
However, our app is not entirely for fun and satire. We will learn some practical skills, including:
-
Configuring the Raspberry Pi for deep learning
-
Installing Keras and TensorFlow on the Raspberry Pi
-
Deploying a pre-trained convolutional neural network to your Raspberry Pi
-
Executing a given action once detected
But before we write the code, let’s talk about the hardware we need.

Figure 2: The “Not Santa” detector setup includes Raspberry Pi 3, speakers, a 3D Christmas tree, and a webcam, with Raspberry Pi implementing LeNet in Python script to detect Santa Claus.
To follow this tutorial, you will need:
-
Raspberry Pi 3 (strongly recommended Raspberry Pi 3 starter kit)
-
A Raspberry Pi camera module or a USB camera.
-
A 3D Christmas tree suitable for Raspberry Pi
-
A set of speakers
Of course, these are not all mandatory. As long as you have a Raspberry Pi + camera module/USB webcam, you can set everything up (but you must modify the code so that it does not try to access GPIO pins or play music through the speakers).
Your setup should be similar to Figure 2 above, connecting the speakers, 3D Christmas tree, and webcam together. I also recommend using an HDMI monitor + keyboard to test and debug the script:

Figure 3: My deep learning setup includes Raspberry Pi and components, along with a keyboard, mouse, and a small HDMI display. Once set up, I will surely catch Santa when he comes to my Christmas tree to leave gifts.

Regarding how to use Keras to train a convolutional neural network to determine whether Santa Claus is in the input image, you can refer to [1]:
We will use a pre-trained model and deploy it to the Raspberry Pi. As I mentioned earlier, the Raspberry Pi is not suitable for training neural networks. However, the Raspberry Pi can deploy trained neural networks (of course, the model needs to fit within a small memory footprint).
I assume you have already installed OpenCV on the Raspberry Pi. If not, you can check the tutorial in [2].
It is recommended to increase the swap space of the Raspberry Pi, which allows you to increase memory using the Raspberry Pi SD card (this is a crucial step when trying to compile and install large libraries on a memory-constrained Raspberry Pi).
To increase the swap space, open /etc/dphys-swapfile and edit the CONF_SWAPSIZE variable:

I increased the swap space from 100MB to 1024MB.Then, restart the swap server:

Note: Increasing swap space can easily burn out the storage card, so be sure to revert this change and restart the swap server once completed.
Then, we start configuring the development environment.
First, create a Python virtual environment named not_santa using Python 2.7:

Please note that the -p switch points to python2, indicating that Python 2.7 will be used for the virtual environment.
Also, make sure you have bound cv2.so to the not_santa virtual environment:

Similarly, confirm again that OpenCV has been compiled with Python 2.7 bindings, and carefully check the path of the cv2.so file in case the installation path differs from my demonstration.
If you compiled Python 3 + OpenCV bindings, created a sym-link, and tried to import cv2 into your Python shell, you would get a confusing traceback saying the import failed.
Important Note:For the next few pip commands, ensure you are in the not_santa environment, or you will install these packages into the system Python of the Raspberry Pi.
To enter the environment, simply use the workon command at the bash prompt:

Then, you will see “(not_santa)” at the beginning of the bash prompt.
Ensure to install NumPy in the not_santa environment using the following command:

Since we will access the GPIO pins of the project, we also need to install RPi.GPIO and gpiozero:

Now install TensorFlow on the Raspberry Pi. The problem is that there is no official (Google-released) TensorFlow distribution, so we have to compile TensorFlow from scratch on the Raspberry Pi, as referenced in [3].
Or we could use pre-compiled binaries by Sam Abrahams (available on GitHub [4]).
The issue is that there are only two types of pre-compiled TensorFlow binaries, one for Python 2.7 and the other for Python 3.4.
The Raspbian Stretch distribution comes with Python 3.5, so our version does not match. To avoid issues between Python 3.4 and Python 3.5, I decided to stick with installing Python 2.7.
Let’s continue and use the following command to install TensorFlow for Python 2.7:

Once TensorFlow is compiled and installed (which took me about an hour), we need to install HDF5 and H5py. These libraries will allow us to load pre-trained models from disk:

Finally, let’s install Keras and other dependencies required for this project:

To test your configuration, open a Python shell (in the not_santa environment) and execute the following command:

If everything goes as planned, you should see Keras imported using the TensorFlow backend.
As shown in the output above, you should also carefully check whether the OpenCV binding (cv2) can be imported.
Finally, don’t forget to reduce the swap space from 1024MB back to 100MB by:
-
Opening /etc/dphys-swapfile
-
Resetting CONF_SWAPSIZE to 100MB.
-
Restarting the swap server

Figure 5: Running deep learning models with Keras and Python on Raspberry Pi.
Now we are ready to write a Not Santa detector using Keras, TensorFlow, and Raspberry Pi. Again, I will assume your hardware setup is the same as mine; if not, you will need to modify the code below.
First, open a new file, name it not_santa_detector.py, and insert the following code:

Lines 2-12 handle the input, particularly:
-
keras: for preprocessing the input frames for classification and loading the pre-trained model from disk.
-
gpiozero: for accessing the 3D Christmas tree.
-
imutils: for accessing the video stream (whether from the Raspberry Pi camera module or USB).
-
threading: for non-blocking operations, especially when we want to light up the Christmas tree or play music without blocking the execution of the main thread.
Then, define a function to light up the 3D Christmas tree:

The light_tree function takes a tree parameter (set as a LEDBoard object).
First, we loop through all the LEDs in the tree and randomly light each LED to create a “twinkling” effect (lines 17-19).
We keep the lights on for a while (line 23), then loop through the LEDs again and turn them off (lines 26-28).
Here is an example of turning on the 3D Christmas tree lights:

Figure 6: The 3D Christmas tree for Raspberry Pi
When Santa is detected, the next step is to play music

In the play_christmas_music function, a system call to aplay command is made to play the music file just like from the command line.
Then, let’s hard-code the configuration we will use:

Lines 38 and 39 will hard-code the paths to the pre-trained Keras model and audio file. The download at the end can obtain the audio file.
Initialize parameters for detection, including TOTAL_CONSEC and TOTAL_THRESH. These two values represent the number of frames containing Santa Claus and the thresholds for playing music and lighting the tree, respectively (lines 43 and 44).
The final initialization is SANTA = False, a boolean (line 47). We will use the SANTA variable later in the script as a status flag.
Next, load the pre-trained Keras model and initialize the Christmas tree:

Keras allows us to save the model to disk for future use. The Not Santa model has already been saved to disk [1], so we load it onto the Raspberry Pi. Line 51 uses the Keras load_model function to load the model.
Line 54 instantiates the tree object. As shown, the tree is a LEDBoard object from the gpiozero package.
Then initialize the video stream:

To access the camera, use VideoStream from the imutils package
Important Note: If you want to use the PiCamera module (instead of a USB camera) in this project, simply comment out line 58 and uncomment line 59.
Sleep for two seconds to allow the camera to warm up (line 60), then start looping through the frames:

In line 63, we start looping through the video frames until a stop condition is met (to be shown later in the script).
First, obtain a frame by calling vs.read (line 66).
Then resize the frame to width= 400, maintaining the aspect ratio (line 67). Preprocess this frame before feeding it into the neural network model. Later, we will display the frame along with the text label.
Then preprocess the image and make predictions using Keras + deep learning model:

Lines 70-73 preprocess the image and prepare it for classification. Then, we query model.predict with the image as a parameter. This sends the image to the neural network, returning a tuple containing class probabilities (line 77).
We initialize the label as “Not Santa“, and the probability proba is initialized with the value of notSanta in lines 78 and 79.
Let’s see if Santa is in the image:
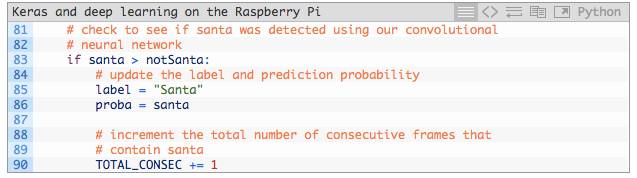
In line 83, we check if the probability of Santa is greater than notSanta. If so, we continue to update label and proba, then increment TOTAL_CONSEC (lines 85-90).
If enough consecutive “Santa” frames are provided, we need to trigger the Santa alert:

If SANTA is False, and TOTAL_CONSEC reaches the TOTAL_THRESH threshold, two actions need to be performed:
-
Create and start a treeThread to blink the Christmas tree lights (lines 98-100).
-
Create and start a musicThread to play music in the background (lines 103-106).
These threads will run independently without stopping the forward execution of the script (i.e., non-blocking operations).
In line 95, we set our SANTA status flag to True, meaning we found Santa in the input frame. In the next loop of the loop, we will check this value as in line 93.
Otherwise (if SANTA is True or TOTAL_THRESH is not met), we will reset TOTAL_CONSEC to zero and reset SANTA to False:

Finally, we display the frame on the screen with the generated text label:

The value of the probability is appended to the label containing “Santa” or “Not Santa” (line 115).
Then using OpenCV’s cv2.putText, we can display the label at the top of the frame (in Christmas-themed green), and then display the frame on the screen (lines 116-120).
The exit condition for the infinite while loop is pressing the “q” key on the keyboard (lines 121-125). If the exit condition of the loop is met, break and perform some cleanup in lines 129 and 130 before exiting the script.
Done!
Looking back at these 130 lines of code, this framework/template can also be easily used for other deep learning projects on Raspberry Pi.
Now, let’s catch that jolly, bearded 🎅!

Figure 7: Me, Adrian Rosebrock, dressed as Santa Claus. I will personally test the “Not Santa” detector built using deep learning, Keras, Python, and OpenCV.
Then, I pointed the camera at the Raspberry Pi on the Christmas tree in the living room:

Figure 8: The Christmas tree will serve as the backdrop for testing the Not Santa deep learning model already deployed on Raspberry Pi.
If Santa comes to deliver gifts to my good kids, I want to ensure he is welcomed with blinking 3D Christmas tree lights and Christmas songs.
Then, I used the following command to start the Not Santa deep learning + Keras detector:
|
1 |
$python not_santa_detector.py |
Once the Not Santa detector is started and running, I will take action:
Dear Santa 🎅: If you read this, know that I will find you with the Raspberry Pi!
References:
[1]https://www.pyimagesearch.com/2017/12/11/image-classification-with-keras-and-deep-learning
[2]https://www.pyimagesearch.com/2017/10/09/optimizing-opencv-on-the-raspberry-pi
[3]https://github.com/samjabrahams/tensorflow-on-raspberry-pi/blob/master/GUIDE.md
[4]https://github.com/samjabrahams/tensorflow-on-raspberry-pi
Original article link: https://www.pyimagesearch.com/2017/12/18/keras-deep-learning-raspberry-pi/
