Abstract
QT, as a cross-platform application development framework, has always been the top choice for Linux user interface development. Since its inception in 1991, QT has been acquired multiple times, but its features for cross-platform development and support for multiple platforms have only increased. This article is an excerpt from a technical post by enthusiastic user HelloWii on Electronic Enthusiasts, shared for those planning to learn QT.
Today, I tinkered with Qt.
First, let’s share some information from Baidu Encyclopedia:
Qt is a cross-platform C++ graphical user interface application development framework developed by Trolltech in 1991. It can develop both GUI and non-GUI applications, such as console tools and servers. Qt is an object-oriented framework that uses special code generation extensions (called Meta Object Compiler, moc) and some macros, making it easy to extend and allowing component programming.
In 2008, Trolltech was acquired by Nokia, and QT thus became a programming tool under Nokia.
In 2012, Qt was acquired by Digia. In April 2014, QT achieved full support for iOS, added plugins like WinRT and Beautifier, discontinued GDB debugging support without Python interface, integrated Clang-based C/C++ code modules, and adjusted support for Android, thus achieving comprehensive support for Linux, iOS, Android, and WP.
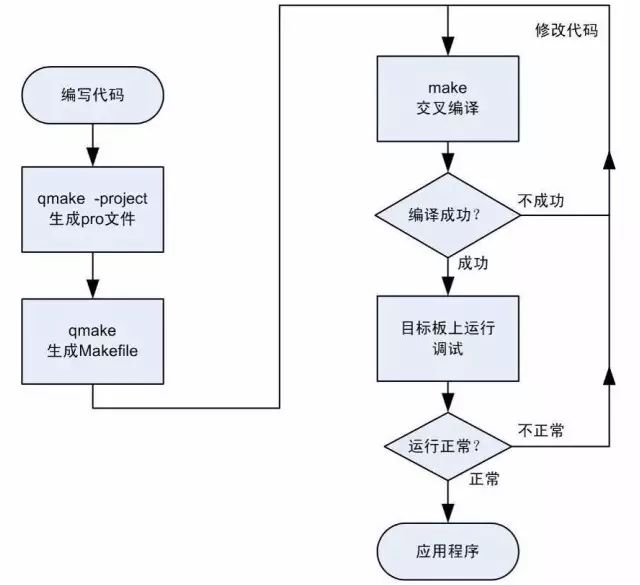
Back to the main topic, the programming flowchart for Qt is as follows:
The first Helloworld development process:
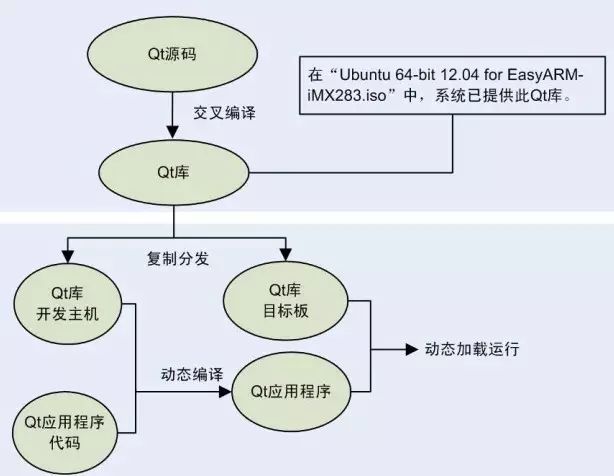
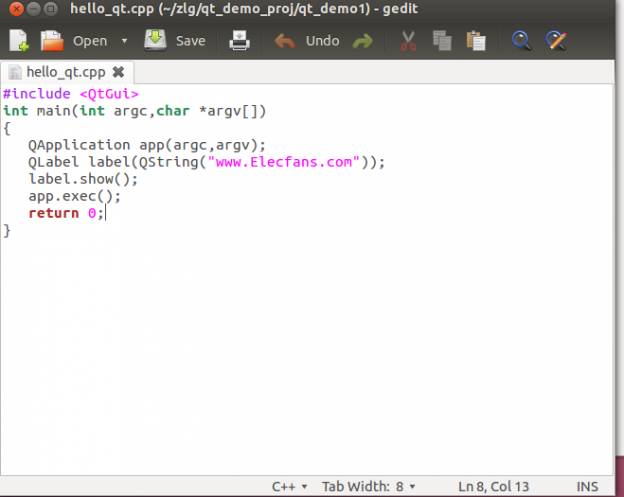
First, configure the development environment, refer to official materials (such as the EasyARM-i.MX283A Linux Development Guide), and write the hello_qt.cpp program as follows:
Copy hello_qt.cpp to ~/zlg/qt_demo_proj/qt_demo1 directory, and run the following command to generate the hello_qt.pro file:
$ qmake –project
The hello_qt.pro file describes the source code and corresponding resource files included in the entire project, and qmake is the project management tool used in Qt. Executing the qmake command will generate a makefile based on the previous pro file.
$ qmake
Executing the make command according to the makefile will compile an executable program. In the future, when recompiling, you only need to execute the last step, which is the make command.
$ make
After the above steps, you will find the hello_qt file in the qt_demo1 directory, which is the executable Qt program.
Download the hello_qt file to the /root/ directory of the development kit using nfs or other methods, then log in to the Linux system of the development kit through the serial terminal, and start the program using the following command.
# ./hello_qt -qws
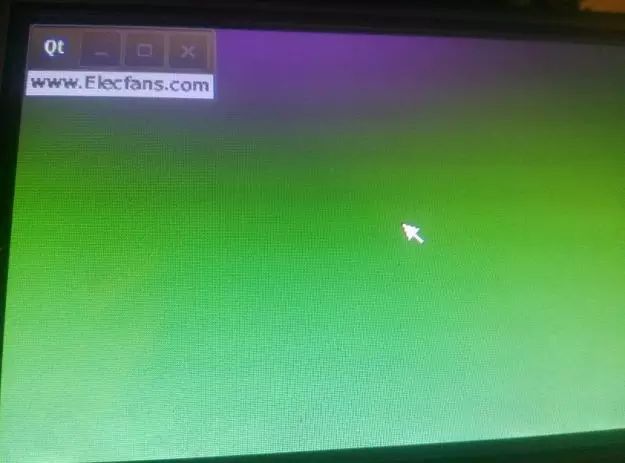
Thus, the demonstration of the Helloworld development process based on QT is complete, and it really is as simple as imagined!
Further Reading:
“EasyARM-i.MX283A Practical Guide to Serial Login in Windows Environment”
“EasyARM-i.MX283A Practical Guide to Serial Login in Windows Environment”
“Entering the Journey of Embedded Linux Development”
 EasyARM-i.MX283A Development Kit
Contact Information
-
Sales Phone: 400-888-4005 ext 1
-
Technical Support Phone: 400-888-4005 ext 2
ZhiYuan Electronics (ID: ZLG_zhiyuan )
Haven’t followed ZhiYuan Electronics yet? You will miss out on daily valuable content! You will miss a history that subverts foreign brands! Sometimes you want to prove something to ten thousand people, but in the end, you realize you only got one understanding person, and that is enough. Are you the congee we have been looking forward to? Our WeChat ID: ZLG_zhiyuan.