Click the above “Linux Notes”, select “Pin/Star the Official Account”
Welfare and valuable content delivered promptly
- Introduction
- Environment of this article
- Real-Time Kernel
- Main Features
- What the patches do
- Installing and using the real-time patch
- Verifying the real-time kernel
- Performance without real-time kernel patch under no load
- Performance without real-time kernel patch under full load CPU stress
- Performance with real-time kernel patch under no load
- Performance with real-time kernel patch under full load CPU stress
- Application scenarios of the real-time kernel
- Conclusion
Introduction
The Linux kernel real-time patch (Real-Time Patch, commonly referred to as <span>PREEMPT-RT</span> or <span>RT</span> patch) is designed to provide real-time performance for the Linux kernel. It reduces kernel latency, increases predictability, and improves responsiveness, enabling Linux systems to meet the demands of time-sensitive applications such as industrial control, audio processing, robotics, etc.
Environment of this article
Hardware platform: Feilin OK3588 development board
Kernel source: 5.10.66-rt53
Compilation environment: Ubuntu 20.04 LTS
Compilation toolchain: aarch64-linux-gnu-
Real-Time Kernel
Main Features
-
Low Latency: The RT patch allows the kernel to respond more quickly to external events, reducing system response time and processing latency.
-
High Priority Scheduling: Provides higher priority scheduling for real-time tasks, ensuring critical tasks can be completed within the expected time.
-
Preemption Support: Enhances the kernel’s preemption capability, allowing real-time tasks to interrupt other tasks at any time, especially long-running kernel code.
-
Lock Optimization: Optimizes the use of kernel locks, reducing lock contention and critical section time.
-
Better Thread Handling: Improves scheduling strategies for real-time threads to better support high-priority tasks.
What the patches do
- High-resolution timers: Reduce precision errors, achieving precise nanosecond-level delays. Linux Driver Basics | Usage of High-Resolution Timers
- Interrupt threading: Uses kernel threads to execute interrupt handlers, preventing real-time tasks from being preempted by interrupts.
- Spinlock
<span>spinlock_t</span>changed to real-time mutex<span>rt_mutex</span>: The critical section protected by spinlock<span>spinlock_t</span>is non-preemptive, causing real-time processes to not be scheduled in a timely manner. The real-time kernel uses real-time mutex<span>rt_mutex</span>to implement spinlocks, allowing preemption in critical sections, thus enabling priority inheritance and avoiding priority inversion issues, making it more suitable for real-time applications.
Let’s supplement the concepts of priority inheritance and priority inversion.
What is the priority inversion problem?
Assume process 1 has a low priority, and process 2 has a high priority. Process 1 holds a mutex, and process 2 requests the mutex. Since process 1 already holds the mutex, process 2 must sleep and wait, causing the high-priority process 2 to wait for the low-priority process 1. If process 2 is a real-time process, it will affect the real-time performance of process 2.
If there is a process 3 with a priority between processes 1 and 2, the situation worsens. Assume process 1 still holds the mutex, and process 2 is waiting. Process 3 starts running because its priority is higher than process 1, causing process 1 to hold the mutex longer, extending the wait time for process 2.
What is priority inheritance?
Priority inheritance can solve the priority inversion problem. If a low-priority process holds a mutex and a high-priority process requests the mutex, then the priority of the process holding the mutex is temporarily raised to the priority of the requesting process. In the above example, the priority of process 1 is temporarily raised to that of process 2, preventing process 3 from preempting process 1, allowing process 1 to complete the critical section quickly, thus reducing the wait time for process 2.
The real-time mutex (<span>rt_mutex</span><code><span>) implements priority inheritance. The waiters for the lock are sorted by priority from high to low, </span><strong><span>if the priorities are equal, then the process that requested the lock first has a higher priority. If the process holding the lock has a lower priority than the highest priority waiter, its priority is temporarily raised to that of the highest priority waiter.</span></strong>
Installing and using the real-time patch
To use the real-time patch, you typically need to:
- Download the kernel source code: Obtain the source code for the kernel version you wish to patch.
wget https://www.kernel.org/pub/linux/kernel/vX.Y/linux-X.Y.Z.tar.xz
-
Download the RT patch: Download the patch that matches your kernel version from the official RT patch website.
RT patches can usually be found at https://www.kernel.org/pub/linux/kernel/projects/rt/.
-
Apply the patch:
tar -xf linux-X.Y.Z.tar.xz
cd linux-X.Y.Z
patch -p1 < /path/to/patch-rt-X.Y.Z.patch
-
Configure the kernel:
Run the following command in the kernel source directory to configure kernel options:
make menuconfig
In the configuration menu, you can enable real-time options. Ensure that the <span>Preemption Model</span> option is enabled and select the appropriate real-time options.
- Compile and flash the kernel:
Compile the kernel
make
Flash the kernel
./upgrade_tool di -b boot.img
- Reboot the system: Reboot the system to use the new kernel.
Verifying the real-time kernel
You can check the currently running kernel version using the <span>uname</span> command:
uname -r
If the kernel is a real-time kernel, the version number usually contains the <span>-rt</span> suffix.

cyclictest test
<span>cyclictest</span> is a very popular and common real-time testing tool on Linux, which measures the delay between two time points using high-precision timers.
Install <span>cyclictest</span>
git clone git://git.kernel.org/pub/scm/utils/rt-tests/rt-tests.git
cd rt-tests
git checkout stable/v1.0
make all
make install
We will first verify three scenarios using the <span>cyclictest</span> tool on the unpatched version: no load, full load stress, and Wi-Fi streaming, and then verify these three scenarios again on the version with the real-time patch.
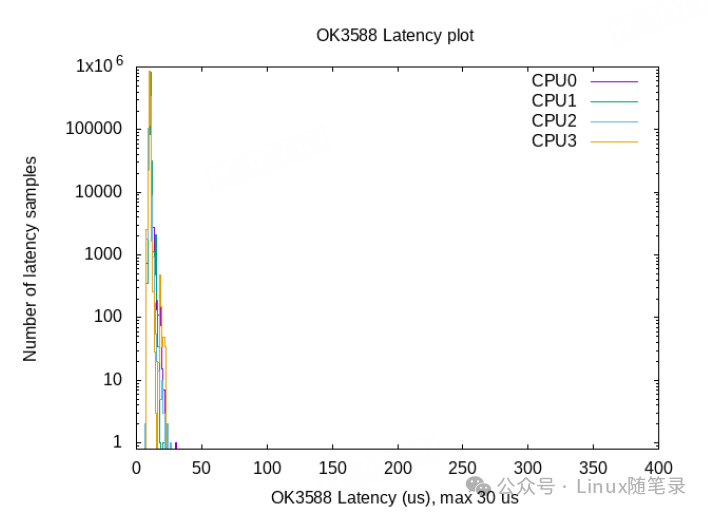
Performance without real-time kernel patch under no load
First, set each CPU’s <span>cpufreq</span> to <span>performance</span>
echo performance > /sys/devices/system/cpu/cpu0/cpufreq/scaling_governor
echo performance > /sys/devices/system/cpu/cpu1/cpufreq/scaling_governor
echo performance > /sys/devices/system/cpu/cpu2/cpufreq/scaling_governor
echo performance > /sys/devices/system/cpu/cpu3/cpufreq/scaling_governor
echo performance > /sys/devices/system/cpu/cpu3/cpufreq/scaling_governor
echo performance > /sys/devices/system/cpu/cpu4/cpufreq/scaling_governor
echo performance > /sys/devices/system/cpu/cpu5/cpufreq/scaling_governor
echo performance > /sys/devices/system/cpu/cpu6/cpufreq/scaling_governor
echo performance > /sys/devices/system/cpu/cpu7/cpufreq/scaling_governor
Then use the <span>cyclictest</span> tool to measure real-time performance
cyclictest -l 1000000 -m -Sp99 --policy=fifo -h 25000 -q >output-kong-nort
Parameter explanation:
-
<span>-l 1000000</span>: Sets the number of loops for the thread to 1,000,000. This means<span>cyclictest</span>will execute 1,000,000 test loops. -
<span>-m</span>: Indicates that the test runs in real-time mode and allows the program to print more detailed information, usually used for monitoring and debugging real-time performance. -
<span>-Sp99</span>: Sets the thread’s priority to 99 and uses the real-time scheduling policy SCHED_FIFO.<span>-S</span>sets the thread’s scheduling policy, where<span>p99</span>indicates a priority of 99. -
<span>--policy=fifo</span>: Explicitly sets the scheduling policy to FIFO (First In, First Out). This is a real-time scheduling policy suitable for tasks with strict latency requirements. -
<span>-h 25000</span>: Sets the thread’s call interval to 25,000 microseconds (25 milliseconds). This means the thread executes every 25 milliseconds. -
<span>-q</span>: Indicates that the test runs in silent mode, without outputting debug information, only outputting the test results.
In summary: This creates a real-time thread with high priority (99) and FIFO policy, looping 1,000,000 times, with a 25-millisecond interval between executions, and writes the results to the file <span>output-kong-nort</span>.
Then use the <span>run_cyclictest.sh</span> script to generate result statistics
#!/bin/bash

# 1. Run cyclictest

# 2. Get maximum latency
max=`grep "Max Latencies" output | tr " " "\n" | sort -n | tail -1 | sed s/^0*//`

# 3. Grep data lines, remove empty lines and create a common field separator
grep -v -e "^#" -e "^$" output | tr " " "\t" >histogram

# 4. Set the number of cores, for example here I set 4 cores
cores=4

# 5. Create two-column data sets with latency classes and frequency values for each core, for example
for i in `seq 1 $cores`
do
  column=`expr $i + 1`
  cut -f1,$column histogram >histogram$i
done

# 6. Create plot command header
echo -n -e "set title \"Latency plot\"\n\
set terminal png\n\
set xlabel \"Latency (us), max $max us\"\n\
set logscale y\n\
set xrange [0:400]\n\
set yrange [0.8:*]\n\
set ylabel \"Number of latency samples\"\n\
set output \"plot.png\"\n\
plot " >plotcmd

# 7. Append plot command data references
for i in `seq 1 $cores`
do
iftest$i != 1
then
    echo -n ", " >>plotcmd
fi
  cpuno=`expr $i - 1`
iftest$cpuno -lt 10
then
    title=" CPU$cpuno"
   else
    title="CPU$cpuno"
fi
echo -n \"histogram$i\" using 1:2 title \"$title\" with histeps" >>plotcmd
done

# 8. Execute plot command
gnuplot -persist <plotcmd
Executing <span>./run_cyclictest.sh output-kong-nort</span> will generate <span>plot.png</span> in the same directory
Open the plot.png file as shown below
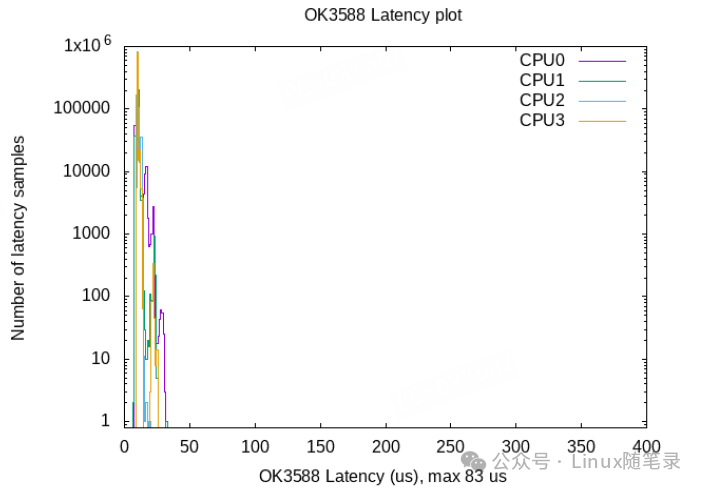
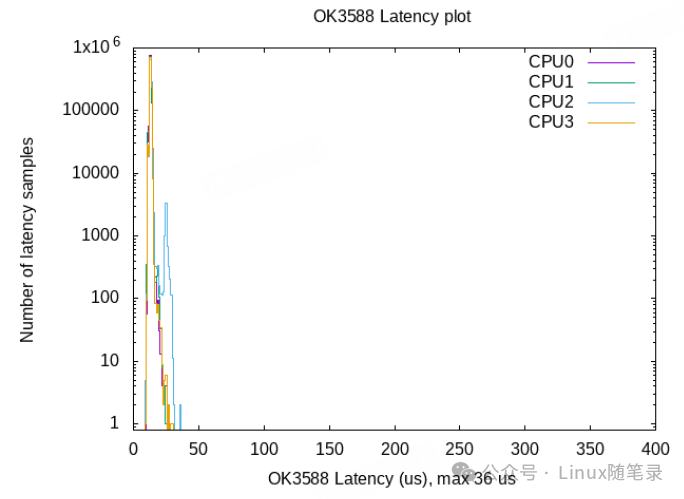
Performance without real-time kernel patch under full load CPU stress
First, set each CPU’s <span>cpufreq</span> to <span>performance</span>
echo performance > /sys/devices/system/cpu/cpu0/cpufreq/scaling_governor
echo performance > /sys/devices/system/cpu/cpu1/cpufreq/scaling_governor
echo performance > /sys/devices/system/cpu/cpu2/cpufreq/scaling_governor
echo performance > /sys/devices/system/cpu/cpu3/cpufreq/scaling_governor
echo performance > /sys/devices/system/cpu/cpu3/cpufreq/scaling_governor
echo performance > /sys/devices/system/cpu/cpu4/cpufreq/scaling_governor
echo performance > /sys/devices/system/cpu/cpu5/cpufreq/scaling_governor
echo performance > /sys/devices/system/cpu/cpu6/cpufreq/scaling_governor
echo performance > /sys/devices/system/cpu/cpu7/cpufreq/scaling_governor
To run a stress test, you can use <span>stress</span> or <span>stress-ng</span>. I personally recommend using <span>stress-ng</span> because the former is a good choice for simple and quick stress testing without complex setup, while the latter offers more flexibility, more testing options, and more complex testing scenarios.
Before using <span>stress-ng</span>, install it first
sudo apt-get install stress-ng
After installation, run the stress test
stress-ng -c 8 --cpu-method fft --timerfd-freq 1000000 -t 24h &
Parameter explanation:
-
<span>stress-ng</span>: Indicates that you are using the<span>stress-ng</span>tool, which is a powerful tool for stress testing. -
<span>-c 8</span>: This option specifies the number of CPU load threads to use. In this example,<span>8</span>indicates that 8 threads will be started to apply CPU load. Generally, you should choose an appropriate number of threads based on the number of CPU cores in the system to fully utilize system resources. -
<span>--cpu-method fft</span>: This parameter specifies the CPU load testing method used.<span>fft</span>stands for Fast Fourier Transform, which is a compute-intensive algorithm suitable for CPU stress testing. -
<span>--timerfd-freq 1000000</span>: This option sets the timer frequency in nanoseconds.<span>1000000</span>nanoseconds equals 1 millisecond, this parameter adjusts the scheduling frequency of the load task to perform calculations more frequently. -
<span>-t 24h</span>: This option sets the duration of the stress test. In this example,<span>24h</span>indicates that the test will last for 24 hours.
In summary, this executes a 24-hour CPU stress test using 8 threads and the Fast Fourier Transform method.
In the background, you can see that each CPU is fully utilized 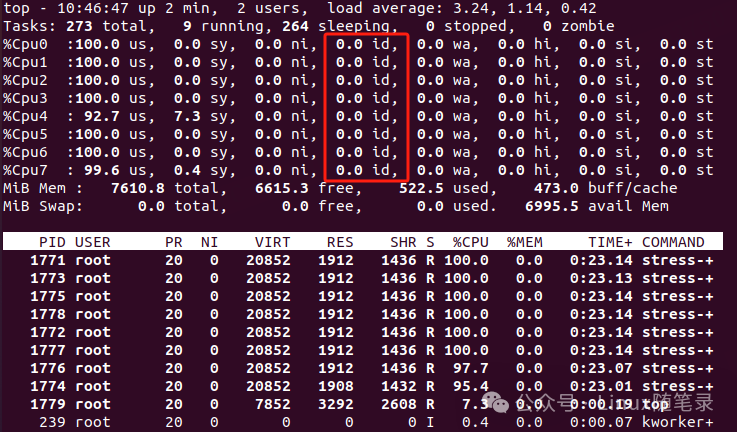
Next, you can use the <span>cyclictest</span> tool to measure real-time performance
cyclictest -l 1000000 -m -Sp99 --policy=fifo -h 25000 -q >output-cpu-nort
In summary: This creates a real-time thread with high priority (99) and FIFO policy, looping 1,000,000 times, with a 25-millisecond interval between executions, and writes the results to the file <span>output-cpu-nort</span>.
Executing <span>./run_cyclictest.sh output-cpu-nort</span> will generate <span>plot.png</span> in the same directory
Open the plot.png file as shown below
Performance with real-time kernel patch under no load
First, set each CPU’s <span>cpufreq</span> to <span>performance</span>
echo performance > /sys/devices/system/cpu/cpu0/cpufreq/scaling_governor
echo performance > /sys/devices/system/cpu/cpu1/cpufreq/scaling_governor
echo performance > /sys/devices/system/cpu/cpu2/cpufreq/scaling_governor
echo performance > /sys/devices/system/cpu/cpu3/cpufreq/scaling_governor
echo performance > /sys/devices/system/cpu/cpu3/cpufreq/scaling_governor
echo performance > /sys/devices/system/cpu/cpu4/cpufreq/scaling_governor
echo performance > /sys/devices/system/cpu/cpu5/cpufreq/scaling_governor
echo performance > /sys/devices/system/cpu/cpu6/cpufreq/scaling_governor
echo performance > /sys/devices/system/cpu/cpu7/cpufreq/scaling_governor
Then use the <span>cyclictest</span> tool to measure real-time performance
cyclictest -l 1000000 -m -Sp99 --policy=fifo -h 25000 -q >output-kong-nort
In summary: This creates a real-time thread with high priority (99) and FIFO policy, looping 1,000,000 times, with a 25-millisecond interval between executions, and writes the results to the file <span>output-kong-nort</span>.
Then use the <span>run_cyclictest.sh</span> script to generate result statistics, executing <span>./run_cyclictest.sh output-kong-nort</span> will generate <span>plot.png</span> in the same directory
Open the plot.png file as shown below
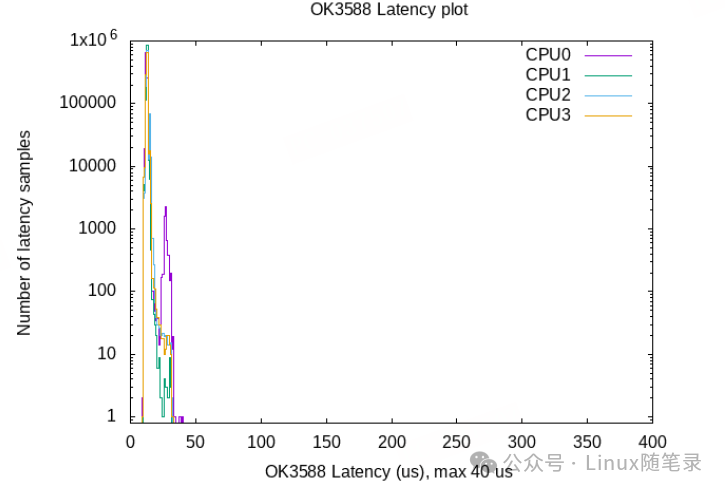
Performance with real-time kernel patch under full load CPU stress
First, run the stress test
stress-ng -c 8 --cpu-method fft --timerfd-freq 1000000 -t 24h &
In summary, this executes a 24-hour CPU stress test using 8 threads and the Fast Fourier Transform method.
In the background, you can see that each CPU is fully utilized
Then run the <span>cyclictest</span> tool to measure real-time performance
cyclictest -l 1000000 -m -Sp99 --policy=fifo -h 25000 -q >output-cpu-nort
In summary: This creates a real-time thread with high priority (99) and FIFO policy, looping 1,000,000 times, with a 25-millisecond interval between executions, and writes the results to the file <span>output-cpu-nort</span>.
Executing <span>./run_cyclictest.sh output-cpu-nort</span> will generate <span>plot.png</span> in the same directory
Open the plot.png file as shown below
The results will show that whether under no load or full CPU stress, the maximum latency tested with the real-time kernel patch is lower than that without the real-time kernel patch. You can also try the maximum latency effects during Wi-Fi streaming TX and RX.
Application scenarios of the real-time kernel
The real-time kernel is very suitable for the following scenarios:
- Industrial Automation: Used for controlling and monitoring industrial equipment, ensuring fast response times.
- Audio Processing: Used for real-time audio processing and digital signal processing (DSP), reducing audio latency.
- Robotics: Ensures quick responses to sensors and actuators in robotic systems.
- Network Communication: Ensures low-latency packet processing in time-sensitive network applications.
However, with the continuous advancement of semiconductors, multi-core heterogeneous AMP chips have emerged, and mainstream solutions now run both Linux and RTOS dual systems, with real-time tasks running on the RTOS cores and non-real-time tasks running on the Linux cores. Examples include <span>STM32MP157</span> and <span>RK3506</span> chip solutions.
Conclusion
This article has taught us how to ensure real-time performance in Linux systems. If you have any questions, feel free to leave a comment. For those who have learned from this article, please give a thumbs up! Follow the official account [Linux Notes] for periodic sharing of Linux tips.
References:
- https://wiki.linuxfoundation.org/realtime/documentation/howto/tools/cyclictest/start
- https://blog.csdn.net/gufuguang/article/details/128017756
end
Previous recommendations
Essential reading for learning embedded systems
My Linux driver learning path
1V1 paid consultation
What websites do embedded experts usually browse?
Ten projects recommended for fresh graduates to include in their resumes