Click on the “Microcontroller” above, then click the top right corner… select “Pin/Star“Public Account to receive the latest articles!


Hello friend! My name is Nikolas, I am 15 years old, living in Athens, Greece. Today, I will show you how to use Arduino Nano, a 3D printer, and some simple electronic components to create a 2-wheeled Bluetooth controlled car! If you like, be sure to watch my demo video later to see the car in action and follow the instructions there!
Motivation
When I was 9 years old, my father brought me some batteries, a switch, and a small bulb to play with, which got me excited about learning basic electronics. At that time, with my father’s help, I made my first car, which was very simple. It was made from an old phone box, on which we mounted four DC motors, with some wheels from a toy car, powered by a few AA batteries, and could only move forward, but I felt very proud and happy at 9 years old. Over the next few years, I created many projects and toy cars. At one point, I set a goal for myself to make a remote-controlled car, which might seem easy to you, but based on my past experiences, it was beyond my reach. However, when the pandemic broke out last spring and we went into lockdown, I got in touch with more complex electronics, and around April, I achieved my goal of making a car based on Arduino Uno that could be controlled via an IR remote! Then, I set my goal to make a car that could be controlled via Bluetooth from a smartphone.
Materials List:
This is a list of necessary components
-
Arduino Nano
-
2 x 200RPM N20 Micro Motors
-
DRV8833 Motor Driver
-
HC-06 (Bluetooth Module)
-
18650 Lithium Battery
-
Battery Holder
-
11mm x 6mm Slide Switch
-
M3 Screws (10mm) and Nuts
-
Some Wires
-
4 x Regular Rubber Bands
-
Soldering Iron
-
3D Printer
-
Some Filament (I used Prusament PETG)
Step 1: 3D Printing


I designed the 3D files myself using Onshape. You will need to print the base and two wheels. I printed all parts in Prusament Gold PETG on Creality Ender 3 V2 with a layer height of 0.2mm and 40% infill.
You can find the .stl files here:Thingiversehttps://www.thingiverse.com/thing:4683747

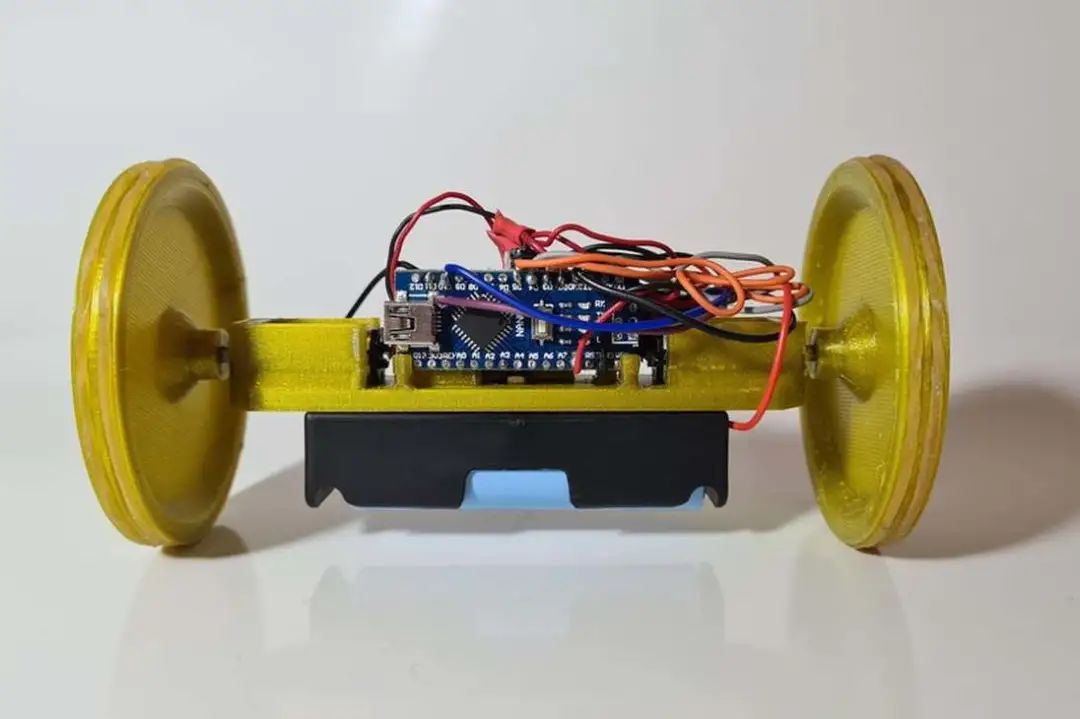
Step 2: Circuit


It’s time to make the circuit! So now place the Arduino Nano, DRV8833, and HC-06 on the breadboard.
-
Connect the HC-06 and DRV8833’s VCC to 5V
-
Connect the HC-06 and DRV8833’s GND to GND
-
Connect TXD to D10
-
Connect RXD to D11
-
Connect INT1, INT2, INT3, INT4 to D2, D3, D4, D5 respectively
-
Connect the first motor’s cable to OUT1 and OUT2
-
Connect the second motor’s cable to OUT3 and OUT4
-
Connect the battery’s ” + ” to 5V, and ” – ” to GND (if needed, you can now add the slide switch to the ” +”)
Step 3: Programming

Let’s upload the code to the Arduino Nano! Just connect it to the computer using a USB cable, then open the “BluetoothCar.ino” file in the Arduino IDE. Make sure the options in the “Tools” tab are the same as in the image above, and select the correct COM port. Click “Upload” and you are good to go!
Attachments
-
Bluetooth Car
Step 4: Bluetooth App


Now it’s time to test if our circuit and program work as expected. I created my own Android app program using MIT App Inventor, which is a simple program that lets you easily create Android apps! You can install the app on your Android phone by downloading the “BluetoothController.apk” below. If you like, you can find other options in the Play Store and App Store, but I did this because the car only moves when your finger presses the button, which is a feature I really like.
The first time you connect to the Bluetooth module, you need to turn on Bluetooth on your device and then find the device named ” HC-06 ” and connect to it using the password ” 1234 ” or ” 0000 “. Then go to the app and click the “Bluetooth” button, then select HC-06. Now you have successfully connected the car to your smartphone, and you can control the motors through the app!
Attachments
-
Bluetooth Controller.apk (https://appinventor.mit.edu/)
Step 5: Assembly


Now, you should solder the electronics and prepare to assemble the car!
-
Twist the 18650 battery holder onto the base and add nuts
-
Push the two motors into place
-
Install the slide switch into place
-
Install the DRV8833 motor driver into place
-
Install the Arduino Nano into place
-
Slide the HC-06 into place
-
Add the 18650 battery into its holder
-
Push the two wheels onto the motor shafts
-
Last but not least, add 2 rubber bands on each wheel
Step 6: Enjoy your creation!
Well done! Now turn it on, connect it with your Android app, and have fun!
If you like it, please like, share it to your friends, and follow the steps below to get the code and document resources for this article!
Type the keywords you are interested in the public account dialog window to automatically return the results.
Instructions for material purchase and resource download
(For the materials mentioned in the text with purchase links, please click the bottom left corner: Read the original text to view the original text.)
Resource Identifier:DIY-Arduino-Bluetooth-Controlled-Car
First, open this link in WeChat, copy the red part after “Resource Identifier:” above,
Second, click the link below to follow the “Microcontroller” public account, enter the public account dialog window,
Third, reply to the copied red content above, the public account will automatically return the download link!
Fourth, click the three dots in the top right corner of the blank page in WeChat to open it in a browser; or click the link on your PC.
Recommended Good Articles Click the title to jump
☞《Must-read for Microcontroller Beginners》
☞《Words from Zhou Ligong to Young People Learning Microcontrollers》
☞《Experts Discuss: The Difficulty of Software and Hardware Entry and Mastery Time Span》
☞《Feelings on Learning 51 Microcontrollers; Recommended Learning Materials; Essential Programs to Write》
☞《Comparison of Several Microcontrollers Used》
☞《ARM+LINUX Learning Path (Learning Order, Knowledge Points, and Book Recommendations) 》
☞《Differences and Connections between ARM/DSP/FPGA/CPLD/SOPC/SOC》
☞《Interesting Electronic Production: Food Power Generation in the Hands of Artists – Electronic DIY》
☞《My Experience: From a Production Line Worker to a Microcontroller Engineer》
☞《Things Hardware Engineers Should Learn》
☞《Insights on Learning 51 Microcontroller: Understanding One Leads to All》
☞《Dynamic Diagrams of Working Principles of Various Sensors, Isn’t This Complete?》
☞Beware! If any of these apply, your phone may be monitored☞《This little thing is actually a generator? Make one yourself and you won’t be afraid of power outages》☞《Collection of DIY Websites and Electronic Websites Abroad (Various Strange High-energy Projects)》☞《What Apps Do Electronic Engineers Use?》☞《A Diagram Understanding Programmers’ Career Planning》☞《10 Easy Arduino Projects to Get Started》☞《When Charging, Should You Plug in the Phone or the Power First?》
☞《The Truth of Learning Analog Electronics》☞《7 Mechanical Principles Experiments Every Boy Should Learn to Flirt》
 Welcome to forward, leave a message, like, share, thank you for your support!