Introduction

ENV is a development assistant tool launched by RT-Thread, designed for projects based on the RT-Thread operating system. It provides a compilation build environment, graphical system configuration, and software package management functions. The built-in menuconfig offers a simple and easy-to-use configuration trimming tool, allowing for flexible trimming of the kernel, components, and packages, enabling the system to be constructed in a modular fashion.
-
The Xianji RT-Thread BSP v1.10.0 not only supports application development based on RT-Thread Studio but also supports generating different toolchains and IDEs for application development through RT-Thread ENV.
-
This article describes how to develop RT-Thread applications on Windows using the following toolchains via RT-Thread ENV, including:
Generating a gcc toolchain compilation project using RT-Thread ENV
Generating a zcc toolchain compilation project using RT-Thread ENV
Generating a Segger Embedded Studio project using RT-Thread ENV
1. Environment Setup
1.1 Software Installation
-
Download and install the Segger Embedded Studio IDE from the official Segger website. Link: https://www.segger.com/downloads/embedded-studio/, select the latest version of Embedded Studio for Arm and RISC-V. It is recommended to install it in a directory without Chinese characters or spaces.
–Apply for a License at the following link (skip this step for non-commercial use): https://license.segger.com/hpmicro.cgi
-
Set up and install RT-Thread ENV according to https://www.rt-thread.org/document/site/#/development-tools/env/env . It is recommended to read the section on opening the Env console through the right-click menu in the Usage of Env.
–Note: The Xianji RT-Thread BSP v1.10 is developed based on RT-Thread v5.0.2, and RT-Thread Env v1.5.2 must be used for development. When downloading the official RT-Thread env_release from the cloud, select env-windows-v1.5.2.7z
1.2 Installation of Related Compilation Toolchains
Download the RISC-V gcc toolchain
-
Download link:
https://github.com/helloeagleyang/riscv32-gnu-toolchain-win/archive/2022.04.12.zip or https://gitee.com/hpmicro/riscv-gnu-toolchain/releases/download/2022.04.12/riscv32-gnu-toolchain-win-2022.04.12.7z
-
Extract to a directory without Chinese characters or spaces, and remember the path to the bin directory.
-
If you do not want to use the gcc toolchain, you can ignore this step if you only use Segger Embedded Studio.
Download the zcc toolchain
-
Download the zcc toolchain from the official website of Zhaosong Technology, version 4.0.0 or higher.
-
Download link: https://www.terapines.com/download/zcc
-
Extract to a directory without Chinese characters or spaces, and remember the path to the bin directory.
-
If you do not want to use the zcc toolchain, you can ignore this step if you only use Segger Embedded Studio.
Segger toolchain
-
After installing the Segger Embedded Studio IDE, remember the path to the bin directory under the Segger Embedded Studio installation path.
Set ENV environment variables
-
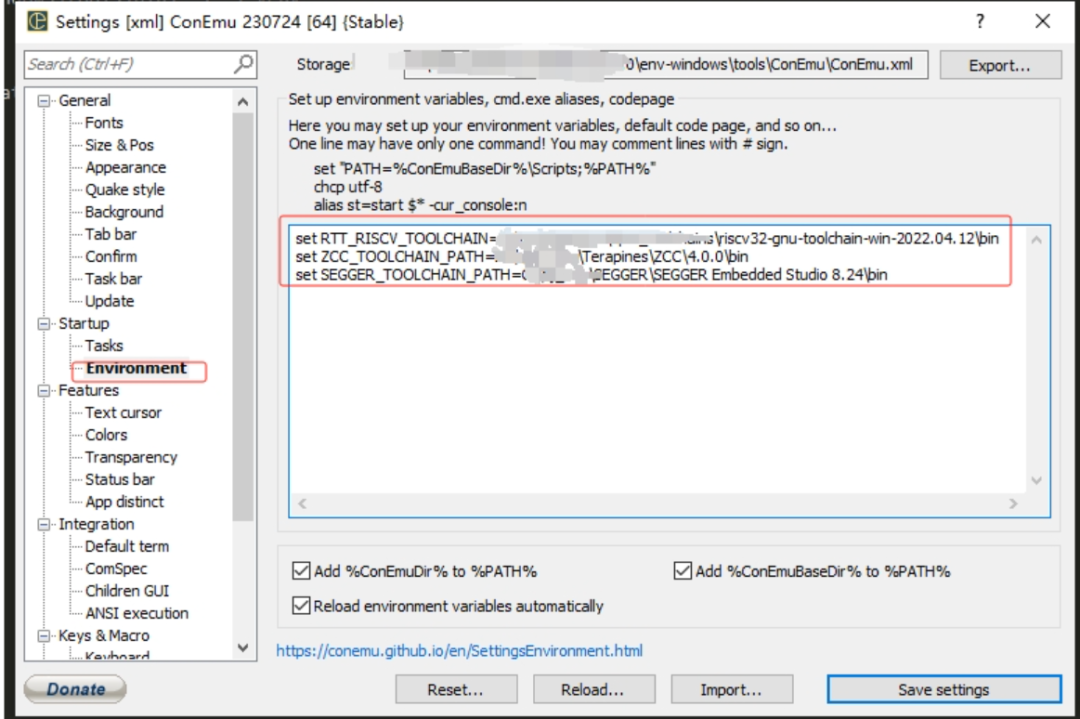
Right-click to open the Env console, click the upper right corner’s system menu, and select settings

-
Click on Environment, and in the edit box, enter the paths for RTT_RISCV_TOOLCHAIN, ZCC_TOOLCHAIN_PATH, and SEGGER_TOOLCHAIN_PATH variables, with the variable values being the paths of the aforementioned toolchains. After setting, click Save settings to save.
-
RTT_RISCV_TOOLCHAIN corresponds to the path of the riscv32-gnu-toolchain-win-2022.04.12/bin directory
-
ZCC_TOOLCHAIN_PATH corresponds to the path of the zcc-4.0.0/bin directory
-
SEGGER_TOOLCHAIN_PATH corresponds to the path of the Segger Embedded Studio/bin directory
-
Restart ENV to make the environment variables effective.
Note: There should be no spaces before or after the = in set <variable_name>=<path>
2. Compiling and Developing Applications Based on RT-Thread ENV
2.1 Downloading and Installing the Xianji BSP Package
Download the corresponding BSP package for your development board
|
Development Board |
Repository Link |
|
hpm6750evkmini |
https://github.com/hpmicro/rtt-bsp-hpm6750evkmini/archive/v1.10.0.zip |
|
hpm6750evk2 |
https://github.com/hpmicro/rtt-bsp-hpm6750evk2/archive/v1.10.0.zip |
|
hpm6300evk |
https://github.com/hpmicro/rtt-bsp-hpm6300evk/archive/v1.10.0.zip |
|
hpm6200evk |
https://github.com/hpmicro/rtt-bsp-hpm6200evk/archive/v1.10.0.zip |
|
hpm5300evk |
https://github.com/hpmicro/rtt-bsp-hpm5300evk/archive/v1.10.0.zip |
|
hpm5301evklite |
https://github.com/hpmicro/rtt-bsp-hpm5301evklite/archive/v1.10.0.zip |
|
hpm6800evk |
https://github.com/hpmicro/rtt-bsp-hpm6800evk/archive/v1.10.0.zip |
|
hpm6e00evk |
https://github.com/hpmicro/rtt-bsp-hpm6e00evk/archive/v1.10.0.zip |
|
hpm6p00evk |
https://github.com/hpmicro/rtt-bsp-hpm6p00evk/archive/v1.10.0.zip |
|
hpm5e00evk |
https://github.com/hpmicro/rtt-bsp-hpm5e00evk/archive/v1.10.0.zip |
2.2 Exporting Examples from the BSP Package
Python needs to be installed, with version 3.10 or higher recommended.
Extract the downloaded BSP package, and you can use the bsp_utils.py script in the BSP package to export examples.
In the directory of the BSP package, use PowerShell or git bash to run bsp_utils.py. The commands currently supported by this script are as follows:
-
-v/–version Show version Get the script version
-
-l/–list Show supported examples in this BSP View all examples supported by the current BSP
-
-e/–export_proj Export project from this BSP to specified destination directory Export the generated project to the specified directory
For example, to export the blink_led example, assuming the export path is D:\rtt_proj, you can use the following command to export this example.
python .\bsp_utils.py -e –project_name=blink_led –output=D:\rtt_proj
-
Upon successful export, the following message will be displayed, and a blink_led directory will be generated in the D:\rtt_proj directory, which contains the exported project.
Successfully exported project ‘blink_led’ to ‘D:\rtt_proj\blink_led’
-
Note: Ensure that the export path exists.
2.3 Configuring the Project
Based on the project created in the previous tutorial, taking blink_led as an example
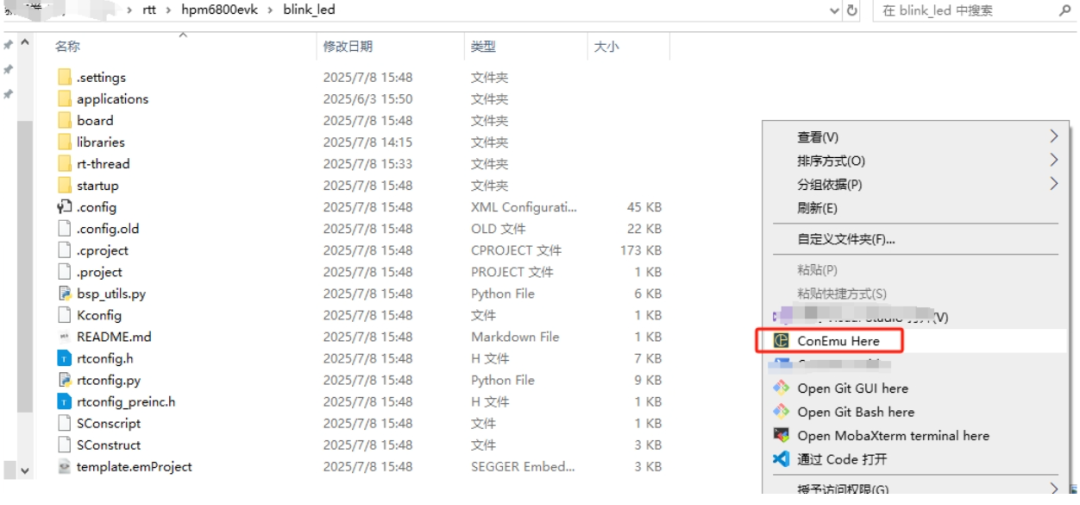
Right-click in the main directory of the project, select ComEmu here, and the env window will pop up.
In the env, type menuconfig to open the board-level kconfig related configuration, and complete the following operations:
-
RT-Thread Kernel RT-Thread kernel configuration
-
RT-Thread Components RT-Thread component configuration
-
RT-Thread online package RT-Thread software package configuration
-
Hardware Drivers Config Board-level hardware configuration
Example operations are as follows:
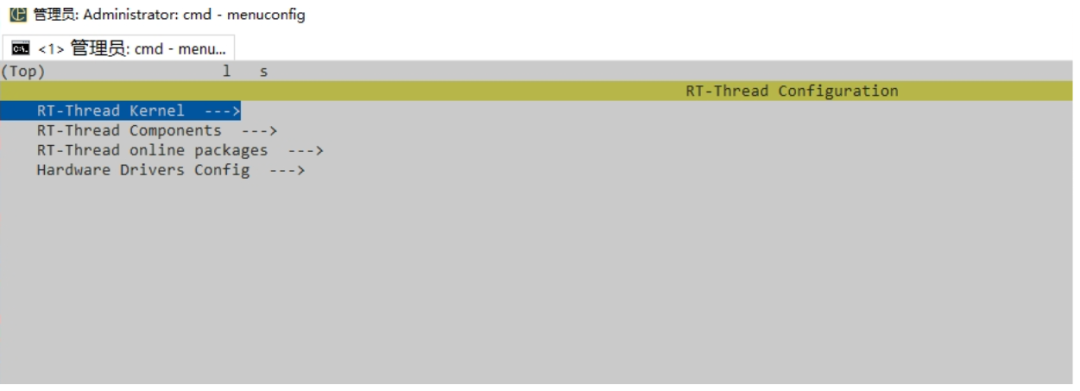
This operation is very similar to the graphical operations in RT-Thread Studio.
For information on the RT-Thread build and configuration system, which includes Kconfig and scons, please refer to the following link:
https://www.rt-thread.org/document/site/#/development-tools/build-config-system/summary
2.4 Changing Toolchain Parameters as Needed
1. Configure RV_ARCH and RV_ABI architecture instruction sets
-
The user can execute the following operations in the env command line under the project directory to complete the ABI configuration. If this operation is not performed, the default value is RV_ABI=ilp32.
set RV_ABI=<rv_abi>
-
The user can execute the following operations in the env command line under the project directory to complete the ARCH configuration. If this operation is not performed, the default value is RV_ARCH=rv32imac.
set RV_ARCH=<rv_arch>
The supported combinations of RV_ARCH and RV_ABI are:
-
rv32imac + ilp32
-
rv32imafc + ilp32f
-
rv32gc + ilp32d
Note:
-
This variable only takes effect for gcc and zcc
2. Configure RTT_BUILD_TYPE compilation options
The user can execute the following operations in the env command line under the project directory. If this operation is not performed, the default value is flash_debug.
set RTT_BUILD_TYPE=<rtt_build_type>
The commonly supported RTT_BUILD_TYPE options are:
-
flash_debug
-
flash_release
-
ram_debug
-
ram_release
-
flash_hybrid_debug
-
flash_hybrid_release
Detailed supported options can be found in rtconfig.py.
Note:
-
When using the segger toolchain, the RTT_BUILD_TYPE option does not need to be set, and related compilation options can be switched in the Segger Embedded Studio IDE.
3. Switch Toolchains
The user can use the following operation in the project directory to switch toolchains, or if this operation is not performed, the default toolchain is gcc.
set RTT_TOOLCHAIN_PLATFORM=<platform>
Where the supported options for platform are:
-
gcc
-
zcc
-
segger
2.5 Generating, Compiling, and Debugging the Project
1. Generate cmake project
When using the gcc or zcc toolchain, you can generate a cmake project using the following command
scons –target=cmake
After that, you can use your familiar IDE that supports cmake (such as vscode, CLion) to open the cmake project for subsequent development and debugging.Note: In this mode, if you need to change RT-Thread related configurations again, you may need to repeatedly perform the following operations:
-
menuconfig
-
scons –target=cmake
2. Generate Segger Embedded Studio project
When using the segger toolchain, you can generate a Segger Embedded Studio project using the following command.
set RTT_TOOLCHAIN_PLATFORM=segger
scons –target=ses
Note: In this mode, if you need to change RT-Thread related configurations again, you may need to repeatedly perform the following operations:
-
menuconfig
-
scons –target=ses
After generating the project, you can open the project.emProject file in the project directory to use Segger Embedded Studio for development and debugging. You can select different compilation option windows in the upper left corner’s configuration window.
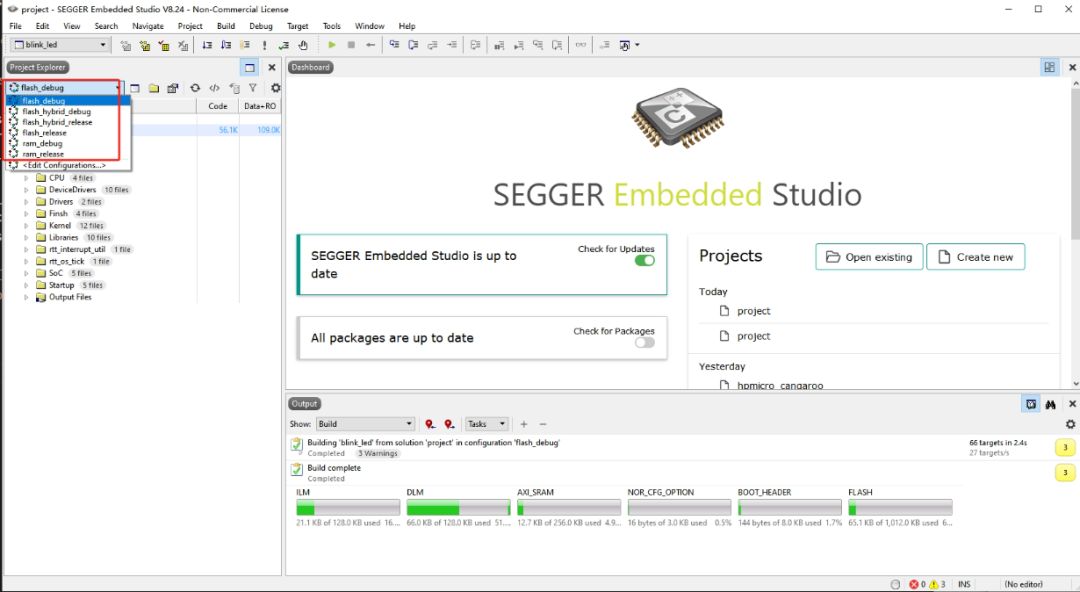
Note: The default generated proj.emProject has the RISC-V ISA and RISC-V ABI combination as rv32imac and ilp32, as shown in the figure below. Users can adjust it to the corresponding configuration as needed.
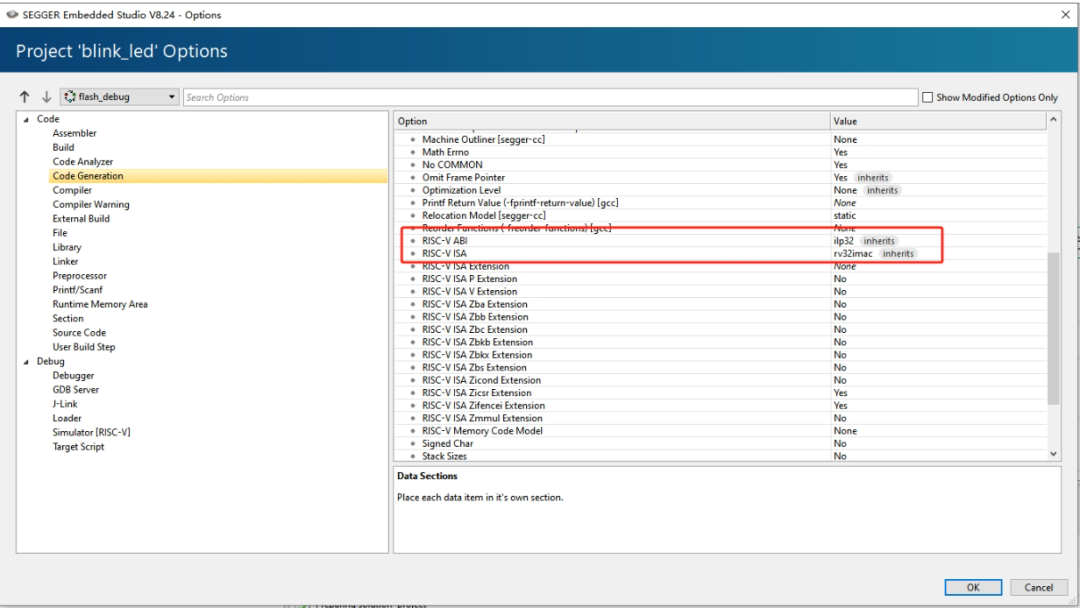
After that, you can use Segger Embedded Studio for development and debugging. The debugging experience is consistent with using hpm_sdk.
3. Compiling the Project Based on the env Environment
Env includes a Python & scons environment, and users can execute the following operations in the env command line under the project directory to complete the project compilation.
-
Compile directly using scons, where: N represents the number of threads.
scons -jN
-
After compilation, an rtthread.elf file will be generated in the project directory, which is the executable file.
-
For debugging, you can use openocd + riscv32-unknown-elf-gdb for command-line debugging or use vscode’s related debugging plugins. You can also use a jlink debugger with Ozone for debugging.
2.6 Typical Examples
Using rv32imac + ilp32 + gcc to compile the code based on scons, with the compilation option as flash_release
As shown in the following example script:
set RTT_BUILD_TYPE=flash_release
set RTT_TOOLCHAIN_PLATFORM=gcc
set RV_ARCH=rv32imac set RV_ABI=ilp32
scons -j16
Using rv32gc + ilp32d + gcc to generate a cmake project based on scons.
As shown in the following example script:
set RTT_TOOLCHAIN_PLATFORM=gcc
set RV_ARCH=rv32gc
set RV_ABI=ilp32d
scons –target=cmake
Using rv32imac + ilp32 + zcc to compile the code based on scons, with the compilation option as ram_debug
As shown in the following example script:
set RTT_BUILD_TYPE=ram_debug
set RTT_TOOLCHAIN_PLATFORM=zcc
set RV_ARCH=rv32imac
set RV_ABI=ilp32
scons -j16
Using rv32gc + ilp32d + zcc to generate a cmake project based on scons.
As shown in the following example script:
set RTT_TOOLCHAIN_PLATFORM=zcc
set RV_ARCH=rv32gc
set RV_ABI=ilp32d
scons –target=cmake
Using segger based on scons to generate a segger embedded studio project.
As shown in the following example script:
set RTT_TOOLCHAIN_PLATFORM=segger
scons –target=ses
3. Conclusion
This article provides a brief process for developing RT-Thread applications based on Xianji MCU using the ENV tool on Windows. The entire process is simple and intuitive based on practical experience. If you have any questions or suggestions during use, feel free to leave a message on the public account or submit an issue in the corresponding GitHub repository.





“Xianji Semiconductor” (HPMicro) is a semiconductor company dedicated to high-performance embedded solutions, with products covering microcontrollers and their supporting development tools and ecosystems. The company is headquartered in the Pudong Software Park in Shanghai and has branches in Tianjin, Suzhou, and Shenzhen. It has been selected as one of the Top 100 Most Promising Companies in Asia by Forbes in 2025. Xianji Semiconductor prioritizes product quality, with all products undergoing rigorous reliability testing. Currently, it has mass-produced eight series of high-performance general-purpose MCU products, with performance and versatility leading international counterparts and passing AEC-Q100 certification. The company has completed dual certification for ISO9001 quality management and ISO 26262/IEC61508 functional safety management systems, fully serving the industrial automation, robotics, energy, and automotive markets in China and globally. For more information, please visit https://hpmicro.com/