Overview of Node Functions:
-
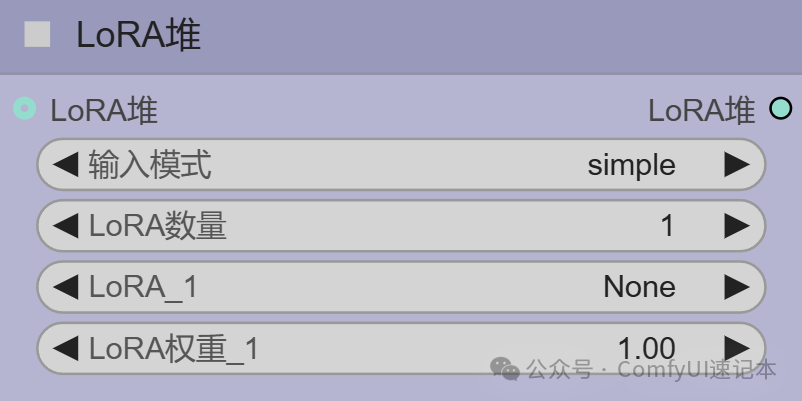
LoRA Stack: Used for batch loading and applying multiple LoRA models, achieving composite control over generation styles, characters, painting styles, etc.
-
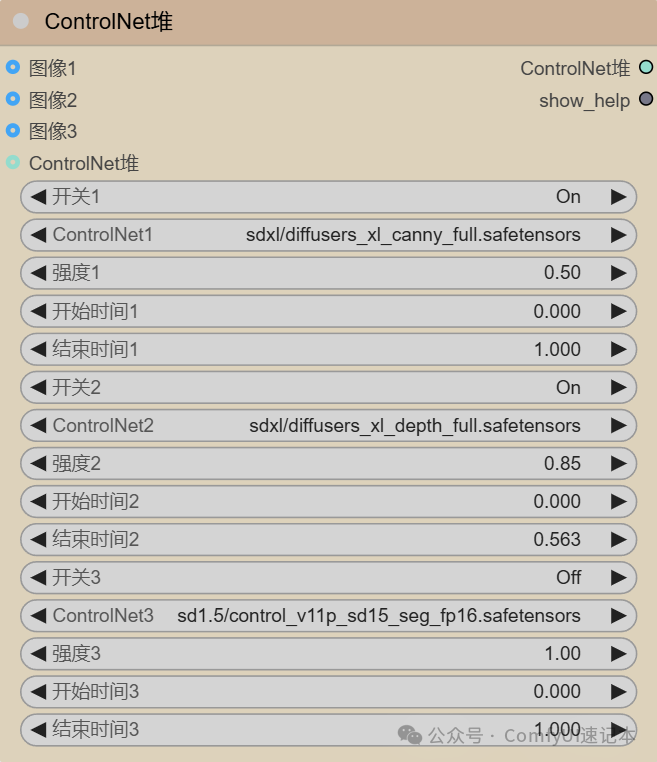
ControlNet Stack: Used for batch loading and applying multiple ControlNet models, achieving precise joint control over image composition, posture, depth, edges, and other dimensions.
Both are designed as “stacks”, allowing users to flexibly configure multiple units within a single node, greatly simplifying workflows.
Node Details:
1. LoRA Stack
This node is used to apply multiple LoRA models simultaneously, with their effects stacking and blending.
| Parameter Name | Options/Description |
|---|---|
| Input Mode | <span>simple</span> (Simple): Use the built-in simple list to configure LoRA.<span>advanced</span> (Advanced): Connect to external, more complex LoRA application nodes via input ports. |
| Number of LoRAs | Set the number of LoRA models to enable and configure (e.g., set to 2 to open configuration options for LoRA_1 and LoRA_2). |
| LoRA_1 | Select the file for the first LoRA model (<span>.safetensors</span>). |
| LoRA Weight_1 | Set the effective strength of the first LoRA model. Typically, 1.0 is standard strength, >1.0 enhances the effect, <1.0 weakens the effect. Can be positive or negative. |
| … | (and so on) LoRA_2, LoRA Weight_2, … |
Output:
-
LoRA Stack: Outputs a stack containing all configured LoRA information, connected to the Efficient Loader‘s
<span>LoRA Stack</span>input port.
Use Cases:
-
Generate an “Iron Man (LoRA_2) wearing Final Fantasy style armor (LoRA_1).”
-
Generate a “Cyberpunk city (LoRA_2) in ink wash style (LoRA_1).”
2. ControlNet Stack
This node is used to apply multiple ControlNet conditions simultaneously, with their control effects guiding the generation process in a weighted manner.
| Parameter Group | Parameter Name | Description |
|---|---|---|
| General Switch | Switch 1, Switch 2, … | <span>On</span>/<span>Off</span>. Master switch to quickly enable or disable a ControlNet unit without deleting the configuration. |
| Input Image | Image 1, Image 2, … | Input the corresponding condition images for each ControlNet (e.g., Canny edge map, depth map, pose map, etc.). |
| Model Selection | ControlNet 1, 2, … | Select the ControlNet model to be used for each unit (e.g., Canny, Depth, Openpose, etc.). |
| Strength Control | Strength 1, 2, … | Control the impact strength of each ControlNet. The higher the value, the more strictly the generated result follows the condition image. |
| Timing Control | Start Time 1, 2, … | Control at which point in the denoising process each ControlNet starts to take effect (0.0 starts, 1.0 ends). |
| End Time 1, 2, … | Control at which point in the denoising process each ControlNet stops taking effect. |
Output:
-
ControlNet Stack: Outputs a stack containing all configured ControlNet information, connected to the Efficient Loader‘s
<span>ControlNet Stack</span>input port.
Configuration Example Analysis (from your image):
-
Unit 1 (Canny): Uses the Canny edge model, strength 0.5, effective throughout (0.0->1.0).Effect: Gently controls the overall composition and outline of the generated content.
-
Unit 2 (Depth): Uses the depth model, strength 0.85, effective for the first 56.3% of the generation process (0.0->0.563).Effect: Strongly controls the three-dimensional spatial layout of the scene in the early generation phase, and releases constraints in the later phase to allow AI to freely add details.
-
Unit 3 (Seg): The segmentation model is turned off (
<span>Off</span>), not effective.
Summary and Best Practices:
-
Function Positioning:
-
LoRA Stack: Controls the “what” (content style, character identity, object concept).
-
ControlNet Stack: Controls the “how it looks” (shape, structure, composition, posture).
Usage Process:
-
Configure the LoRA Stack and ControlNet Stack.
-
Connect their output ports to the Efficient Loader‘s
<span>LoRA Stack</span>and<span>ControlNet Stack</span>input ports. -
Generate images as usual.
-
Refer to the Efficient Loader node for details on the Efficient Loader and Sampler node parameters.
Advanced Techniques:
-
LoRA Weights: You can try negative weights for a “reverse” effect.
-
ControlNet Timing: Allowing a ControlNet to exit early (e.g., setting end time to 0.5) can let the AI deviate from strict constraints in the later stages to add details or artistic flair.
-
Strength Balancing: When multiple ControlNets are working simultaneously, their total strength should not be too high, or they may conflict and cause image chaos. It requires repeated adjustments to find a balance.