(Click the public account above to quickly follow)
Author: David Both, Translation: Linux China/penghuster
linux.cn/article-8807-1.html
If you have good articles to submit, please click → here for details
Have you ever wondered how an operating system can execute applications? This article will unveil the mysteries of operating system booting and startup.
Understanding the operating system boot and startup process is crucial for configuring the operating system and troubleshooting related startup issues. This article describes the process of the GRUB2 bootloader loading the kernel and the systemd initialization system executing the booting of the operating system.
In fact, the booting of an operating system is divided into two stages: boot and startup. The boot stage begins when the power switch is turned on and ends when the kernel initialization is complete and the systemd process is successfully running. The startup stage takes over the remaining work until the operating system is in an operational state.
Overall, the Linux boot and startup process is quite easy to understand, and the following sections will provide detailed explanations of the different steps.
-
BIOS Power-On Self-Test (POST)
-
Bootloader (GRUB2)
-
Kernel Initialization
-
Starting systemd, the parent of all processes.
Note that this article discusses the operating system boot and startup process using GRUB2 and systemd as they are the mainstream bootloader and initialization software used in current Linux distributions. Of course, some older related software is still used in some Linux distributions.
Boot Process
The boot process can be initialized in one of two ways. First, if the system is powered off, pressing the power button will initiate the system boot process. Second, if the operating system is already running under a local user (which can be root or another non-privileged user), the user can programmatically initiate a reboot operation through a graphical interface or command line, triggering the system boot process. Rebooting includes a shutdown and restart operation.
BIOS Power-On Self-Test (POST)
During the power-on self-test, Linux does not perform any actions; the POST is primarily completed by the hardware, which is the same for all operating systems. When the computer is powered on, it begins executing the BIOS (Basic Input/Output System) POST process.
In 1981, the first personal computer designed by IBM had BIOS designed to initialize hardware components. POST, as part of BIOS, is used to check whether the basic functions of the computer hardware are normal. If POST fails, the computer cannot be used, and the boot process will be interrupted.
The BIOS power-on self-test confirms that the basic functions of the hardware are normal and then generates a BIOS interrupt INT 13H, which points to the boot sector of a connected bootable device. The first boot sector found that contains a valid boot record will be loaded into memory, and control will be transferred from the boot sector to this segment of code.
The boot sector is the true first stage of the bootloader. There are three bootloaders commonly used by most Linux distributions: GRUB, GRUB2, and LILO. GRUB2 is the latest and is the most widely used compared to other older programs.
GRUB2
GRUB2 stands for GRand Unified BootLoader, Version 2. It is the main bootloader for most popular Linux distributions today. GRUB2 is an intelligent program used by computers to find the operating system kernel and load it into memory. Since the word GRUB is easier to write and read than GRUB2, in the following text, GRUB will refer to GRUB2 unless otherwise specified.
GRUB is designed to be compatible with the multi-boot specification, allowing it to boot different versions of Linux and other open-source operating systems; it can also chain-load the boot records of proprietary operating systems.
GRUB allows users to select one of several different kernels from any given Linux distribution to boot. This feature enables the operating system to boot to a previous version of the kernel in case of critical software incompatibility or other reasons for upgrade failure. GRUB can be configured through the file /boot/grub/grub.conf.
GRUB1 has now been gradually phased out and has been replaced by GRUB2 in most modern distributions. GRUB2 is a complete rewrite based on GRUB1. Red Hat-based distributions upgraded to GRUB2 around Fedora 15 and CentOS/RHEL 7. GRUB2 provides the same boot functionality as GRUB1, but it is also a command-line-based pre-OS environment similar to a mainframe system, making configuration during the pre-boot phase more convenient and user-friendly. GRUB2 is configured through /boot/grub2/grub.cfg.
The primary function of both GRUB versions is to load the kernel into memory and run it. The basic working methods of both versions of GRUB are consistent, and their main stages remain the same, which can be divided into three stages. This article will discuss the working process using GRUB2 as an example. The configuration of GRUB or GRUB2, as well as the usage of GRUB2 commands, are beyond the scope of this article and will not be covered.
Although GRUB2 does not formally use these stage names in its three boot stages, for the sake of discussion, we will use them in this article.
Stage 1
As mentioned in the previous POST stage, at the end of the POST stage, the BIOS will look for the boot record on the connected disk, which is usually located in the MBR (Master Boot Record). It loads the first boot record it finds into memory and begins executing this code. The boot code (and stage 1 code) must be very small because it must fit within the first 512 bytes of the hard disk sector along with the partition table. In a traditional MBR, the actual space occupied by the boot code is 446 bytes. This 446-byte file for stage 1 is commonly referred to as the boot image (boot.img), which does not contain partition information, as partitions are generally added separately to the boot record.
Since the boot record must be very small, it cannot be very intelligent and cannot understand the file system structure. Therefore, the only function of stage 1 is to locate and load the stage 1.5 code. To accomplish this task, the stage 1.5 code must be located between the boot record and the first partition of the device. After loading the stage 1.5 code into memory, control will be transferred from stage 1 to stage 1.5.
Stage 1.5
As mentioned, the stage 1.5 code must be located between the boot record and the first partition of the device. This space has been left empty for historical technical reasons. The starting position of the first partition leaves 62 sectors (a total of 31744 bytes) between sector 63 and the MBR (sector 0), which is used to store the stage 1.5 code image core.img file. This file is 25389 bytes in size, so there is enough space to store core.img.
Because there is more storage space for stage 1.5, it can accommodate some common file system drivers, such as standard EXT and other Linux file systems, such as FAT and NTFS. GRUB2’s core.img is much more complex and powerful than the older GRUB1 stage 1.5. This means that GRUB2’s stage 2 can be placed within a standard EXT file system but cannot be placed within a logical volume. Therefore, stage 2 files can be stored in the /boot file system, typically under the /boot/grub2 directory.
Note that the /boot directory must be placed on a file system supported by GRUB (not all file systems are supported). The function of stage 1.5 is to begin executing the drivers for the /boot file system where stage 2 files are stored and load the relevant drivers.
Stage 2
All files for GRUB stage 2 are stored under the /boot/grub2 directory and its several subdirectories. This stage does not have a corresponding image file like stages 1 and 1.5. Accordingly, this stage primarily needs to load some kernel runtime modules from the /boot/grub2/i386-pc directory.
The main function of GRUB stage 2 is to locate and load the Linux kernel into memory and transfer control to the kernel. The relevant kernel files are located in the /boot directory, and these kernel files can be identified by their filenames, which all start with the prefix vmlinuz. You can list the contents of the /boot directory to see the currently installed kernels in the operating system.
Similar to GRUB1, GRUB2 supports booting from one of the Linux kernels. The Red Hat Package Manager (DNF) supports retaining multiple kernel versions so that if the latest kernel version fails to boot, the older version can be restored. By default, GRUB provides a pre-boot menu of installed kernels, including a problem diagnosis menu (rescue) and a recovery menu (if a recovery image has been configured).
Stage 2 loads the selected kernel into memory and transfers control to the kernel code.
Kernel
Kernel files are stored in a self-extracting compressed format to save space, along with an initialized memory image and a storage device mapping table, all stored under the /boot directory.
Once the selected kernel is loaded into memory and begins execution, the kernel file must first decompress itself from the compressed format before it can perform any work. Once the kernel has decompressed itself, it loads the systemd process (which is a replacement for the old System V system’s init program) and transfers control to systemd.
This marks the end of the boot process. At this point, the Linux kernel and systemd are running, but since no other programs are executing, it cannot perform any user functional tasks.
Startup Process
The startup process follows the boot process and brings the Linux system to an operational state, enabling it to perform user functional tasks.
systemd
systemd is the parent process of all processes. It is responsible for bringing the Linux host to a user-operable state (where functional tasks can be executed). Some of systemd’s features are far richer than the old init program, allowing it to manage many aspects of a running Linux host, including mounting file systems and starting and managing system services on the Linux host. However, any systemd functions unrelated to the system startup process are beyond the scope of this article.
First, systemd mounts the file systems configured in /etc/fstab, including memory swap files or partitions. Accordingly, systemd must be able to access the configuration files located in the /etc directory, including its own. systemd determines which state (or target) the Linux system should start by using its configuration file /etc/systemd/system/default.target. default.target is a symbolic link to a real target file. For desktop systems, it links to graphical.target, which is equivalent to runlevel 5 in the old systemV init method. For a server operating system, default.target is more often linked to multi-user.target, which corresponds to runlevel 3 in the systemV system. emergency.target corresponds to single-user mode.
(LCTT Note: “target” is a new concept introduced by systemd, and no official accurate translation has been found yet. Considering its function and context, we believe translating it as “目标态” (target state) is more appropriate. Additionally, “unit” refers to various objects/files in systemd, such as services and target states, and is translated as “单元” (unit) in this context.)
Note that all target states and services are units of systemd.
The following Table 1 compares the target states of systemd with the runlevels of the old systemV init. This systemd target state alias is provided for backward compatibility with systemV. This target state alias allows system administrators (including myself) to change the runlevel using systemV commands (e.g., init 3). Of course, this systemV command is forwarded to systemd for interpretation and execution.
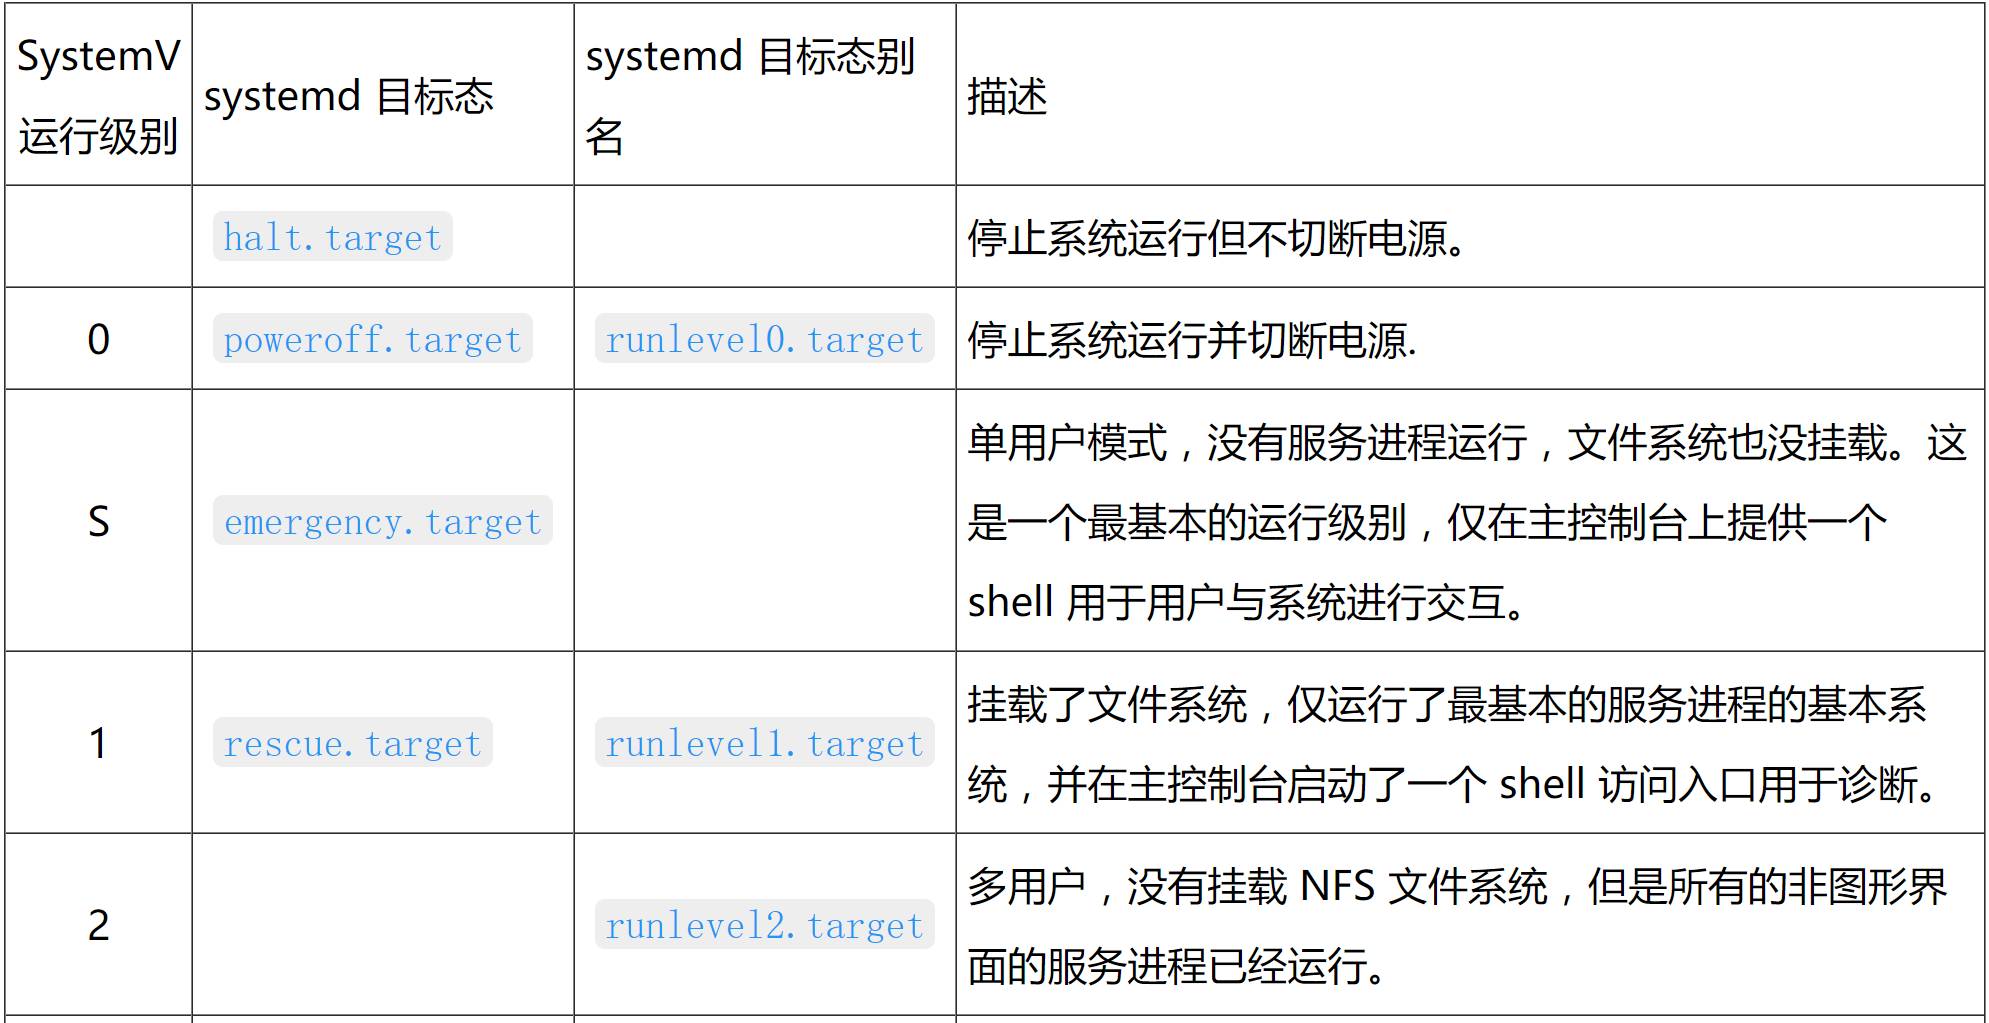
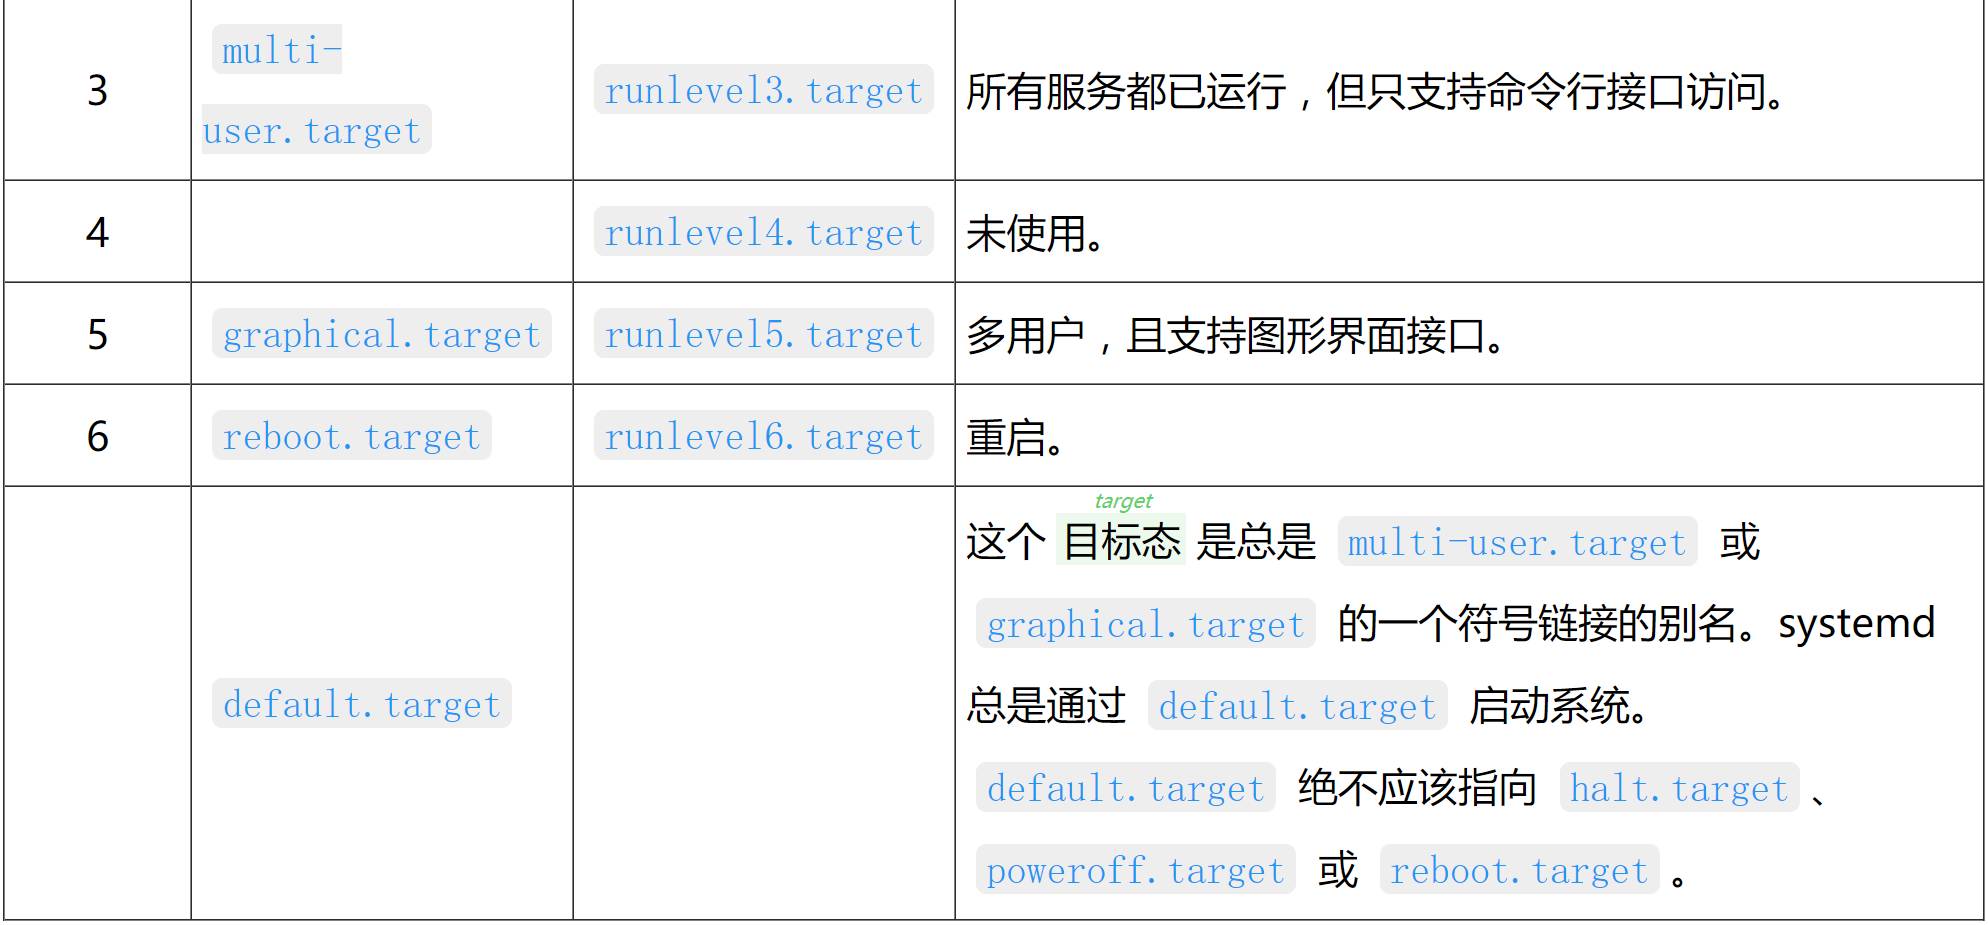
Table 1 Comparison of old systemV runlevels with systemd target states or target state aliases
Each target state has a set of dependencies described in its configuration file, and systemd needs to start the required dependencies first. These dependent services are the services required for the Linux host to operate at a specific functional level. When all the dependent services in the configuration file are loaded and running, it indicates that the system is operating at that target level.
systemd also checks whether there are relevant startup files in the old systemV init directory; if they exist, systemd starts the corresponding services based on the contents of these configuration files. In Fedora systems, outdated network services are an example of a service started in this way.
The following Figure 1 is copied directly from the man page of bootup. It shows the general sequence of events during the systemd startup process and the basic order requirements to ensure a successful startup.
sysinit.target and basic.target can be viewed as checkpoints in the startup process. Although systemd is designed to start system services in parallel, some services or functional targets are prerequisites for the startup of other services or targets. The system will pause at the checkpoint until the required services and targets are satisfied.
The arrival at the sysinit.target state is predicated on the normal startup of all its dependent resource modules; all other units, such as file system mounts, swap file setups, device manager startups, random number generator seed settings, low-level system service initializations, and encryption service startups (if one or more file systems are encrypted), must be completed, but these services and modules can be started in parallel within sysinit.target.
sysinit.target starts all low-level services and units required for the system to have basic functionality, which are necessary prerequisites for entering the next stage, basic.target.

Figure 1: systemd Startup Process
Once the conditions for sysinit.target are met, systemd then starts basic.target, initiating all the required units. basic.target provides more functionality by starting the units required for the next target state, including paths to various executable files, communication sockets, and timers.
Finally, the user-level target states (multi-user.target or graphical.target) can be initialized. It should be noted that multi-user.target must be achieved before satisfying the dependencies of the graphical target state graphical.target.
In Figure 1, the target states starting with * are general startup states. When one of these target states is reached, it indicates that the system has completed the startup. If multi-user.target is the default target state, the successfully started system will present a command-line login interface to the user. If graphical.target is the default target state, the successfully started system will present a graphical login interface to the user, with the specific style of the interface depending on the configured display manager.
Troubleshooting Discussion
Recently, I needed to change the default boot kernel of a Linux computer using GRUB2. I found that some GRUB2 commands were not available on my system, possibly due to incorrect usage. To this day, I still do not know the reason for this issue, which requires further investigation.
The grub2-set-default command failed to successfully set the default kernel index in the configuration file /etc/default/grub, resulting in the expected alternative kernel not being booted. Therefore, I manually changed GRUB_DEFAULT=saved to GRUB_DEFAULT=2 in that configuration file, where 2 is the index of the installed kernel file I needed to boot. Then I executed the command grub2-mkconfig > /boot/grub2/grub.cfg to create a new GRUB configuration file, which successfully bypassed the issue as expected and booted the alternative kernel.
Conclusion
GRUB2 and the systemd initialization system are key components for booting and starting most modern Linux distributions. Although there is some controversy regarding the use of systemd in practice, GRUB2 and systemd can closely cooperate to first load the kernel and then start the system services required for a business system.
Although both GRUB2 and systemd are more complex than their predecessors, they are easier to learn and manage. There is a wealth of help documentation about systemd available in the man pages.
Author Bio
David Both lives in Raleigh, North Carolina, USA, and is a Linux open-source contributor. He has been in the IT industry for over 40 years, teaching OS/2 at IBM for over 20 years. In 1981, he developed the first training course on the original IBM personal computer at IBM. He has also taught RHCE courses at Red Hat and has worked for MCI Worldcom, Cisco, and North Carolina. He has been working for the Linux open-source community for nearly 20 years.
Did you gain something from reading this article? Please share it with more people.
Follow “Linux Enthusiasts” to enhance your Linux skills