
Detailed configuration screenshots for Cloudflare Zero Trust secure browsing
This tutorial will guide you through the process of creating a small Linux distribution for ARM-based embedded devices (like Raspberry Pi) using Buildroot. By the end of this article, you will be able to run your own Linux system on Raspberry Pi 3/4/ZeroW.
What Is Buildroot?
Buildroot is a set of tools that helps you easily generate an embedded Linux distribution for your IoT devices. This project is community-driven and completely open-source.
Features of Buildroot
For most of your embedded applications, Buildroot is a perfect choice. With kernel-like menuconfig, interactive download scripts, and overlay systems, it makes the process of creating embedded systems very easy.
Buildroot is designed to handle everything on its own; you just need to select what to include in the system, and Buildroot will download, configure, compile, and install everything without any additional configuration.
With just one command (and about 30 minutes of time), you will get a flashable image! Amazing, right? While I am enthusiastic about Buildroot, I also need to mention its main alternative: Yocto.
Differences Between Buildroot and Yocto
Both Buildroot and Yocto are build systems for embedded devices, meaning they will generate a root filesystem, bootloader, kernel, and basic toolchain for your target architecture. Thus, the two projects differ in how they handle things: Buildroot focuses on simplicity and minimalism, while Yocto emphasizes versatility and the ability to create a true Linux distribution (like one with a dedicated package manager).
On the other hand, Buildroot creates a simple and plain firmware, and you must recompile every time you want to update something, which could cause issues in large embedded applications that require frequent updates.
Moreover, Yocto supports a broader package set (Yocto has about 8000, while Buildroot has about 1800), which means that for many applications, Buildroot will force you to write Kconfig files to integrate missing packages into the target system.
In summary, if you need to build a complex embedded network that requires remote updates without rebuilding the entire system from scratch, you should consider Yocto. However, if you only want to build firmware for a small number of embedded devices that may not receive updates in the near future, you should consider Buildroot.
Last but not least, the learning curve for Yocto is very steep compared to Buildroot. If you want to learn more about the differences between these two build systems, please visit this resource.
Prerequisites
To build an embedded Linux image, you will need:
- A UNIX/Linux system (i.e., Mac OS or GNU/Linux);
- A C and a C++ compiler;
- Basic build tools, such as build-essential in Debian distributions;
- At least 15GB of free space on your disk;
- A Raspberry Pi 3/4/ZeroW;
- A UART device.
For a complete list of updated requirements, please visit this resource. You should also be a proficient UNIX/Linux user and should be able to configure the development environment yourself.
Downloading Buildroot
You can obtain Buildroot in three different ways:
- Long-term support version (currently 2020.02.8);
- Stable version (currently 2020.08.2);
- The latest candidate release version.
As of writing this article, I am using the stable version (2020.08.2), but you can use any version you want. Buildroot can be downloaded from this link.
Setting Up Your Target Architecture
Once you have downloaded one of the available versions, extract the archive and then look for your architecture. By default, Buildroot stores the supported architectures in the configs/ directory. For example, since we are building a Linux image for the Raspberry Pi Zero, we should use one of the following configuration files:
$> ls -lh configs | grep raspberry
.rw-r--r-- marco marco  1.1 KB Mon Jun 16 23:13:14 2019 raspberrypi0_defconfig
.rw-r--r-- marco marco    1 KB Mon Jun 16 23:13:14 2019 raspberrypi0w_defconfig
.rw-r--r-- marco marco  1.1 KB Mon Jun 16 23:13:14 2019 raspberrypi2_defconfig
.rw-r--r-- marco marco  1.2 KB Mon Jun 16 23:13:14 2019 raspberrypi3_64_defconfig
.rw-r--r-- marco marco  1.1 KB Mon Jun 16 23:13:14 2019 raspberrypi3_defconfig
.rw-r--r-- marco marco  1.5 KB Mon Jun 16 23:13:14 2019 raspberrypi3_qt5we_defconfig
.rw-r--r-- marco marco  1.1 KB Mon Jun 16 23:13:14 2019 raspberrypi4_64_defconfig
.rw-r--r-- marco marco  1.1 KB Mon Jun 16 23:13:14 2019 raspberrypi4_defconfig
.rw-r--r-- marco marco  1.1 KB Mon Jun 16 23:13:14 2019 raspberrypi_defconfig
To select raspberrypi0w_defconfig, enter make raspberrypi0w_defconfig.
Additionally, other relevant folders are:
• board/: Configuration files for officially supported platforms• configs/Build: Configuration files for officially supported development boards• output/Output: Images, packages, and configuration files• package/Build: Scripts for supported packages
System Configuration
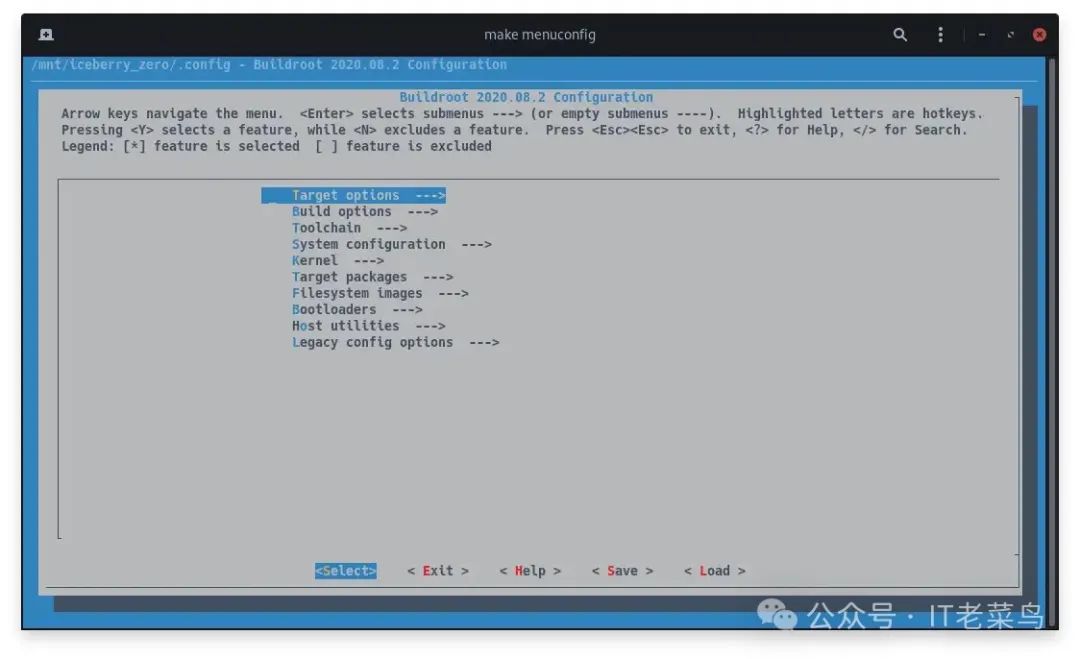
As you can see, this is a common configuration menu for configuring the Linux kernel. If you have seen this menu before, you should know how useful and organized it is compared to manual file editing. Using the keyboard arrow keys to move the cursor, you can enter various submenus and select what you want to include. However, since this may be your first time using Buildroot and you may be intimidated by the number of available options, I have listed the minimum requirements available for Raspberry Pi Zero (like Wi-Fi support, OpenSSH server, basic POSIX utilities, etc.).
Build Options
In the build options menu, I recommend enabling compiler cache to significantly speed up the compilation process:
Build options -> Enable compiler cache (BR2_CCACHE)Toolchain
In the “Toolchain” section, enable WCHAR support, which is required by some packages such as bash or vim:
Toolchain -> Enable WCHAR support (BR2_TOOLCHAIN_BUILDROOT_WCHAR)System Configuration
In the “System Configuration” submenu, you can customize your Linux system by changing the default hostname, system banner, default root password, and default shell (I recommend replacing the original busybox default shell with a more robust one, like bash):
System configuration -> System hostname (BR2_TARGET_GENERIC_HOSTNAME)
System configuration -> System banner (BR2_TARGET_GENERIC_ISSUE)
System configuration -> Root password (BR2_TARGET_GENERIC_ROOT_PASSWD)
System configuration -> /bin/sh (busybox' default shell)  ---> (x) Bash
Note that to change the default shell, you may need to enable the BR2_PACKAGE_BUSYBOX_SHOW_OTHERS flag in the “Target Packages” submenu.
Target Packages
The “Target Packages” menu allows you to install all the packages supported by Buildroot. Below is a list of some essential packages you should find in any Raspberry Pi-oriented distribution; however, you can exclude anything that seems unnecessary for your project.
Target packages -> Shell and utilities -> bash completion (BR2_PACKAGE_BASH_COMPLETION)
Target packages -> Shell and utilities -> sudo (BR2_PACKAGE_SUDO)
Target packages -> Shell and utilities -> time (BR2_PACKAGE_TIME)

Target packages -> Hardware handling -> Firmware -> rpi-wifi-firmware (BR2_PACKAGE_RPI_WIFI_FIRMWARE)

Target packages -> Interpreter languages and scripting -> Python3 (BR2_PACKAGE_PYTHON3)

Target packages -> Networking applications -> wget (BR2_PACKAGE_WGET)
Target packages -> Networking applications -> wpa_supplicant (BR2_PACKAGE_WPA_SUPPLICANT)
Target packages -> Networking applications -> wpa_supplicant -> Enable nl80211 support (BR2_PACKAGE_WPA_SUPPLICANT_NL80211)
Target packages -> Networking applications -> wpa_supplicant -> Enable AP mode (BR2_PACKAGE_WPA_SUPPLICANT_AP_SUPPORT)
Target packages -> Networking applications -> wpa_supplicant -> Enable autoscan (BR2_PACKAGE_WPA_SUPPLICANT_AUTOSCAN)
Target packages -> Networking applications -> wpa_supplicant -> Enable WPA3 support (BR2_PACKAGE_WPA_SUPPLICANT_WPA3)
Target packages -> Networking applications -> wpa_supplicant -> Install wpa_cli binary (BR2_PACKAGE_WPA_SUPPLICANT_CLI)
Target packages -> Networking applications -> wpa_supplicant -> Install wpa_client shared library (BR2_PACKAGE_WPA_SUPPLICANT_WPA_CLIENT_SO)
Target packages -> Networking applications -> wpa_supplicant -> Install wpa_passphrase binary (BR2_PACKAGE_WPA_SUPPLICANT_PASSPHRASE)
Target packages -> Networking applications -> iptables (BR2_PACKAGE_IPTABLES)
Target packages -> Networking applications -> ntp (BR2_PACKAGE_NTP)
Target packages -> Networking applications -> ntp -> sntp (BR2_PACKAGE_NTP_SNTP)
Framebuffer Logo

Have you ever noticed the identifier at the top of each tty representing the number of CPU cores? This is called a framebuffer identifier, and while you can ignore it and keep the default (or disable it), having a custom identifier would be cool. Additionally, you might want to replace the Raspbian identifier with your company’s logo. Manually doing this work is usually a tedious task; however, thanks to Buildroot, this process is very quick and doesn’t require weird format conversions. You just need to place a 64×64 PNG or JPEG image (with a black background) into the root of the Buildroot directory and edit the value of the BR2_LINUX_KERNEL_CUSTOM_LOGO_PATH flag in Buildroot’s menuconfig using the absolute path of the image. That’s it! Once you are satisfied with your configuration, save the configuration file and exit menuconfig by pressing Ctrl+C.
Kernel Configuration
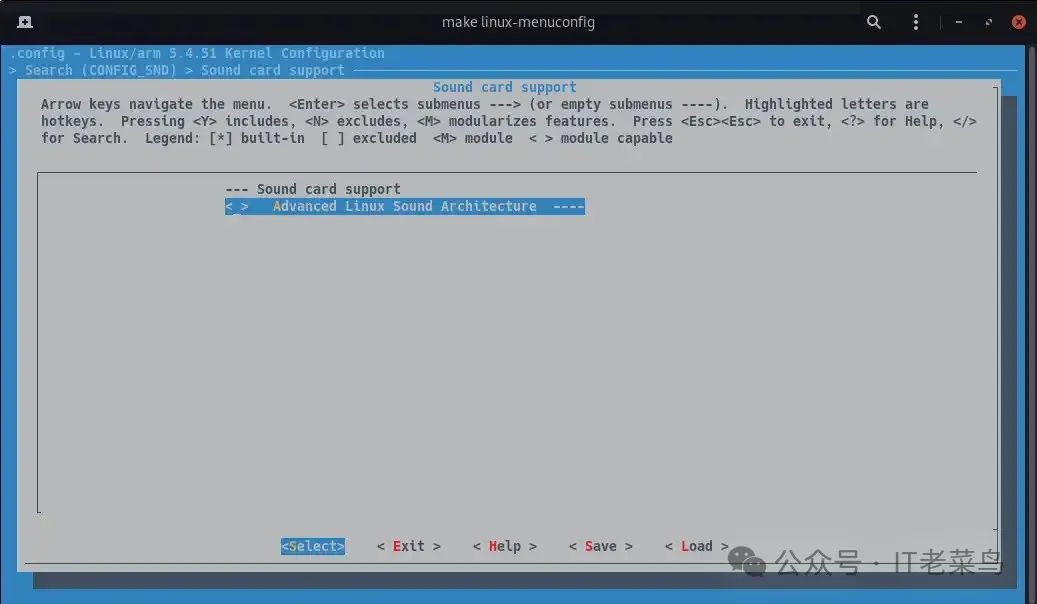
Another cool thing about Buildroot is that you can manually configure the Linux kernel to include (or remove) anything that is not enabled by default. To do this, simply run make linux-menuconfig to open another menuconfig menu. It’s worth mentioning that for many applications, there’s no need to touch the kernel: it works fine with the default configuration. But just for the purpose of this tutorial, let’s see how to remove certain things; for example, since I don’t plan to use audio in my Raspberry Pi Zero, let’s remove ALSA support (CONFIG_SND):
Once done, run make all again and wait while Buildroot downloads, compiles, and installs everything we have selected so far.
Init System
As you may have noticed, we haven’t talked about one of the most critical parts of the operating system throughout the system configuration process: the init system. Specifically, I haven’t mentioned one of the most common init systems for GNU/Linux: systemd. While you can easily change the default init system from “System Configuration -> Init System,” I think the fastest and simplest init system for low-performance embedded systems is the one that comes with Busybox. Don’t get me wrong; this is not the common anti-systemd debate that has existed since systemd was released; I like systemd and its many features, but for embedded applications, nothing beats the minimalism and simplicity of Busybox’s init system. Additionally, systemd requires a different filesystem framework (different from Buildroot’s default framework) and some large dependencies like dbus and udev. Therefore, my recommendation is to stick with Busybox’s default init system unless your embedded project relies on some features of systemd (like cgroups, namespaces, or SELinux).
Image Configuration: Overlay Filesystem
Even after you have selected all the packages required for your embedded project, you still haven’t configured any of them. You can indeed configure after installation, but what if your client requests a Linux system with specific SSH configurations or a specific netfilter rule set? To achieve this, Buildroot provides an excellent way to handle configuration files and startup scripts: overlays! An overlay is just a simple directory that acts like the root directory of your system. In this directory, you can place all the files that you want to be copied into the embedded distribution at build time. For example, to copy a file into the /etc/ssh directory of your distribution, you just need to create the following structure:
overlayfs/
`-- etc/
    `-- ssh/
        `-- sshd_config

2 directories, 1 file
Buildroot will copy this file into the image based on the directory structure you created. All you need to do is enable it; look for the BR2_ROOTFS_OVERLAY flag in the Buildroot menu and specify the absolute path of the overlay folder (it can be placed anywhere you want, but I recommend placing it in the same folder as Buildroot). Now that Buildroot has registered the overlay path, let’s configure our system.
OpenSSH Server
By default, OpenSSH does not allow remote root login, but if you need it for any reason at first boot, you can enable it by specifying PermitRootLogin yes in the sshd_config file. You can also configure the listening port and other security settings here.
mkdir -p $OVERLAY_FS/etc/ssh
cp -R output/target/etc/ssh/sshd_config $OVERLAY_FS/etc/ssh
vim $OVERLAY_FS/etc/ssh/sshd_config # Edit ssh server
The default SSH init script will terminate active connections during reboot (e.g., /etc/init.d/S50sshd restart); to avoid this, let’s create the following folders in the overlay.
mkdir -p $OVERLAY_FS/etc/init.d
cp -R output/target/etc/init.d/S50sshd $OVERLAY_FS/etc/init.d
Then edit the SSH configuration file by changing the following lines (vim $OVERLAY_FS/etc/init.d/S50sshd):
...
20 stop() {
21      printf "Stopping sshd: "
22      killall sshd
23      rm -f /var/lock/sshd
24      echo "OK"
25 }
26 restart() {
27      kill -HUP $(cat /var/run/sshd.pid)
28      echo "OK"
29 }
In this way, the SSH daemon will restart without terminating active sessions.
Connecting to Wi-Fi
By default, not only does Wi-Fi not work (because no network has been configured), but you also cannot recognize the Raspberry Pi’s onboard Wi-Fi card. To solve this issue, we first need to load the kernel module at startup:
cp -R output/target/etc/inittab $OVERLAY_FS/etc
vim $OVERLAY_FS/etc/inittab # Edit inittab file
Add this:
16 # Startup the system
17 ::sysinit:/bin/mount -t proc proc /proc
18 ::sysinit:/bin/mount -o remount,rw /
19 ::sysinit:/bin/mkdir -p /dev/pts /dev/shm
20 ::sysinit:/bin/mount -a
21 ::sysinit:/sbin/swapon -a
22 null::sysinit:/bin/ln -sf /proc/self/fd /dev/fd
23 null::sysinit:/bin/ln -sf /proc/self/fd/0 /dev/stdin
24 null::sysinit:/bin/ln -sf /proc/self/fd/1 /dev/stdout
25 null::sysinit:/bin/ln -sf /proc/self/fd/2 /dev/stderr
26 ::sysinit:/bin/hostname -F /etc/hostname
27 ::sysinit:/sbin/modprobe brcmfmac
28 # now run any rc scripts
29 ::sysinit:/etc/init.d/rcS
Then, configure the network interface:
mkdir -p $OVERLAY_FS/etc/network
cp -R output/target/etc/network/interfaces $OVERLAY_FS/etc/network
vim $OVERLAY_FS/etc/network/interfaces # Edit the interfaces
Add this:
# interface file auto-generated by buildroot

auto lo
iface lo inet loopback

auto wlan0
iface wlan0 inet dhcp
pre-up wpa_supplicant -B -Dnl80211 -iwlan0 -c/etc/wpa_supplicant.conf
post-down killall -q wpa_supplicant
wait-delay 15
udhcpc_opts -t 10
iface default inet dhcp
That’s it. On the next boot, the system will load the Wi-Fi module, configure the interface, execute the wpa_supplicant daemon using /etc/wpa_supplicant.conf as the configuration file, and finally request an IP address. These are the essential settings I believe you should have, but feel free to include anything else you need. After all, it’s not hard.
Serial Communication
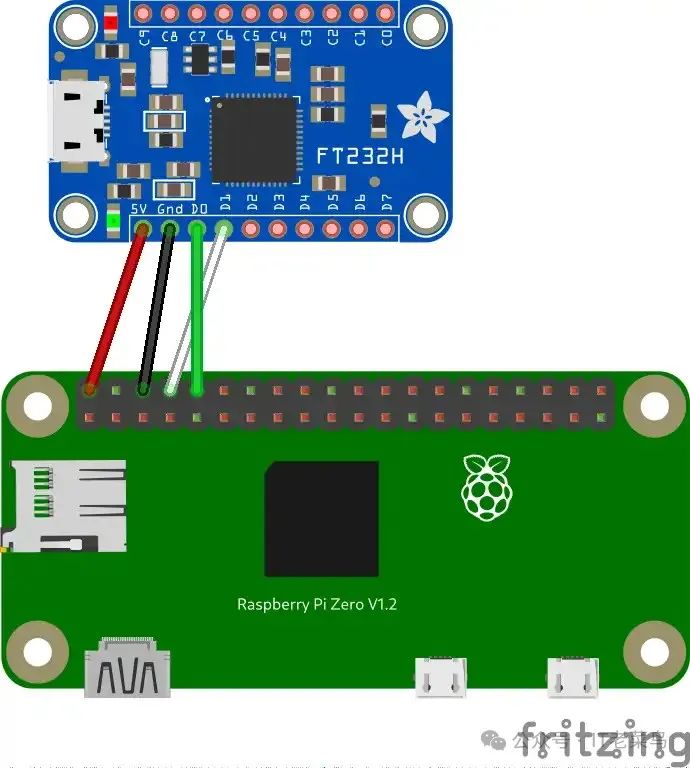
Debugging embedded systems can be quite tricky. When you have to figure out which part of the system is not working, you cannot handle the keyboard, video output, Ethernet/wireless connections, etc., all at the same time. In such cases, you must have a UART (Universal Asynchronous Receiver-Transmitter) device: a small piece of hardware that allows you to communicate with digital devices. UART is a very simple and old protocol; so if you have previously debugged microcontrollers, you probably already have one. By the way, if you have never used any of these, I recommend looking into the FT232H; the FT232H chip also supports various serial protocols like SPI, I2C, JTAG, etc. Regardless of which you choose, you will need to connect the RX and DX pins, along with the usual VCC and GND to power your Raspberry Pi. If you plan to use an external power supply, you don’t need to connect the VCC pin. Finally, you should have the following circuit:
Now that the circuit is configured, connect the UART device to your computer using the USB port, open a terminal, and run the following command:
$> screen /dev/ttyUSBX 115200On GNU/Linux systems
$> screen /dev/tty.usbserial-XXXXX 115200On macOS and *BSD. In both cases, replace X with the correct device (just use tab completion). If you’re on Windows, you can use PuTTY or use GNU screen via WSL. The second parameter of the command is the baud rate (symbols per second), which should be fixed at 115200 unless you changed it in Buildroot’s menu.
Initial Configuration
Once the serial communication is ready and the device is powered on, you should see a bunch of system logs continually appearing from the top of the terminal.
Once Linux boots and opens a getty on the serial port, you should be able to log in as root with the password you set in Buildroot. Note that it may take a bit longer the first time you boot the new image. This is normal; in fact, the system has to generate SSH keys using data from the random pool; additionally, since the network has not been configured yet, the Wi-Fi connection will fail (in our setup, udhcpc will try to obtain an IP address for no more than 10 seconds).
Network Settings
The Raspberry Pi Zero does not have an Ethernet port, and the only way to connect it to the network is through Wi-Fi. Since we have configured the system to automatically load the wireless drivers, you should be able to see the network interfaces using ip a. To add a new network using the wpa_passphrase utility, use the following command:
wpa_passphrase "SSID_NAME" "NETWORK_PW" >> /etc/wpa_supplicant.confBe sure to remove any other occurrences of the network entry in the wpa_supplicant.conf file. In the end, you should get something like this:
ctrl_interface=/var/run/wpa_supplicant
ap_scan=1

network={
     ssid="Router1"
     #psk="a_bad_pw"
     psk=XXX
}
After rebooting, the Raspberry Pi should be able to connect to the network by itself. To get its local IP address, you can use this not-so-pretty command chain:
ip a | grep wlan0 | grep inet | awk '{print $2}' | sed '$s/...$//'At this point, you can access your Raspberry Pi using SSH!
Adding a New User
It is not recommended to use the root account for common system usage; it’s advisable to add a new account:
mkdir -p /home
adduser -G users -s /bin/bash marco
Changing password for marco
New password:
Retype password:
passwd: password for marco changed by root
Let’s give him superuser privileges by adding his name to the sudoers (visudo):
##
## Runas alias specification
##
## User privilege specification
##
root ALL=(ALL) ALL
marco ALL=(ALL) ALL
## Uncomment to allow members of group wheel to execute any command
# %wheel ALL=(ALL) ALL
## Same thing without a password
# %wheel ALL=(ALL) NOPASSWD: ALL
## Uncomment to allow members of group sudo to execute any command
%sudo   ALL=(ALL) ALL
## Uncomment to allow any user to run sudo if they know the password
## of the user they are running the command as (root by default).
-- INSERT --                                                  80,20         91%
SSH Server (Again)
The default SSH configuration we did at the beginning allows remote root login; however, for security reasons, you should disable it. To do this, simply change PermitRootLogin back to no in /etc/ssh/sshd_config. After that, restart the daemon by running /etc/init.d/S50sshd restart; your active connections should not be terminated.
Conclusion

Your brand new embedded Linux system should now be ready! Remember, this tutorial should be seen as an introduction to Buildroot; in reality, there is much more to do to create something usable and secure. However, I believe this should be a fairly solid starting point. You may now wonder why you would want to manually create your ARM Linux when there are many free precompiled solutions that include more packages and a wider community. To be fair, if you ask yourself this question, you might want to use Arch Linux ARM, Raspbian, or Fedora ARM. For most of your Raspberry Pi projects, there’s no need to build something like this, but at least there are two reasons you absolutely should give it a try:
- You need a minimal, highly customizable system tailored to a specific embedded application, and you find the available Linux distributions too “bulky” or complex for your needs. You also need a specific combination of software that is not available in any other existing distribution.
- You want to experience the actual work that Linux developers do (for free) to provide your favorite distribution. Building one from scratch should give you an appreciation for their work.
