1.LVM Principles
To understand the principles of LVM, we must first grasp four basic concepts of logical volumes.
① PE (Physical Extend) – Physical Extend
② PV (Physical Volume) – Physical Volume
③ VG (Volume Group) – Volume Group
④ LV (Logical Volume) – Logical Volume
PV (Physical Volume)
A physical volume is the basic storage device in the LVM mechanism, typically corresponding to a regular partition or an entire hard disk.
When creating a physical volume, a reserved block is created at the beginning of the partition or hard disk to record LVM attributes, and the storage space is divided into basic units (Physical Extent, PE) with a default size of 4MB, thus forming the physical volume.
Physical volumes are generally directly referenced by their device file names, such as /dev/sdb1, /dev/sdb1, /dev/sdd, etc.
For ordinary partitions converted into physical volumes, it is recommended to first use the fdisk tool to change the partition type ID to “8e” (8e indicates LVM logical volume). If it is an entire hard disk, all disk space can be divided into a primary partition before making corresponding adjustments.
VG (Volume Group)
A volume group consists of one or more physical volumes combined into a whole.
Physical volumes can be dynamically added or removed from the volume group.
Multiple physical volumes can form different volume groups, and the name of the volume group is user-defined.
LV (Logical Volume)
A logical volume is built on top of a volume group and has no direct relationship with physical volumes.
For a logical volume, each volume group is a whole, from which a small piece of space is “cut out” to serve as the basis for the user to create a file system; this small piece of space is called a logical volume.
After creating a file system on the logical volume using tools like mkfs, it can be mounted to a directory in the Linux system for use.
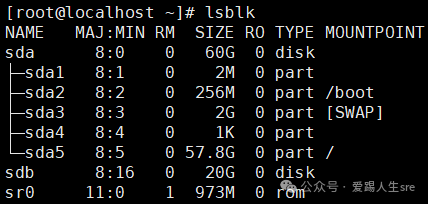
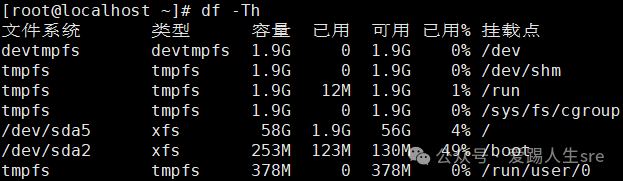
2.Check the newly added disk and existing usage
lsblk
df -Th
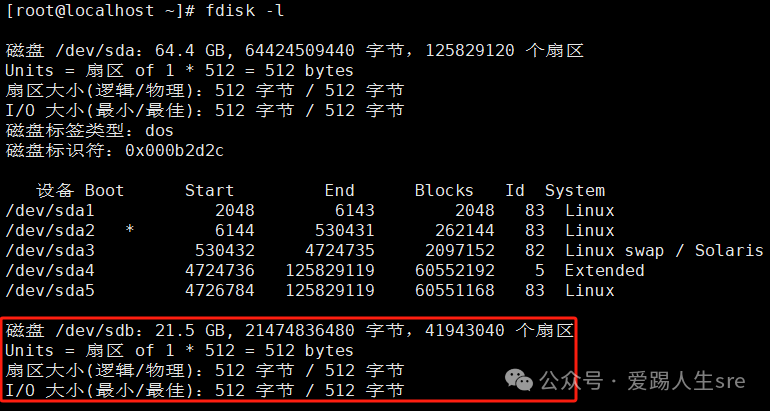
3.Check unpartitioned disks
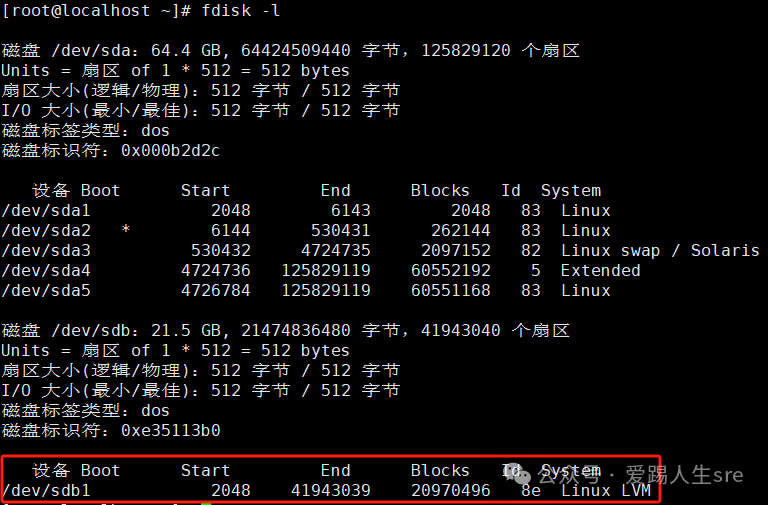
fdisk -l
4.Partition the disk sdb
fdisk /dev/sdb

Inputn to create a new partition. Inputp to create a primary partition. Input1 to create the first primary partition.

Inputp to print the partition status.

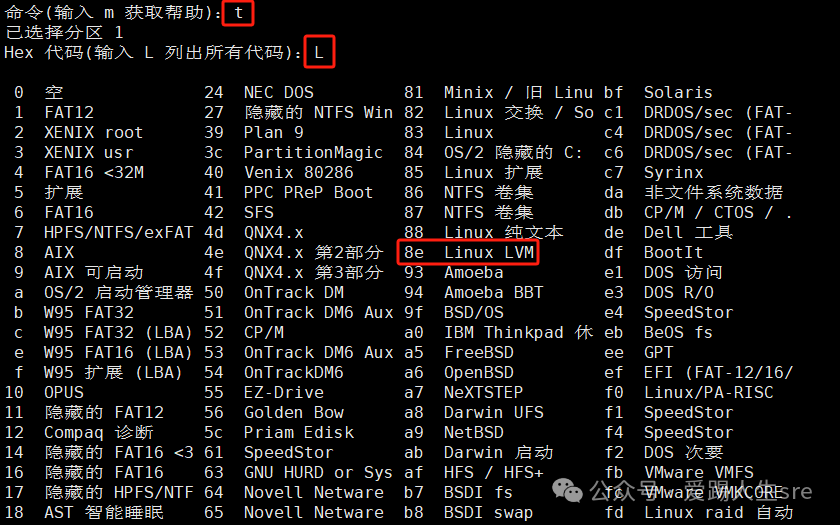
5.Change the system identifier
Inputt to change the attributes of partition 1. InputL to view the corresponding commands. Input8e to change partition 1 to Linux LVM format. Inputp to print the partition status and find that the created partition /dev/sdb1 is in Linux LVM format. Inputw to save and exit.
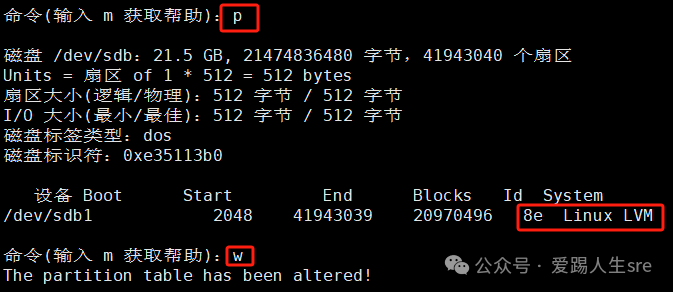
fdisk -l
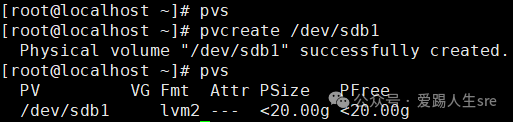
6.Create PV
Scan the system for PV: pvs Create PV: pvcreate /dev/sdb1 View PV: pvs
yum install lvm2 -y
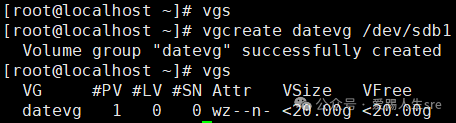
7.Create VG
Scan the system for VG: vgs Create VG: vgcreate datevg /dev/sdb1 (datevg is the custom name for the VG) View VG: vgs
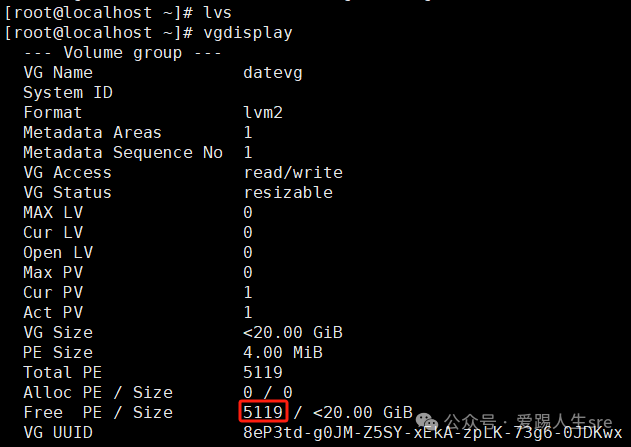
8.Create LV
Scan the system for LV: lvs Check the number of PEs in the VG: vgdisplay Create LV: lvcreate -l 5119 -n lv1 datevg (-l is the number of PEs in the VG, lv1 is the name of the LV created from datevg) View LV: lvs

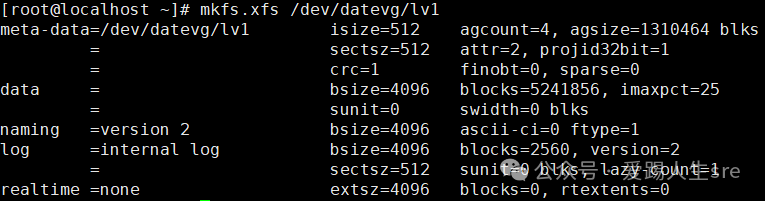
9.Format the newly created LV
mkfs.xfs /dev/datevg/lv1
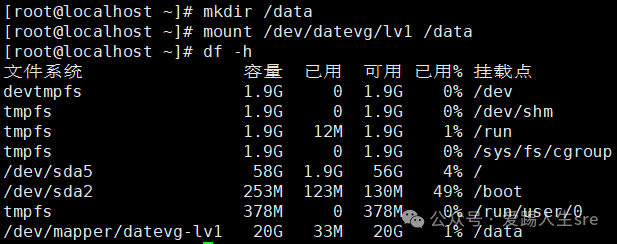
10.Create Directory
Create a test directory: mkdir /data Mount the directory: mount /dev/datevg/lv1 /data Check: df -h
11.Set up automatic mounting at boot
Use the blkid command to get the file type of the device.
blkid

Edit the /etc/fstab file system information
vim /etc/fstab
/dev/mapper/datevg-lv1 /data xfs defaults 0 0