Command Description


Basic AT Commands
AT: Test AT startup.
AT+RST: Restart the module.
ATE: Enable or disable AT echo function.
WiFi Connection Related Commands
AT+CWMODE: Query/set Wi-Fi mode (Station/SoftAP/Station+SoftAP).
AT+CWJAP: Connect to the specified WiFi network.
MQTT Configuration Commands
AT+MQTTUSERCFG: Set MQTT user attributes.
AT+MQTTLONGCLIENTID: Set MQTT client ID.
AT+MQTTLONGUSERNAME: Set MQTT login username.
AT+MQTTLONGPASSWORD: Set MQTT login password.
AT+MQTTCONNCFG: Set MQTT connection attributes.
AT+MQTTALPN: Set MQTT Application Layer Protocol Negotiation (ALPN).
AT+MQTTSNI: Set MQTT Server Name Indication (SNI).
AT+MQTTCONN: Connect to MQTT Broker.
AT+MQTTPUB: Publish MQTT message (string).
AT+MQTTPUBRAW: Publish long MQTT message.
AT+MQTTSUB: Subscribe to MQTT Topic.
AT+MQTTUNSUB: Unsubscribe from MQTT Topic.
AT+MQTTCLEAN: Disconnect MQTT connection.
Process
Configure Huawei Cloud Platform
Visit Huawei Cloud official website
https://www.huaweicloud.com/
Log in with your account and password.
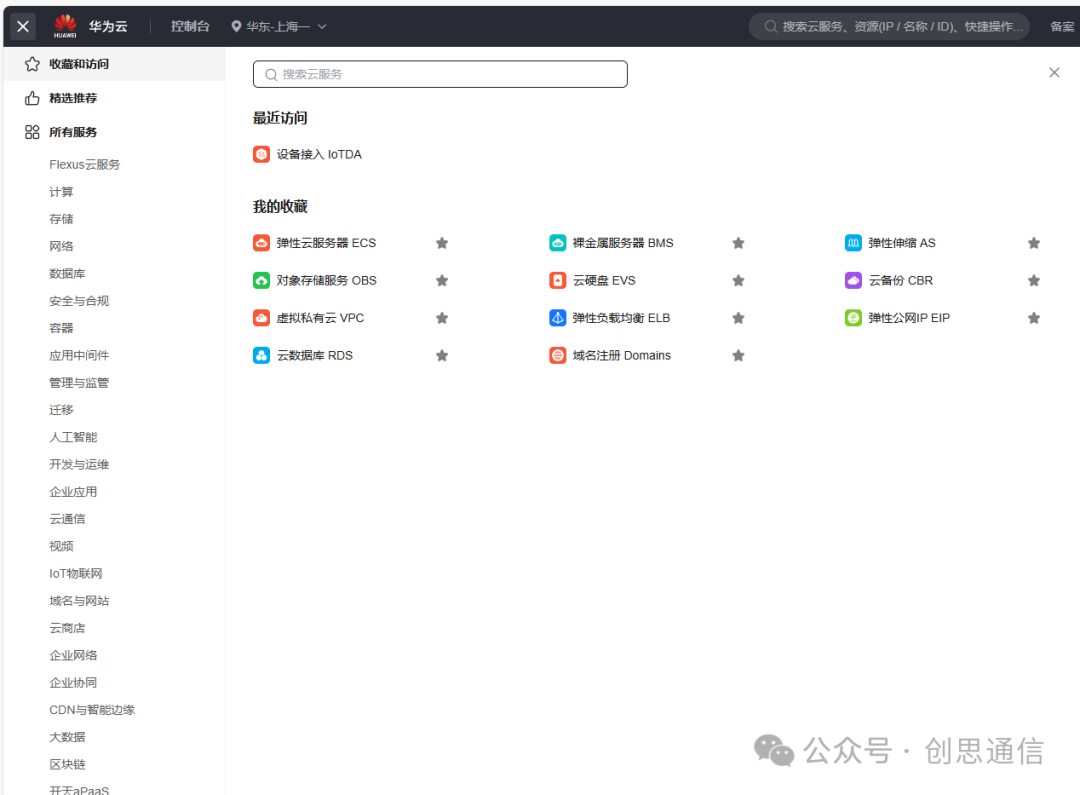
Click on “Console” in the upper right corner of the page to enter the management backend. In the service list on the upper left of the console, search for “Device Access IoTDA” and click to enter.
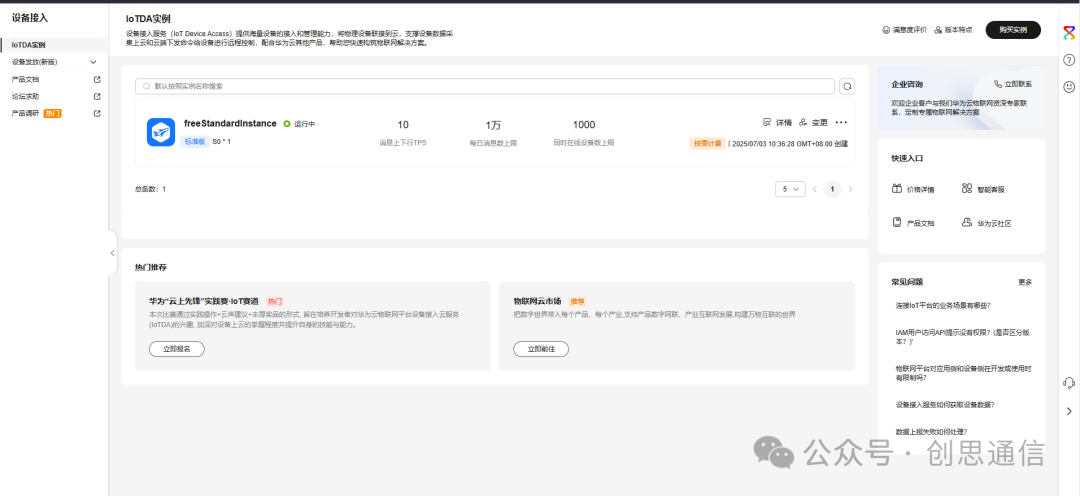
On the IoTDA service page, click “Instances” to enter the backend management interface.

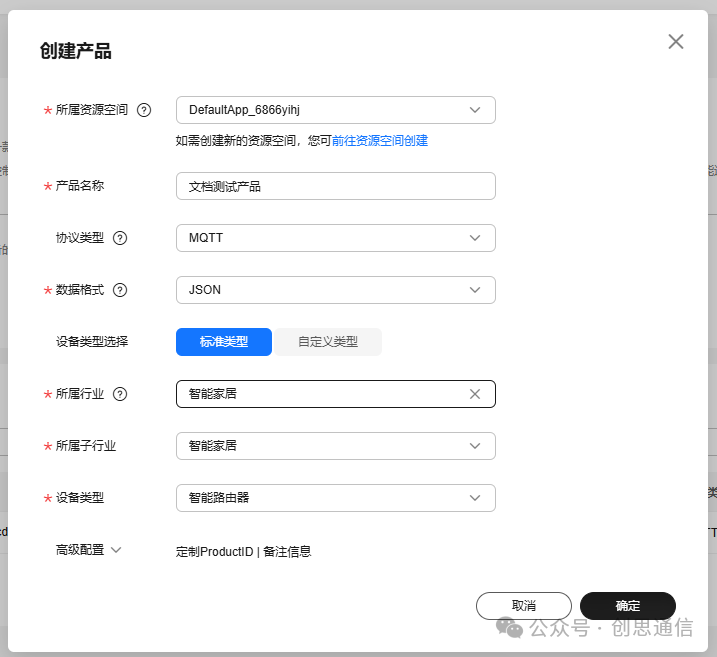
In the left navigation bar, select [Products] → [Create Product]. Fill in the product name (e.g., “Smart Sensor”), resource space, protocol type (e.g., MQTT), device type (custom or standard category), etc.
Find the created product in the product list, click on details to enter the product development detail page.
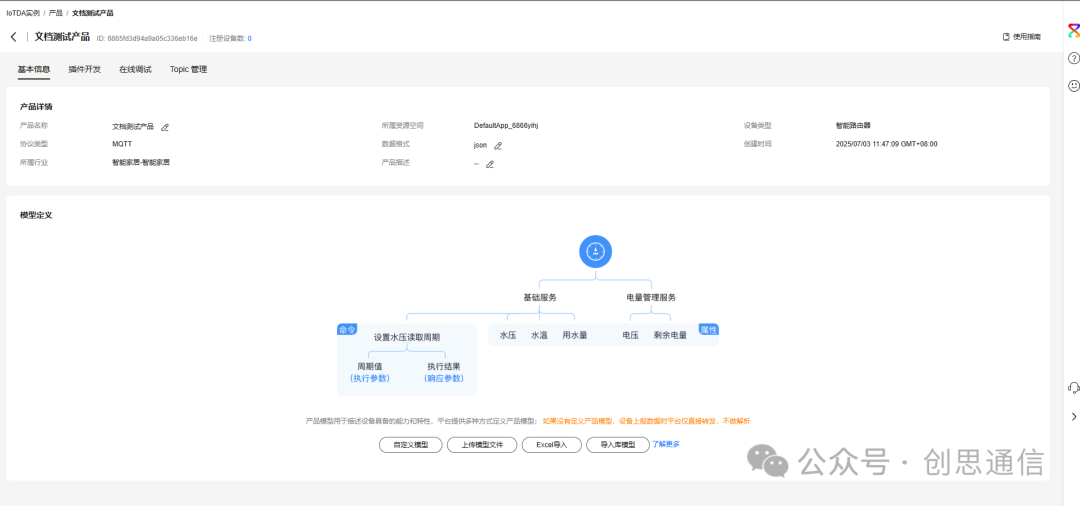
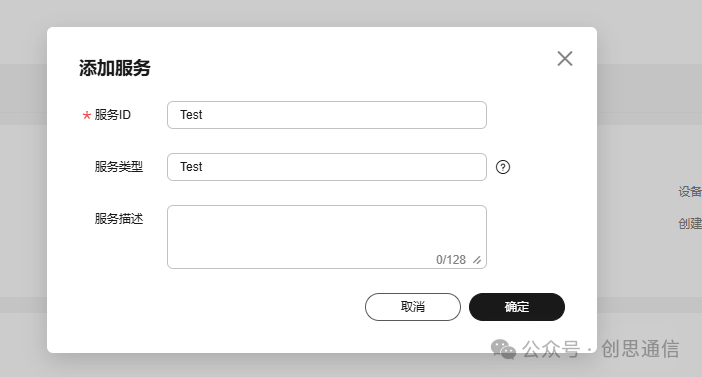
Click on “Custom Model” and fill in the basic information of the model (e.g., model name, description).
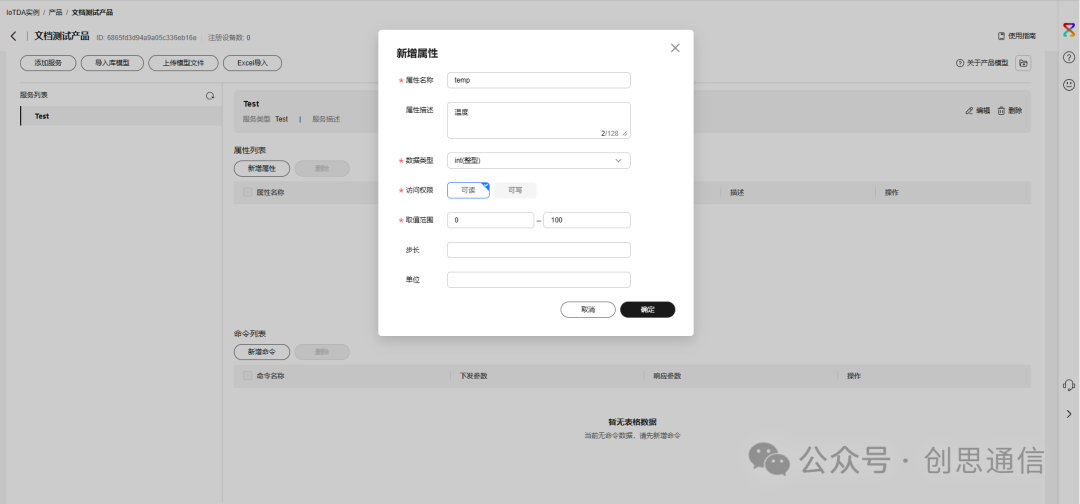
After adding, click on “Add Property” on this page, fill in the property name (e.g., “Temperature”), data type (int/float/string, etc.), access permission (read/write), unit (°C), etc., and click “OK”.
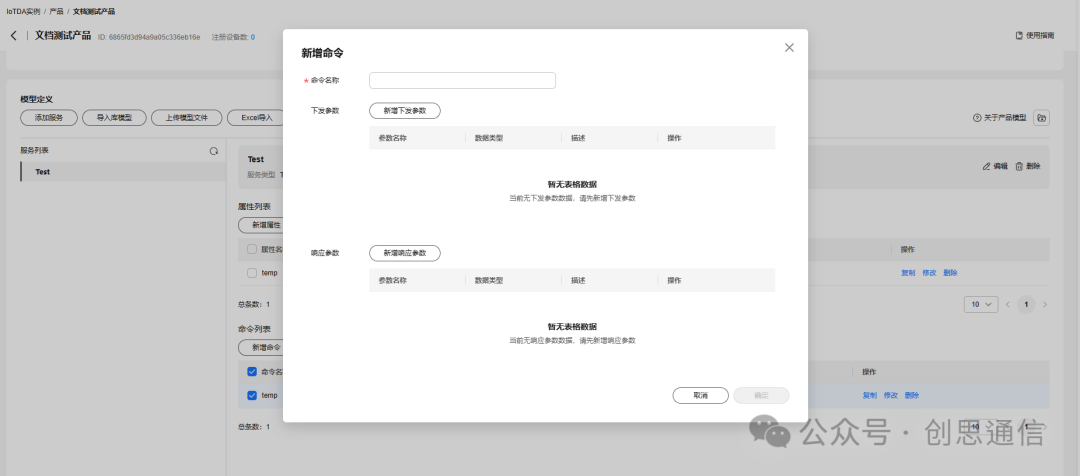
Click on “Add Command” to configure the command name (e.g., “Set Temperature Threshold”), parameter list (e.g., threshold value), response parameters, etc., and click “OK”.
Exit the product detail page, in the left navigation bar select [Devices] → [All Devices]. Click on “Register Device”, select the created product, fill in the device name, etc.

By following the above steps, you can complete the device access configuration for the Huawei Cloud IoTDA platform.
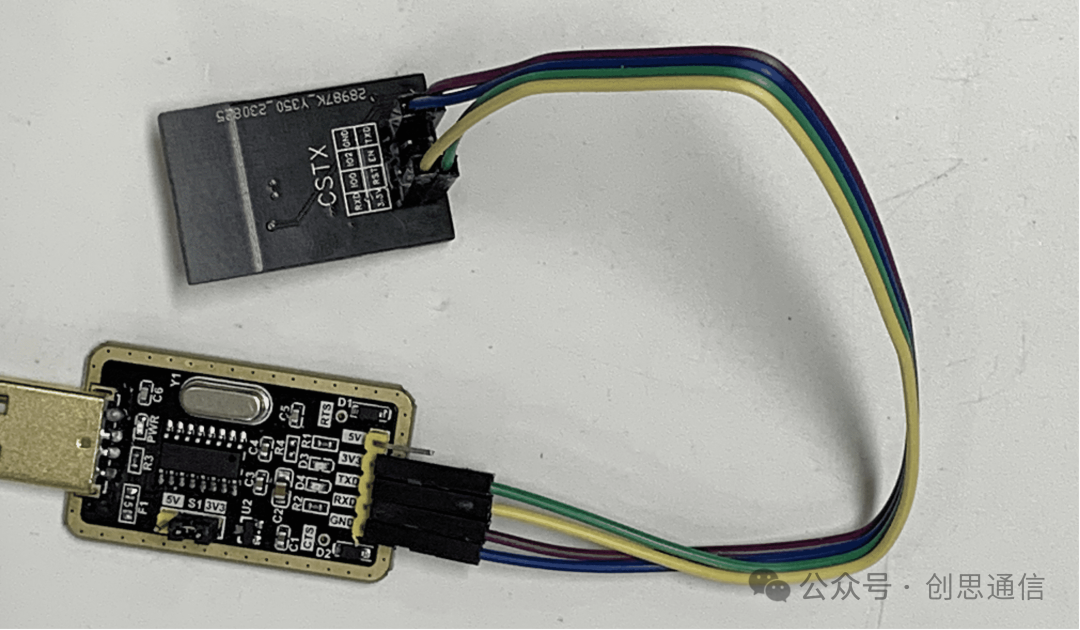
ESP12F Wiring
Physical Wiring
Connecting to Huawei Cloud Platform
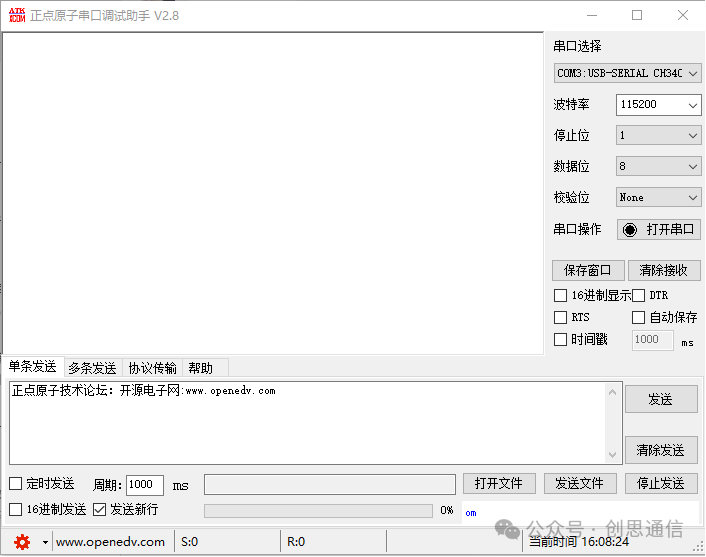
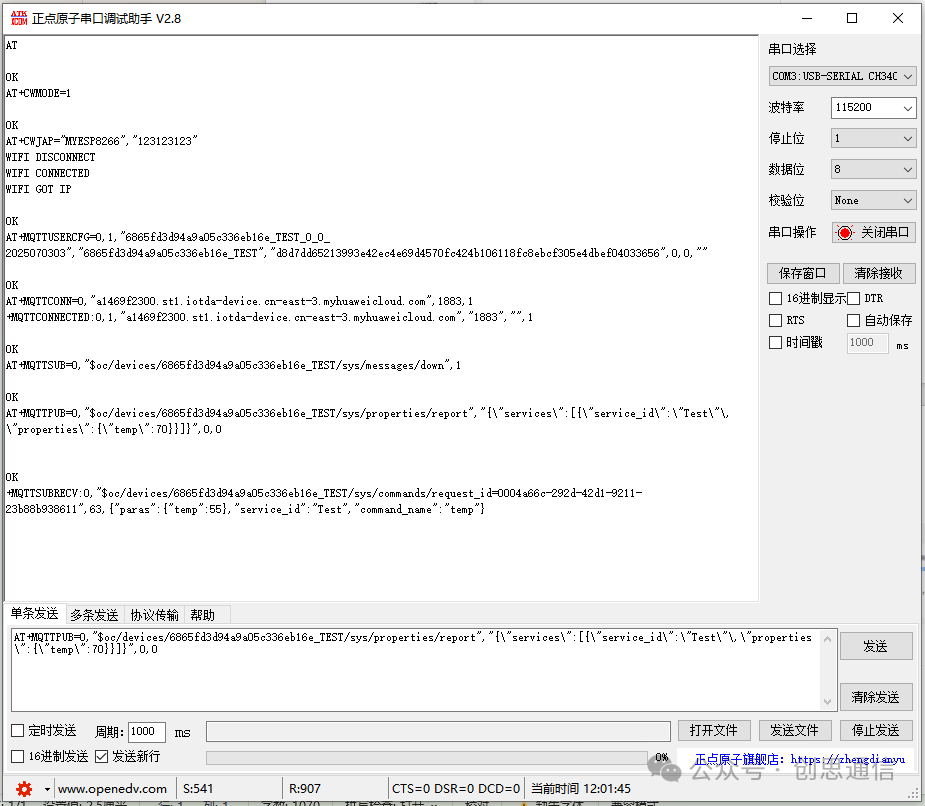
Connect the USB to TTL module to the device, open the serial debugging assistant, select the corresponding communication port, and set the baud rate to 115200. Then, by sending AT commands, you can achieve the connection between the device and the Huawei Cloud platform, completing data upload and data downlink operations.
AT Command Process and Command Results:
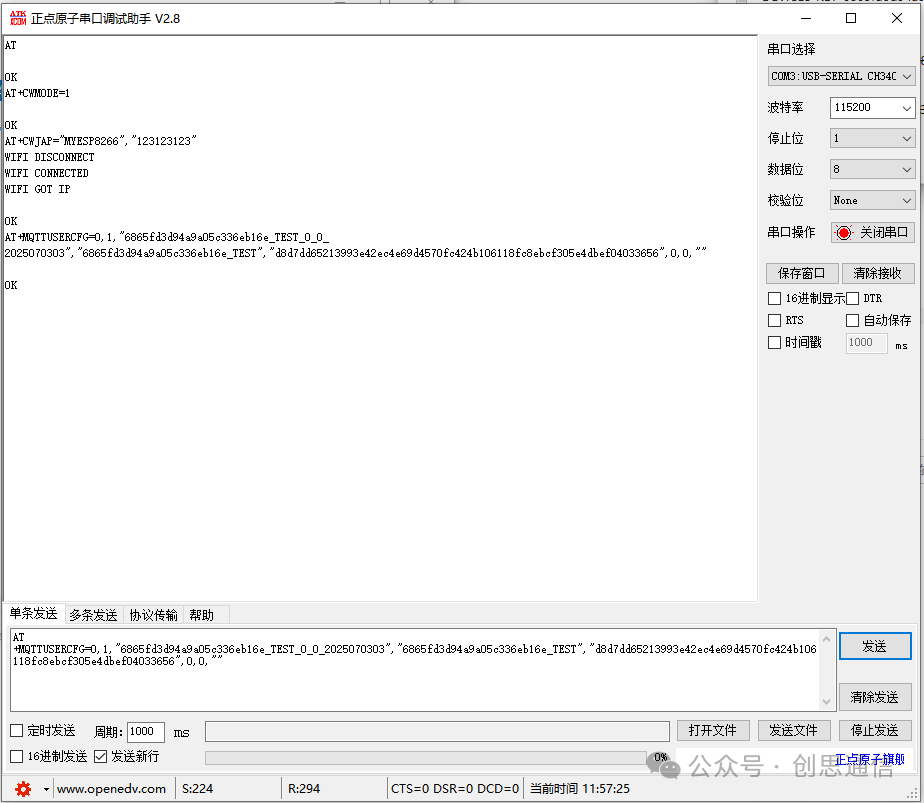
1. Test Module Response Send Command: AT
Description: Used to check if the WiFi module is working properly, returning OK indicates the module is ready.
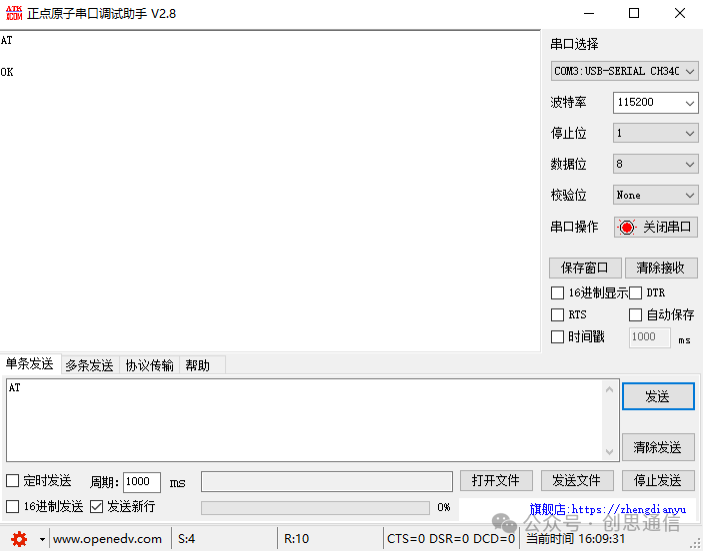
2. Set WiFi Working Mode Send Command: AT+CWMODE=1 Description: Set the module to Station mode, which is the device WiFi connection mode, preparing for subsequent network connection, returning OK indicates the setting is successful.

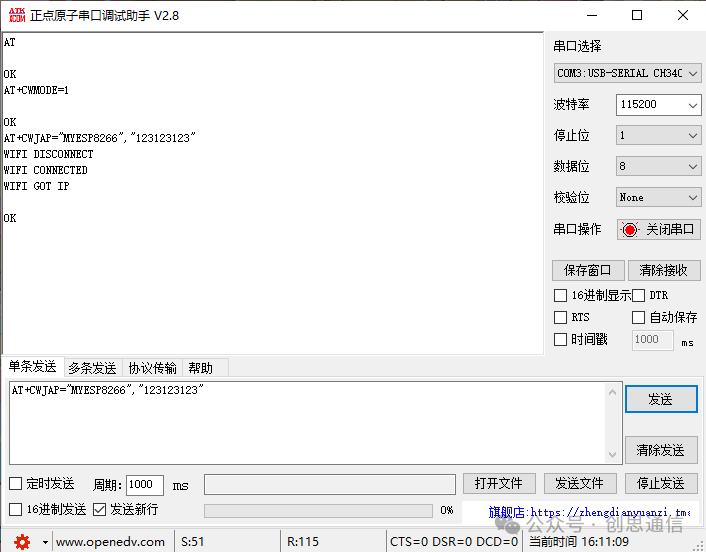
3. Connect to WiFi Network Send Command:
AT+CWJAP=”MYESP8266″,”123123123″ Description: MYESP8266 is the WiFi name, 123123123 is the password, returning WIFI CONNECTED+WIFI GOT IP indicates successful network connection.
4. Configure MQTT User Authentication Information Send Command:
AT+MQTTUSERCFG=0,1,”6865fd3d94a9a05c336eb16e_TEST_0_0_2025070303″,
“6865fd3d94a9a05c336eb16e_TEST”,
“d8d7dd65213993e42ec4e69d4570fc424b106118fc8ebcf305e4dbef04033656″,0,0,””
Description: 0 is the client number (fixed to 0 in single client scenarios);
6865fd3d94a9a05c336eb16e_TEST_0_0_2025070303 is the ClientID;
6865fd3d94a9a05c336eb16e_TEST is the username device ID;
d8d7dd65213993e42ec4e69d4570fc424b106118fc8ebcf305e4dbef04033656 is the Password device key, returning OK indicates user information configuration is successful.
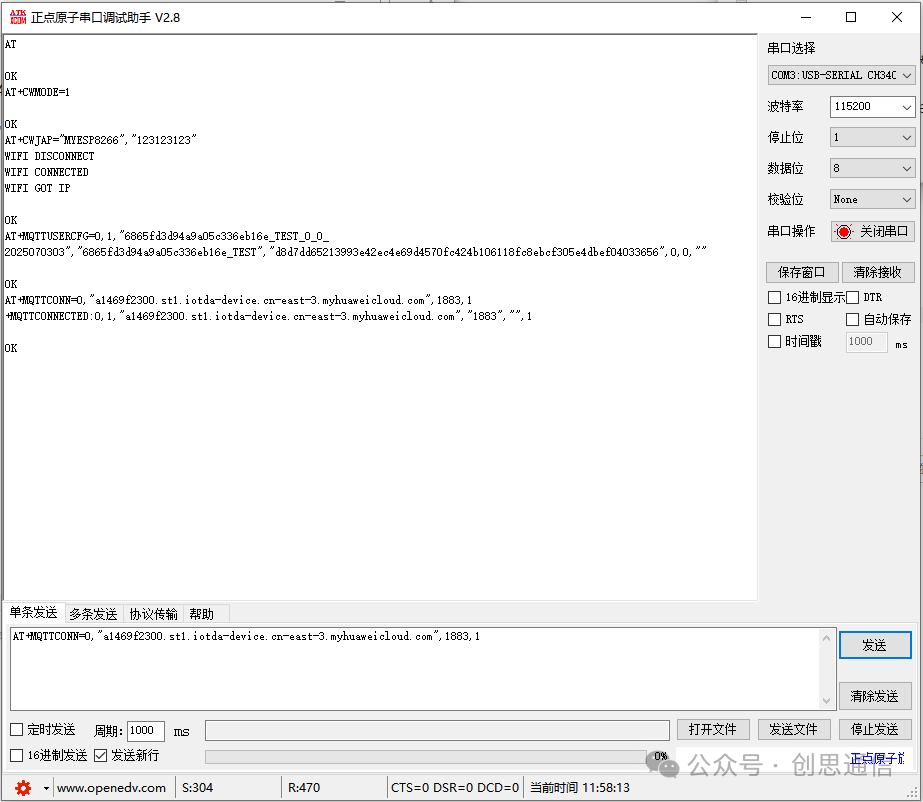
5. Connect to MQTT Broker Send Command:
AT+MQTTCONN=0,”a1469f2300.st1.iotda-device.cn-east-3.myhuaweicloud.com”,1883,1
Description:
a1469f2300.st1.iotda-device.cn-east-3.myhuaweicloud.com is the MQTT access address for Huawei Cloud IoTDA service; 1883 is the MQTT port; 1 indicates to clean the session (set as needed), returning MQTT CONNECTED indicates successful connection to the platform.
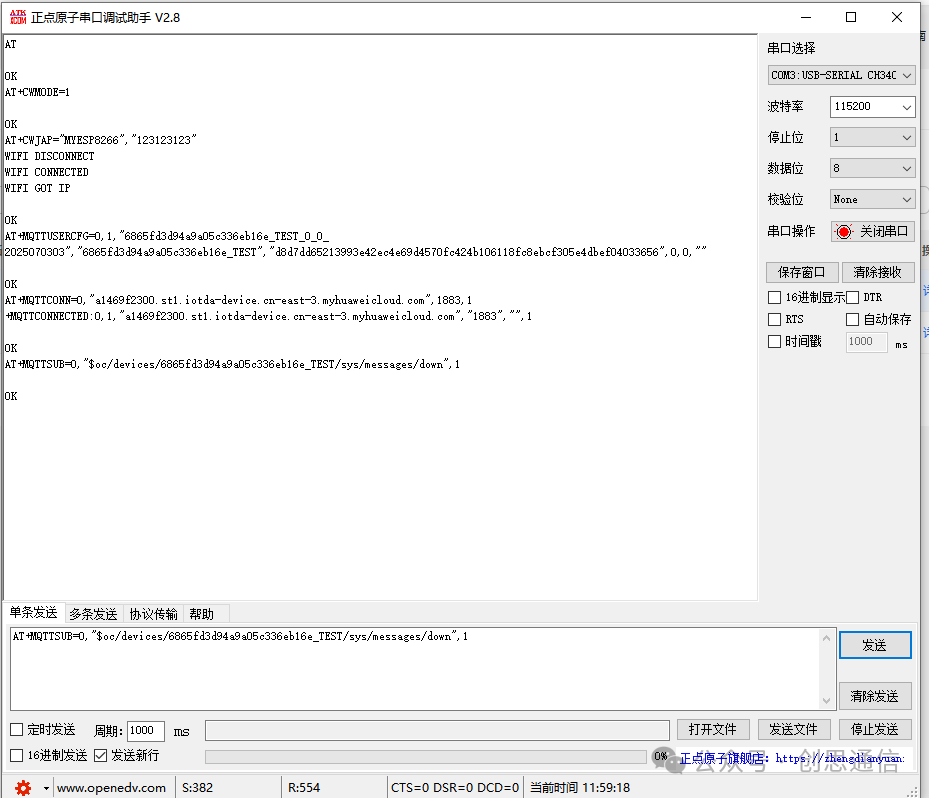
6. Subscribe to Platform Command Topic Send Command:
AT+MQTTSUB=0,”$oc/devices/6865fd3d94a9a05c336eb16e_TEST/sys/messages/down”,1Description: Subscribe to the topic for attribute commands issued by the Huawei Cloud platform, 1 is the QoS level (ensure reliable message reception), returning OK indicates successful subscription, after which commands issued by the platform can be received by the module.
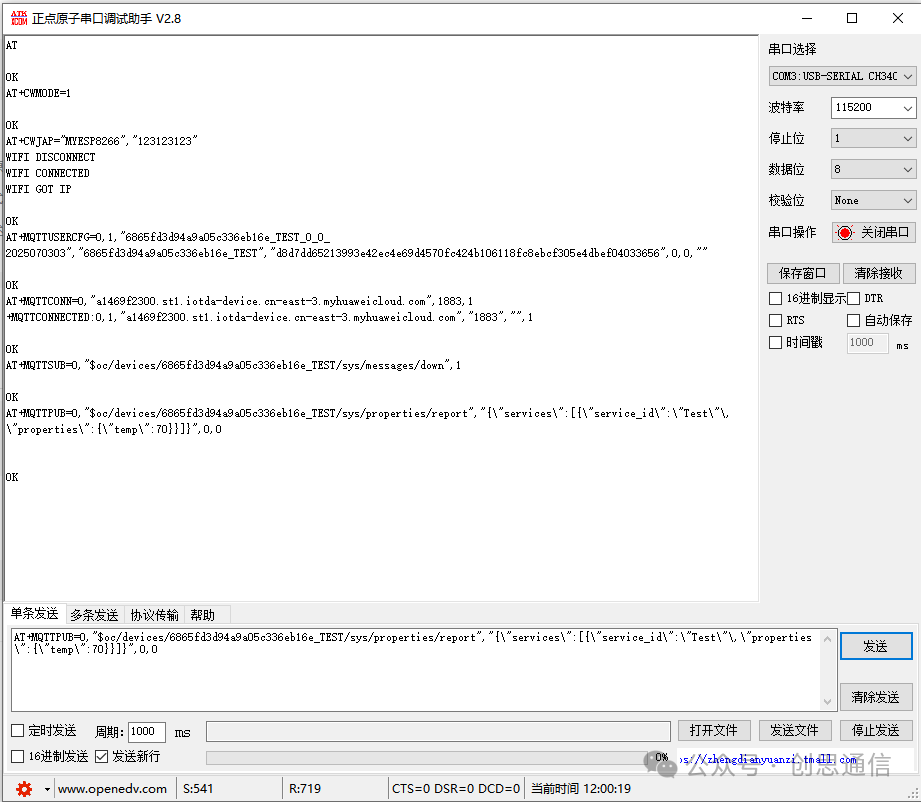
7. Report Device Data to the Platform Send Command:
AT+MQTTPUB=0,”$oc/devices/6865fd3d94a9a05c336eb16e_TEST/sys/properties/report”,”{\”services\”:[{\”service_id\”:\”Test\”,\”properties\”:{\”temp\”:70}}]}” ,0,0Description: Report data to the specified topic on the platform, in the example reporting temp (temperature) value as 70; 0,0 indicates QoS level and retain message flag, returning OK indicates data report trigger successful, the platform can receive the data.
Huawei Cloud Platform Data Interaction Operations:
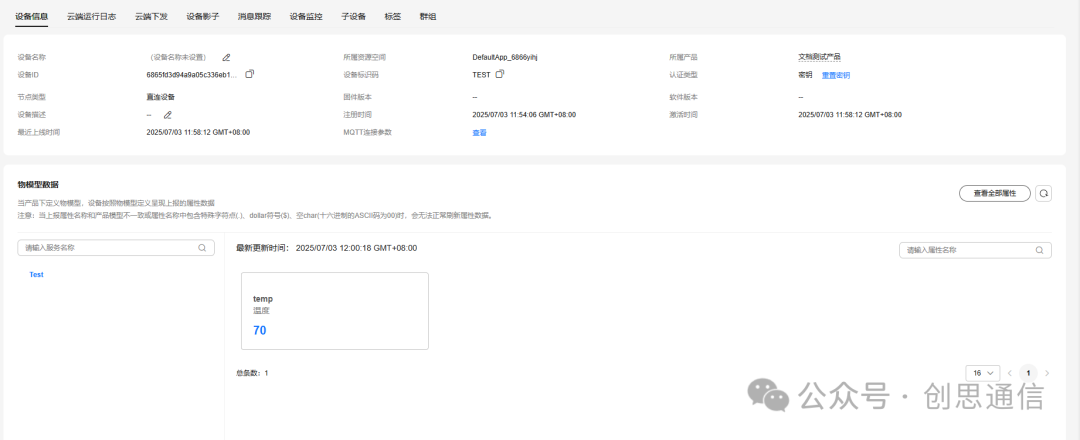
In the Huawei Cloud IoTDA console, in the left navigation bar, select [Devices] → [All Devices], click on the target device name to enter the detail page. You can view the device basic information (such as device ID, online status, registration time), attribute report data (such as temperature).
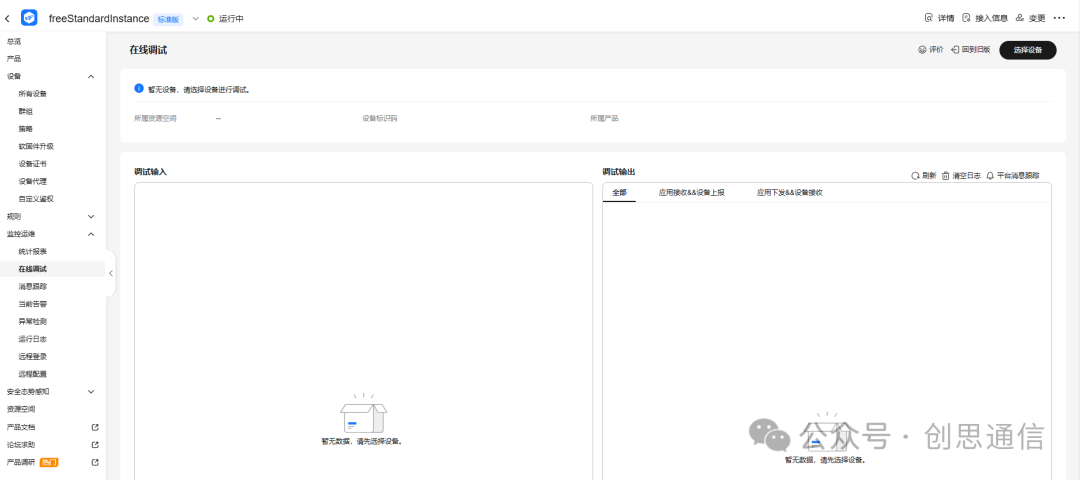
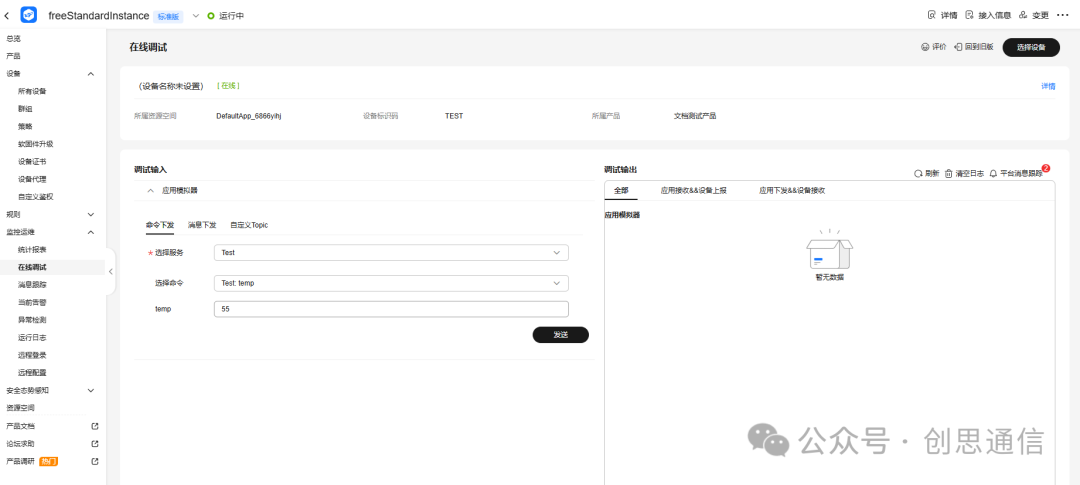
In the console, select [Monitoring and Maintenance] → [Online Debugging], click the “Select Device” button, and select the target device from the list (ensure the device is online).
Select Service: Corresponding service name defined in the device model (e.g., “Temp”). Select Command: Choose specific command based on service type (e.g., “setTemperature”). Fill in the data to be sent: Enter values according to command parameter requirements (e.g., 25). Click the “Send” button, and the platform will send commands to the device.
In the serial debugging assistant, you can monitor the status of the data received by the device in real-time:
Command Summary
config.css
AT
AT+CWMODE=1
AT+CWJAP="MYESP8266","123123123"
AT+MQTTUSERCFG=0,1,"6865fd3d94a9a05c336eb16e_TEST_0_0_2025070303","6865fd3d94a9a05c336eb16e_TEST","d8d7dd65213993e42ec4e69d4570fc424b106118fc8ebcf305e4dbef04033656",0,0,""
AT+MQTTCONN=0,"a1469f2300.st1.iotda-device.cn-east-3.myhuaweicloud.com",1883,1
AT+MQTTSUB=0,"$oc/devices/6865fd3d94a9a05c336eb16e_TEST/sys/messages/down",1
AT+MQTTPUB=0,"$oc/devices/6865fd3d94a9a05c336eb16e_TEST/sys/properties/report","{\"services\":[{\"service_id\":\"Test\",\"properties\":{\"temp\":70}}]}",0,0
Purchase Link
https://item.taobao.com/item.htm?id=759224402169