In today’s rapidly developing technology, the Raspberry Pi has gained widespread attention for its compact yet powerful capabilities. As an excellent tool for developers, makers, and DIY enthusiasts, the Raspberry Pi can easily implement various projects. Among these projects, display output is a crucial part. This article will detail the three main display interfaces of the Raspberry Pi: HDMI, DSI, and remote login, helping you find the display solution that suits you best.
1. HDMI Interface
Introduction to HDMI
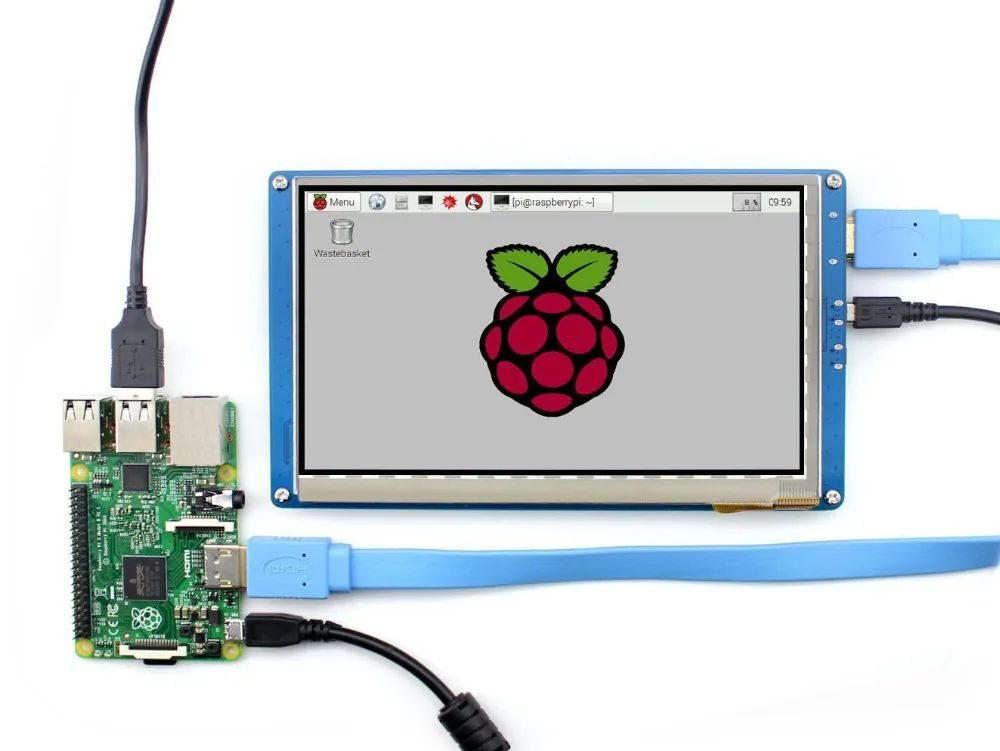
HDMI (High-Definition Multimedia Interface) is a common digital video and audio interface, and it is one of the most used display connection methods for the Raspberry Pi. It supports resolutions up to 4K, making it suitable for high-definition display needs.
Compatibility
Almost all models of the Raspberry Pi (including Raspberry Pi 1, 2, 3, 4, and Zero series) support HDMI interfaces. The Raspberry Pi 4 even comes with two HDMI ports, allowing it to connect to two displays simultaneously, greatly enhancing multimedia and multitasking capabilities.
Usage Scenarios
Using the HDMI interface, you can easily connect the Raspberry Pi to a TV, monitor, or projector, making it suitable for creating home theaters, gaming consoles, or programming environments. The plug-and-play feature of the HDMI interface simplifies the connection process for users, allowing for high-definition images with simple settings.
Configuration Steps
-
1. Connect the Device: Use a standard HDMI cable to connect the Raspberry Pi to the monitor or TV.
-
2. Power On: Insert power and start the Raspberry Pi; the system will begin to load.
-
3. Adjust Resolution: If the display effect is not ideal, you can adjust the resolution through the configuration file. Open
<span>/boot/config.txt</span>, and modify the<span>hdmi_group</span>and<span>hdmi_mode</span>parameters.
2. DSI Interface
Introduction to DSI
DSI (Display Serial Interface) is a dedicated display interface primarily used to connect the official Raspberry Pi touchscreen display. Compared to HDMI, DSI can achieve higher bandwidth and uses simpler cables, making it suitable for space-constrained projects.
Advantages
The advantage of the DSI interface lies in its miniaturization and integration, making it suitable for developing embedded systems and personal projects. For example, the official 7-inch touchscreen display of the Raspberry Pi connects via the DSI interface, allowing for beautiful graphical interfaces and excellent user interaction experiences.
Usage Scenarios
The DSI interface is very suitable for creating portable devices, such as homemade tablets, gaming consoles, or other terminals that require touch operation. Using the DSI interface can effectively enhance the overall aesthetics and operability of the project.
Configuration Steps
-
1. Connect the Display: Insert the DSI connection cable into the DSI interface of the Raspberry Pi and the touchscreen display.
-
2. Install the Driver: The Raspberry Pi system usually automatically recognizes the DSI display; if it is not recognized, you can manually adjust it in the configuration file.
-
3. Test the Display: After rebooting the Raspberry Pi, check the display effect and confirm whether the touch function is working normally.
3. Remote Login
Introduction to Remote Login
Remote login allows users to operate the Raspberry Pi without relying on a physical display, accessing it over the network. Common remote login methods include SSH (Secure Shell) and VNC (Virtual Network Computing).
Advantages
-
1. No Display Required: You can operate the Raspberry Pi on any device with a network connection, without the need for additional displays and input devices.
-
2. High Convenience: With remote login, you can develop, control, and debug anytime and anywhere, greatly improving flexibility and convenience.
Usage Scenarios
Remote login is suitable for users who cannot conveniently connect a display at home or in the office, especially during development and debugging. Whether programming, configuring environments, or running scripts, remote login provides significant convenience.
Configuration Steps
-
1. Enable SSH: In the Raspberry Pi system, use the command
<span>sudo raspi-config</span>to enter the configuration interface and enable the SSH service. -
2. Install VNC: The Raspberry Pi comes with a VNC server pre-installed; after configuration, you can access the graphical interface remotely via a VNC client.
-
3. Connect and Operate: Use tools like Putty to connect to the Raspberry Pi via SSH, or connect via VNC Viewer for graphical operations.
Conclusion
Whether you choose HDMI, DSI interface, or remote login, the Raspberry Pi offers users flexible and diverse display solutions. Depending on different needs, you can choose the most suitable method for operation and development. This diversity makes the Raspberry Pi suitable not only for DIY enthusiasts but also for education, research, and business in various fields. I hope this article helps you better understand the display options of the Raspberry Pi, enabling you to realize your creative projects.
With the correct configuration and usage, you will be able to fully unleash the potential of the Raspberry Pi and create countless amazing projects.