Linux | Red Hat Certification | IT Technology | Operations Engineer
👇 Join our technical exchange QQ group with 1000 members, note 【public account】 for faster approval

1. Introduction to Shell Commands
Before understanding Linux operating permissions, let’s add a knowledge point: shell – command line interpreter. For Linux, it is the operating system, which is the kernel. Users cannot directly operate the operating system, hence the need for the “shell” program that acts as the interface to the kernel.
Function of the shell:
It translates the user’s commands for the kernel to process.
At the same time, it translates the kernel’s processing results back to the user.
2. Linux Permissions
Permissions = Role + Target Attributes. To modify permissions, one must start with the role or change the target attributes.
1. Users in Linux
There are two types of users in Linux: root user and regular user.
-
The root user has super privileges, unrestricted by permissions, and can do anything without limitations.
-
Regular users are constrained by permissions.
-
The command prompt for the superuser is #, while the prompt for regular users is $.
Only users with the corresponding permissions can perform certain operations. For example, to install a program in the /usr/bin directory, root permissions are required.
If a regular user does not have root permissions, they can temporarily elevate their permissions using sudo.
The elevation of sudo is based on a “whitelist” set by the root user, where only users on the whitelist can elevate their permissions.
For example, if the user tr is not on the whitelist:

2. The su Command
There are two ways: su username and su – username. Using su switches without changing the current directory, while su – switches as if logging in as another user.
-
Switching from root to another user does not require a password.
-
Switching from another user to root requires a password (the password input will not be echoed).
For example, switching from the root user to user tr (note that the directory remains /home):

tr switching to root (note that the directory changes to the home directory):

Creating a user: use adduser username. This command will automatically generate a user directory in the /home directory.
3. Linux Permission Management
3.1. File Accessors
-
Owner of the file and directory: u—User
-
Users in the group of the file and directory owner: g—Group
-
Other users: o—Others
Anything other than u and g is o.

The first root represents the owner, and the second root represents the group.
Next, we see: the first – represents file attributes, and the following three characters in a group represent the corresponding access permissions for the accessors.
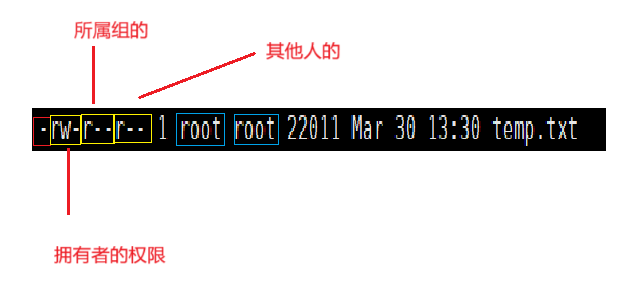
Each character is binary, indicating allowed (1) or denied (0), i.e., r or -.
And the order must be rwx, where r: read permission, w: write permission, x: executable permission (having executable permission does not mean the file is executable; the file must also be an executable file).
Therefore, a user’s permissions can also be represented by an octal number: for example, 6 represents 110, i.e., rw-.
For directories:
-
r: whether the directory contents and files can be viewed, such as ls. Even if internal files have r permission, if the parent directory does not have r, the internal files cannot be viewed.
-
w: whether files can be created and deleted in the directory. Whether a file can be deleted is unrelated to the file’s own permissions, but depends on the directory’s w permission.
-
x: whether the directory can be entered.
By default, if a new directory is created, rwx permissions must all be granted.
4. Modifying Permissions
1. Modifying Target Attributes
Command: chmod [options] permissions filename
Note: Only the file owner and root can change the file’s permissions.
Common options:
-
R: Recursively modify directory file permissions.
Format of chmod command permission values:
User identifier +/-/= Permission characters
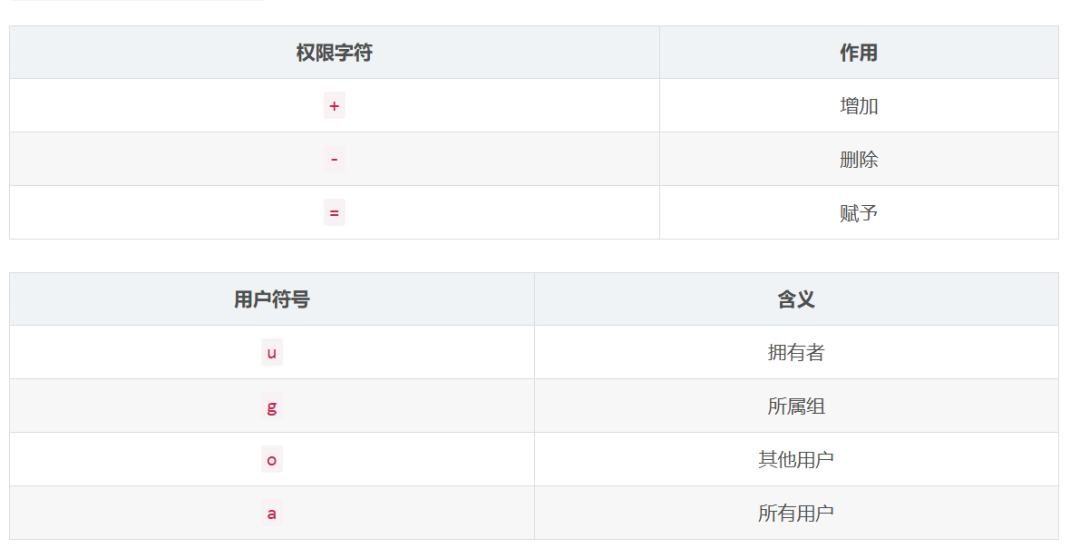
Examples:
-
chmod u+w abc.txt, modify single user permissions.
-
chmod o-rwx abc.txt, modify multiple permissions for a single user.
-
chmod u+x, g-rw abc.txt, modify multiple permissions for multiple users.
Three-digit octal number:
-
chmod 664 abc.txt, (i.e., owner: rw-, group: rw-, others: r–)
-
chmod 640 abc.txt
When we access a file, if we do not have the corresponding permissions, the system will deny our access.
In CentOS, permissions are determined only once, and the order of determining permissions is: owner → group → other users (i.e., first check if it is the owner, if so, apply the owner’s permissions; if not, check if it is in the group, and so on).
2. Modifying Owners
chown
chown command:
Format: chown [options] username[:group] filename
Prerequisite: Must have root-level permissions to modify the owner (root user or sudo elevation).
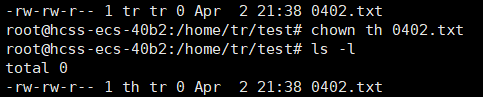
For example, a regular user cannot change the file owner to someone else:

Root user:
chgrp
chgrp command:
Function: Modify the group ownership of a file or directory (also requires root permissions).
Format: chgrp [options] groupname filename
Common option: -R: Recursively modify the group ownership of files or directories.

5. Default Permissions
As shown, when creating a file, the system automatically assigns default permissions to different roles, such as 664, which is the default permission.

The default permissions when creating are: files: 666, directories: 777.
So why is it 664 here?
This leads us to umask.
umask
umask is the permission mask that exists in the system, meaning that any permissions appearing in umask cannot appear in the final permissions.
Composition and meaning of the four-digit umask:
umask is displayed as a four-digit octal number, where the first digit represents special permission bits, and the last three correspond to the permission masks for the owner, group, and other users.
-
Special permission bit (first digit): This bit is used to set special permissions, namely setuid (4), setgid (2), and sticky (1). For example, if umask is 0022, the first digit 0 indicates no special permissions are set.
-
Owner permission mask (second digit): Corresponds to the owner’s permission mask; in 0022, the second digit 0 indicates no masking of the owner’s default permissions.
-
Group permission mask (third digit): Corresponds to the group permission mask; in 0022, the third digit 2 indicates masking the group’s write permission.
-
Other users permission mask (fourth digit): Corresponds to the other users’ permission mask; in 0022, the fourth digit 2 indicates masking other users’ write permission.
Specific calculation method: Final permissions = Initial permissions & (~umask), which is also the initial permissions – corresponding umask bits.
For example, for the group: Initial permissions: 111, umask is 010, then final permissions: 111 & 101 = 101.
Why have umask?
umask can remove unnecessary permissions, meet needs, and ensure security.
Configuring umask can control the default permissions of newly generated files, meeting the needs of more users.
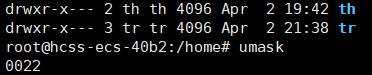
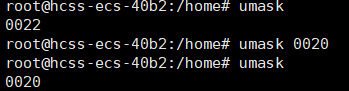
umask can also be modified:
The “isolation” between multiple users in Linux is also achieved through this. When we create a new user, an independent user file is created in the /home directory, which is by default open to all permissions for itself but prohibits permissions for other non-root users.

t Sticky Bit
For shared directories (where others have rwx permissions), if you want others to be able to create files but non-file owners cannot delete others’ files (even if they have w permission for the directory), how to achieve this?
Method: Set a “sticky bit” t on the directory (to recheck permissions when deleting files).
Syntax: chmod o+t directory_name
When a directory has a “sticky bit” set, files in that directory can only be deleted by:
-
Super administrators
-
The owner of the directory
-
The owner of the file
For example, the tmp directory under the root has a sticky bit set.

For course inquiries, add: HCIE666CCIE
↓ Or scan the QR code below ↓

If you have any technical points or content you want to see, please leave a message below to let us know!