
Case Overview
“Join Me to Make” is a memory game machine composed of 3 LED lights and 3 buttons. The game has a total of 10 levels. At the start, the LED lights will flash in a certain order, and after the flashing ends, players need to press the 3 corresponding buttons in sequence. If the sequence is correct, they move on to the more challenging next level; if they press the wrong button, the game ends.
The game is designed using Arduino, allowing students to develop computational thinking and programming skills during the making process.

Suitable Age
Middle school to high school

Materials Used
Functional materials: Arduino UNO board (if there is an integrated main board, it can be used directly; if not, an IO expansion board can be installed), LED module × 3, button module × 3, 3p connection line × 6
Structural materials: corrugated cardboard, colored paper, blue clay glue, cable ties, decorative stickers

Idea Analysis
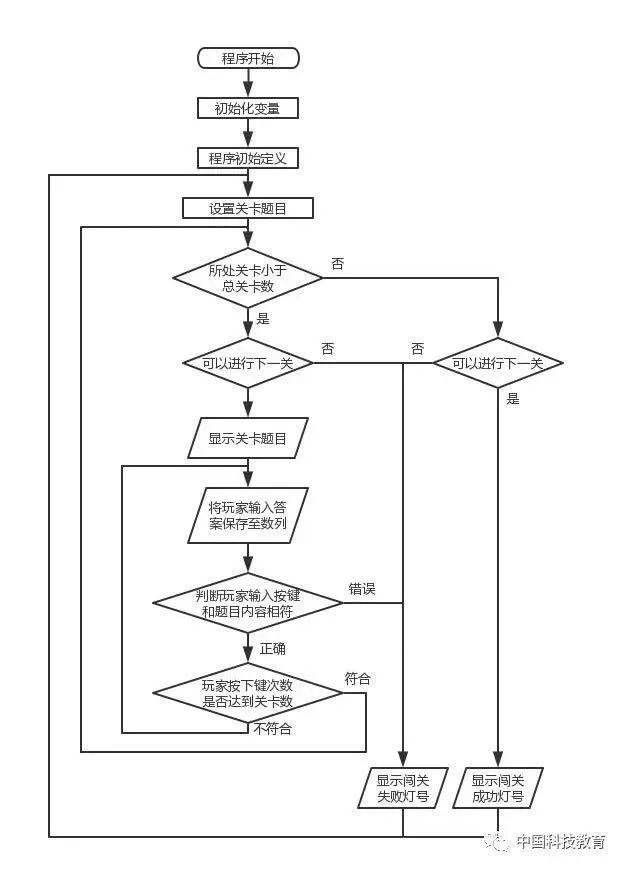
Before starting production, we should clarify the entire game idea to better design the game’s program. We can draw a flowchart (as shown in Figure 1) to make your thoughts clearer.

Program Design
Step 1: Hardware Connection
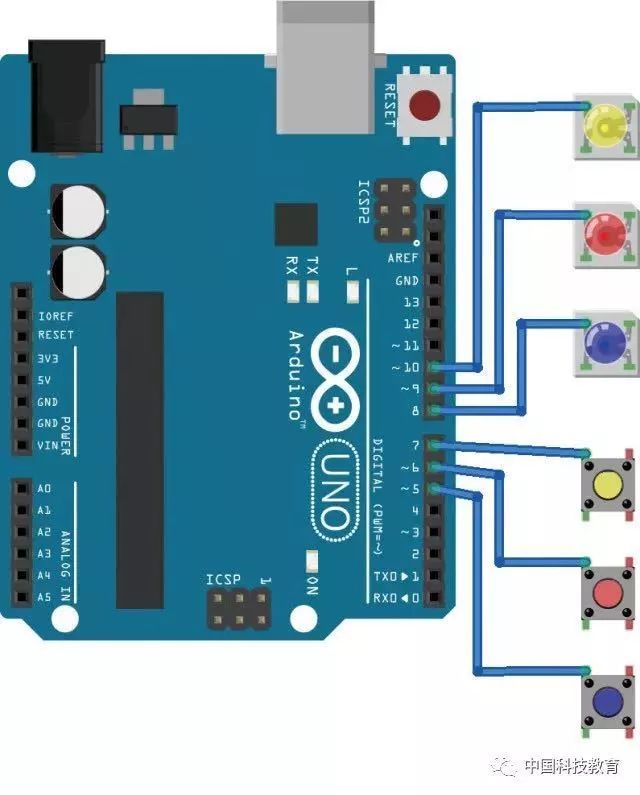
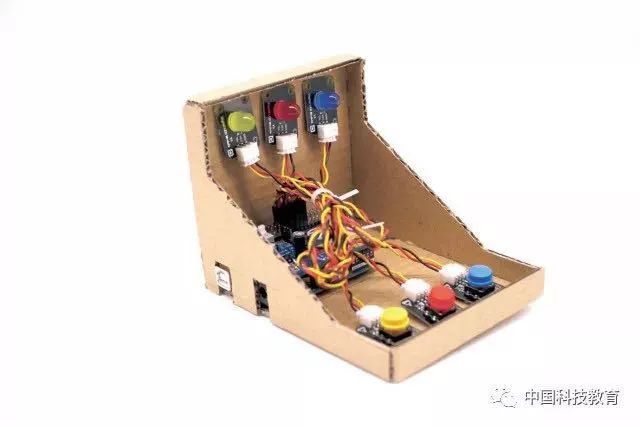
As shown in Figure 2, connect the blue, red, and yellow buttons’ Dupont interface to Arduino’s pins 5, 6, and 7, respectively, and connect the blue, red, and yellow LED Dupont interfaces to Arduino’s pins 8, 9, and 10.
Step 2: Variable Initialization
First, declare all the variables needed in this program. Here we need to declare the button interfaces, LED light interfaces, an array to save level data LedA, an array to save player input answers userLed, a variable Level to record the current level number, and a boolean variable nextL to indicate whether to proceed to the next level. The program is as follows:
// Buttons Pins
int GrBpin = 5;
int ReBpin = 6;
int YeBpin = 7;
// Leds Pins
int GrLpin = 8;
int ReLpin = 9;
int YeLpin = 10;
// Leds Array
int LedA [10]; // Define level array
int userLed [10]; // Player’s record array
int Level; // Count the current level
boolean nextL = true; // Indicates whether to proceed
Step 3: Initial Program Definitions
Before the game starts, all commands related to hardware communication in the program need to be declared in the setup() function. Here we declare input/output interfaces, random seeds, and commands to start serial communication. The program is as follows:
void setup() {
randomSeed(analogRead(0)); // Random seed
// Define LED lights as OUTPUT interfaces
pinMode(BlLpin, OUTPUT);
pinMode(ReLpin, OUTPUT);
pinMode(YeLpin, OUTPUT);
// Define buttons as INPUT interfaces
pinMode(BlBpin, INPUT);
pinMode(ReBpin, INPUT);
pinMode(YeBpin, INPUT);
}
Step 4: Set Level Questions
Before the game starts, we must prepare new questions for the game levels. To avoid making the main program too lengthy, we can write the function to set level questions into the restartLeds() function, which can be called once after each game round ends. This function needs to store the results of random seed operations into the level array through a loop. The program is as follows:
// Store the questions generated by random seed operations into the level array
void restartLeds() {
Level = 1;
nextL = true;
int index = 0;
while (index < 10) {
LedA [index] = random (BlLpin, YeLpin+1);
index++;
}
}
Step 5: Level Completion Indicator Functions
We let the LED lights display different states to indicate the player’s level completion results. When the player successfully completes the level, the LED lights display a flowing light; when the player fails, the 3 LED lights flash simultaneously. To indicate this state, we need to design two sets of functions, one for success and one for failure. The program is as follows:
// Success indicator function
void winnerDance () {
for (int id=1; id <= 5; id++) {
digitalWrite (BlLpin, HIGH);
digitalWrite (ReLpin, LOW);
digitalWrite (YeLpin, LOW);
delay (100);
digitalWrite (BlLpin, LOW);
digitalWrite (ReLpin, HIGH);
delay (100);
digitalWrite (ReLpin, LOW);
digitalWrite (YeLpin, HIGH);
delay (100);
}
digitalWrite (YeLpin, LOW);
delay (2900);
}
// Failure indicator function
void Loose () {
digitalWrite (BlLpin, HIGH);
digitalWrite (ReLpin, HIGH);
digitalWrite (YeLpin, HIGH);
delay (200);
digitalWrite (BlLpin, LOW);
digitalWrite (ReLpin, LOW);
digitalWrite (YeLpin, LOW);
delay (200);
digitalWrite (BlLpin, HIGH);
digitalWrite (ReLpin, HIGH);
digitalWrite (YeLpin, HIGH);
delay (200);
digitalWrite (BlLpin, LOW);
digitalWrite (ReLpin, LOW);
digitalWrite (YeLpin, LOW);
}
Step 6: Button Detection Function
We also need to design a function that links the button and the corresponding color LED light. The program is as follows:
// Wait for the button to be pressed and return the pressed button interface number
char w4press() {
boolean bottPress = false;
while (bottPress == false) {
if (digitalRead(BlBpin) == HIGH) { // Read if the blue button is pressed
while (digitalRead (BlBpin) == HIGH) {} // Wait for the button to be released
return BlLpin; // Return blue light interface number
bottPress = true;
}
if (digitalRead(ReBpin) == HIGH) { // Read if the red button is pressed
while (digitalRead (ReBpin) == HIGH) {} // Wait for the button to be released
return ReLpin; // Return red light interface number
bottPress = true;
}
if (digitalRead(YeBpin) == HIGH) { // Read if the yellow button is pressed
while (digitalRead (YeBpin) == HIGH) { // Wait for the button to be released
return YeLpin; // Return yellow light interface number
bottPress = true;
}
}
delay (200);
}
Step 7: Display Level Question Function
In Step 4, we have set up the question functions for each level, but we haven’t displayed them with LED lights. In this step, we need to design a function to display the current level’s question with LED lights. The program is as follows:
// Display current level question indicator
void questionLeds () {
int index = 0;
while (index < Level) {
digitalWrite (LedA [index], HIGH);
delay (500);
digitalWrite (LedA [index], LOW);
if (LedA [index] == LedA [index+1])
delay (200);
if (index >= 9)
break ;
index++;
}
}
Step 8: Main Program
After declaring all the functions, we can start designing the main program. Since the game needs to be executed repeatedly, the entire main program needs to be written in the loop() function. The main program consists of two parts: level judgment and answer judgment, where the answer judgment program is nested within the while statement of level judgment.
● Level Judgment. The main program needs to determine whether the player has cleared the level. It checks two variables: Level and nextL. The Level variable confirms whether the player has passed all levels, and when the current level is not less than the total number of levels, it is at the highest level, which may indicate success; otherwise, continue to the game; the boolean variable nextL records whether the player has passed the level. If false, it indicates failure.
Only when the boolean variable nextL is true and the current level is not less than the total number of levels will the program call the winnerDance() function to indicate victory with flowing lights.
The following is the judgment part of the main program:
void loop() {
restartLeds();
while (nextL == true && Level <=10) {
// Here, nest the answer judgment program from Step 8
}
if (nextL == false) {
Loose ();
delay (3000);
}
if (nextL == true && Level >=10)
winnerDance();
}
Answer Judgment:
Define a new local variable ubc to calculate the number of button presses by the player. At the same time, call the w4press() button detection function, saving its return value to the userLED array, and compare whether the player’s record array userLED and the question array LedA are consistent. If not, set nextL to false, indicating level failure, and change the ubc variable to be less than the current level variable Level to exit the loop and end the judgment. The program is as follows:
questionLeds(); // Play the current level
int ubc=0;
while (Level>=ubc+1) { // Read player input button and compare in a loop
userLed[ubc] = w4press();
if (userLed[ubc] != LedA[ubc]) {
nextL = false;
ubc = Level-1;
}
ubc ++;
}
Level ++;
delay (1000); // Wait 2 seconds for each level
Step 9: Compile, Upload, and Test
Compile the program and upload it to Arduino, and test until the game machine works normally.

Structural Design
After completing the functionality of the “Join Me to Make” game machine, we also need to make a shell for the game machine to have a better gaming experience.
Step 1: Cut a piece of 10cm × 13cm rectangular cardboard and a piece of 10cm × 10cm cardboard, and paste them vertically to serve as the base and back panel of the game machine (as shown in Figure 3).
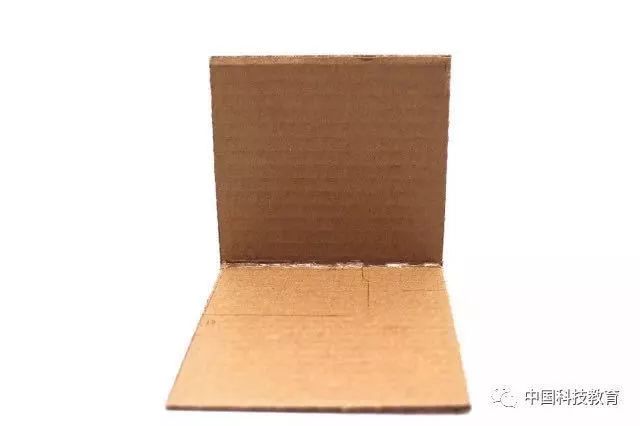
(Figure 3)
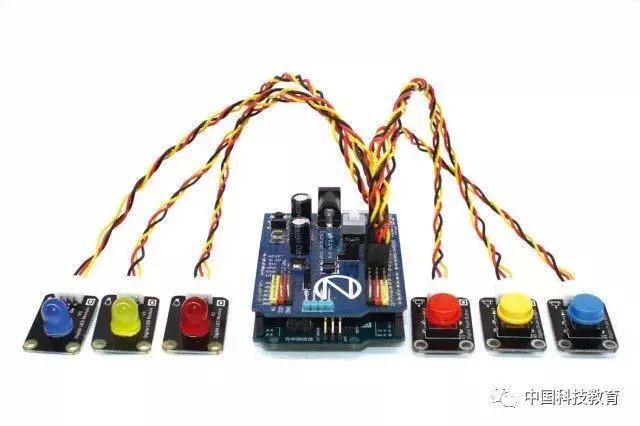
Step 2: Use blue clay glue to attach the Arduino board, LED modules, and button modules to the cardboard, and use cable ties to bundle the cables (as shown in Figure 4).

(Figure 4)
Step 3: Use cardboard to make the sides and top of the game machine. Be careful to leave the data and power interfaces of the Arduino board (as shown in Figure 5).
(Figure 5)
Step 4: Cut out a piece of colored cardboard, and cut out circular windows corresponding to the buttons and LED lights. Paste the colored cardboard on the front of the game machine. Finally, paste decorative stickers, and the “Join Me to Make” game machine is completed. Connect the power line and start playing the game machine (as shown in Figure 6)!
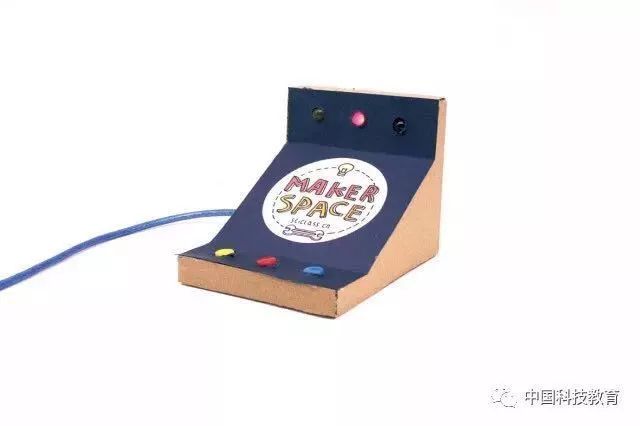
(Figure 6)

Download Materials
Reply with the keyword “Join Me to Make” on the WeChat public account of SciClass (sciclass) to download the game program.
This article was originally published in the “Special Topic” column of the 2018, Issue 2 of “China Science and Technology Education” magazine, authored by SciClass.