Performance Parameters① Main Control Chip: ATmega328P② Digital Input/Output Pins: 14③ PWM Pins: 6④ Storage (Code Space): 32KB⑤ RAM (Runtime Storage): 2KB; EEPROM (Power-off Save Space): 1KB⑥ Crystal Oscillator: 16MHzOnline Simulation: https://wokwi.com/
Arduino Uno Tutorial ①: Install Arduino IDE
Arduino Uno Tutorial ②: Development Board and LED Test Arduino Uno Tutorial ③: Button Control LED, with Practice Questions Arduino Uno Tutorial ④: Analog Quantity, Using ADC to Measure Voltage Arduino Uno Tutorial ⑤: External Interrupt, with Practice QuestionsArduino Uno Tutorial ⑥: Serial Communication, Sending and Receiving
(1) Introduction The serial receive (RX) and transmit (TX) functions of Arduino Uno are important means for data exchange with other devices. Below is a detailed explanation of these two functions: 1. Serial Receive (RX) Function: The serial receive (RX) pin is used to receive data sent to Arduino Uno from external devices. Application Scenario: When Arduino Uno needs to obtain data from other devices (such as sensors, other microcontrollers, etc.), it will receive this data via the RX pin. For example, a temperature sensor sends temperature data to Arduino Uno via serial, and Arduino Uno can receive this data through the RX pin for further processing or display. 2. Serial Transmit (TX) Function: The serial transmit (TX) pin is used to send data from Arduino Uno. Application Scenario: When Arduino Uno needs to send data to other devices (such as computers, other microcontrollers, displays, etc.), it will send this data via the TX pin. For example, Arduino Uno can send sensor-collected data to a computer via the TX pin for real-time display or storage on the computer. 3. Role of Serial Communication Data Transmission: Serial communication allows Arduino Uno to transmit data bidirectionally with other devices, which is the basis for inter-device interaction and data sharing. Device Control: Through serial communication, Arduino Uno can receive control instructions from other devices and execute corresponding operations based on the instructions. For example, a remote control can send instructions to Arduino Uno via serial to control the motor connected to it to rotate or stop. Debugging and Monitoring: During development, developers can use the built-in serial monitor in the Arduino IDE to monitor and debug the serial communication between Arduino Uno and the computer. This helps identify potential problems and fix them. Extended Functions: Through serial communication, Arduino Uno can connect with other modules (such as Bluetooth, WIFI, etc.), enabling broader communication and control functions. For example, through a Bluetooth module, Arduino Uno can wirelessly communicate with a mobile phone or tablet for remote control or data transmission.(2) ProgramWe can use the built-in serial communication library in ArduinoSerial Library 1. Serial Initialization and ConfigurationSerial.begin(speed, config)Function: Initializes serial communication and sets the baud rate (speed) and data format (config, such as data bits, parity bits, stop bits). Parameters: speed: Baud rate, optional values include 300, 1200, 2400, 4800, 9600, 14400, 19200, 28800, 38400, 57600, 115200, etc. config: Data format, such as Serial_8N1 indicating 8 data bits, no parity bit, 1 stop bit. Example: Serial.begin(9600); // Initialize serial, set baud rate to 9600.Serial.end()Function: Disables the serial port, releasing the pins occupied by the serial port for other uses (such as digital IO). Parameters: None. 2. Serial Buffer ManagementSerial.flush()Function: Used in versions prior to Arduino 1.0 to clear the serial buffer, but in subsequent versions, it was changed to wait for output data to be sent. To clear the buffer, use while(Serial.read() >= 0);. Parameters: None.Serial.available()Function: Returns the current number of characters remaining in the serial buffer. Parameters: None. Return Value: Integer, indicating the number of readable bytes in the buffer. 3. Serial Data Read/WriteSerial.read()Function: Reads one byte of data from the serial buffer and deletes the read data. Parameters: None. Return Value: Integer, indicating the byte read. When there is no readable data, returns -1.Serial.peek()Function: Reads the next byte in the serial buffer without deleting that data from the internal buffer. Parameters: None. Return Value: Integer, indicating the next byte in the buffer. When there is no readable data, returns -1.Serial.readBytes(buffer, length)Function: Reads a specified length (length) of characters from the serial into the buffer array (buffer). Parameters: buffer: The buffer array used to store the read data. length: The length of characters to read. Return Value: Integer, indicating the actual number of characters read and stored in the buffer.Serial.write(val/str/buf, len)Function: Sends data in binary form to the serial port. Parameters: val: Value of a single byte. str: String data. buf: Data buffer array. len: Specifies the length of the array to be sent. Return Value: Integer, indicating the number of bytes written to the serial port. 4. Serial Data Formatted OutputSerial.print(val, format)Function: Outputs formatted data to the serial. Parameters: val: Data to output. format: Data format, including decimal places for integer types and floating-point data, etc. Example: Serial.print(78, HEX); // Output 78 in hexadecimal format.Serial.println(val, format)Function: Similar to Serial.print(), but automatically adds a newline character after outputting data. 5. Serial Event HandlingSerial.serialEvent()Function: Serial interrupt event function. When data arrives at the serial port, Arduino will call this function to process the data. Typically, Serial.read() is used in this function to read data. Syntax: void serialEvent() { //statements } Parameters: None. However, the body of the function can contain any valid statements to process serial data.Program Analysis① Set up a SerialRcvBuf character array of size 1000 bytes to store data received from the serial. Then set up a string data rcvData
char SerialRcvBuf[1000]; // Save data
char SerialRcvBuf[1000];② The initialization function opens the serial port and sets the baud rate to 9600, which will be used to output voltage values later
void setup() { Serial.begin(9600); // Set baud rate to 9600}
③ In the loop function, if there is still data in the serial buffer, first clear the previously saved data, then define a byte variable rcvMark to track the current data position in SerialRcvBuf. When there is still data in the serial buffer, enter the while loop, char(Serial.read()) reads one byte at a time, saving it to SerialRcvBuf[rcvMark], incrementing rcvMark each time the while loop runs; when there is no data left in the buffer, convert SerialRcvBuf to String and save it in the string variable rcvData. Finally, print the variable rcvData
void loop() { if (Serial.available() > 0) { memset(SerialRcvBuf, 0, sizeof(SerialRcvBuf)); // Clear buffer first byte rcvMark = 0; while (Serial.available() > 0) { SerialRcvBuf[rcvMark] = char(Serial.read()); delay(2); rcvMark++; } // Serial.println(SerialRcvBuf); rcvData = String(SerialRcvBuf); // Execute conversion and save Serial.println(rcvData); }}
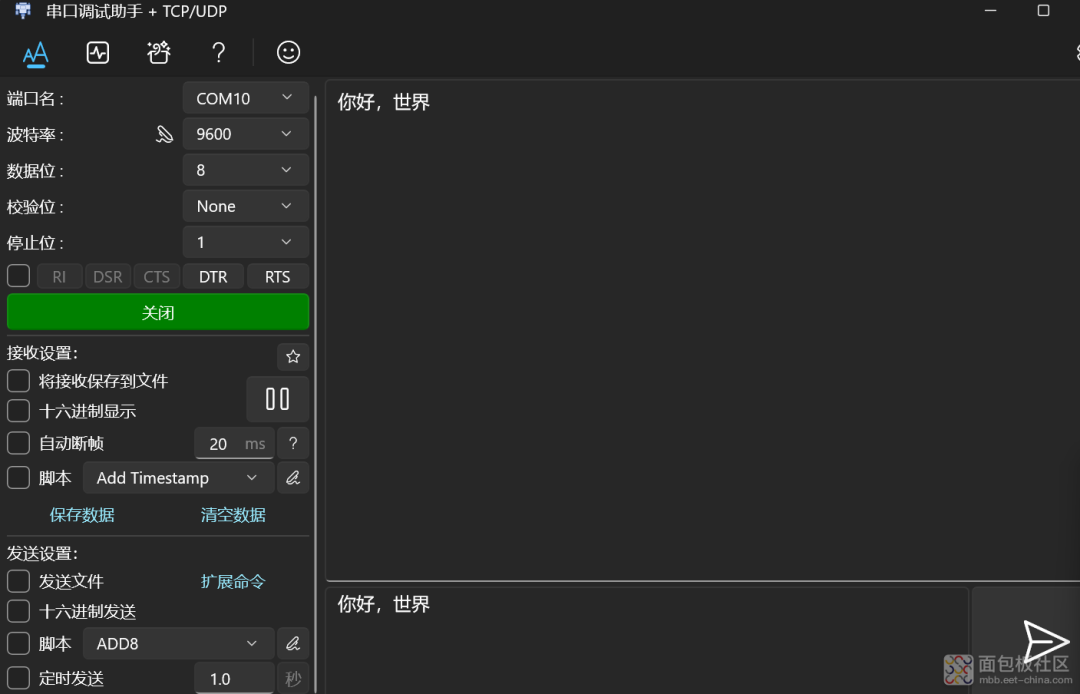
④ Experimental Phenomenon
String rcvData = ""; // Save data char SerialRcvBuf[1000]; void setup() { Serial.begin(9600); // Set baud rate to 9600 } void loop() { if (Serial.available() > 0) { memset(SerialRcvBuf, 0, sizeof(SerialRcvBuf)); // Clear buffer first byte rcvMark = 0; while (Serial.available() > 0) { SerialRcvBuf[rcvMark] = char(Serial.read()); delay(2); rcvMark++; } // Serial.println(SerialRcvBuf); rcvData = String(SerialRcvBuf); // Execute conversion and save Serial.println(rcvData); }}
Free Application for Development Board

Submission/Promotion/Cooperation/Add Group Please scan to add WeChat
(Please specify the purpose, when adding to the group please specify city-name-industry position information)


