If you don’t want to miss my updates, remember to check the public account in the upper right corner and mark it as a star. Send me a star!


A development board connected to a screen, mouse, and keyboard becomes a mini PC and can also be used for AI project development. Do you want to own such a fun board?

Video Viewing Guide:
00:00-1:58: Introduction to the board
1:59-13:09: Software environment configuration
13:10-17:56: Environmental monitoring and face recognition code
17:57-19:56: Effect demonstration
Overview of the Development Board
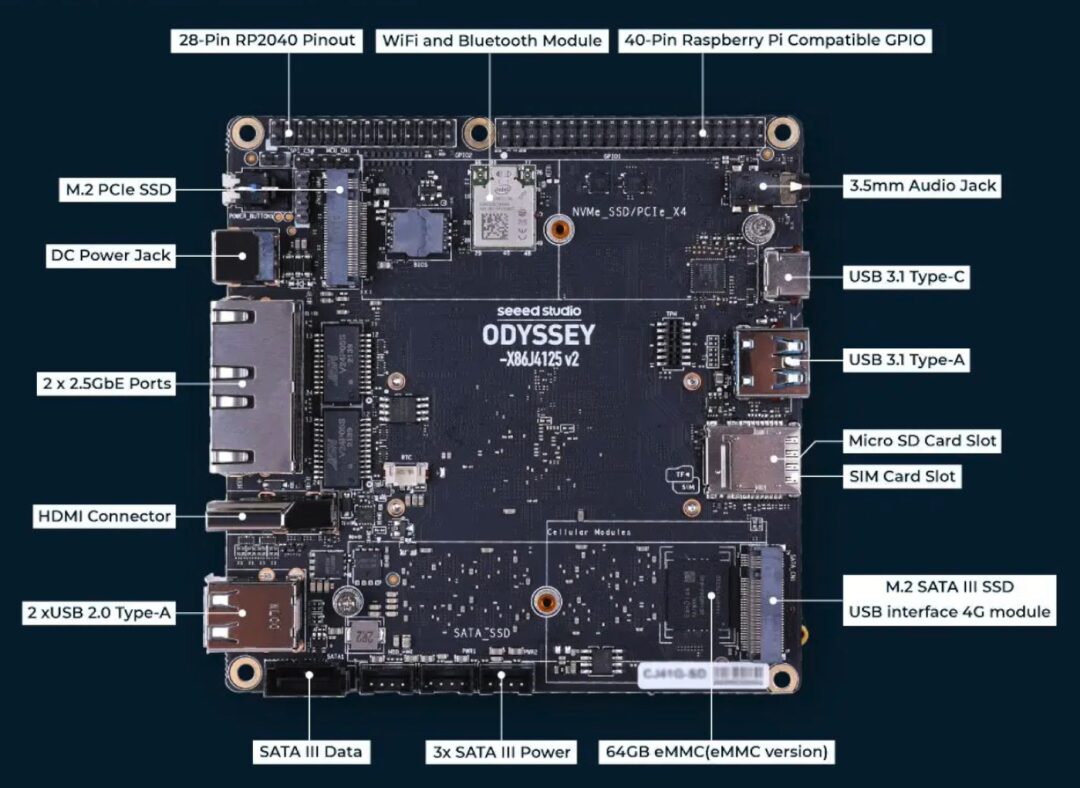
Using as a Mini PC
First, let’s see how to use it as a regular mini PC.
The development board comes pre-installed with a genuine Windows 11 system, with the system installed on the onboard 64GB eMMC.
After entering the operating system, we see the familiar Windows 11 interface. Opening the Task Manager, we can view the system configuration and hardware resource usage. From the hardware resources, we can see that this board has an onboard Raspberry Pi RP2040 coprocessor, compatible with Raspberry Pi pins, which can be controlled using Arduino for these I/O; let’s take a look at the use of office software. We open the built-in online office software, find the built-in poster template, and the performance is still very smooth, suitable for normal office work.

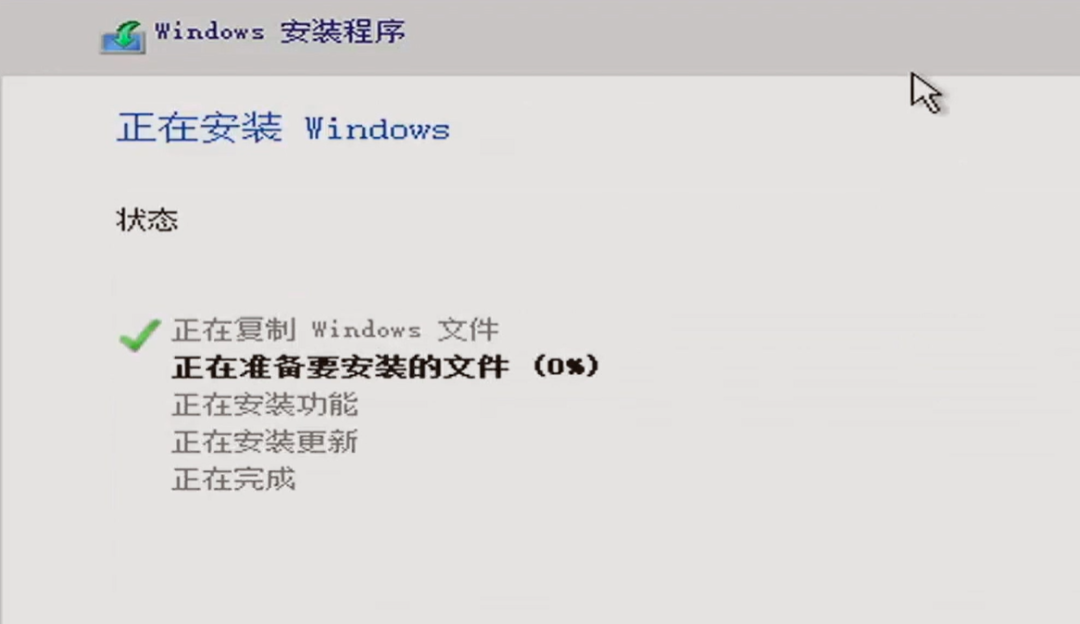
If you are not used to the Windows 11 system, you can also reinstall it back to Windows 10. Just like a regular PC, insert the prepared Windows 10 installation USB into the USB port, enter the BIOS settings, change the first boot option to USB, save and exit. After rebooting, you will enter the Windows 10 installation interface. Here, select the operating system type as Professional Edition, then proceed to disk partitioning. I have pre-installed a 500GB NVME SSD on this board; we will delete all existing partitions on the original hard drive and select the SSD as the system disk, create a system partition, and then click “Next” to start the system installation. Next, we just need to wait for the system to finish installing and restart to enter the new system.
Overview of the AIoT Project
First, we will deploy the OpenCV environment on the J4125864-v2 edge control board, using OpenCV and an external camera to create a smart electronic peephole for facial recognition. When the electronic peephole detects a visitor outside the door, it will upload the recognized face results to the platform, distinguishing whether the person is the owner or a guest.

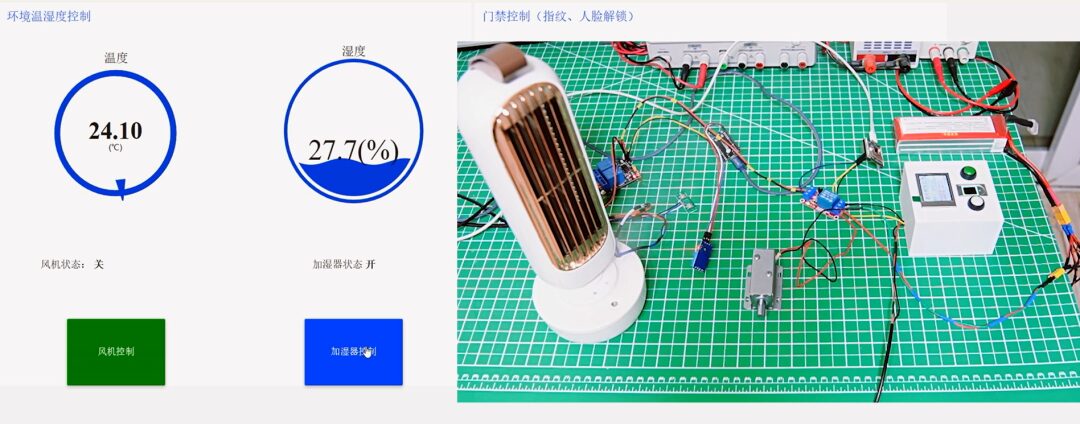
Then, we will use Node-Red to create a simple IoT platform, connecting the J4125-V2 board and two ESP32C3 boards to the same local area network. One ESP32C3 connects to a DHT11 temperature and humidity sensor and two relays to control a small fan and humidifier, while the other ESP32C3 connects to a door lock and fingerprint recognition module. The ESP32C3 modules communicate with the IoT platform via MQTT protocol. The platform displays the indoor humidity and temperature, allowing control over whether to turn on the air conditioner and humidifier based on the collected indoor temperature and humidity.
Process of Implementing the AIoT Project
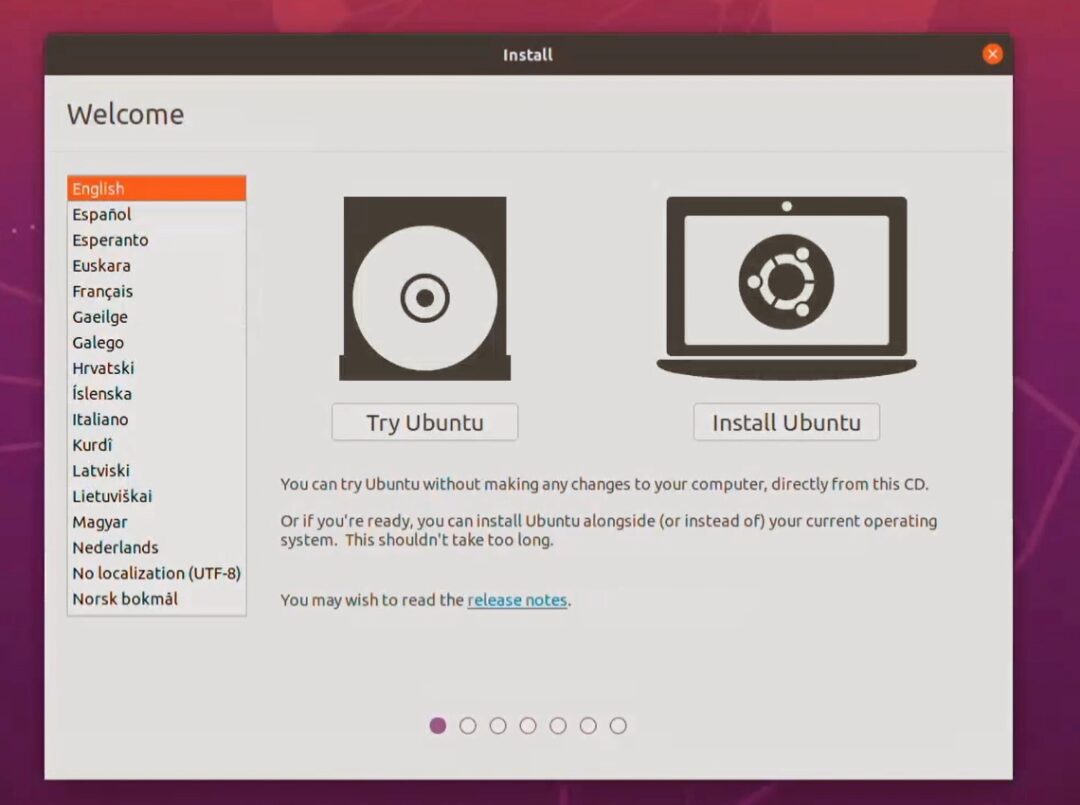
First, change the operating system of this board to Ubuntu 20.04.
The installation of Ubuntu 20.04 is also quite simple, similar to that of Windows. Just replace the system image disk with that of Ubuntu 20.04. After entering the system installation interface, click “Install Ubuntu” and then follow the configuration process to select installation options, setting the time zone to Shanghai, and then entering user configuration to input a username and password.
For convenience in logging in, configure automatic login. Wait for the system installation to complete. During the installation, it’s best to keep the network stable since the system will need to download many plugins.
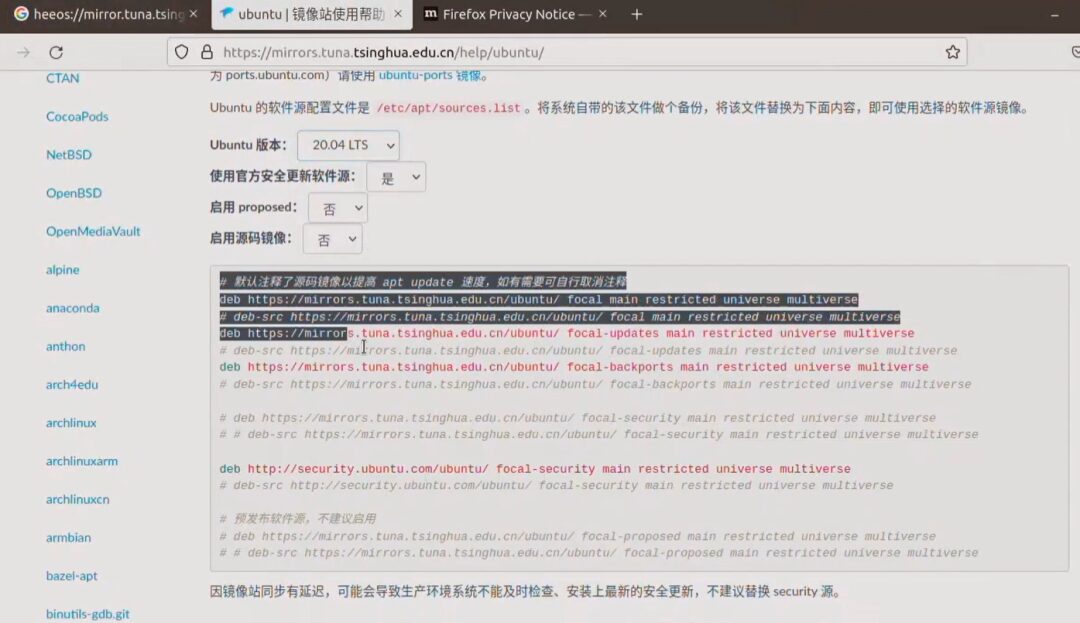
Next is changing the software sources: After the system installation is complete, enter the Ubuntu 20.04 system, skip the recommended installations, and before configuring application software, first change the software sources. Changing the sources can speed up software downloads. Replace the software source with Tsinghua University’s open-source mirror. When changing, first delete the original software source address, find the method for changing Ubuntu’s software source on Tsinghua University’s open-source mirror site, select version 20.04LTS, and copy all the software source addresses into the system’s software source configuration file. Then use the command to update the software list, and you will see that the software list acquisition address has been changed to Tsinghua University’s mirror address, indicating that the source change was successful.
Next is VNC configuration: VNC is a remote control feature within the local area network, which is convenient for later remote debugging. First, install dconf-editor. After installation, go to settings, find sharing settings, configure the password for sharing the desktop, and then find dconf in the software menu. Follow the operation steps for configuration, and do not touch unrelated options. After configuration, open the VNC software on your personal PC, input the board’s IP address, and then connect. Once connected successfully, you can remotely control it within the local area network. At this point, the configuration of the Ubuntu 20.04 system is basically complete.
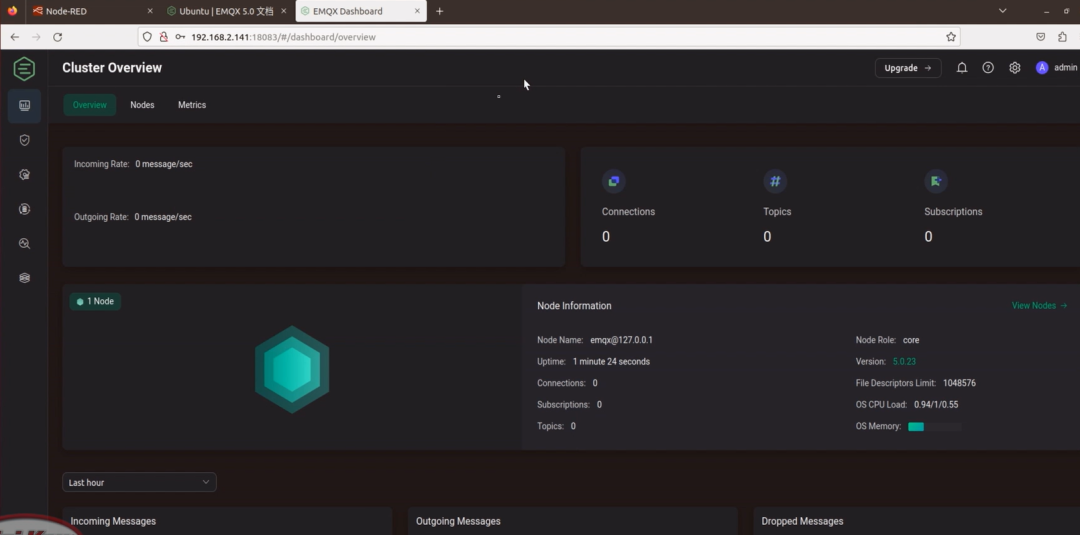
Next is the installation and configuration of application software: You need to install EMQX, Node-Red, Anaconda, and PyCharm.
EMQX is a cloud-native distributed IoT MQTT message server that can scale elastically on a large scale.
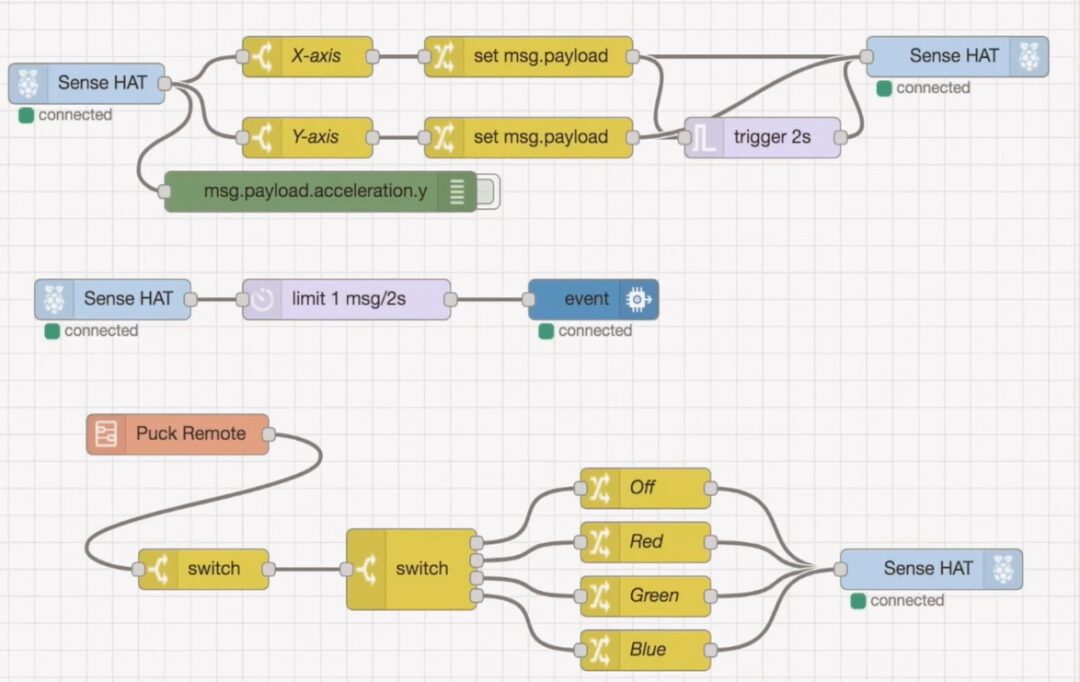
Node-RED is a flow-based programming tool that helps developers quickly build IoT applications and automate workflows. It provides a web-based visual programming environment, making it easy to create, test, and deploy various flows. The runtime engine is a lightweight Node.js application that can run on various platforms such as Raspberry Pi, cloud servers, PCs, etc.
Anaconda is an open-source Python distribution that includes conda, Python, and several scientific packages and their dependencies. It is very convenient to use Anaconda for managing Python environments during Python development.
PyCharm is a Python IDE that comes with a complete set of tools to help users improve their efficiency when developing with Python, such as debugging, syntax highlighting, project management, code navigation, and smart suggestions.
Code Writing
Code writing mainly includes three parts: the flow writing for Node-Red, hardware code writing for ESP32C3, and face recognition code writing.
First, use Node-Red to write the program for the platform. I have uploaded all the code for this demo to GitHub. Find the location of the code, copy all the scripts, and then enter Node-Red to import the copied code.
Note that you need to change the MQTT message server’s proxy address, username, and password. Change the server IP to your own while keeping port 1883 unchanged, set your username and password, and then go to the EMQX interface to add the newly set username and password. After adding, you can see that the MQTT connection is successful in the Node-Red interface, and you can perform a simple test.
Next is the hardware code writing for ESP32C3, using Arduino. The program is also quite simple; its main function is to connect to the MQTT message server, subscribe to control commands published by the platform, parse the received control commands, and execute the corresponding actions. The hardware-side code is also fully open-source.
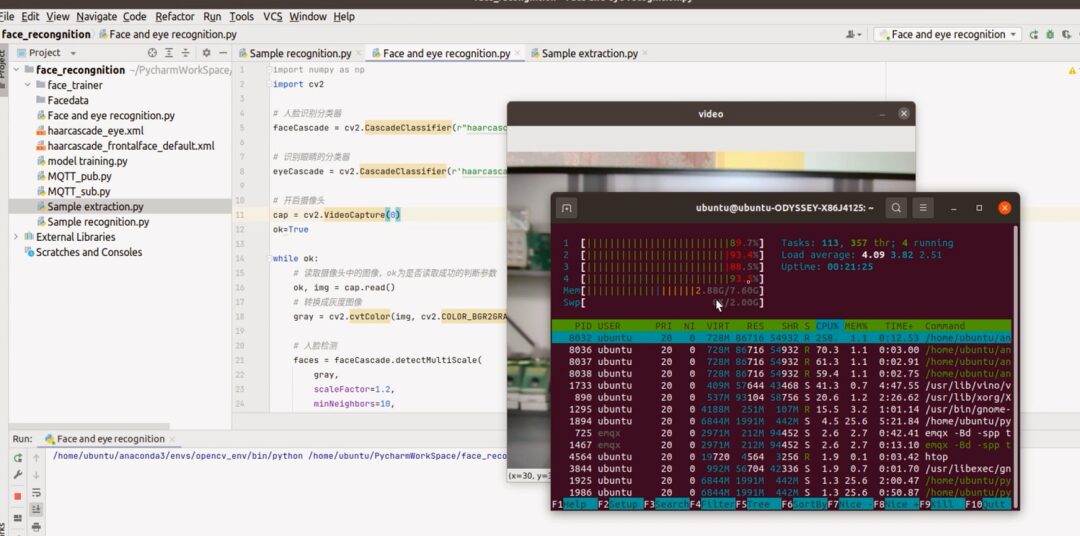
Finally, we will write the face recognition code. Before editing the code, the first step is to configure the OpenCV environment. This step is very simple; just ensure the network is stable. After the OpenCV package installation is complete, we also need to install the MQTT package. Once installed, we start creating the project and importing the program. Open the PyCharm software, create a new project, select your project path, and choose the OpenCV virtual environment configured with conda. After selection, start the creation, and once created, copy the project files into it. The face recognition program is a modification of the official OpenCV examples and open-source programs, thanks to open source.
After creating and importing the project, we start testing the face recognition. First, run an official example that detects eyes, mouth, and face. By running this, if the demo works normally, it indicates that our environment configuration is basically fine.
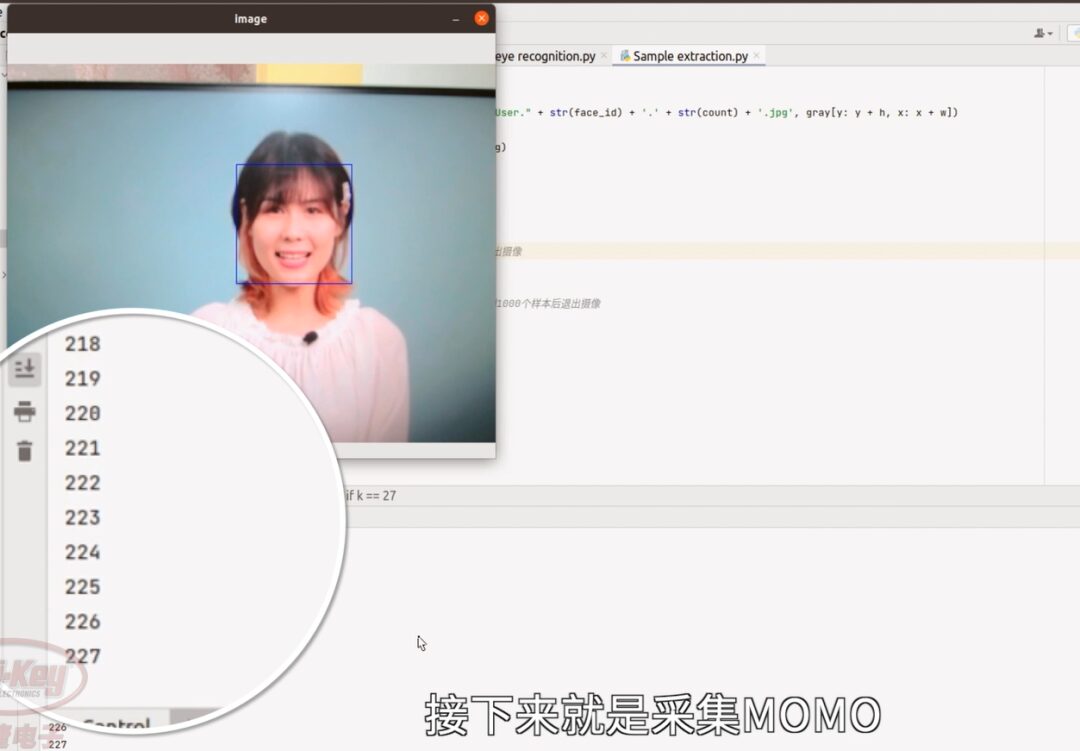
Next, we will implement the electronic peephole function. This functionality mainly consists of three steps: face collection, face feature training, and testing. Here we use images of Niece and MoMo as face identifiers, collecting 1000 images for each face. First, we collect Niece’s face by running the collection program and entering the ID. The system will start recognizing and collecting faces. Once 1000 images are collected, the collection program will exit automatically, completing the face information collection for Niece. Next, we will collect MoMo’s face, with the collection process being the same. All collected images are saved in the Facedata folder. Once all collections are complete, we proceed to training. Next, we execute the training program while monitoring resource usage during the training process. Once training is complete, we obtain a .xml model file. Here we set Niece as the owner and MoMo as the guest. Running the electronic peephole program, it correctly recognizes MoMo, and the MQTT message server is also successfully connected. Switching to the demo operation control interface, we can see that the identity of the current person is displayed as MoMo, with the permission level as a guest. When changing to Niece’s photo, the recognition result is also accurate. The demonstration of the electronic peephole program ends here.
Finally, you can watch the video for the overall demo effect.
In the past, we were most afraid of development boards gathering dust, but this board will definitely not gather dust because it can do so much, including robot control, AIoT applications, edge control, etc. Moreover, this board has a maximum power consumption of only 24W, making it very suitable for battery power.
Alright, this concludes the sharing of three projects from the AI edge computing practical camp. I hope it can be helpful to everyone. Follow Dejie Electronics on Bilibili for more exciting content!

Project Sharing | Electric Competition Series | Artificial Intelligence | Postgraduate Entrance Examination
Must-Know Knowledge Points | Graduation Design | Switch Power Supply | Job Seeking
We are Nimo, the founder of Darwin, a sister who only talks about technology and not flirting. Darwin is an online education platform aimed at serving professionals in the electronics industry, providing skill training videos covering popular topics in various subfields, such as embedded systems, FPGA, artificial intelligence, etc. It offers tailored learning content for different audiences, including common knowledge points, disassembly assessments, electric competitions/smart cars/postgraduate entrance examinations, etc. Welcome to follow.