
In previous articles, I introduced how to choose computer configurations and some graphics card options for older computers. These were just basic introductory knowledge, with no depth. Today, we will start to touch on some practical knowledge, and this part requires everyone to get hands-on. Follow my upcoming articles to learn. While I can’t guarantee that everyone will become a computer expert, I can assure you that anyone can assemble a computer by themselves without any issues!

Today, I originally planned to start with hardware recognition, but a friend mentioned that they had already purchased all the parts, including the graphics card and memory, and installed them, but they were struggling with how to connect the case jumpers. So today, I will explain how to connect these case jumpers.
Connecting case jumpers is a hurdle for all novice builders. I have encountered many people who either connected them incorrectly and couldn’t power on, or had no sound, or had USB ports that were not recognized. More seriously, incorrect connections could even burn the motherboard. As long as you get this step right, assembling the computer will be much easier. Please pay attention to the following content, as it may be useful to you.Fortunately, today I found an old motherboard, a Gigabyte B85. I couldn’t find any other boards, so I will use this one as an example. However, don’t get too hung up on the motherboard model; most motherboards have similar installation methods. Just be attentive, and remember to be bold yet meticulous when assembling. Don’t be reckless, as this can easily damage hardware.
If possible, I recommend buying an anti-static wrist strap. If not, it's best to discharge static electricity before assembling. You can do this by touching a metal object, especially a water pipe, which is the most effective. Don’t overlook static electricity, as it can damage hardware if you're not careful. Remember!We will divide this knowledge into three parts:
✪ Part One: Understanding Jumpers
✪ Part Two: Functions of Jumpers
✪ Part Three: Installing Jumpers
Understanding Jumpers
The so-called case jumper connects the case to the motherboard and allows functions like powering on, shutting down, and restarting through buttons, while also indicating the operational status of the hard drive and power supply through LED lights on the case. Below is the external structure of the case jumper connection. Since the location varies for each case, some are at the top, some on the side, and some at the front, but the functions are generally the same. Mine is at the top; please refer to the image.

The above shows the external situation of the case. Next, let’s take a look at the jumpers inside the case. Generally speaking, all cases have the following types of jumpers: RESET SW, Power SW, HDD LED, Power LED, F_AUDIO, F_USB, USB 2.0, and 3.0.

Functions of Jumpers
● RESET SW Restart Function

● Power SW Power Switch

● HDD LED Hard Drive Indicator

● Power LED Power Indicator

● F_AUDIO Audio Port

● F_USB 2.0 3.0 USB Ports. This USB is divided into 2.0 and 3.0 interfaces.

Installing Jumpers
This part is quite important, so please pay close attention. While the exact locations may vary slightly between motherboards, the installation methods and functions are completely consistent. The following installation images are for the Gigabyte B85 motherboard. If you have the same motherboard, you can follow along; if not, you can use it as a reference. Before installation, we need to have a general understanding of the motherboard. The image below highlights the main parts, which is sufficient for beginners.

Next, let’s focus on the jumper area of this motherboard. The installation is really simple; all motherboards label these jumpers. Just follow the labels for installation. Even if there are no labels, the motherboard manual will have them. As long as you read carefully, there should be no issues. For example, this motherboard has clear labels, which I have separated for better visibility. Just follow the order and insert them into the corresponding ports; it’s really that simple.

Next, I will detail this knowledge, and you can easily understand it by referring to the image above.
● Power SW Power Switch
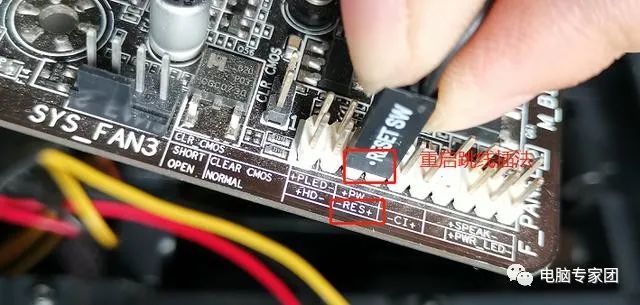
This power switch jumper is usually colored, either red and black, or orange and black, with some being entirely black. This jumper is very important; if installed incorrectly, it will prevent the computer from powering on. The installation method is shown in the image below. (Note that due to space constraints, they often simplify the jumper labels, such as using PW for power switch, HD for hard drive indicator, RES for restart, and PLED for power indicator.)

● RESET SW Restart Function
I won’t explain this much; the restart button allows you to restart without shutting down. If the computer freezes, you can press this restart button to reboot. However, I personally recommend using it sparingly. If you need to restart, it’s better to shut down and wait a minute before turning it back on. This is less damaging to the computer. Sometimes, restarting is meant to end the current program to speed up the computer, but pressing restart doesn’t truly stop the CPU; it continues working. So, it’s best to shut down and wait a minute before starting again.
● HDD LED Hard Drive Indicator
You may often see this hard drive indicator light flashing when the computer starts. It flashes rapidly until the system is fully booted, especially when some mechanical hard drives run large programs or read data, at which point it flashes vigorously. During this time, it’s advisable not to run other programs until it stabilizes. Note that this hard drive jumper has positive and negative terminals, and both the jumper and motherboard connections are labeled; be careful not to reverse them. The installation is shown in the image below.

● Power LED Power Indicator
This light is generally green. When the power light is on, it indicates that the power supply is functioning normally. Note that this jumper also has positive and negative terminals; if reversed, it won’t light up. Generally, the colored wire is positive, and the black wire is negative. The motherboard will also have markings for positive and negative terminals; be sure to check during installation. If you are unsure, you can leave it unconnected; the worst-case scenario is that the power indicator won’t light up. As long as the power and restart jumpers are connected correctly, the others can be left unconnected, but I recommend connecting all of them so you can monitor the overall operation of your computer.

● F_USB 2.0 3.0 USB Ports
This USB is divided into 2.0 and 3.0 interfaces. (USB 2.0 has a theoretical maximum transfer speed of 480Mbps, approximately 60MB/s; USB 3.0 has a theoretical maximum transfer speed of 5Gbps, approximately 500MB/s.) Due to the different transfer standards, the interfaces are also different. The image below shows the USB 2.0 and 3.0 ports.

I must remind everyone not to force the connections. These ports have foolproof designs, meaning you can’t insert them incorrectly. The same goes for the USB jumper; if you look closely, one of the ports is missing a hole, and the motherboard also has a missing pin. The correct way to plug it in is to align the missing hole with the missing pin on the motherboard; that’s the correct way. Remember, if it doesn’t feel right, don’t force it; check carefully to see if it’s inserted correctly. The installation is shown in the image below.

USB 3.0 ports also have foolproof designs, as shown in the image below.

● F_AUDIO Audio Port
Finally, we have the audio jumper. Locate the F_AUDIO label on the motherboard and connect the audio port from the case directly to it. This port also has one less hole than the motherboard, so just align the missing hole with the missing pin on the motherboard for correct installation, as shown in the image below.


Final Summary
The above is the method for connecting case jumpers. You can use it as a reference. The locations of jumpers vary on each motherboard, but the markings are generally the same. If the restart and power switch jumpers are connected incorrectly, it will just swap their functions; however, if the USB and AUDIO jumpers are connected incorrectly, it could burn the wires. So please pay attention during installation. Remember, no one is born with this knowledge; it is gained through continuous learning, practice, and accumulation. In this day and age, it’s better to rely on yourself than to rely on others. Let’s work hard together to learn and improve!
—The end—

Previous Highlights

Click “Read Original” for more free content