Text length:5883 words 11 images
Estimated reading time:15 minutes
(For easy reading, key points have been highlighted)

Picking it up to take a look…

Husky! Husky! Husky!
It was actually the HuskyLens AI camera (Chinese name: 哈士奇) which is still in pre-sale!
This story tells us: Creators who like to work overtime are often lucky.
# HuskyLens Feature Introduction
What is HuskyLens?
Here’s a brief excerpt from the official introduction:
HuskyLens is a user-friendly AI camera (visual sensor) with 6 built-in functions: face recognition, object tracking, object recognition, line tracking, color recognition, and tag (QR code) recognition. With just one button, you can complete AI training, freeing you from cumbersome training and complex visual algorithms, allowing you to focus more on your project ideas and implementation.

For a detailed introduction, you can refer to the official website:
https://www.dfrobot.com.cn/goods-2050.htmlFor the official introduction video of Husky, please jump directly to Bilibili:
http://player.bilibili.com/player.html?aid=66695069&cid=115655109HuskyLens can be summarized in three words:Click、Learn&Play。
In summary: Simple, easy to use, and truly delightful!
With such a delightful tool, how should we play with it?
First, let Teacher Tie Xiong share some insights:
Note: The following chapters are technical and provide a detailed textual description of the experience video, which may be a bit boring. Please save it and read it slowly.
#HuskyLens Data Reading Test
Since HuskyLens has not yet officially launched, information about it is very limited. DF has not yet released the corresponding function library for HuskyLens, let alone called it in graphical programming tools like Mind+. However, we believe that soon, we will see it in Mind+, making its use even simpler and more user-friendly!
For now, we can only rely on its communication protocol to manually code.
HuskyLens uses serial communication by default, and you can change it to I2C communication in its settings. The default serial baud rate is 57600 bps, with a format of 8N1 (8 data bits, no parity, 1 stop bit), and the default communication address is<span>0x11</span>. In this article, I will guide you to read the data from HuskyLens using the control board.
Of course, you can also choose to use controllers like Arduino, Raspberry Pi, LattePanda, micro:bit, etc., to read data from HuskyLens. The principle is the same, so consider it as homework. After reading this article, can you use other main control boards to read data from HuskyLens?
The circuit connection diagram is as follows:

Additional explanation about the control board’s serial port:
The main control chip of the control board is ESP32, which has 3 serial ports:
<span>Serial</span>、<span>Serial1</span>、<span>Serial2</span>.<span>Serial</span>is generally used for program downloading,<span>Serial1</span>uses<span>GPIO 9</span>and<span>GPIO 10</span>by default, but GPIO 6~11 is generally used to connect external Flash chips, so we will use<span>Serial2</span>to communicate with HuskyLens. Additionally, ESP32 can map serial RX to almost all IO ports, and TX to<span>GPIO 0~31</span>(this has not been verified).Therefore, we will map the RX of the control board’s
<span>Serial2</span>to pin P14 and TX to pin P13.Reference material:
https://blog.csdn.net/Naisu_kun/article/details/86004049
Let’s take a look at the communication protocol of HuskyLens. It mainly has two modes, as seen in the video. In most cases, the HuskyLens screen will display a box (Block mode), and in line tracking mode, it will display an arrow (Arrow mode). The data length and format in these two modes are basically the same, so we will explain using Block mode as an example, while the Arrow mode follows the same principle and will not be elaborated further.
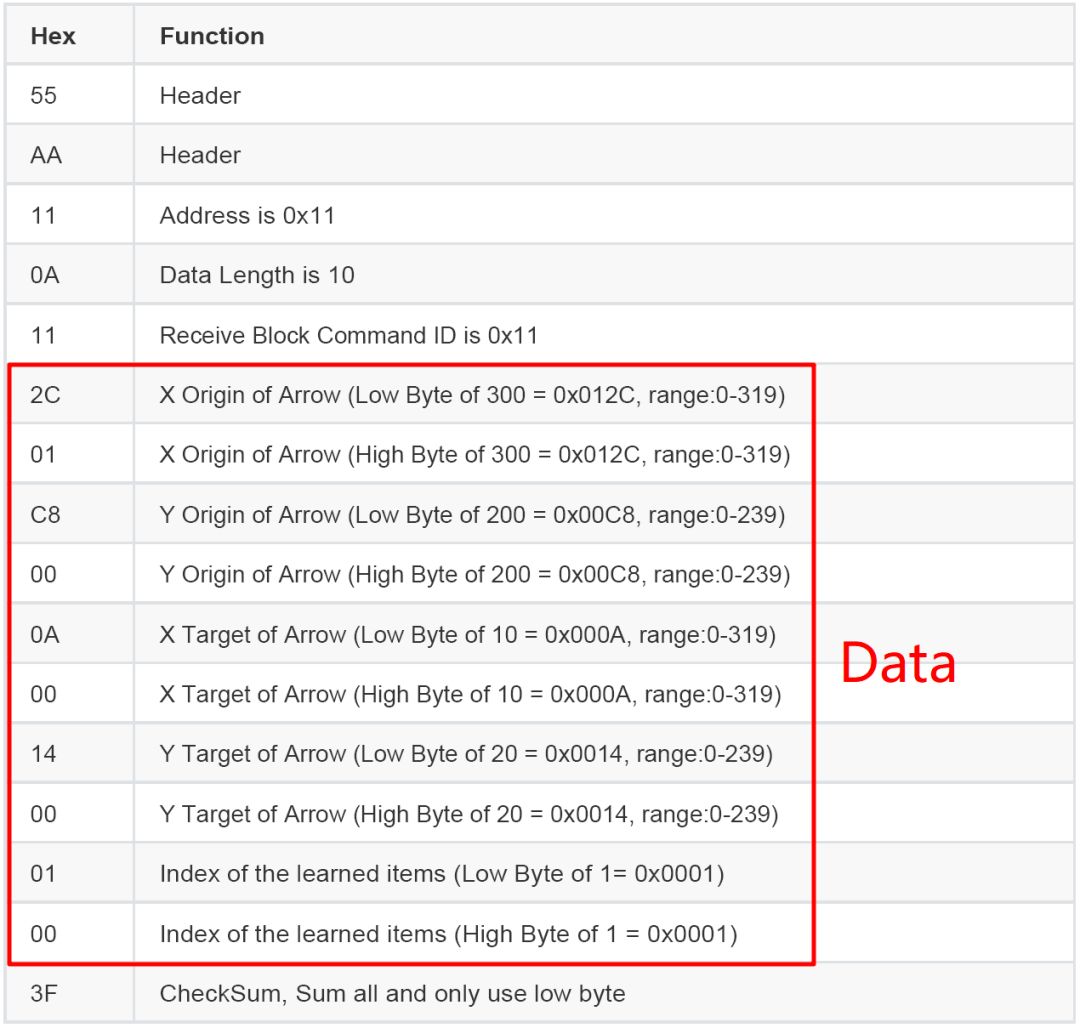
Let’s take a look at its data format; it starts with a series of data beginning with <span>0x55</span> and <span>0xAA</span>, followed by its communication address Address, data length Data Length, command code Command, and the data Data we are most concerned about. Finally, there is a checksum.

The meaning of each data is as follows:
Block mode:

Arrow mode:

The red boxes in the two tables indicate the corresponding data Data 1 ~ Data n, where:
-
X Center represents the X coordinate of the geometric center of the Block;
-
Y Center represents the Y coordinate of the geometric center of the Block;
-
Width represents the width of the Block;
-
Height represents the height of the Block;
-
LearnedIndex represents the number of the recognized target.
Based on the communication protocol, we will write a program to read the data returned by HuskyLens.
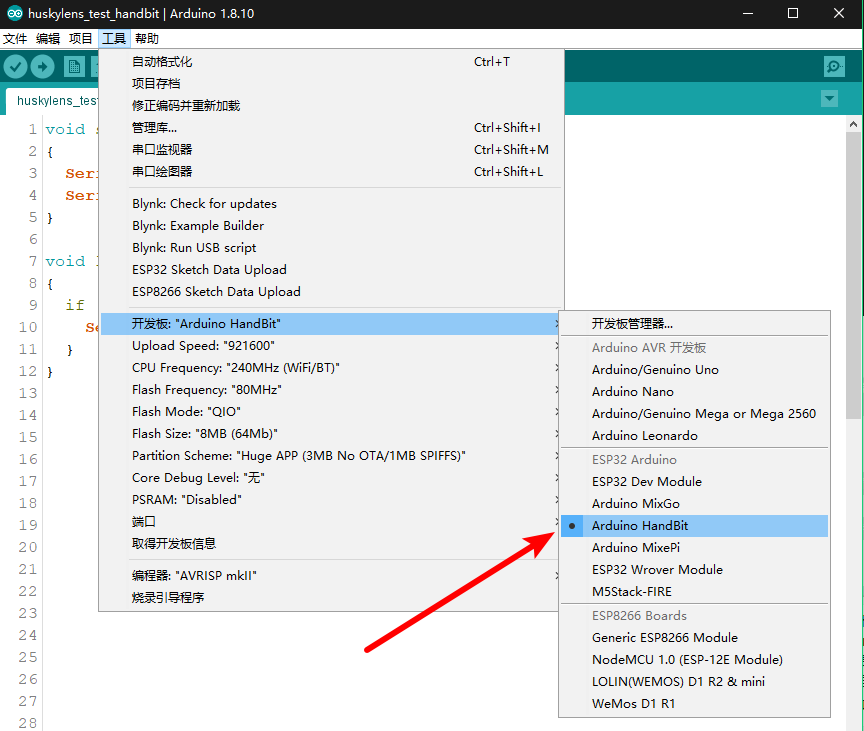
First, open the Arduino IDE that comes with Mixly, and select Arduino HandBit (control board) for programming.
The latest version of Mixly 1.0 download link:
https://mixly.readthedocs.io/zh_CN/latest/basic/02Installation-update.html

The program is as follows:
void setup()
    {
        Serial.begin(57600);
        Serial2.begin(57600, SERIAL_8N1, P14, P13);
    }void loop()
    {
        if (Serial2.available() > 0) {
              Serial.println(Serial2.read(), HEX);
          }
    }
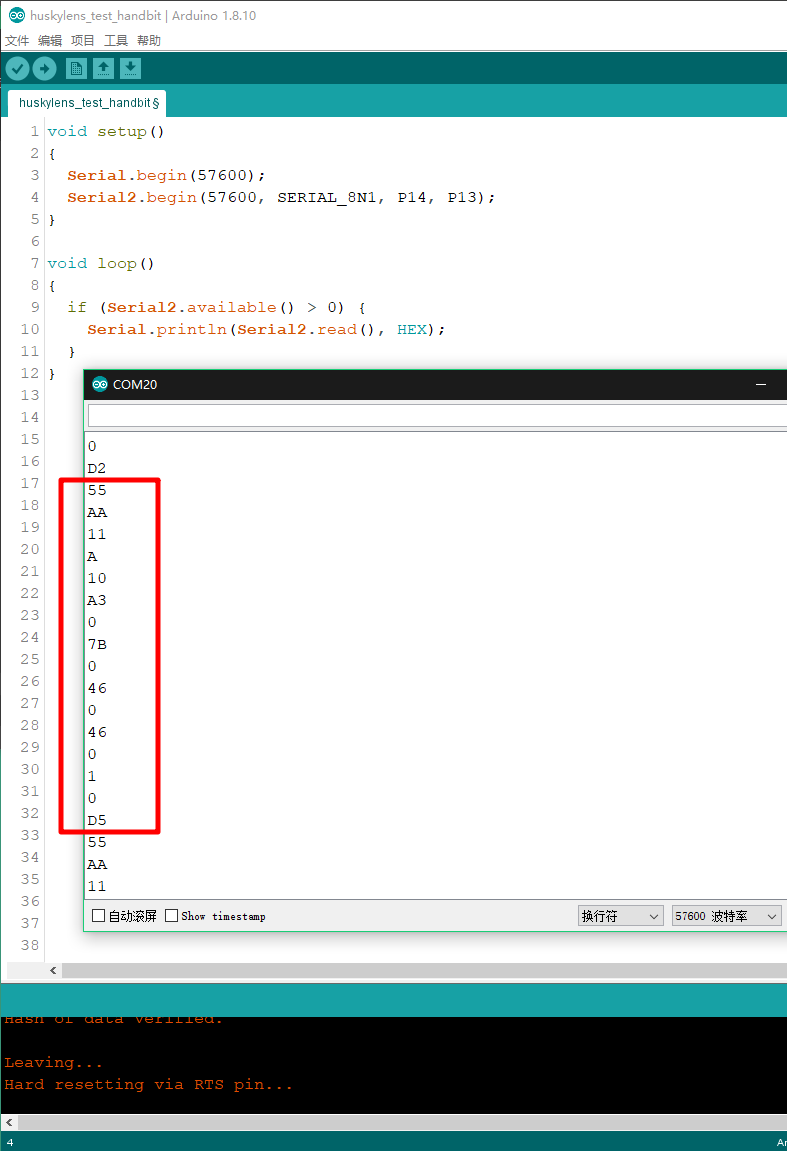
Upload the program to the control board and open the serial monitor. You will see data similar to the following image:

But what do these data represent? We will highlight the key data: 0x55, 0xAA, 0x11, 0x0A, 0x10, 0xA3, 0x00, 0x7B, 0x00, 0x46, 0x00, 0x46, 0x00, 0x01, 0x00, 0xD5. Among them:
-
<span>0x55</span>is the Header; -
<span>0xAA</span>is Header 2; -
<span>0x11</span>is Address; -
<span>0x0A</span>is Data Length; -
<span>0x10</span>is Command, which is<span>0x10</span>in Block mode and<span>0x11</span>in Arrow mode; -
<span>0xA3</span>and<span>0x00</span>are the low 8 bits and high 8 bits of X Center,<span>0x00A3</span>equals 163, representing the X coordinate of 163; -
<span>0x7B</span>and<span>0x00</span>are the low 8 bits and high 8 bits of Y Center,<span>0x007B</span>equals 123, representing the Y coordinate of 123; -
<span>0x46</span>and<span>0x00</span>are the low 8 bits and high 8 bits of Width,<span>0x0046</span>equals 70, representing the width of 70; -
<span>0x46</span>and<span>0x00</span>are the low 8 bits and high 8 bits of Height,<span>0x0046</span>equals 70, representing the height of 70; -
<span>0x01</span>and<span>0x00</span>are the low 8 bits and high 8 bits of LearnedIndex,<span>0x0001</span>equals 1, representing the number of the recognized object; -
<span>0xD5</span>is the low 8 bits of the Checksum. We sum all the above data: 0x55 + 0xAA + 0x11 + 0x0A + 0x10 + 0xA3 + 0x00 + 0x7B + 0x00 + 0x46 + 0x00 + 0x46 + 0x00 + 0x01 + 0x00 =<span>0x02D5</span>, and the low 8 bits are<span>0xD5</span>, indicating that the checksum is valid.
Thus, we have completed the simple reading of HuskyLens data.
But do we have to read the data like this every time and then calculate manually? How can we do artificial intelligence projects like that?
Of course not. We find that reading these data is a repetitive task, and the program is best at doing repetitive tasks.
#HuskyLens Data Analysis
We will make a simple adjustment to the program above, and voila! (The source code of the program can be found at the download link at the end of the article, and it is recommended to read it together with the accompanying code.)

We first define some variables to store the data. The names of these variables are mostly self-explanatory, and will not be elaborated here.
#define LENG 15 // 0x55 + 15 bytes equal to 16 bytes
unsigned char buf[LENG];

int xCenterOrXOrigin = 0;
int yCenterOrYOrigin = 0;
int widthOrXTarget = 0;
int heightOrYTarget = 0;
int learnedIndex = 0;
In <span>setup()</span>, we mainly initialize the two serial ports:
void setup()
    {
        Serial.begin(57600);
        Serial2.begin(57600, SERIAL_8N1, P14, P13);
    }
Then in <span>loop()</span>, we continuously read the data returned from serial port 2 (Serial2) of the control board. First, we need to check whether the first data read is the default Header<span>0x55</span>. We use the <span>find()</span> function:
// Header
// Read data until get the first header of data packet 0x55
if (Serial2.find(0x55))
  {
      // ......
  }
If we read <span>0x55</span>, we will read the next 15 data and store them in the <span>buf</span> variable. Since a valid communication command has a total of 16 data, you can count them in the communication protocol.
// Read the next 15 data
Serial2.readBytes(buf, LENG);
Next, we check whether the second data is the default Header 2<span>0xAA</span>. Here, it is important to note that we have not stored the first header data<span>0x55</span> into the <span>buf</span> variable, so <span>buf[0]</span> is not <span>0x55</span>, but rather <span>0xAA</span>.
// Header 2
// Check the second header of data packet 0xAA
if (buf[0] == 0xAA)
  {
      // ......
  }
If the second data is also the default header, we then check the remaining data for validity, calling the checksum function <span>checkSum()</span>. The implementation of this function will be explained later.
// Checksum
if (checkSum(buf, LENG))
  {
      // ......
  } else {
        Serial.println("Checksum Errorrrrr!");
  }
If the checksum passes, we can then process and compute the data. In the program below, we first print the raw data:
// print the command list
  Serial.print(0x55, HEX);
  Serial.print(" ");
for (int i = 0; i < LENG; i++)
  {
     Serial.print(buf[i], HEX);
     Serial.print(" ");
  }
  Serial.println();
Then we calculate the values of several fields in Data using five functions. Finally, we print these data to the serial monitor.
// get the values
xCenterOrXOrigin = getX(buf);
yCenterOrYOrigin = getY(buf);
widthOrXTarget = getWidthOrXTarget(buf);
heightOrYTarget = getHeightOrYTarget(buf);
learnedIndex = getLearnedIndex(buf);

// print the values
Serial.print("x: ");
Serial.print(xCenterOrXOrigin);
Serial.print("   ");

Serial.print("y: ");
Serial.print(yCenterOrYOrigin);
Serial.print("   ");

Serial.print("width: ");
Serial.print(widthOrXTarget);
Serial.print("   ");

Serial.print("height: ");
Serial.print(heightOrYTarget);
Serial.print("   ");

Serial.print("learnedIndex: ");
Serial.print(learnedIndex);
Serial.print("   ");

Serial.println();
Serial.println("-----------------------------");
Serial.println();
Thus, we have read the data!
#Function Descriptions
##checkSum()
<span>checkSum()</span> function checks whether the data read is correct. It simply sums the read data and takes the low 8 bits of the total, checking whether it equals the last read data. If they are equal, the flag variable <span>receiveflag</span> is set to 1, otherwise it is set to 0, and the result of <span>receiveflag</span> is returned.
// check sum
char checkSum(unsigned char *buf, char leng)
{
char receiveflag = 0;
int sum = 0;
int sumLow = 0;
for (int i = 0; i < (leng - 1); i++)
{
sum = sum + buf[i];
}
sum = sum + 0x55;
sumLow = sum & 0x00FF;
if (sumLow == buf[leng - 1])
{
sum = 0;
receiveflag = 1;
}
return receiveflag;
}##getX()
##getY()
##getWidthOrXTarget()
##getHeightOrYTarget()
##getLearnedIndex()
These five functions operate similarly, and their names are mostly self-explanatory, so we won’t elaborate on the functionality of each function here.
Taking the first function <span>getX()</span> as an example, we will introduce the internal principles of these functions.
By examining the communication protocol, we can see that the X coordinate value is stored in the <span>buf</span> variable’s 5th and 6th positions (actually the 6th and 7th positions of the complete data, but we did not store the first data <span>0x55</span> in the <span>buf</span> variable), so we take <span>buf[4]</span> and <span>buf[5]</span> to calculate. Since this is hexadecimal data, we can use bit shifting to calculate, which is equivalent to multiplying by 256. Finally, we return the calculated value.
// X Center of Block [Block mode]
// or X Origin of Arrow [Arrow mode: Line tracking mode]
int getX(unsigned char *thebuf)
   {
     int xCenterValue;

     // calculate X Center of Block value
       xCenterValue = ((thebuf[5] << 8) + thebuf[4]);

     return xCenterValue;
   }
The other functions follow the same principle; just take the corresponding data bits for calculation.
#Conclusion
Through this chapter, we have read all the data returned by HuskyLens based on its communication protocol. So what interesting things can we do with this data?
How do we use functions like object tracking, face recognition, object recognition, line tracking, color recognition, and tag recognition?
How do we implement interactive gesture control, autonomous robots, intelligent access control, interactive toys, etc.?
We will leave you with a cliffhanger for now; see you in the next issue!
#Code Download
Please download the corresponding source code for this tutorial from Knowledge Planet:
https://t.zsxq.com/RB6EaYf

Previous Reviews
[Benefit] Arduino Series Pin Guide
Make an Otto Robot in One Hour
Color Picker Flashlight: Countless colors, only one chosen
Look! This is true creativity!
Let’s play with HuskyLens together!
👇