Source丨Network
/01/ Clipboard Manager
Have you ever found yourself busy handling multiple text snippets and forgotten what you copied? Have you thought about having a tool that records everything you copy throughout the day?
This automation script can monitor all the content you copy, seamlessly storing each copied text in a stylish graphical interface, so you don’t have to search through endless tabs and won’t lose valuable information.
The automation script utilizes the powerful Pyperclip library to seamlessly capture copied data and integrates Tkinter to visually track and manage the copied texts.
import tkinter as tk
from tkinter import ttk
import pyperclip
def update_listbox():
    new_item = pyperclip.paste()
    if new_item not in X:
        X.append(new_item)
        listbox.insert(tk.END, new_item)
        listbox.insert(tk.END, "----------------------")
    listbox.yview(tk.END)
    root.after(1000, update_listbox)
def copy_to_clipboard(event):
    selected_item = listbox.get(listbox.curselection())
    if selected_item:
        pyperclip.copy(selected_item)
X = []
root = tk.Tk()
root.title("Clipboard Manager")
root.geometry("500x500")
root.configure(bg="#f0f0f0")
frame = tk.Frame(root, bg="#f0f0f0")
frame.pack(padx=10, pady=10)
label = tk.Label(frame, text="Clipboard Contents:", bg="#f0f0f0")
label.grid(row=0, column=0)
scrollbar = tk.Scrollbar(root)
scrollbar.pack(side=tk.RIGHT, fill=tk.Y)
listbox = tk.Listbox(root, width=150, height=150, yscrollcommand=scrollbar.set)
listbox.pack(pady=10)
scrollbar.config(command=listbox.yview)
update_listbox()
listbox.bind("", copy_to_clipboard)
root.mainloop()
Applications
- Capture research notes copied from various sources and categorize them.
- The extended script can capture important calendar events, reminders, passwords, etc.
/02/ Code Quality Checker
Every developer faces the frustration of finding errors in Python code, only to get lost in a maze of mistakes. As developers, we understand the importance of writing clean and efficient code, but manually analyzing code quality can be a stressful task.
This automation script uses the Pylint and Flake8 Python packages to perform a comprehensive review of code quality. It compares your code against coding standards and identifies logical errors. It ensures that the code adheres to industry best practices and remains error-free.
import os
import subprocess
def analyze_code(directory):
    # List Python files in the directory
    python_files = [file for file in os.listdir(directory) if file.endswith('.py')]
    if not python_files:
        print("No Python files found in the specified directory.")
        return
    # Analyze each Python file using pylint and flake8
    for file in python_files:
        print(f"Analyzing file: {file}")
        file_path = os.path.join(directory, file)
        # Run pylint
        print("\nRunning pylint...")
        pylint_command = f"pylint {file_path}"
        subprocess.run(pylint_command, shell=True)
        # Run flake8
        print("\nRunning flake8...")
        flake8_command = f"flake8 {file_path}"
        subprocess.run(flake8_command, shell=True)
if __name__ == "__main__":
    directory = r"C:\Users\abhay\OneDrive\Desktop\Part7"
    analyze_code(directory)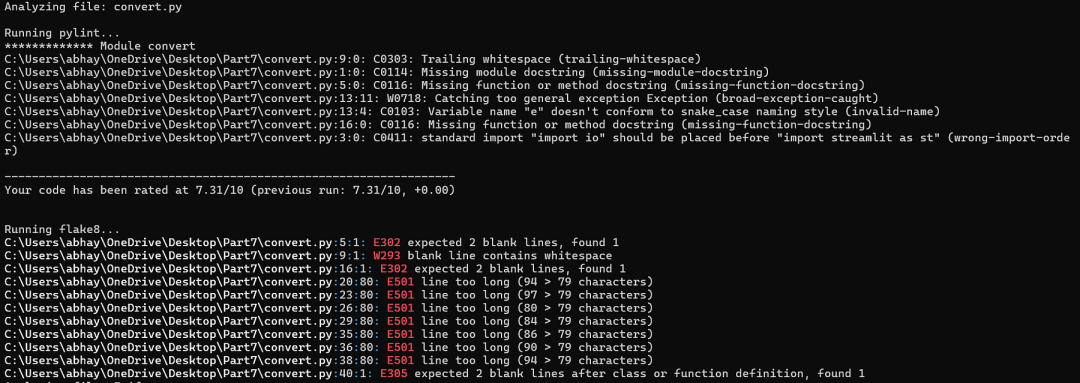
Applications
- Automatic code enhancer – with slight modifications, this script can be used to create a Python script that identifies issues in the code and makes corresponding changes.
- Automatic code review.
/03/ File Integrity Checker
File tampering, also known as data tampering, refers to the unauthorized intentional alteration of information, including destruction, alteration, or editing of data.
Many threat actors around the world exploit file tampering techniques to introduce different vulnerabilities or backdoors in critical system files, compromising security and allowing unauthorized access.
To mitigate this risk, it is crucial to verify the integrity of files to ensure they remain consistent with their original state. This automation script can help you test any file and identify whether it has been tampered with.
import hashlib
import os
def calculate_sha256(file_path):
    sha256 = hashlib.sha256()
    with open(file_path, 'rb') as file:
        for chunk in iter(lambda: file.read(4096), b''):
            sha256.update(chunk)
    return sha256.hexdigest()
def check_integrity(file_path, expected_checksum):
    actual_checksum = calculate_sha256(file_path)
    return actual_checksum == expected_checksum
if __name__ == "__main__":
    file_path = input("Enter the path to the file: ")
    expected_checksum = input("Enter the expected SHA-256 checksum: ")
    if os.path.isfile(file_path):
        if check_integrity(file_path, expected_checksum):
            print("File integrity verified: The file has not been tampered with.")
        else:
            print("File integrity check failed: The file may have been tampered with.")
    else:
        print("Error: File not found.")

/04/ Smart Trading
Trading refers to buying and selling financial instruments such as stocks, bonds, currencies, commodities, or derivatives for profit. Journal traders spend their days looking at different dashboards, trying to find the perfect decision to buy or sell.
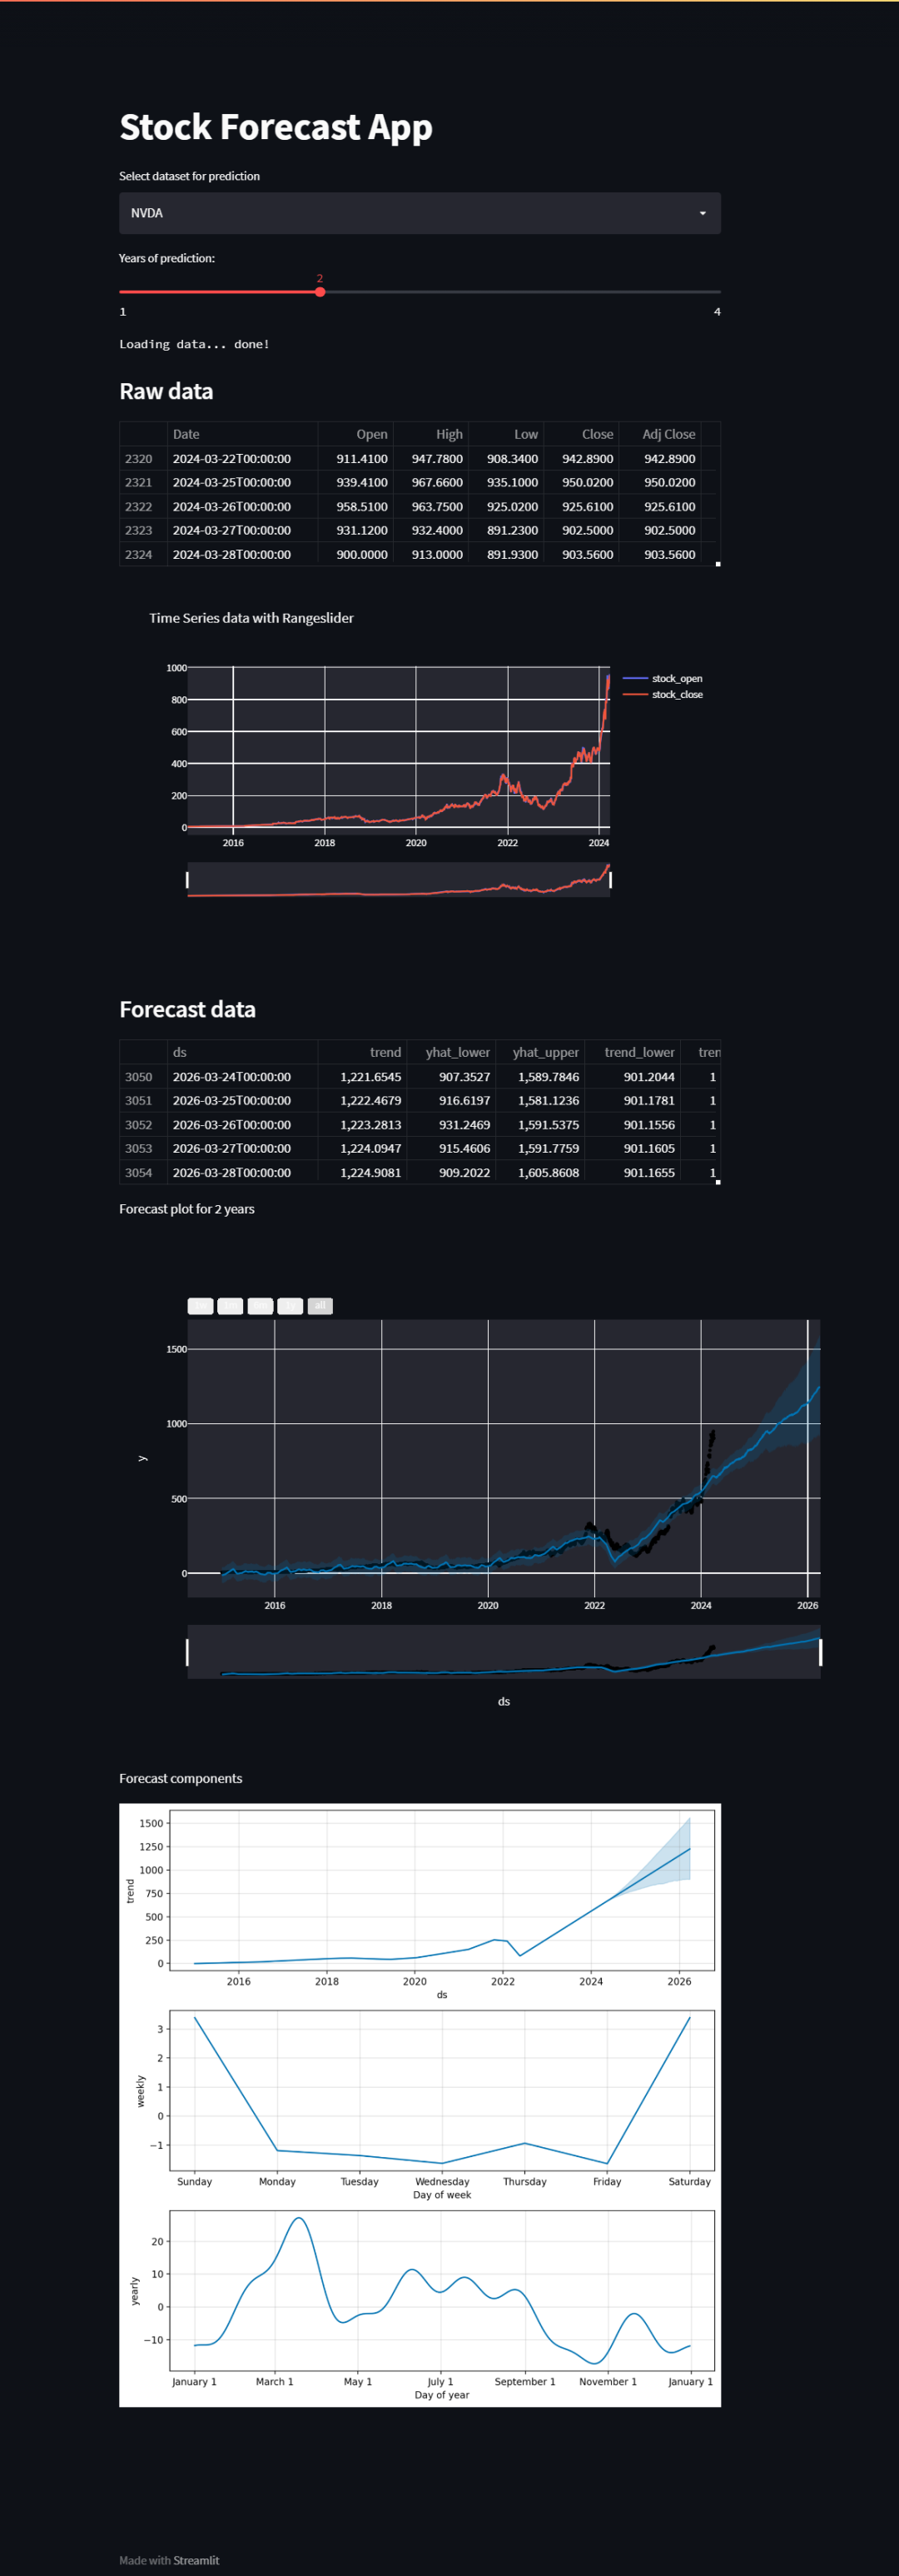
This automation script can help traders and investors get a good understanding of any stock they are willing to invest in. It uses the Prophet Python library to predict recent stock prices based on historical stock data obtained from Yahoo Finance.
import streamlit as st
from datetime import date
import yfinance as yf
from prophet import Prophet
from prophet.plot import plot_plotly
from plotly import graph_objs as go
START = "2015-01-01"
TODAY = date.today().strftime("%Y-%m-%d")
st.title('Stock Forecast App')
stocks = ('MSFT', 'TSLA', 'GOOG', 'AAPL', 'NVDA')
selected_stock = st.selectbox('Select dataset for prediction', stocks)
n_years = st.slider('Years of prediction:', 1, 4)
period = n_years * 365
@st.cache
def load_data(ticker):
    data = yf.download(ticker, START, TODAY)
    data.reset_index(inplace=True)
    return data
data_load_state = st.text('Loading data...')
data = load_data(selected_stock)
data_load_state.text('Loading data... done!')
st.subheader('Raw data')
st.write(data.tail())
# Plot raw data
def plot_raw_data():
    fig = go.Figure()
    fig.add_trace(go.Scatter(x=data['Date'], y=data['Open'], name="stock_open"))
    fig.add_trace(go.Scatter(x=data['Date'], y=data['Close'], name="stock_close"))
    fig.layout.update(title_text='Time Series data with Rangeslider', xaxis_rangeslider_visible=True)
st.plotly_chart(fig)
plot_raw_data()
# Predict forecast with Prophet.
df_train = data[['Date', 'Close']]
df_train = df_train.rename(columns={"Date": "ds", "Close": "y"})
m = Prophet()
m.fit(df_train)
future = m.make_future_dataframe(periods=period)
forecast = m.predict(future)
# Show and plot forecast
st.subheader('Forecast data')
st.write(forecast.tail())
st.write(f'Forecast plot for {n_years} years')
fig1 = plot_plotly(m, forecast)
st.plotly_chart(fig1)
st.write("Forecast components")
fig2 = m.plot_components(forecast)
st.write(fig2)
To run this program, you first need to install the Streamlit, yfinance, prophet, and plotly Python libraries using pip.
pip install streamlit prophet yfinance plotly
Then use the command streamlit run smart_trade.py to run it.
Applications
- Algorithmic trading
- Stock price comparison dashboard
/05/ Automatic Image Downloader
Collecting image data is a key challenge in computer vision projects. As Andrew Ng said, if you can gather a large dataset, the algorithm doesn’t matter. Data plays a crucial role in improving the performance and accuracy of models.

With just a few lines of code, this automation script can help you download data from the web in minutes.
# Importing the necessary module and function
from simple_image_download import simple_image_download as simp
# Creating a response object
response = simp.simple_image_download
# Keyword
keyword = "Dog"
# Downloading images
try:
    response().download(keyword, 20)
    print("Images downloaded successfully.")
except Exception as e:
    print("An error occurred:", e)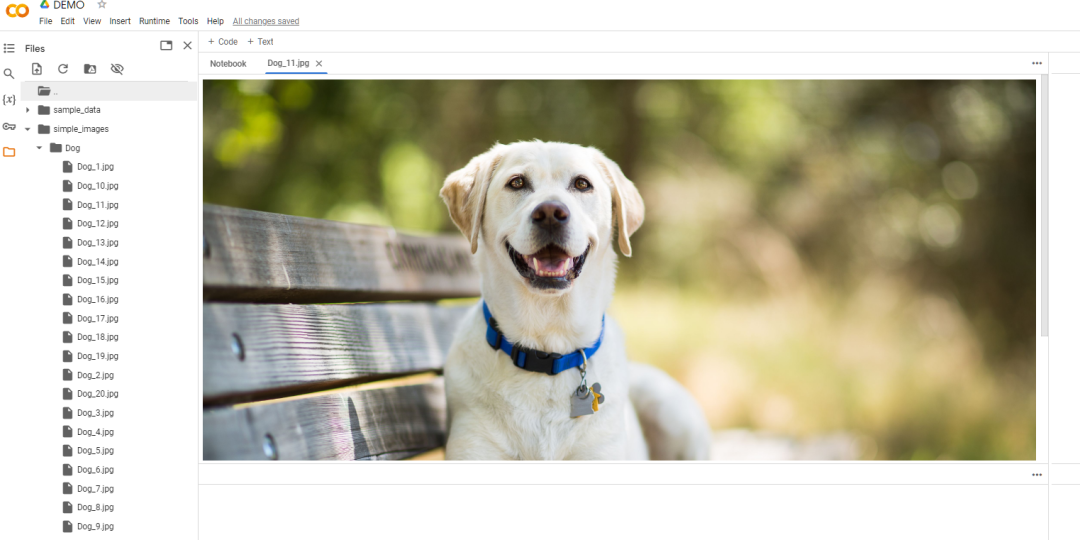
/06/ Port Scanner
In computer networking, a port is a communication endpoint that allows different processes or services to connect and exchange data over a network. Ports are identified by numbers and are associated with specific protocols.
Open ports are like doors and windows in a building, where each port is a potential entry point for a website to communicate with the outside network. However, open ports without proper security measures can make a website vulnerable to cyber attacks.
This automation script takes a website URL as input and checks if there are any open ports on the website. Whether you are executing tasks as part of a “red team” or holding the fort in a “blue team,” this script can provide you with a useful convenience tool.
import socket
from prettytable import PrettyTable
# Dictionary mapping common ports to vulnerabilities (Top 15)
vulnerabilities = {
    80: "HTTP (Hypertext Transfer Protocol) - Used for unencrypted web traffic",
    443: "HTTPS (HTTP Secure) - Used for encrypted web traffic",
    22: "SSH (Secure Shell) - Used for secure remote access",
    21: "FTP (File Transfer Protocol) - Used for file transfers",
    25: "SMTP (Simple Mail Transfer Protocol) - Used for email transmission",
    23: "Telnet - Used for remote terminal access",
    53: "DNS (Domain Name System) - Used for domain name resolution",
    110: "POP3 (Post Office Protocol version 3) - Used for email retrieval",
    143: "IMAP (Internet Message Access Protocol) - Used for email retrieval",
    3306: "MySQL - Used for MySQL database access",
    3389: "RDP (Remote Desktop Protocol) - Used for remote desktop connections (Windows)",
    8080: "HTTP Alternate - Commonly used as a secondary HTTP port",
    8000: "HTTP Alternate - Commonly used as a secondary HTTP port",
    8443: "HTTPS Alternate - Commonly used as a secondary HTTPS port",
    5900: "VNC (Virtual Network Computing) - Used for remote desktop access",
    # Add more ports and vulnerabilities as needed
}
def display_table(open_ports):
    table = PrettyTable(["Open Port", "Vulnerability"])
    for port in open_ports:
        vulnerability = vulnerabilities.get(port, "No known vulnerabilities associated with common services")
        table.add_row([port, vulnerability])
    print(table)
def scan_top_ports(target):
    open_ports = []
    top_ports = [21, 22, 23, 25, 53, 80, 110, 143, 443, 3306, 3389, 5900, 8000, 8080, 8443]  # Top 15 ports
    for port in top_ports:
        try:
            sock = socket.socket(socket.AF_INET, socket.SOCK_STREAM)
            sock.settimeout(1)  # Adjust timeout as needed
            result = sock.connect_ex((target, port))
            if result == 0:
                open_ports.append(port)
            sock.close()
        except KeyboardInterrupt:
            sys.exit()
        except socket.error:
            pass
    return open_ports
def main():
    target = input("Enter the website URL or IP address to scan for open ports: ")
    open_ports = scan_top_ports(target)
    if not open_ports:
        print("No open ports found on the target.")
    else:
        print("Open ports and associated vulnerabilities:")
        display_table(open_ports)
if __name__ == "__main__":
    main()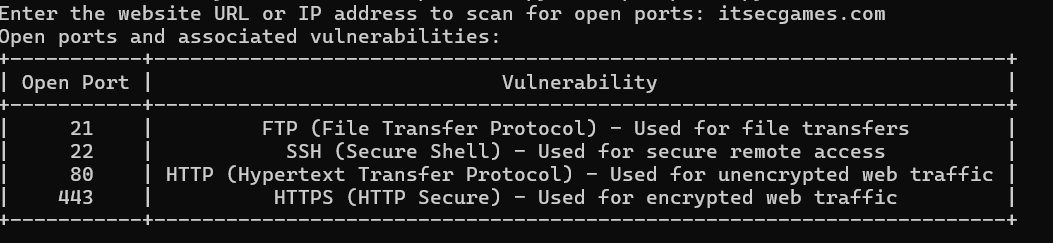
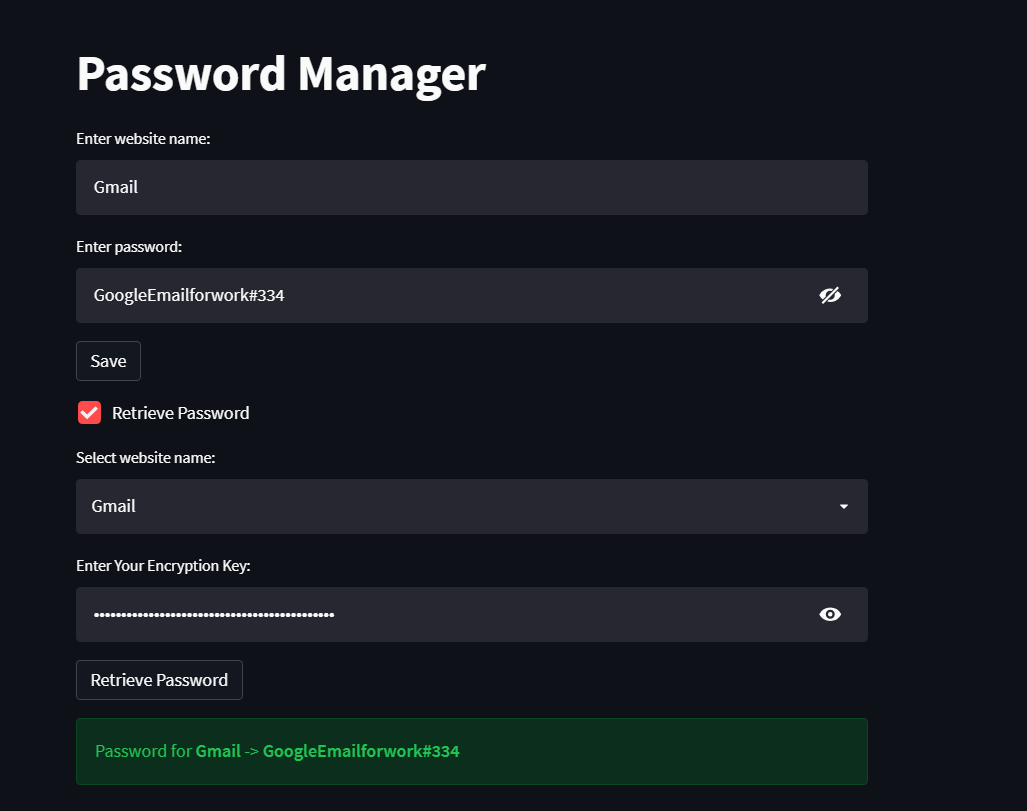
/07/ Password Manager
As a digital freelancer, one of the worst things is having to remember a lot of passwords, as you register for a new website every day.
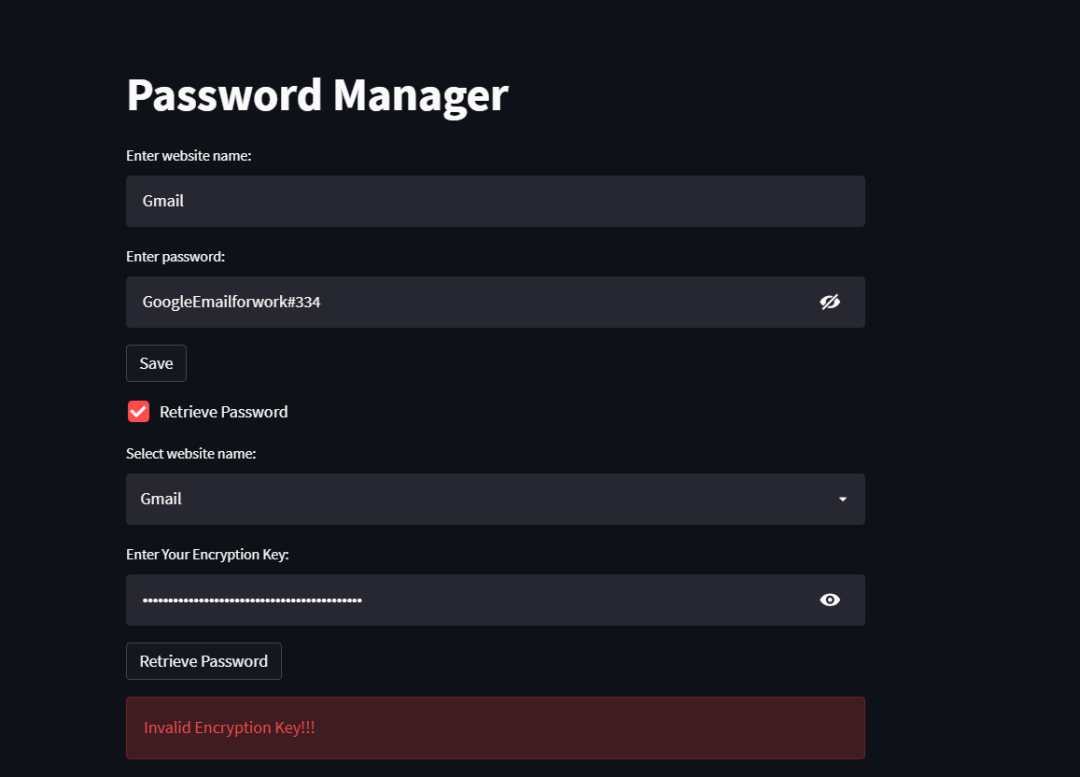
This automation script can help you manage all your passwords, using different encryption techniques to ensure that your passwords are secure and accessible only by you.
The best part of this script is that it is a web application, and with minor modifications, you can deploy it to cloud storage, allowing you to access all your passwords anytime, anywhere without worrying about security issues.
import streamlit as st
import csv
from cryptography.fernet import Fernet
from cryptography.fernet import InvalidToken
# Custom encryption key (hardcoded)
CUSTOM_ENCRYPTION_KEY = b'u7wGgNdDFefqpr_kGxb8wJf6XRVsRwvb3QgITsD5Ft4='
# If you plan to use this script on a shared platform, ensure this key is kept in a separate secure file.
# Function to encrypt password
def encrypt_password(password):
    cipher_suite = Fernet(CUSTOM_ENCRYPTION_KEY)
    encrypted_password = cipher_suite.encrypt(password.encode())
    return encrypted_password
# Function to decrypt password
def decrypt_password(encrypted_password):
    if isinstance(encrypted_password, bytes):
        try:
            cipher_suite = Fernet(CUSTOM_ENCRYPTION_KEY)
            decrypted_password = cipher_suite.decrypt(encrypted_password)
            return decrypted_password.decode()
        except InvalidToken:
            return "Invalid Token"
    else:
        return None
# Function to save website name and password to CSV file
def save_credentials(website_name, password):
    encrypted_password = encrypt_password(password)
    with open('credentials.csv', 'a', newline='') as csvfile:
        writer = csv.writer(csvfile)
        writer.writerow([website_name, encrypted_password.decode()])  # Ensure storing string representation
# Function to retrieve password from CSV file
def retrieve_password(website_name):
    with open('credentials.csv', 'r') as csvfile:
        reader = csv.reader(csvfile)
        for row in reader:
            if row[0] == website_name:
                encrypted_password = row[1].encode()
                return encrypted_password
    return None
# Streamlit UI
st.title("Password Manager")
# Input fields for website name and password
website_name = st.text_input("Enter website name:")
password = st.text_input("Enter password:", type="password")
# Save button to save website name and password
if st.button("Save"):
    if website_name and password:
        save_credentials(website_name, password)
        st.success("Website name and password saved successfully.")
    else:
        st.error("Please fill in all fields.")
# Retrieve button to retrieve password
if st.checkbox("Retrieve Password"):
    website_name = st.selectbox("Select website name:", options=[""] + [row[0] for row in csv.reader(open('credentials.csv', 'r'))])
    key = st.text_input("Enter Your Encryption Key:", type="password")
    if st.button("Retrieve Password"):
        if key == str(CUSTOM_ENCRYPTION_KEY.decode()):
            if website_name:
                encrypted_password = retrieve_password(website_name)
                if encrypted_password:
                    decrypted_password = decrypt_password(encrypted_password)
                    st.success(f"Password for **{website_name}** -> **{decrypted_password}**")
                else:
                    st.error("Password not found in database.")
        elif key == "":
            pass
        else:
            st.error("Invalid Encryption Key!!!")
It uses a hardcoded custom key for encryption and decryption. If you plan to use this script on a shared platform, ensure this key is kept in a separate secure file.
/08/ Email Bulk Sender
Email lists are the currency of online engagement, with each subscriber being an important member of your digital tribe. They are the heart of effective digital marketing.
As an influential digital marketer, it is crucial to stay engaged with your followers, but manual operations can be a daunting task, and using relevant tools can be costly.
This automation script can utilize Gmail’s built-in SMTP server to send bulk emails in minutes, allowing you to fully customize and empower your outreach.
import smtplib
import ssl
# SMTP server details
smtp_server = 'data.STUDIO.com'
smtp_port = 465
# Sender and recipient details
from_address = 'Winzo Shop'
to_address = ['','']     # Recipients List
# Authentication details
username = ''       # Sender Email
password = ''       # Sender Password
# Email message details
subject = '🎉 Exclusive Offer Inside! Get 10% Off Your Next Purchase'
body = ''
# Create an SSL/TLS context
context = ssl.create_default_context()
# Connect to the SMTP server using SSL/TLS
with smtplib.SMTP_SSL(smtp_server, smtp_port, context=context) as server:
    # Enable debugging to print the server's responses
    server.set_debuglevel(1)
    # Login to the SMTP server
    server.login(username, password)
    # Create the email message
    message = f'From: {from_address}\r\nSubject: {subject}\r\nTo: {to_address}\r\n\r\n{body}'
    message = message.encode()  # Convert the message to bytes
    # Send the email
    server.sendmail(from_address, to_address, message)
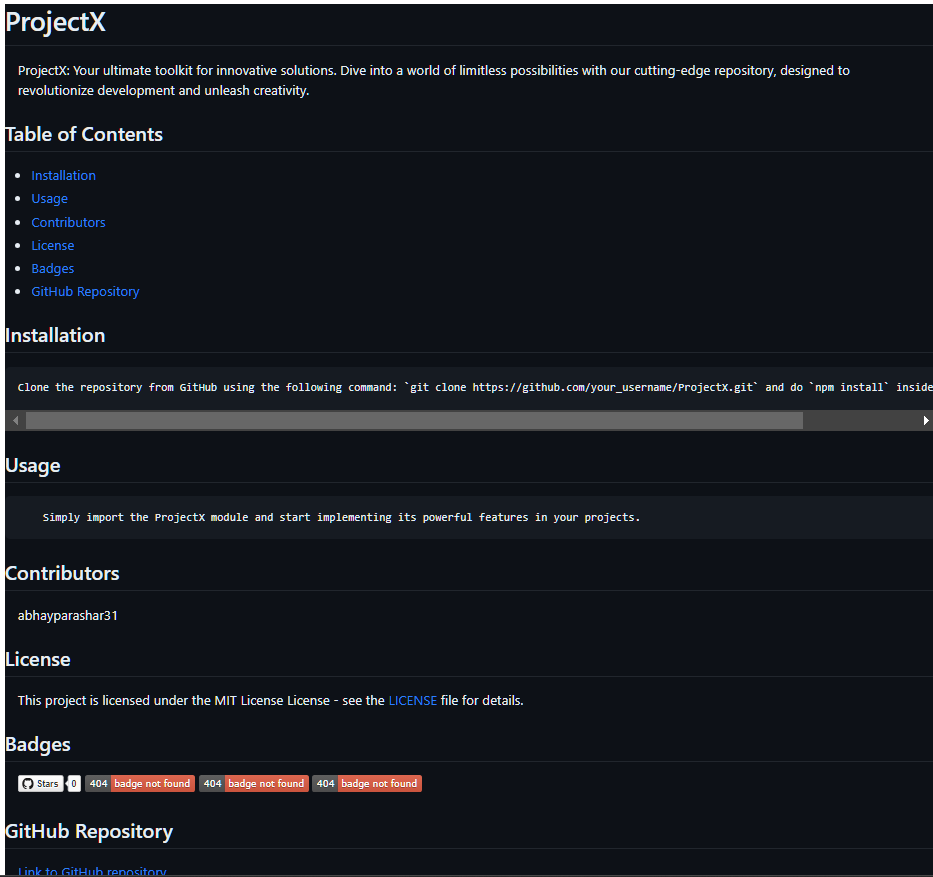
/09/ Readme.md Generator
A README.md file is the entry point of a project, providing basic information and enticing visitors to explore further. It is considered one of the most important files in a repository, but creating it can be quite time-consuming.
This automation script can easily generate a README.md file based on input information such as repository name, link, and description, saving you a lot of time.
def generate_markdown_file():
# Prompting user for inputs
repository_name = input("\n Enter the name of your GitHub repository: ")
project_description = input("Enter a short description of your project: ")
installation_instructions = input("Enter installation instructions for your project: ")
usage_instructions = input("Enter usage instructions for your project: ")
contributors = input("Enter the contributors to your project (separated by commas): ")
license = select_license()
# Generating badges
stars_badge = "[](https://github.com/{}/stargazers)".format(repository_name, repository_name)
forks_badge = "[](https://github.com/{}/network/members)".format(repository_name, repository_name)
issues_badge = "[](https://github.com/{}/issues)".format(repository_name, repository_name)
license_badge = "[](https://github.com/{}/blob/master/LICENSE)".format(repository_name, repository_name)
# Generating Markdown content
markdown_content = f"""
# {repository_name}
{project_description}
## Table of Contents
- [Installation](#installation)
- [Usage](#usage)
- [Contributors](#contributors)
- [License](#license)
- [Badges](#badges)
- [GitHub Repository](#github-repository)
## Installation
```
{installation_instructions}
```
## Usage
```
{usage_instructions}
```
## Contributors
{contributors}
## License
This project is licensed under the {license} License - see the [LICENSE](LICENSE) file for details.
## Badges
{stars_badge} {forks_badge} {issues_badge} {license_badge}
## GitHub Repository
[Link to GitHub repository](https://github.com/{repository_name})
"""
# Writing content to Markdown file
markdown_file_name = f"{repository_name}_README.md"
with open(markdown_file_name, "w") as markdown_file:
markdown_file.write(markdown_content)
print(f"Markdown file '{markdown_file_name}' generated successfully!")
def select_license():
licenses = {
"MIT": "MIT License",
"Apache": "Apache License 2.0",
"GPL": "GNU General Public License v3.0",
# Add more licenses as needed
}
print("Select a license for your project:")
for key, value in licenses.items():
print(f"{key}: {value}")
while True:
selected_license = input("Enter the number corresponding to your selected license: ")
if selected_license in licenses:
return licenses[selected_license]
else:
print("Invalid input. Please enter a valid license number.")
if __name__ == "__main__":
generate_markdown_file()
/10/ OrganizeIT 2.0
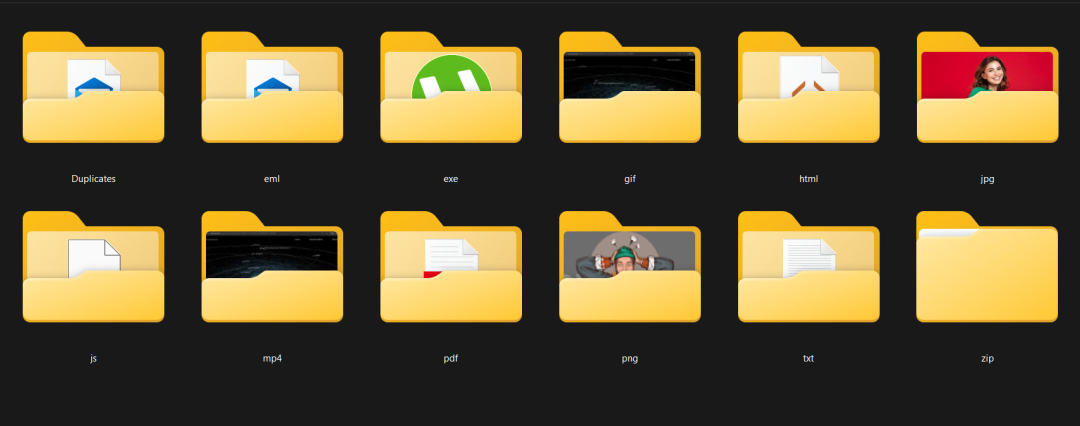
Is your downloads folder a mess? Do you find it difficult to locate important files when you need them the most? Have you tried countless times to organize your folders but failed?
This automation script can help you organize your folder in minutes. You just need to specify the path to clean, and this script will automatically categorize all files into different folders based on their file extensions.
That’s not all; it can also detect and handle duplicate files by comparing the hashes of the files.
import os
import hashlib
import shutil
def get_file_hash(file_path):
    with open(file_path, 'rb') as f:
        return hashlib.sha256(f.read()).hexdigest()
def organize_and_move_duplicates(folder_path):
    # Create a dictionary to store destination folders based on file extensions
    extension_folders = {}
    # Create the "Duplicates" folder if it doesn't exist
    duplicates_folder = os.path.join(folder_path, 'Duplicates')
    os.makedirs(duplicates_folder, exist_ok=True)
    # Create a dictionary to store file hashes
    file_hashes = {}
    # Iterate through files in the folder
    for filename in os.listdir(folder_path):
        file_path = os.path.join(folder_path, filename)
        if os.path.isfile(file_path):
            # Get the file extension
            _, extension = os.path.splitext(filename)
            extension = extension.lower()  # Convert extension to lowercase
            # Determine the destination folder
            if extension in extension_folders:
                destination_folder = extension_folders[extension]
            else:
                destination_folder = os.path.join(folder_path, extension[1:])  # Remove the leading dot from the extension
                os.makedirs(destination_folder, exist_ok=True)
                extension_folders[extension] = destination_folder
            # Calculate the file hash
            file_hash = get_file_hash(file_path)
            # Check for duplicates
            if file_hash in file_hashes:
                # File is a duplicate, move it to the "Duplicates" folder
                shutil.move(file_path, os.path.join(duplicates_folder, filename))
                print(f"Moved duplicate file {filename} to Duplicates folder.")
            else:
                # Store the file hash
                file_hashes[file_hash] = filename
                # Move the file to the destination folder
                shutil.move(file_path, destination_folder)
                print(f"Moved {filename} to {destination_folder}")
if __name__ == "__main__":
    folder_path = input("Enter the path to the folder to organize: ")
    organize_and_move_duplicates(folder_path)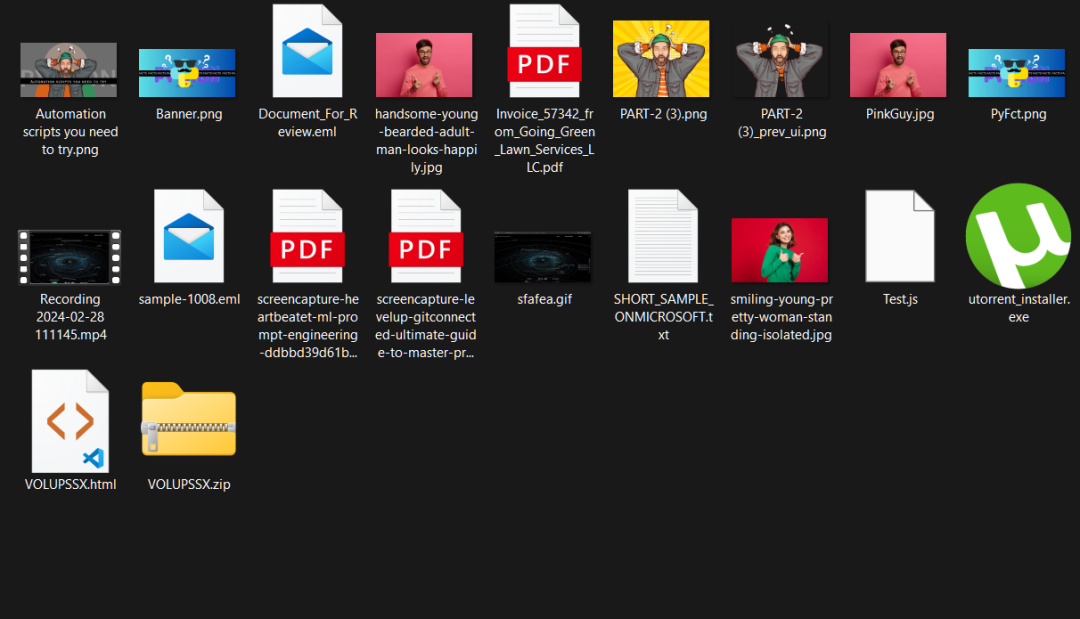
All mountains and rivers are always emotional, would you mind giving a thumbs up 👍?
Editor / Fan Ruqiang
Review / Fan Ruqiang
Verification / Fan Ruqiang
Click below
Follow us