
Readers who work with microcontrollers should have heard of Arduino or even used it, but many friends are still unclear about what Arduino is. Today, we will briefly describe Arduino for beginners.
1. Introduction to Arduino
To understand Arduino, you must first understand what a microcontroller is. The basis of the Arduino platform is actually the AVR instruction set microcontroller.
1. What is a microcontroller?
A working computer consists of several parts: Central Processing Unit (CPU), Random Access Memory (RAM), Read-Only Memory (ROM), and Input/Output devices (I/O). In personal computers (PCs), these parts are divided into several chips installed on a printed circuit board called the motherboard. In a microcontroller, all these parts are integrated into a single integrated circuit chip, hence the name microcontroller. Some microcontrollers also integrate other components such as Analog/Digital converters (A/D) and Digital/Analog converters (D/A).
2. What is the use of a microcontroller?
There is a saying that one should not use a sledgehammer to crack a nut; not every scenario requires high performance. Imagine a voice-controlled lamp using an Intel i7 processor; the cost-effectiveness would be astronomical. The key is whether it is sufficient and offers good performance-to-price ratio, which is where microcontrollers fit in well.
So, what is Arduino?
Arduino is a convenient, flexible, and easy-to-use open-source electronic prototyping platform, including hardware (various models of Arduino boards) and software (Arduino IDE). It is suitable for artists, designers, enthusiasts, and anyone who wants to tinker. Its features include a simple shape that can interact with people, allowing even ten-year-olds to create things they want. Arduino can sense the environment through various sensors and can control lights, motors, and other devices to respond to and affect the environment. The microcontroller on the board can be programmed using the Arduino programming language, compiled into a binary file, and uploaded to the microcontroller. Arduino-based projects can consist solely of Arduino or include other software running on a PC, communicating with each other (such as Flash, Processing, MaxMSP) to achieve functionality.
2. Types of Arduino
There are so many Arduino boards available on the market that it can be overwhelming for beginners. Choosing the right Arduino for a project is half the success. Let’s look at the most common Arduino boards and how to differentiate them.

To differentiate between so many boards, the main aspects to consider are performance, features, and size.
First, look at performance, which includes processor memory, clock frequency, and bit width. The hardware processing capability usually depends entirely on the chip on the board, which also limits the software that can run.
Next, consider the features, which include everything on the board except for the microprocessor, such as input/output pins, integrated components (buttons, LEDs, motor drivers, etc.), and the types and numbers of available interfaces (USB, Ethernet, etc.).
Finally, consider the size. Due to different project requirements, the volume and weight allocated for the electronic parts can vary greatly. For example, if you want to make a tracker for a dog, using a Mega with a battery box and expansion board would require at least a size of 10*5*5cm and a weight of 200g. Is this a tracker or a sandbag? This is why there are so many Arduino siblings.
Having said so much, let’s take a look at the mainstream Arduinos.
1. Arduino Uno
Processor: ATmega328 (8-bit CPU, 16MHz clock frequency, 2KB SRAM, 32KB flash memory)
Features: 14 digital I/O ports, 6 analog input ports, replaceable processor design
Size: 75 x 55mm
Price: $30

2. Arduino Leonardo
Processor: ATmega32u4 (8-bit CPU, 16MHz clock frequency, 2.5KB SRAM, 32KB flash memory)
Features: 20 digital I/O ports, 12 of which can be used as analog ports, native USB support
Size: 75 x 55mm
Price: $25

3. Arduino Due
Processor: Atmel SAM3X8E ARM Cortex-M3 (32-bit CPU, 84MHz clock frequency, 96KB SRAM, 512KB flash memory)
Features: 54 digital I/O ports, 12 analog input ports, 2 analog output ports, native USB support
Size: 100 x 55mm
Price: $50

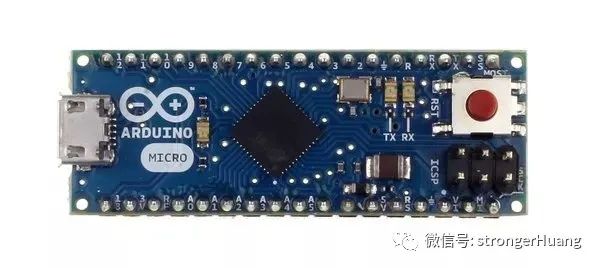
4. Arduino Micro
Processor: ATmega32u4 (8-bit CPU, 16MHz clock frequency, 2.5KB SRAM, 32KB flash memory)
Features: 20 digital I/O ports, 12 of which can be used as analog ports, native USB support
Size: 50 x 18 mm
Price: $27
5. LilyPad Arduino
Processor: ATmega328 (8-bit CPU, 16MHz clock frequency, 2KB SRAM, 32KB flash memory)
Features: 14 digital I/O ports, 6 analog input ports
Size: 50mm diameter round
Price: $22


The purpose of this small experiment is to light up the LED on pin 13 of the Arduino UNO board for one second, then turn it off for one second, and keep repeating.
Now, let’s assume we are using the Arduino UNO control board (recommended for beginners due to its stability), and we have already set up the Arduino development environment and installed the USB driver as per the steps above.
1. Connect the Arduino control board to the computer
Plug one end of the USB cable into the Arduino control board and the other end into the computer’s USB port. (Note: When working independently, the Arduino control board can be powered either from USB or from a power bank or power adapter.)
Connect the Arduino control board to the computer
Open the Arduino IDE, and the Arduino IDE editing interface will appear.

2. Understanding Arduino IDE
Let’s briefly understand this Arduino compiler, as we will be interacting with it often in the future.

Arduino IDE is the software editing environment for Arduino products. In simple terms, it is where you write and download code.
Any Arduino product needs to download code to operate.
The hardware circuit we build is auxiliary to the code. Both are indispensable. Just like a person controls body movements through the brain. If the code is the brain, then the peripheral hardware is the body, and the body’s movements depend on the brain; thus, hardware implementation depends on code.
The basic functional areas of Arduino IDE have been indicated above (using an old image for convenience, but the layout is the same as the new version). The majority of the white area in the image is the code editing area, where you input code. Note that when entering code, you need to switch to English input mode. The black area below is the message prompt area, which displays whether compilation or downloading was successful.
3. Downloading a Blink Program

Download the simplest code, which can help us familiarize ourselves with how to download programs while also testing whether the board is functioning.
The LED marked L on the UNO board will blink with this test code.
4. Open Blink
Plug in the USB cable, open the Arduino IDE, and find the “Blink” code.
File > Examples > 01.Basics > Blink


5. Verify the Program
Usually, after writing a piece of code, we need to verify it to see if there are any errors. Click “Verify”.


After verification (compilation) is complete, you can see the corresponding prompts.
Since this is sample code, there won’t be any errors during verification. However, in the future, when writing code, you will need to verify it after entering the code before downloading it to the Arduino.
Before downloading the program, we also need to tell the Arduino IDE what board we are using and which corresponding serial port it is.
6. Set the Board Type
Arduino includes various versions of controllers, with the most common being the Uno, Leonardo, and Mega series controllers (the most comprehensive selection guide).
In the board section, you need to select the board type based on the firmware type of the controller hardware you have chosen. (In this example, we are using a controller with Uno as the bootloader) Tools > Board > Arduino Uno

7. Set the Serial Port
Tools > Serial Port > xx, where xx should match what you see in your computer’s device manager.

8. Download the Program
As shown, finally, click “Upload”. (Uploading and downloading here are essentially the same.)

Upload complete!
If all goes well, we will directly see the effect of the program running on the board:
The LED on pin 13 of the Arduino Uno board is blinking.
Well, these are the most basic operations of the IDE.

1.Is the embedded industry really without a future?
2.@Embedded friends, there are positions waiting for you!
3.What exactly are we talking about when we talk about embedded engineers?
4.It is reported that Nvidia has discussed acquiring Arm with SoftBank, and Apple lost interest after contacting them.
5.[Revealing] What happens during type conversion in C language?
6.A U.S. company has found a new way to speed up chips! Breaking the key bottleneck in 2D miniaturization.

Disclaimer: This article is a network reprint, and the copyright belongs to the original author. If there are any copyright issues, please contact us, and we will confirm the copyright based on the copyright certificate you provide and pay the remuneration or delete the content.