
Author / Abao
Editor / Abao
Produced by / Abao1990
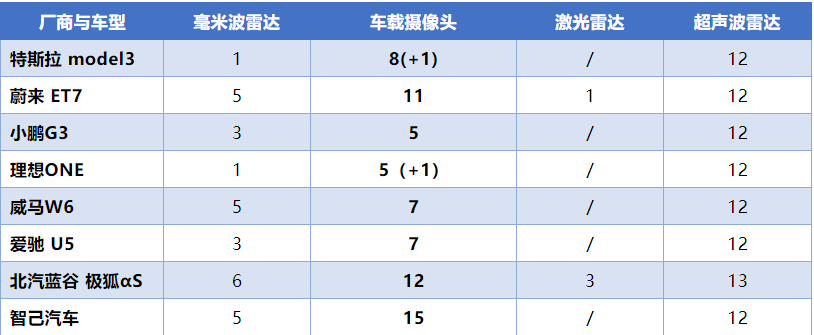
In recent years, the installation rate of ADAS (Advanced Driver Assistance System) in vehicles is rapidly increasing. Looking at major manufacturers, these technologies are basically concentrated in L2-L3 level autonomous driving, and to achieve these functions, the number of cameras used in the vehicle perception system is basically over five. For example, Tesla has 8, Xiaopeng P7 has 14, WM W6 has 7, while the Zhiji car backed by Alibaba and SAIC has increased it to 15.
Where are these cameras distributed? How many cameras does a smart car need at least? What are the main functions? What are the differences in the angles and pixel requirements of these cameras?

ADAS Camera Classification

From the autonomous driving perception solutions of mainstream car manufacturers, various sensor fusion schemes are widely adopted. Taking General Motors’ Cruise AV as an example, GM’s goal is to achieve L4 level autonomous driving, with the entire vehicle equipped with 5 Velodyne VLP16 16-line LiDAR, 21 millimeter-wave radars (12 of which are 79GHz millimeter-wave radars provided by Japan’s ALPS), and 16 cameras.
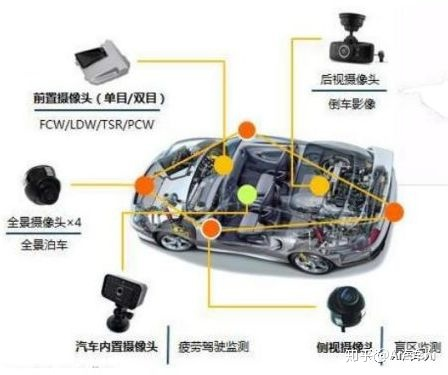
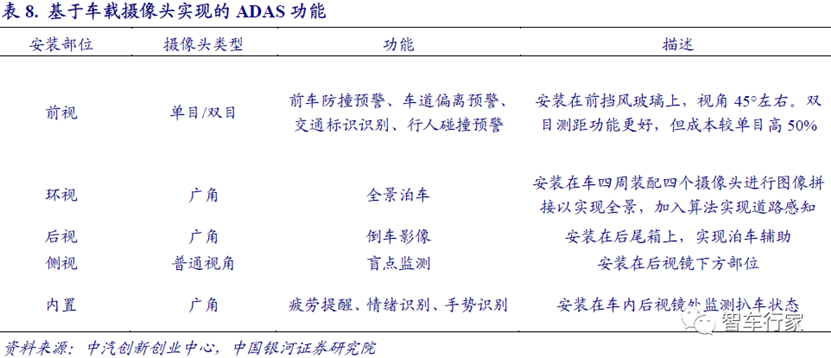
In L3 and below levels of autonomous driving, cameras play a leading role. Depending on the different functions and installation positions of ADAS, onboard cameras include front, surround, rear, side, and built-in cameras, with different functions at different positions, making them an essential part of achieving autonomous driving.
From the above configuration, a smart car needs at least more than 5 cameras. A front-facing camera plus 4 surround cameras is the most basic configuration. Some car manufacturers with more advanced algorithms even use one of the surround cameras as a rear view function, thus requiring a minimum of 5 camera configurations.
Front-facing Camera:
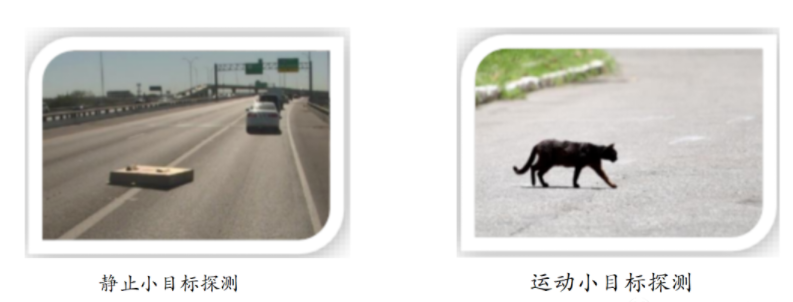
Since the front detection process generally uses consistent target image outputs, in layman’s terms, in many cases, it is impossible to change the image size for detection types, which leads to insufficient detection distance when the image resolution is too low, making it impossible to detect distant small targets in advance; while when the image resolution is too high, the FOV for detection is insufficient, making it impossible to react promptly to targets suddenly cutting into the lane.
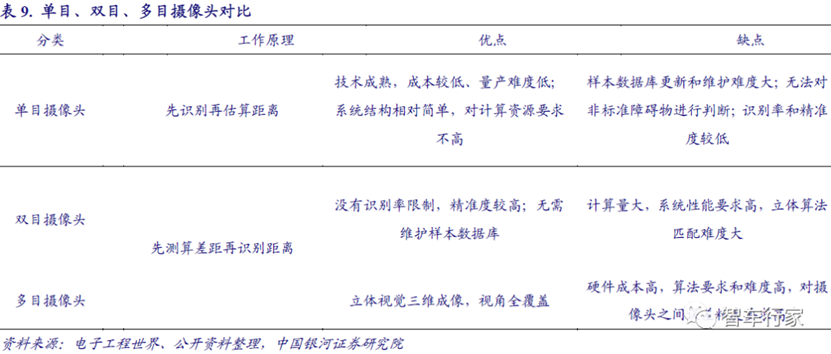
Both single and dual lens cameras obtain distance information through image data collected by the camera, playing an important role in the front-facing camera position; however, the distance measurement principles of the two differ. Monocular vision calculates distance based on target size after image matching, while binocular vision measures distance by calculating the parallax of two images from two cameras.
Monocular cameras have developed earlier, and current technology is relatively mature with lower mass production costs; however, limited by the fixed focus of a single camera, it is difficult to switch focal lengths at different distances, making it difficult to balance measurement distance and range. Dual and multi-camera setups overcome the limitations of a single camera to some extent, as the cooperation of multiple cameras can provide a wider coverage and more accurate data.
However, the hardware costs and corresponding algorithm requirements for multiple cameras are relatively high, and the supporting facilities are not yet fully developed, making mass production and promotion very difficult at this stage. Monocular cameras, due to their lower chip computing power and cost, can already meet the needs below L3 when paired with millimeter-wave radars and ultrasonic radars, thus remaining the mainstream solution for vehicle-mounted cameras in the short term.
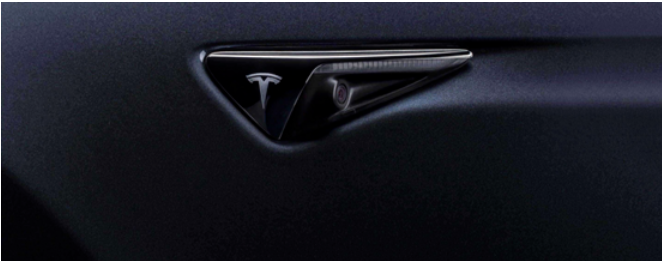
Let’s take a look at the design of Tesla’s front-facing camera, which focuses on vision.
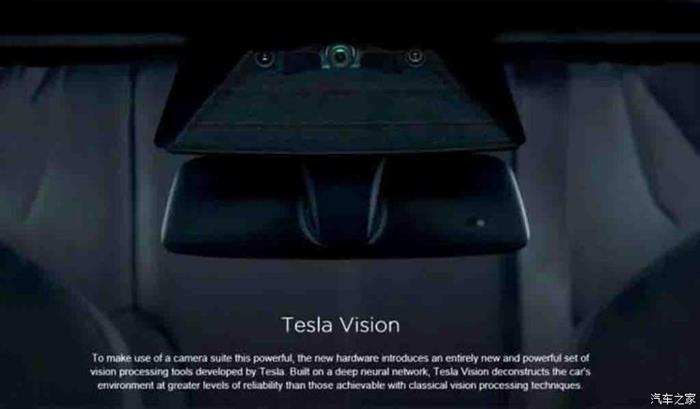
Tesla is a typical example, choosing a tri-camera setup instead of a single or dual camera for its front-facing camera.
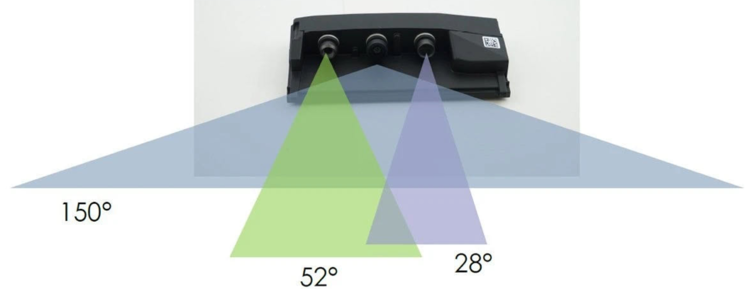
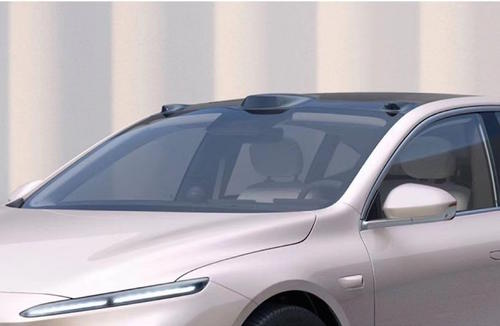
This tri-camera is installed behind the windshield and consists of three components: front wide-angle, main view, and narrow view cameras.
Wide view: The large-angle fisheye lens can capture traffic lights, obstacles on the driving path, and nearby objects, making it very suitable for urban streets and low-speed traffic scenarios. Maximum monitoring distance is 60 meters.
Main view: Covers most traffic scenarios, with a maximum monitoring distance of 150 meters.
Narrow view: Can clearly capture distant objects, suitable for high-speed driving scenarios. Maximum monitoring distance is 250 meters.
Through this tri-camera, Tesla solves the problem of having to choose between wide FOV and distance. The wide-angle camera is needed for complex intersections, while the long-distance camera is necessary for highways, thus addressing both needs.
The image resolution and frame rate of the camera also need to be considered. After solving the computing power and bandwidth issues of the central control unit for autonomous driving, the camera image resolution should be as high as possible. Considering the specific scene issues that need to be addressed during vehicle driving, generally, the higher the resolution for forward detection, the better. The currently promoted resolution for front-facing cameras is 8 million pixels.
The front-facing camera is the core camera of ADAS, covering distance measurement, object recognition, road markings, etc. Therefore, the algorithms are complex and the threshold is high. Thus, to evaluate whether a vehicle’s vision algorithm is advanced, one can directly assess its ability to implement multiple front-facing cameras.
Surround Camera
Friends who have driven cars often feel the pain, especially when reversing, needing to be aware of everything around them. Even with reversing cameras and radar, the environment on both sides still needs constant attention. Thus, the initial pain point of 360-degree panoramic images is to provide an all-around view for parking.
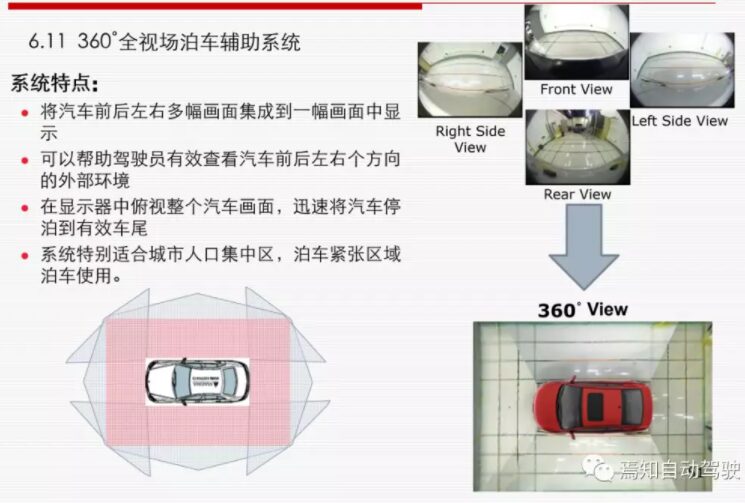
To stitch together a 360° image, theoretically, three cameras could also complete the stitching; however, their placement on the vehicle is not convenient, generally only being able to be placed on the roof, and the difficulty of software algorithm stitching increases. Therefore, currently, at least four cameras are needed, and they must be wide FOV cameras.
Installation positions: A group of surround cameras are installed near the vehicle’s front and rear logos (or nearby), as well as integrated into the left and right rearview mirrors, to identify parking lane markings, road conditions, and surrounding vehicle situations, using images from multiple cameras to stitch together a 360-degree image. Due to the need for detecting the vehicle’s surroundings, they are generally installed at the front of the vehicle, at the logo or grille.
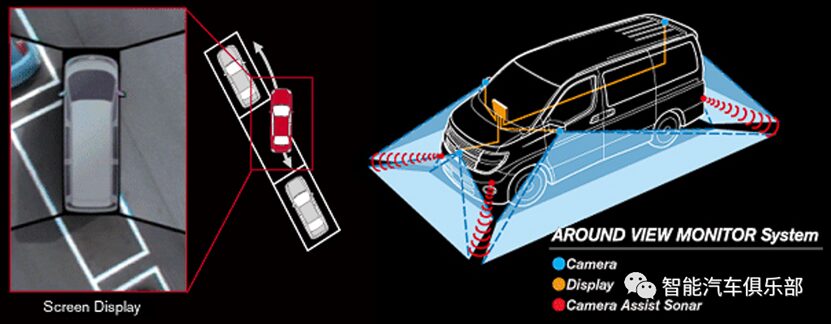
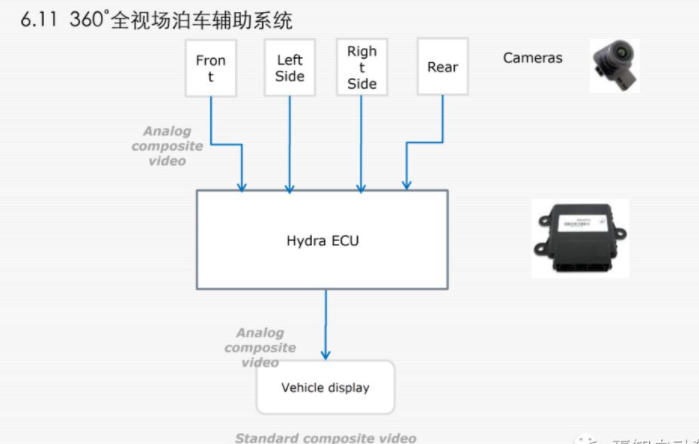
The 360-degree surround image provides a lot of information. Many vehicle models have a 360-degree image processor that performs image stitching algorithms, and the stitched image is transmitted to the cockpit controller for display via a video transmission chip. This greatly reduces the computational requirements for the cockpit’s main chip, and as the cockpit domain controller’s CPU chip becomes increasingly powerful, processing 360-degree surround images poses no difficulty. This allows OEMs to save on a 360-degree processor, significantly reducing costs.
The 360-degree camera images are primarily for the driver’s use, so the precision requirements for these images are not as high, and the observation distance is also relatively close. Thus, the pixel requirements for the images are not very high, and higher pixels also require more processing power. Currently, 360-degree surround cameras typically have pixel counts between 100,000 and 200,000, which fully meet the requirements.
Side Camera
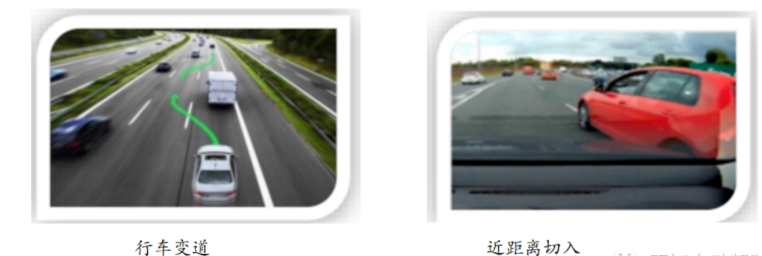
In side detection, the current millimeter-wave radar technology is mainly applied to automatic lane changes. The principle is quite simple; it mainly relies on the reflection points of vehicle targets. Here, we need to clarify that side-angle radar can usually only guarantee the detection of vehicle targets in adjacent lanes, while it is almost ineffective for detecting vehicles in the third lane, which poses significant potential dangers for autonomous driving. For instance, when a vehicle changes from its current lane to the second lane, and a vehicle in the third lane simultaneously cuts into the second lane, if the vehicle in the current lane cannot effectively detect the incoming vehicle, the result could be a collision between the two vehicles.
Additionally, side radar cannot effectively detect the side lane markings, failing to compensate for the blind spots caused by the limitations of the front-facing camera, nor can it support the lateral fusion of Freespace. Therefore, smart vehicles generally need to add side cameras.
Side cameras are mainly used for Blind Spot Detection (BSD). Depending on their installation position, they can serve as front or rear view cameras. Currently, most manufacturers choose to install them under the side mirrors of the car, and they may replace rearview mirrors in the future.
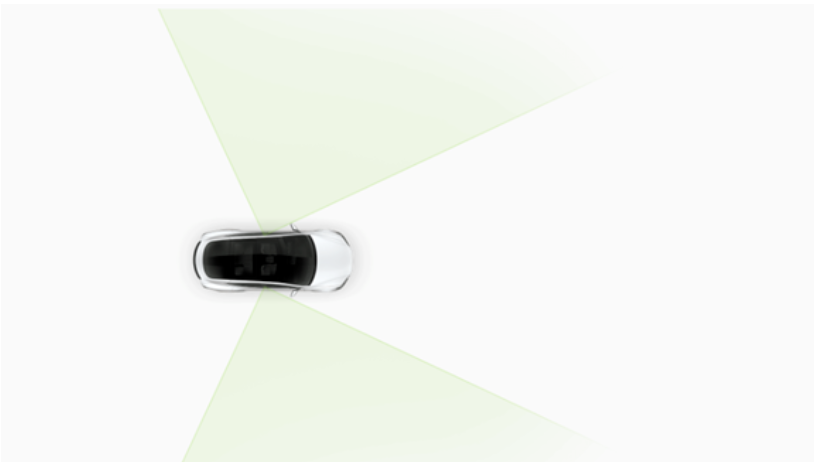
Side Front View: The 90-degree angle side front view camera can monitor vehicles that suddenly merge into the current lane on highways, providing more safety assurance at intersections with limited visibility.

Side Rear View Camera: Monitors the blind spots on both sides of the vehicle, playing an important role during lane changes and merging onto highways.
Tesla is equipped with a total of 8 cameras around the body, forming a 360° view, with a maximum monitoring distance of up to 250 meters. The 8 cameras can be divided into 3 front-facing, 2 side front-facing, 2 side rear-facing, and 1 rear view camera.
Performance requirements for side cameras
1. The targets detected by side cameras are generally those in the side lanes. The scene matching library for side lanes typically has fewer scenarios related to safe driving for autonomous driving, and the detection distance for side lanes is generally closer than that for front lanes. Therefore, the resolution requirements for side detection can be slightly lower than for front-facing cameras, and a 2-megapixel camera is generally sufficient. Of course, if cost and processing efficiency are not considered, one can also refer to the front-facing camera scheme for sensor deployment.
2. Surround cameras generally use wide-angle lenses with an angle of more than 135 degrees.
3. The installation position and configuration of the camera largely determine the range and accuracy of visual perception. Based on the understanding of the current Operational Design Domain (ODD), the configuration of side cameras must meet vehicle standards for signal-to-noise ratio and low-light performance, in addition to the following parameter requirements:

4. Additionally, regarding the placement of cameras, the main focus includes waterproof and dustproof levels, as well as whether there are any obstructions within their detection range. For side cameras, since they are generally required to be placed on the side of the vehicle, their placement can refer to the layout of panoramic cameras, typically positioned below the exterior mirrors or near the fenders. This imposes new requirements on the size, dimensions, and weight of the camera’s hardware module. A basic typical camera installation scheme is recommended as follows:

Based on currently known information and some experiences from related developments, the crossing of visual angles can ensure that relatively narrow-angle cameras effectively cover both the near and far distances of the vehicle’s body. The functions of the side front and side rear views are slightly different. The side front view is for detecting nearby scenes, with a higher pitch angle and a wider FOV, while the side rear view is for detecting distant vehicles in the rear and near lanes, useful for highway entry and lane changes, with a lower pitch angle and a yaw angle closer to parallel with the vehicle’s centerline, and a narrower FOV. Specific parameters may need to be adjusted during the design process.
Rear View Camera
The rear view camera is primarily used for reversing, helping the driver capture images behind the vehicle to assist with parking.
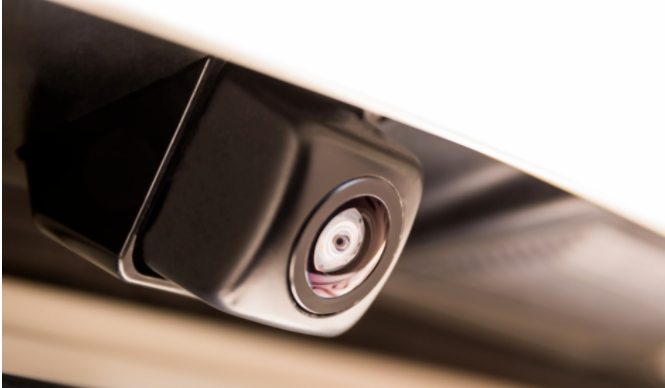
Installation position: Generally installed on the trunk or rear windshield.
DMS Built-in Camera
As current autonomous driving is only at L2-3 levels, requiring human driver intervention, the Driver Monitoring System (DMS) has become a solution in ADAS. Existing DMS solutions mainly use near-infrared cameras with AI recognition. This camera is located in front of the driver and can capture complete facial information of the driver.
Installation position: No fixed position; it can be located at the center of the steering wheel, above the rearview mirror, on the A-pillar, or integrated into the instrument display.
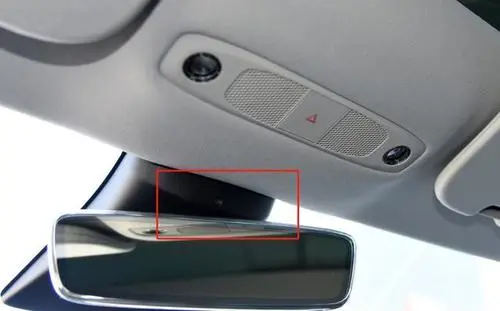
Tesla’s in-car camera is located above the rearview mirror, a position many manufacturers prefer for more accurate recognition.

Typical Layout of Camera Positions in New Energy Vehicles
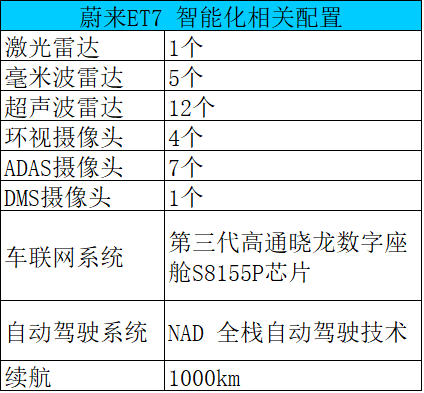
Having discussed the positions and functions of cameras on vehicles, let’s take a look at a few common new energy vehicles, their number of cameras, and layouts.
The camera system consists of 1 tri-camera (similar to Tesla), 4 surround cameras, two front-facing side cameras on the roof, 1 rear view, and 1 in-car DMS camera.
WM W6
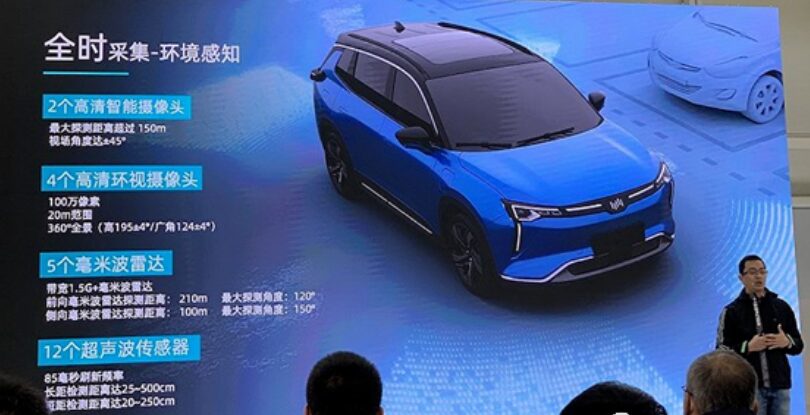
WM has released the W6, which can achieve L3 level autonomous driving, with a total of 7 cameras on board. Among them, two are high-definition smart cameras with a maximum detection distance exceeding 150 meters, reportedly one front view and one rear view. Additionally, there are 4 high-definition surround cameras (1 million pixels, 20m), and one DMS camera.

Summary of Automotive Camera Design Requirements and Specifications
Therefore, the hardware module explosion diagram for ADAS cameras is as follows, with the main considerations in performance design including: image transmission methods, output resolution, frame rate, signal-to-noise ratio, dynamic range, exposure control, gain control, white balance, minimum illumination, lens material, lens optical distortion, module depth of field, module field of view, rated operating current, operating temperature, storage temperature, protection level, dimensions, weight, functional safety level, connector/wire harness impedance, etc.
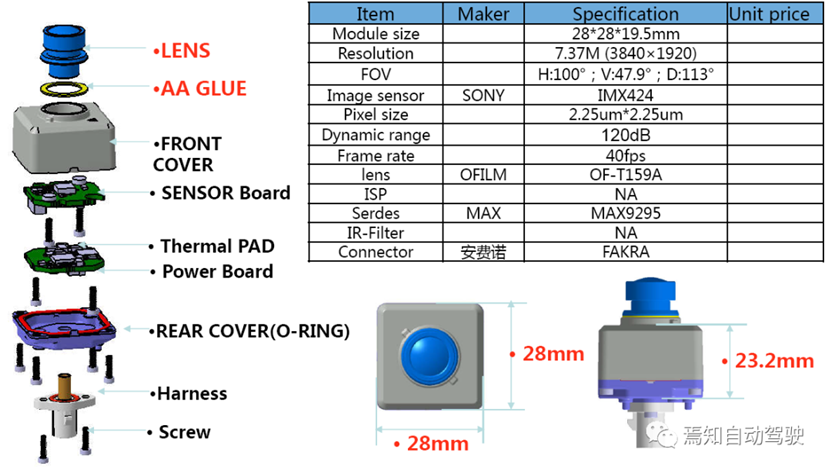
Specifically, to cope with complex and diverse usage environments, onboard cameras need to have high dynamics, with a temperature range generally from -40 to 80 degrees. They also need to have high anti-magnetic and anti-vibration performance and meet basic service life requirements of 8-10 years. In terms of performance, considering the processing burden on chips, the pixel requirements for onboard cameras are relatively low, generally between 1 million and 2 million pixels, with power generally below 10W.
Onboard cameras face more stringent environmental conditions and thus have higher value. Compared to traditional industrial cameras and mobile phone cameras, onboard cameras need to maintain stable operation under various complex working conditions such as extreme temperatures, humidity, strong low light, and vibrations. Therefore, onboard cameras have higher safety and performance requirements. Given safety considerations, automotive manufacturers tend to choose mature technologies and reliable quality components, resulting in longer certification cycles for component suppliers to enter the market, leading to higher industry barriers.
Common Structural Shapes of Front, Surround, and Rear View Cameras
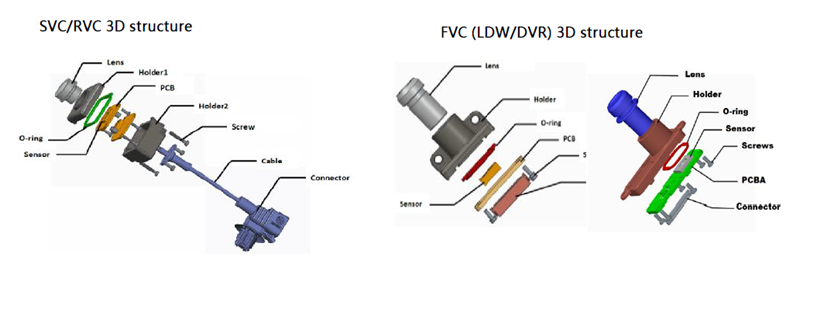
The left side of the image is the architecture of SVC (surround view) and RVC (rear view) cameras. Since these cameras are installed outside the vehicle, they need to have good waterproof requirements and long-distance transmission capabilities, typically using coaxial transmission methods due to cost considerations. The cost of a vehicle-grade twisted pair wire for a 7-8 meter rear view camera can reach 100 RMB, which is why external camera transmissions generally use coaxial lines.
The right side of the image shows the FVC, or front-facing camera. These cameras are generally not assembled into complete products and are typically used inside the vehicle. Only the camera module is shipped, with lower waterproof requirements and shorter transmission distances to the CPU, typically using MIPI signal transmission for short distances via FPC lines, ensuring low-cost and performance reliability.
Summary of Front-Facing Camera Selection:
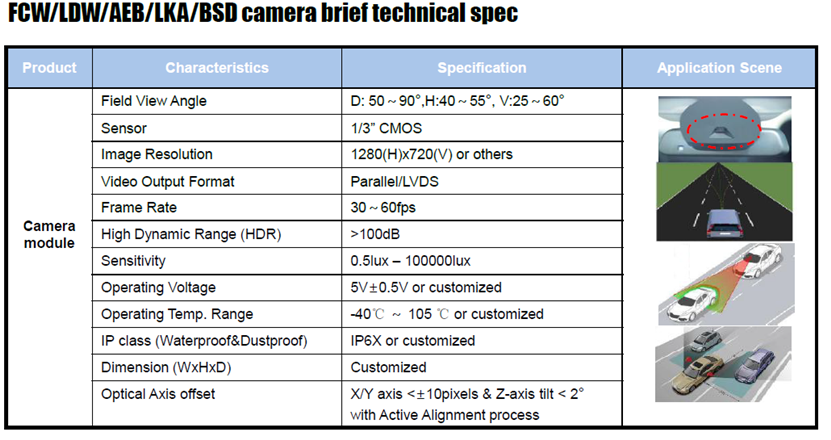
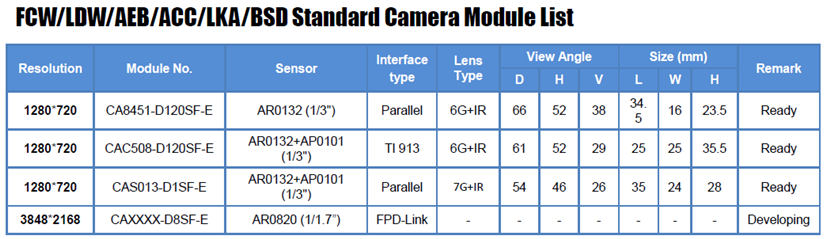
It can be seen that the required FOV angles for front-facing cameras are not large, generally choosing H direction angles around 40-50°, with frequencies of 30-60Hz. Cameras requiring high dynamics have a 100db dynamic range, and the pixels generally range from 100,000 to 200,000, with the mainstream being 100,000 pixels.
Summary of Rear View Camera Selection:


It can be seen that rear view cameras do not need to see far, focusing more on the angle range for easier visibility while reversing, thus requiring H angles greater than 130°. The pixels also need to exceed 100,000 pixels to ensure high-definition images on the display screen. From a cost perspective, these cameras typically do not use wide dynamic range cameras, only needing greater than 70db, and the refresh rate only needs to exceed 30Hz.
Summary of Surround Camera Selection:
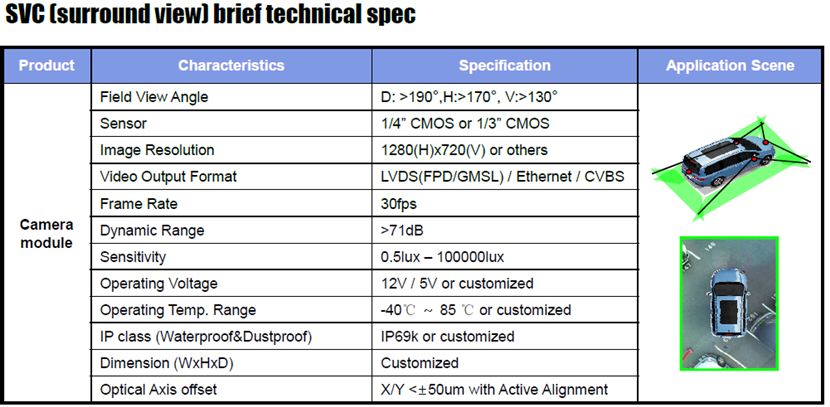
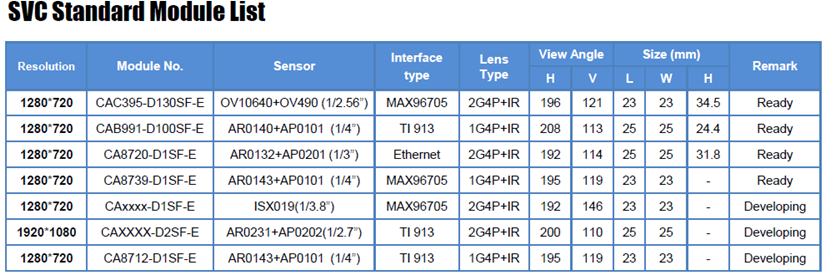
It can be seen that the indicators for surround cameras are very similar to those for front-facing cameras, requiring wide dynamics. The main transmission interface is GSML transmission protocol, requiring very large visual angles for image stitching, with H angles greater than 170°, and a refresh rate exceeding 30Hz.

Overview of Onboard Camera System Architecture Simplified Explanation
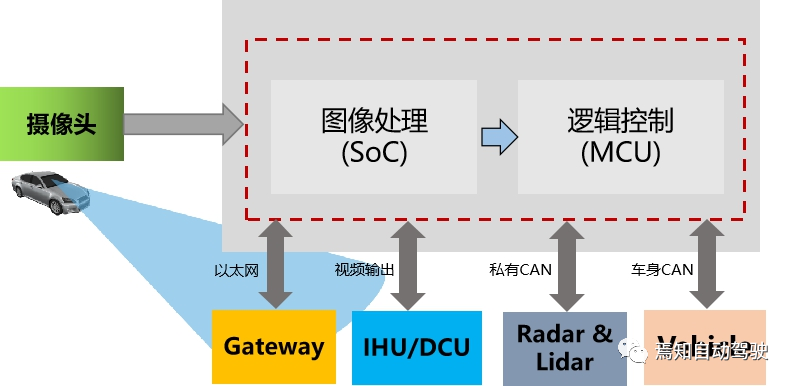
The diagram below illustrates the basic architecture of the next-generation autonomous driving system solution. The key elements include the image processing SoC part, which mainly covers the processing of camera input images, ISP (Image Signal Processing), and target fusion. Of course, radar or LiDAR can also provide raw data as input information. The logic control unit MCU is responsible for processing the target fusion results from the SoC and inputting them into the motion planning and decision control model unit for processing. The results are used to generate vehicle control commands, controlling the vehicle’s lateral and longitudinal movements.
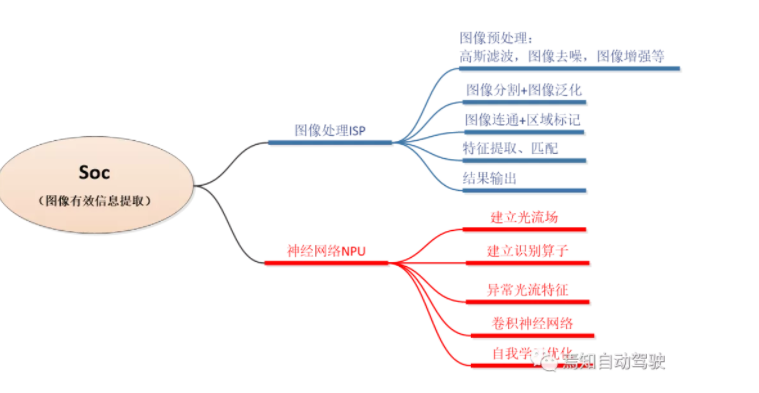
For the image processing software model, it is mainly placed in the SoC chip. The software modules mainly include ISP, NPU (Neural Processing Unit), CPU (Central Processing Unit), CODEC (Coder-Decoder Unit), MIPI interface output, and MCU interface output for logical operations.
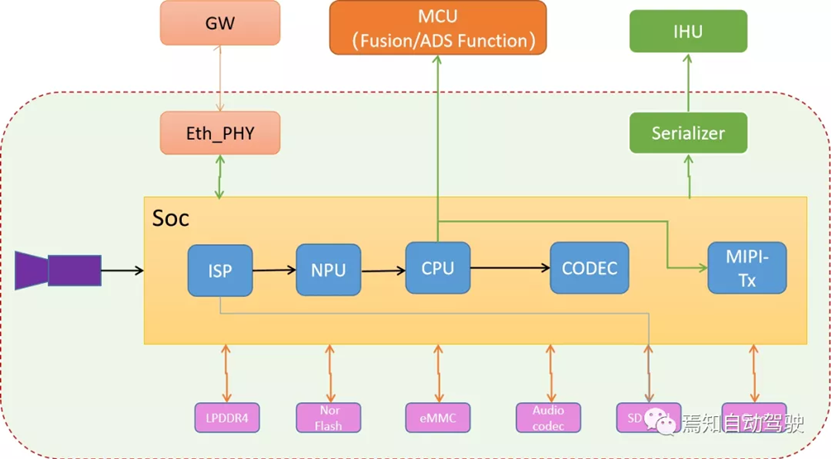
Among these, the two most computationally intensive units are the ISP and the NPU.
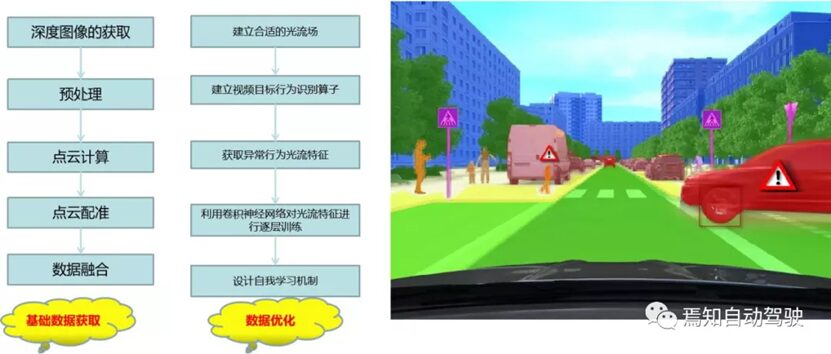
The optimized results serve to generate basic image information results, which are then input to the CPU for comprehensive information processing and distribution. Additionally, the decoded images are output via the MIPI interface to the video entertainment system for display, while the results of semantic analysis of the environment are input to the ADAS logic control unit MCU. This module can generate environment fusion data through information fusion with other environmental data sources (such as millimeter-wave radar, LiDAR, surround cameras, ultrasonic radars, etc.) and ultimately be used for vehicle functional application control.
Of course, if considering that intelligent driving assistance control will have some information input to other intelligent control units for information fusion, the generated results need to be input to the gateway via Ethernet, which will forward them to other units, such as intelligent parking systems and human-computer interaction display systems.
Previous Recommendations
Autonomous Driving Sensors: Camera Development History (Part 1)
Autonomous Driving Sensors: Basic Introduction to Vehicle Camera System Architecture (Part 2)
Autonomous Driving Sensors: Technical Route of Vehicle Camera Image Sensors (Part 3)
Autonomous Driving Sensors: Hardware Interface Design of Vehicle Cameras (Part 4)
Autonomous Driving Sensors: Explanation of Important Components and Optical Parameters of Vehicle Cameras (Part 5)
Autonomous Driving Sensors: Important Indicator Parameters of Vehicle Cameras (Part 6)
Autonomous Driving Sensors: Color Sensing and Correction of Vehicle Cameras (Part 7)
Autonomous Driving Sensors: Color White Balance of Vehicle Cameras (Part 8)
Autonomous Driving Sensors: Image Optimization of Vehicle Cameras (Part 9)
Autonomous Driving Sensors: Implementing Wide Dynamic HDR in Vehicle Cameras (Part 10)
Autonomous Driving Sensors: Mainstream Algorithms for Image Recognition in Vehicle Cameras (Part 11)
Autonomous Driving Sensors: Explanation of Tesla’s Image Recognition Principles (Part 12)
References:
https://mp.weixin.qq.com/s/RVIOlT_Yr5GmpNQ12mfBFQ
https://mp.weixin.qq.com/s/y1CCWyG8pJ8tONZTiiYXfw
https://mp.weixin.qq.com/s/ZZX6NyGKTpC8awscJV6PFg
https://mp.weixin.qq.com/s/bQ_-FJbxDr-h9tYw1G1KZA
https://mp.weixin.qq.com/s/GfJ_u81VoxgE4BCAYm4IOQ
https://mp.weixin.qq.com/s/ewmX5qFkidvL8z21SE8DFg
https://mp.weixin.qq.com/s/XRZ197HIiYDuBF55MaNsog
https://mp.weixin.qq.com/s/YS_2agnfZl6Otm6tvGy_7A
https://mp.weixin.qq.com/s/2E0aQeb_9BFAvbVlu-tdIg
https://mp.weixin.qq.com/s/bxubsR_8orap8GRsUB1xHQ
https://mp.weixin.qq.com/s/eNjbHZaaaa2YRt_X0Ke1pw
https://mp.weixin.qq.com/s/oq_fMnMMlF0HC_J5VJ-xUQ
https://mp.weixin.qq.com/s/iA1cOzz5tLiUREQIaNsNXw
https://mp.weixin.qq.com/s/XWpwgZ_nlx7pjewVtjckWQ
https://mp.weixin.qq.com/s/FiW0S6PRjdFWW8eeCiJWxQ
—END—
Your likes, shares, and comments are all affirmations of my work, thank you!