Source: Big Data Digest


This article is about 1900 words long and suggests a 5-minute read.
This article introduces you to a unique MP3.
Rotary phones are something that many of us often see in old Hollywood films.
As a child, I thought rotary phones were much cooler than the ordinary phones we have today, and I wished I could have one.

Trivia: Which movie is this from?
This kind of luck fell upon a blogger named Gardines.
One day while cleaning the attic, he discovered such an old rotary phone, and it seemed to be in good working condition.
Considering that he didn’t really need a phone at home, he suddenly had the idea to put a Raspberry Pi inside it and transform the phone into a MP3 player.
His goal was to retain the original appearance of the phone as much as possible, so the main change in appearance can be seen on the back where the port was modified from a modular phone jack to a micro USB.
At the same time, he also added a switch on the handset to control the power of the Raspberry Pi. However, in terms of the final result, this switch actually became a drawback in terms of usability.
In keeping with the idea of retaining the appearance as much as possible, the MP3’s speaker was also installed in the handset.
The finished product is shown below:
Next, let’s take a look at how this process was completed!
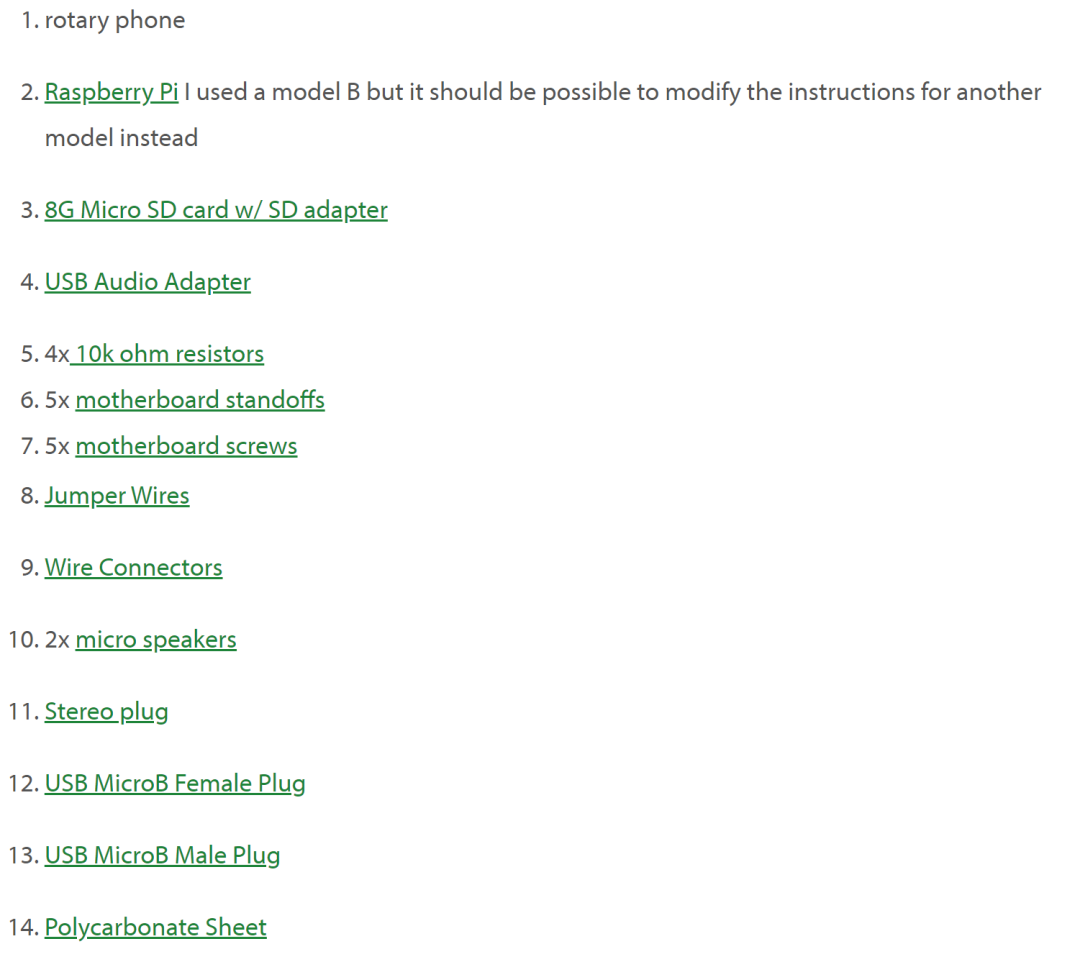
The components needed for the entire project are shown in the image below:
Then, without further ado, let’s get started!
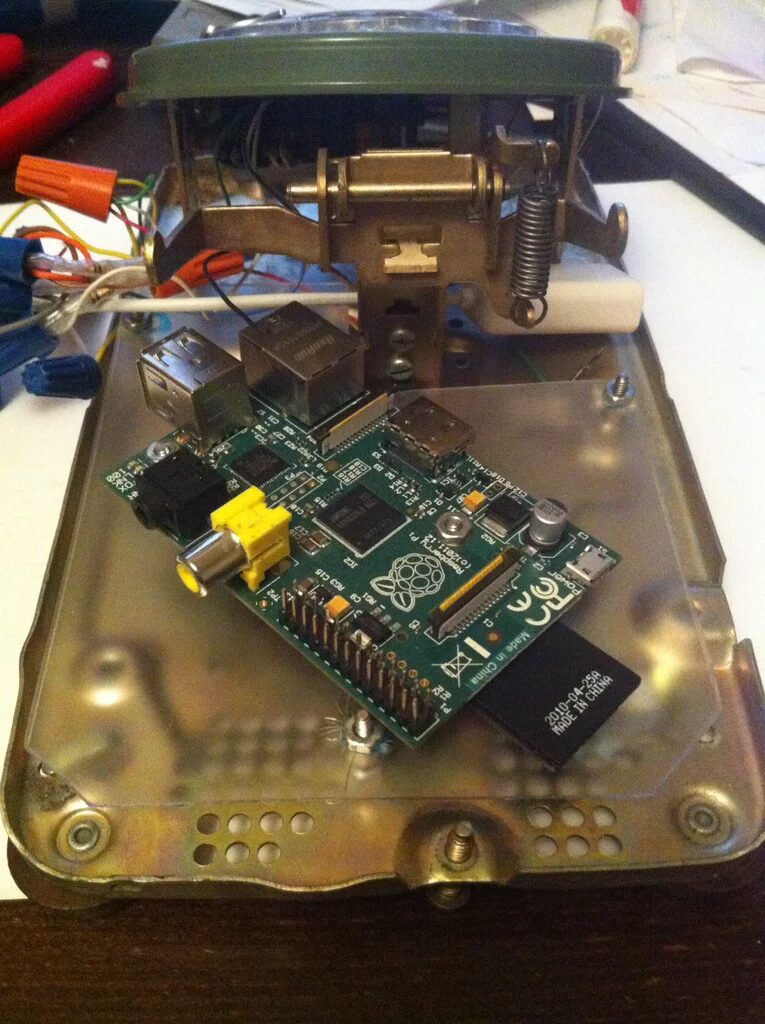
First, clear all parts from inside the phone, then cut a piece of polycarbonate board to install the Raspberry Pi in a place away from the metal base. The blogger used a craft knife for cutting and made a score halfway through to cut along the incision. The cutting template is shown in the image below:
The image below shows the actual board used. You can see that there were some mistakes, such as the label in the upper right corner being damaged, and there were also some errors in the hole positions.
Then use screws to secure the Raspberry Pi to the board and install it in the phone base:
Basically, the hook, rotation, and dialing can be considered as independent switches. When the receiver is on the hook, the hook switch is open, and when the receiver is lifted, the hook switch is closed. When the dial is in the default position, the dial switch is open, and when the dial moves away from the default position, it closes. The rotary switch stops in the closed position, and the number of times it opens and closes corresponds to the number dialed.
Thus, each switch is connected to a GPIO pin using jumper wires. Each switch includes a 10k ohm resistor.
At the same time, to facilitate connecting and disconnecting the wires, jumper wire terminals were glued together to create a “rainbow cable”.
Here, a row of GPIO pins was selected, all aligned in a line. Specifically, they were connected to pins 9, 11, 13, 15, and 17, which included a ground (pin 9) and a 3.3V (pin 17), along with three GPIO pins in between.
Thus, there were connections for the rotary pin 11, dialing pin 13, and hook pin 15, as shown in the image:
Receiver and Power Supply
Next, remove the speaker and microphone from the receiver and replace them with a new speaker, tying them to the stereo speakers with wire.
However, in hindsight, keeping the microphone and using mono audio might have been more interesting.
After installing the new speaker, the receiver’s weight decreased, and it could not hold the hook in place because the spring would push it back. Therefore, it was necessary to add some ballast to the receiver.
One of the most challenging parts of the entire project was soldering the power wires.
Two sockets were needed to carry power, so they were installed at the back of the entire device. The plugs were relatively smaller but still usable.
Installing Arch on the SD Card
Then, download the Arch OS suitable for Raspberry Pi from archlinuxarm.org.
Then, execute all subsequent steps on a Linux machine.
Here are the commands on Linux:
wget http://archlinuxarm.org/os/ArchLinuxARM-rpi-latest.zip
wget http://archlinuxarm.org/os/ArchLinuxARM-rpi-latest.zip.md5
cat ArchLinuxARM-rpi-latest.zip.md5
md5sum ArchLinuxARM-rpi-latest.zip
md5sum ArchLinuxARM-rpi-latest.zip
The last two commands should output 32 characters that match; otherwise, some strange things may happen.
Write the image to the SD card using:
unzip ArchLinuxARM-rpi-latest.zip
dd bs=1M if=./ArchLinuxARM*.img of=/dev/sdX # replace X with location of SD card
This will take a little while.
Since the image written to the SD card is only 2G, to utilize the extra space, you can also resize the partition.
Booting and Installing the Software
At this point, insert the SD card into the Raspberry Pi, connect the network cable, and power it on.
You should see some lights flashing on the Raspberry Pi.
However, since there is no monitor/keyboard connected to the Raspberry Pi, you need to connect remotely via ssh:
Update the operating system software and install the required software:
pacman -Syu nodejs rsync parallel mpc mpd espeak alsa-utils git
The system will prompt you to press “Y” or enter to continue, and then it will download and install several packages.
Once that command is complete, configure the software that is now available:
bash /usr/lib/node_modules/piphone/config_mpd.sh
bash /usr/lib/node_modules/piphone/install_crontab.sh
Then restart, but do not close the ssh session.
As long as your Linux machine has MP3 files, you can use the following command to transfer them to the Raspberry Pi:
On Pi: mkdir -p /var/lib/mpd/music
On Linux: rsync -av /path/to/music/* [email protected]:/var/lib/mpd/music/
After this command completes, run the following command:
Once that command is complete, you can shut down the Raspberry Pi:
At this point, if you see the flashing lights gradually decrease until only one light remains, it indicates that the power is connected.
Then, disconnect the power and network cable. Connect the GPIO pins, plug the headphones into the audio jack, and connect the power line from the case to the Raspberry Pi.
Then close the case, and you should be able to plug the micro USB cable into the back of the phone, and after a moment, everything will be ready.
With the default settings, you can dial “1178” to shut down, but due to some errors in the software, you may need to dial a few times.
Other commands are as follows:
1: Play the current song softly
2: Play the current song loudly
3: Play the next song softly
4: Play the next song loudly
5: Play the previous song softly
6: Play the previous song loudly
7,8,9,0: Search for songs by title and play.
After playing a song, the phone will stop and wait for further instructions.
So, the rotary phone that was already cool has become even cooler. Do you have similar experiences? Feel free to share in the comments!
https://www.instructables.com/Raspberry-Pi-in-Rotary-Phone/
Editor: Yu Tengkai