Click the above  “Easily Learn Electronics” to follow with one click and easily learn electronic knowledge.
Daily updates of technical articles in the electronics industry and the latest news on microcontrollers, making it easy to learn anytime and anywhere.
It’s actually very simple, right? Haha, the power of IAR still awaits our development. In the future, I will share some rich and colorful practical tips about IAR, so stay tuned, haha, to be continued~
Today I am a bit excited; after working on this project for over half a year, I finally have some results. Tears are flowing, it has been tough, haha. So while I am in a good mood and have a good feel for it, I am seizing the moment to update my blog. Also, it’s been a while since I updated the series on starting from scratch, and some friends have asked me when I will update it. I am really grateful for everyone’s enthusiasm. Recently, I have been working on FPGA, and I have put the Kinetis part aside for a while, but I will continue updating it soon. Actually, after working on FPGA for a while, I found that working with ARM is still more comfortable. I am used to C’s sequential programming, and I am having a hard time switching to the parallel programming of FPGA, haha~
I had this content in mind a long time ago, but either I was held up by other matters or I just didn’t feel like writing it, so today I’ll bring it up, otherwise, it will be buried in the depths of my brain cortex for another period of time, haha. The content is quite simple; it’s just about setting up the IAR environment (ahem, I can say there’s hardly any technical content). However, the core idea of this blog is to broaden everyone’s thinking: “Wow, it can be done this way”… Additionally, at the end of this article, I have provided a link to the usage of the format conversion tool that comes with CW, which was written by the moderator An from the Freescale Technical Community. If you’re interested, you can check it out. Now, let’s get to the main topic:
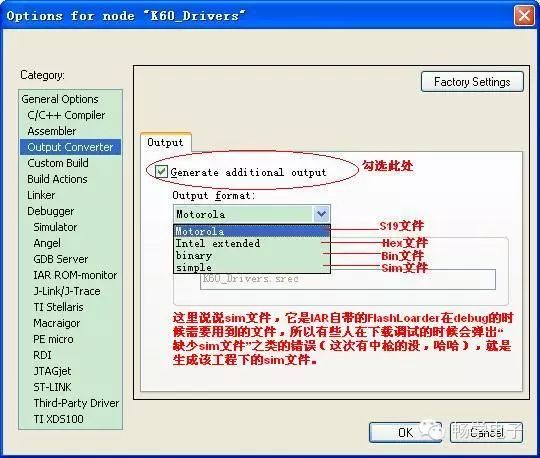
First, let’s talk about the origins of these three file formats. The bin file is the most common binary file; it is a pure data file, meaning “what you see is what you get”. So if we want to see the size of the data that needs to be downloaded to the microcontroller flash, the simplest method is to check the size of the bin file generated after we compile and link. The hex file is a file format that Intel introduced a long time ago (Intel is still as awesome as ever, right?). In addition to valid data information, it also contains some extra information (including address information, checksums, etc.), so the hex file is quite large. The actual data segment that gets downloaded to the microcontroller’s flash is just the valid data part, while the other information segments serve as auxiliary information for the flash programming software (including address information). Therefore, a common question arises: when burning or downloading a bin file, the software prompts for the starting address, while when burning a hex file, there is no need to input address information because it is already included in the hex file. Haha, have you encountered this situation? That’s the reason. As for the S19 file, it is a file format proposed by Freescale, which is similar in principle to hex, just with a different format. I’ll stop here with the principles, and I won’t introduce the specific hex and S19 file formats; you can google it, haha~
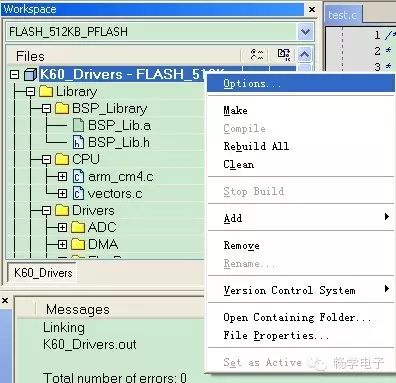
Alright, having discussed the theoretical basis, let’s now talk about how to operate it specifically. It’s very simple, so simple that I feel embarrassed to say it, so I can only show you the pictures, haha:
 、
、
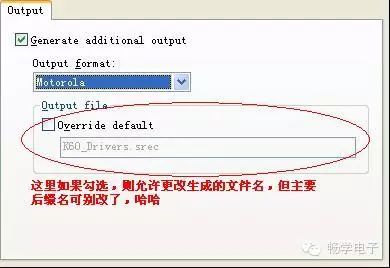
As demonstrated in the images above, after selecting the appropriate settings, click “OK”, then make it again, and you can find the file of the selected format in the FLASH_512KB_PFLASH\Exe directory under the project root. If you want to generate another format file again, just set it up once more, and it will not overwrite the other format files. Then you can use the flash programming software to burn the newly generated file into the microcontroller. If it’s Kinetis, I suggest you take a look at a previous blog I wrote titled “[Original] Teaching You to Use J-Flash ARM Tool to Independently Burn Programs to Kinetis” which explains in detail what to do after generating the burn file, haha, very complementary, right?…
Let’s take a sip of water~~ It’s actually very simple, right? Haha, the power of IAR still awaits our development. In the future, I will share some rich and colorful practical tips about IAR, so stay tuned, haha, to be continued~
> > > > > > > > > > > > > > > > > > > > > > > > > > > > > > > > > > > > > > > > > > > > > > > > > > > > > >
Click the top right corner  and select
  to share to Moments
1. Click the top right corner on WeChat “+” and select “Add Friends” → Search for “Easily Learn Electronics” in “Find Official Accounts” to find and follow us. 2. You can also search for the WeChat ID “Easily Learn Electronics” to find and follow us.
Click the top right icon to enter “Account Information” → “View Historical Messages”
WeChat Name: Easily Learn Electronics updates various knowledge in the electronics industry and the latest news on microcontrollers every day, come and start your visual feast.
WeChat Name: Easily Learn Electronics is a new knowledge sharing platform, allowing you to view the latest articles and online videos from the Easily Learn Electronics website, bringing you into the world of electronic engineering technology development and learning.
==> Visit www.eeskill.com to learn more!