(Click the blue text above to quickly follow us)
English: Linux Journal, Translation: Linux China/XYenChi
linux.cn/article-9091-1.html
I have discovered several scientific software options for displaying your data and work, but I won’t cover too many aspects. Therefore, in this article, I will discuss a popular image processing software called ImageJ. Specifically, I will introduce Fiji, which is a version of ImageJ bundled with a series of plugins for scientific image processing.
The name Fiji is a recursive acronym, similar to GNU, which stands for “Fiji Is Just ImageJ”. ImageJ is a practical tool for image analysis in scientific research — for example, you can use it to identify the types of trees in aerial landscape images. ImageJ can classify object types. It is built on a plugin architecture, with a vast array of plugins available to enhance usability.
First, let’s install ImageJ (or Fiji). Most ImageJ distributions come with this software package. If you prefer, you can install it this way and then add the necessary standalone plugins for your research. Another option is to install Fiji, which comes with the most commonly used plugins. Unfortunately, most Linux distributions’ software centers do not have a Fiji installation package available. Fortunately, a simple installation file is available on the official website. This is a zip file that contains all the directory files needed to run Fiji. Upon first launch, you will only see a toolbar listing the menu items. (Figure 1)

Figure 1. The minimal interface when first opening Fiji.
If you do not have images ready to practice using ImageJ, the Fiji installation package includes some sample images. Click on the “File” -> “Open Samples” dropdown menu option (Figure 2). These samples include many tasks you might be interested in performing.
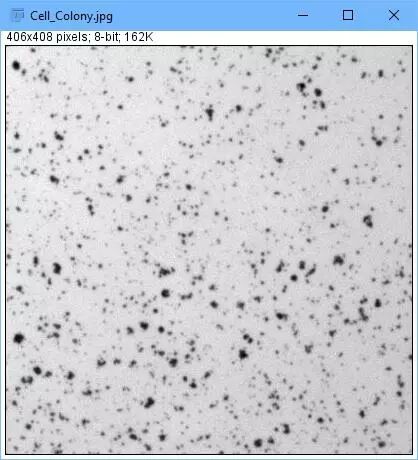
Figure 2. Sample images available for learning to use ImageJ.
If you installed Fiji instead of just ImageJ, then a large number of plugins will also be installed. The first thing to note is the auto-updater plugin. Each time you open ImageJ, this plugin will check online for updates to ImageJ and the installed plugins.
All installed plugins are available under the “Plugins” menu item. Once you have installed many plugins, the list can become cluttered, so you may need to streamline your selected plugins. If you want to manually update, click on “Help” -> “Update Fiji” to force a check and get a list of available updates (Figure 3).
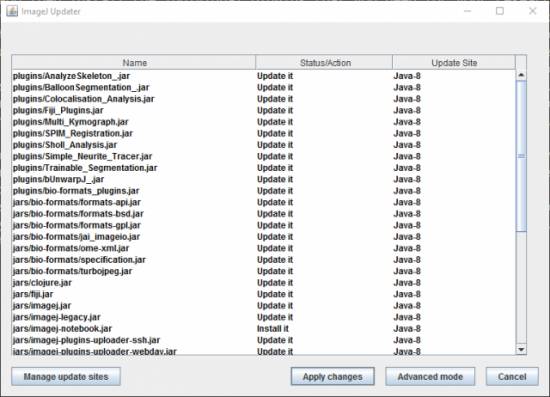
Figure 3. Force manual check for available updates.
So, what can you do with Fiji/ImageJ now? For example, you can count the number of objects in an image. You can load a sample by clicking “File” -> “Open Samples” -> “Embryos”.
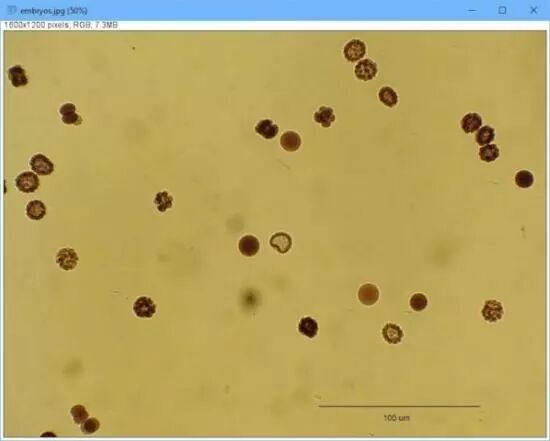
Figure 4. Counting objects in the image using ImageJ.
The first step is to set the scale for the image so that you can tell ImageJ how to discern the objects. First, select the line tool from the toolbar. Then select “Analyze” -> “Set Scale”, and set the number of pixels that the scale bar contains (Figure 5). You can set the “known distance” to 100, with the unit as “um”.
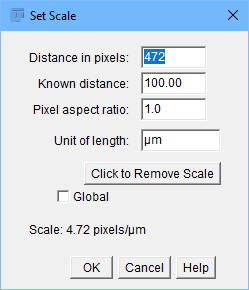
Figure 5. Many image analysis tasks require setting a range for the image.
The next step is to simplify the information within the image. Click “Image” -> “Type” -> “8-bit” to reduce the information to an 8-bit grayscale image. To separate individual objects, click “Process” -> “Binary” -> “Make Binary” to automatically set the image threshold (Figure 6).
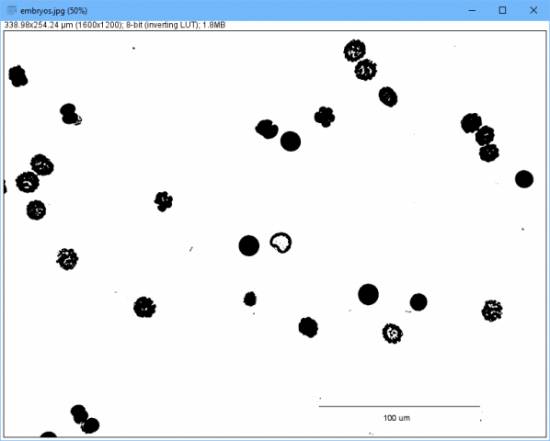
Figure 6. Some tools can automatically perform tasks like thresholding.
Before counting the objects in the image, you need to remove any manual operations like the scale bar. You can use the rectangular selection tool to select it and click “Edit” -> “Clear” to complete this operation. Now you can analyze the image to see what objects are present.
Ensure that no areas in the image are selected, then click “Analyze” -> “Analyze Particles” to pop up a window where you can select the minimum size, which determines what will be displayed in the final image (Figure 7).
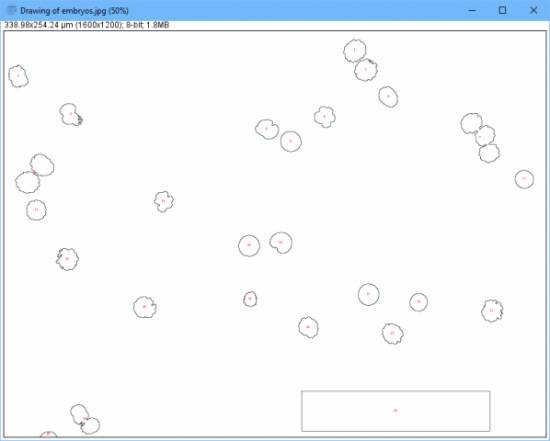
*Figure 7. You can generate a reduced image by determining the minimum size.*
Figure 8 shows an overview in the summary window. Each minimum point also has an individual detail window.
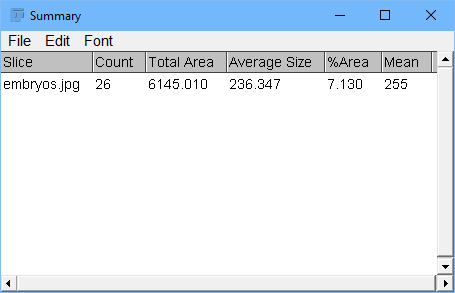
Figure 8. The output results include an overview list of known minimum points.
When you have an analysis program that can work on a given type of image, you typically need to apply the same steps to a series of images. This could be thousands, and you certainly wouldn’t want to repeat the operations manually for each image. At this point, you can consolidate the necessary steps into a macro so that they can be applied multiple times. Click on “Plugins” -> “Macros” -> “Record” to pop up a new window that records all your subsequent commands. Once all steps are completed, you can save it as a macro file and run it on other images by clicking “Plugins” -> “Macros” -> “Run”.
If you have very specific working steps, you can simply open the macro file and edit it manually, as it is a simple text file. In fact, there is a complete macro language available for you to have more control over the image processing.
However, if you have a very large series of images to process, this can also be a tedious job. In this case, go to “Process” -> “Batch” -> “Macro”, which will pop up a new window where you can set up batch processing (Figure 9).
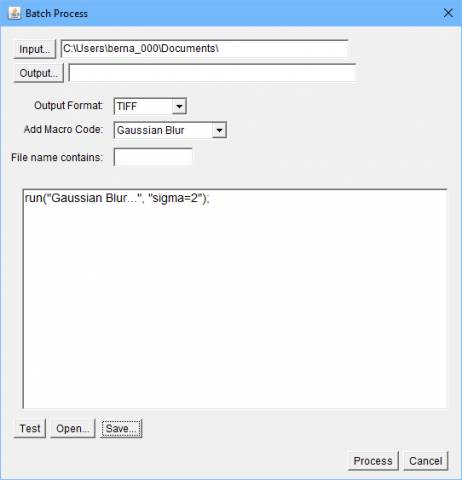
Figure 9. Run a macro on a batch of input images with a single command.
In this window, you can select which macro file to apply, input the source directory of the images, and the output directory where you want to write the output images. You can also set the output file format and filter the input images by filename. Once everything is set, click the “Process” button at the bottom of the window to start the batch operation.
If this is a task that will be repeated multiple times, you can click the “Save” button at the bottom of the window to save the batch processing to a text file. You can also click the “Open” button at the bottom of the window to reload the same work. This feature can automate the most redundant parts of research, allowing you to focus on the actual scientific research.
Considering that there are over 500 plugins and more than 300 macros available on the ImageJ homepage alone, I can only touch on the most basic topics in this short article. Fortunately, there are many tutorials available in specialized fields, and there is excellent documentation on the core of ImageJ on the project homepage. If you find this tool useful for your research, there will be plenty of information in your field to guide you.
Author Bio:
Joey Bernard has a background in physics and computer science, which greatly benefits his daily work as a computational research consultant at the University of New Brunswick. He also teaches computational physics and parallel programming.
Did you gain something from this article? Please share it with more people.
Follow “Linux Enthusiasts” to enhance your Linux skills

Taobao Code: Copy the following red content and open Taobao to purchase
Fanpin Club, use ¥Geek T-shirt¥ for a sneak preview (long press to copy the entire text, open Taobao on your phone to enter the event content)
Recently, normal shipping in the Beijing area, but delivery times have been extended.