(Click the public account above to quickly follow)
English: dzone, Translator: Open Source China
https://www.oschina.net/translate/linux-dns-server-installation-amp-configuration-am?print
If you have good articles to submit, please click → here for details
Each IP address can have a hostname, which consists of one or more strings separated by dots. With a hostname, there is no need to memorize the IP addresses of each device; just remember the relatively intuitive and meaningful hostname. This is the function that the DNS protocol is designed to accomplish.
Today, we will discuss DNS servers, specifically Linux DNS servers, and how to install, configure, and maintain them.
/etc/hosts File
In the absence of a DNS server, it is reasonable for each system to maintain a local copy of its hostname and corresponding IP address list on the local network—especially on small sites without an internet connection.
In Linux systems, this list is the /etc/hosts file. Even if you do not have a DNS server or if the DNS server is unavailable, this file can be used to convert IP addresses to names.
Perhaps you already have a DNS server, but you may also want to keep this file for other reasons. For example, the system may need to look up the IP address of the DNS server locally before querying externally; this means the system retrieves the file before querying the DNS server, and if it finds the corresponding domain, it converts it to an IP address without querying any DNS server.
Try editing the /etc/hosts file and adding the following information: 127.0.0.1 google.com.
Then, return to your browser, enter google.com, and see the result. If you have Apache installed on your system and the localhost is running, the browser will display the index page of localhost instead of the Google page.
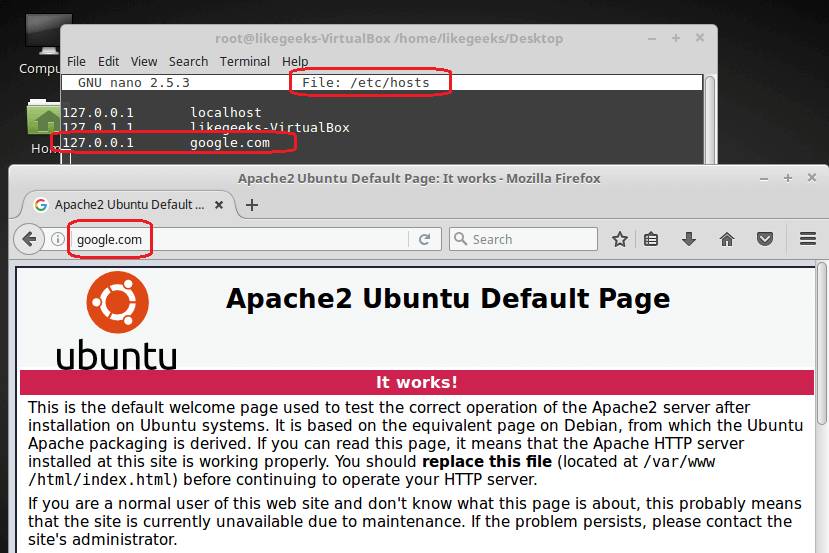
As a confirmation, you can map google.com to any other IP address of any website and see the result.
So what this file does is convert IP addresses into names, but only within the same interconnected network. How are all records for external networks and numerous systems maintained?
Does everyone need to maintain their own /etc/hosts file and update it themselves?
A more robust domain service is the DNS server.
Domain Names
When you visit a website, you can enter an FQDN (Fully Qualified Domain Name) or a domain name like likegeeks.com or www.google.com. Each text between the two dots in the domain name from right to left is the top-level domain component, second-level domain component, and third-level domain component.
So, com is the top-level domain component; google is the second-level domain component; and www is the third-level domain component.
In fact, when you visit any website, the browser automatically adds an invisible dot at the end of the domain, so the domain will look like www.google.com.. This dot is called the root domain.
This dot is managed by a large number of special servers called root name servers. As of the publication of this article, there are 13 root name servers in the world. You can think of them as the brain of the internet – if they fail, there is no internet in the world.
Why 13? Because if an earthquake somewhere in the world could destroy one root server, the other servers can continue to provide service until the affected server comes back online.
These root name servers are named in alphabetical order, with names like a.root-server.net, b.root-server.net, etc.
Top-Level Domains (TLDs)
We have seen components of top-level domains, such as .com. Top-level domains can be thought of as providing a classification organization for the DNS namespace.
Top-level domains (TLDs) are divided into several categories based on geographical or functional aspects.
As of the writing of this article, there are over 800 top-level domains online.
Categories of top-level domains include:
-
Generic top-level domains such as: .org, .com, .net, .gov, .edu, etc.
-
Country code top-level domains such as: .us, .ca, etc., corresponding to the country codes for the United States and Canada.
-
New brand top-level domains that allow organizations to create TLDs of up to 64 characters, such as: .linux, .microsoft, .companyname, etc.
-
Infrastructure top-level domains such as: .arpa.
Subdomains
When you visit a website like mail.google.com, here mail is a subdomain of google.com.
Only the name server of mail.google.com knows all the hosts that exist beneath it, so Google will respond whether there is a subdomain called mail. The root name servers are not aware of this.
Types of DNS Servers
There are three types of DNS servers.
Master DNS Server
These servers store configuration files for specific domain names and authoritatively specify the addresses for those domain names. The master DNS server knows the addresses of all hosts and subdomains under its jurisdiction.
Slave DNS Server
These servers act as backups for the master DNS server and also share some load. The master server is aware of the existence of the slave DNS servers and will push updates to them.
Cache DNS Server
These servers do not store configuration files for specific domain names. When a client requests a cache server to resolve a domain name, the server will first check its local cache. If no match is found, it will query the master server. The response will then be cached. You can also easily set up your system as a cache server.
Setting Up a Linux DNS Server
There are many packages that implement DNS functionality under Linux, but we will focus on the BIND DNS server. It is used by the majority of DNS servers in the world.
If you are using a Red Hat-based Linux distribution, such as CentOS, you can install it like this: $ dnf -y install bind
If you are using a Debian-based operating system, such as Ubuntu: $ apt-get install bind9
Once installed, you can start it and have it start on boot.
$ systemctl start named
$ systemctl enable named
Configuring BIND
This service uses /etc/named.conf as its configuration file.
BIND uses statements like the following in that file:
-
options: for global BIND configuration.
-
logging: to configure what needs to be logged and what to ignore. I recommend you take a look at the Linux syslog server.
-
zone: to define DNS zones.
-
include: to include another file in named.conf.
In the options statement, you can see that BIND’s working directory is /var/named.
The zone statement can be used to define DNS zones, such as the domain name google.com, which includes subdomains mail.google.com and analytics.google.com.
These three domain names (the main domain and subdomains) all have a zone defined by the zone statement.
Defining a Master Domain Server
We know that there are types of DNS servers: master domain servers, slave domain servers, and cache domain servers. Unlike cache domain servers, master domain servers and slave domain servers are on equal footing in the response process.
In the configuration file /etc/named.conf, you can define a master domain server using the following syntax:
zone “likegeeks.com” {
type master;
file likegeeks.com.db
};
The file containing the main zone information is stored in the /var/named directory, as indicated by the options.
Note: Software servers or hosting panels will automatically create the filename for your master domain server information based on your domain name, so if your domain is example.org, then your master domain server information file will be /var/named/example.org.db.
The type is master, meaning this is a master domain server.
Defining a Slave Domain Server
Similar to defining a master domain server, the definition of a slave domain server is slightly different:
zone “likegeeks.com” {
type slave;
masters IP Address list; ;
file likegeeks.com.db
};
For a slave domain server, its domain name is the same as that of the master domain server. The slave type in the above syntax indicates that this is a slave domain server, and the “masters IP Address list” indicates that the information in the zone file of the slave domain server is replicated from the zone file of the master domain server.
Defining a Cache Server
Even if you have configured a master or slave domain server, it is still necessary (though not mandatory) to define a cache server, as this can reduce the number of queries to the DNS server.
Before defining a cache server, you need to define three zone selectors, the first:
zone “.” IN {
type hint;
file “root.hint”;
};
zone “.” IN {
type hint;
file “root.hint”;
};
zone “.” IN {
type hint;
file “root.hint”;
};
zone “localhost” IN {
type master;
file “localhost.db”;
};
The third zone is defined to perform a reverse lookup for the localhost. This reverse lookup points the local IP address to the localhost.
zone “0.0.127.in-addr.arpa” IN {
type master;
file “127.0.0.rev”;
};
By placing this zone information in the /etc/named.conf file, your system can operate as a cache server. But how do you reference the contents of files like likegeeks.com.db, localhost.db, and 127.0.0.rev?
These files contain DNS record types for each zone with certain options. So what are these DNS record types and how are they written?
DNS Record Types
The database files contain record types such as SOA, NS, A, PTR, MX, CNAME, and TXT.
Let’s see how each type is recorded.
SOA: Start of Authority Record
SOA records begin to describe a site’s DNS entry as follows:
example.com. 86400 IN SOA ns1.example.com. mail.example.com. (
2017012604 ;serial
86400 ;refresh, seconds
7200 ;retry, seconds
3600000 ;expire, seconds
86400 ;minimum, seconds
)
The first line starts with the domain name example.com and ends with a period—this statement is consistent with the zone definition in the /etc/named.conf file. We must always remember that DNS configuration files are extremely picky.
IN tells the name server: this is a network record.
SOA tells the name server: this is a Start of Authority record.
ns1.example.com. is the fully qualified domain name (FQDN) of the name server for the domain where this file resides.
mail.host.com. is the email address of the domain administrator. You will notice that this email address does not have an “@” sign but is replaced by a period, and there is also a period at the end.
The second line is a serial number used to tell the name server when the file was last updated. Therefore, if you make changes to the zone code, you must increment this serial number. The format of this serial number is YYYYMMDDxx, where xx starts from 00.
The third line is the refresh rate in seconds. This value is used to tell the second name server how often to check the master server for updates to the records.
The fourth line is the retry frequency in seconds. If the second server attempts to connect to the master name server multiple times to check for updates but cannot connect, the second server will retry the specified number of times per second.
The fifth line is the timeout indication. Its purpose is to allow the second server to cache the zone data. This value tells these servers how long to wait before discarding this value if they cannot connect to the master server for updates.
The sixth line tells cache servers how long to wait before timing out if they cannot connect to the master name server.
NS: Name Server Records
NS records are used to specify which name server maintains the records for that domain.
You can write NS records like this:
IN NS ns1.example.com.
IN NS ns2.example.com.
It is not necessary to have two NS records, but it is generally preferred to have a backup name server.
A and AAAA: Address Records
A records are used to provide a mapping from hostname to IP address support IN A 192.168.1.5.
If you have a host at 192.168.1.5 on support.example.com, you can enter it like the example above.
Note that the host we wrote does not have a period.
PTR: Pointer Records
PTR records are used to perform reverse name resolution, allowing someone to specify an IP address and then find the corresponding hostname.
This is the opposite of the function of A records: 192.168.1.5 IN PTR support.example.com.
Here, we type the full hostname with a period.
MX: Mail Exchange Records
MX records tell other sites about the mail server address for your domain: example.com. IN MX 10 mail.
Of course, this domain ends with a period. The number 10 is a priority indicator for the mail server; if you have multiple mail servers, the one with the smaller number is less important.
CNAME: Canonical Name Records
CNAME records allow you to create an alias for a hostname. This is useful when you want to provide an easy-to-remember name.
Suppose a site has a web server with a hostname of whatever-bignameis.example.com, and since the system is a web server, you can create a CNAME record or alias named www for the host.
You can create a CNAME record for the domain name www.example.com:
whatever–bignameis IN A 192.168.1.5
www IN CNAME whatever–bignameis
The first line informs the DNS server about the location of the alias. The second line creates an alias pointing to www.
TXT Records
You can store any information in TXT records, such as your contact information or any other information you want people to have when querying the DNS server.
You can save a TXT record like this: example.com. IN TXT “YOUR INFO GOES HERE”.
Additionally, RP records are created as explicit containers for host contact information: example.com. IN RP mail.example.com. example.com.
DNS TTL Values
At the top of the /etc/named.conf file, there is a $TTL entry.
This entry tells BIND the TTL (time to live) value for each individual record.
It is a numeric value in seconds, such as 14,400 seconds (4 hours), so the DNS server will cache your domain file for a maximum of 4 hours, after which it will re-query your DNS server.
You can lower this value, but the default value is usually reasonable unless you know what you are doing.
Capturing Configuration Errors
When you write domain files, you may forget a period, space, or other arbitrary errors.
You can diagnose Linux DNS server errors from the logs. The BIND service logs errors on /var/log/messages, which can be viewed in real-time using the tail command with the -f option: $ tail -f /var/log/messages.
Therefore, when you write domain files or modify /etc/named.config and restart the service, you can easily identify the type of error from the logs after displaying errors.
Host Command
After you successfully add or modify records, you can use the host command to check if the host resolves correctly.
The host command allows you to resolve a hostname to an IP address: $ host example.com.
Additionally, you can perform a reverse lookup: $ host 192.168.1.5.
You can find more information about the host and dig commands in this article.
Whois Command
The whois command is used to determine the ownership of a domain name and the email address and phone number of its owner: $ whois example.com.
Rndc Command
The rndc tool can be used to securely manage name servers, as all communication with the server is authenticated via digital signatures.
This tool is used to control name servers and debug issues. You can check the status of the Linux DNS server like this: $ rndc status.
Additionally, if you change any domain (zone) files, you can reload the service without restarting the naming service: $ rndc reload example.com.
Here, we reload the example.com domain file. You can reload all domains: $ rndc reload.
Or you can add new domains or change the service configuration. You can reload the configuration as follows:
$ rndc reconfig.
Linux DNS Resolver
We have learned how the Linux DNS server works and how to configure it. Another part, of course, is the client that interacts with the DNS server (communicating with the DNS server to resolve hostnames to IP addresses).
On Linux, the resolver is the client of DNS. To configure the resolver, you can check the /etc/resolv.conf configuration file.
On Debian-based distributions, you can check the /etc/resolvconf/resolv.conf.d/ directory.
The /etc/resolv.conf file contains the information needed by the client to obtain its local DNS server address.
The first indicates the default search domain, and the second indicates the IP address of the hostname server (nameserver).
The nameserver line tells the resolver which name server is available. As long as your BIND service is running, you can use your own DNS server.
Using a Linux DNS server is very simple. I hope you find this article useful and easy to understand.
Did you gain something from this article? Please share it with more people
Follow “Linux Enthusiasts” to enhance your Linux skills