
In this tutorial, we will use the <span>php-mqtt/client</span> library, which has the highest download count on Composer. It is a reliable and easy-to-use solution for integrating MQTT into PHP applications. If you are looking for other MQTT client libraries for PHP, you can explore more options on Packagist.
Choosing the Best MQTT Client Library for PHP
MQTT communication belongs to network communication scenarios outside of the HTTP system. Due to the limitations of PHP features, using network communication extensions like Swoole/Workerman can provide a better experience in PHP systems.
This article will not repeat its usage. The relevant MQTT client libraries are as follows:
- workerman/mqtt: An asynchronous MQTT client for PHP based on Workerman.
- simps/mqtt: A parser and coroutine client for the MQTT protocol in PHP.
Setting Up a PHP Project for MQTT Integration
Confirm PHP Version
First, ensure that you are using PHP version 7.4.21 or higher. You can check your PHP version by running the following command in the terminal:
php --version

PHP 7.4.21 (cli) (built: Jul 12 2021 11:52:30) ( NTS )
Copyright (c) The PHP Group
Zend Engine v3.4.0, Copyright (c) Zend Technologies
    with Zend OPcache v7.4.21, Copyright (c), by Zend Technologies
Installing with Composer
Composer is a powerful dependency management tool for PHP that simplifies the installation of libraries required for PHP projects.
To install the php-mqtt/client library, run the following command in the root directory of your project:
composer require php-mqtt/client
This will download and install the php-mqtt/client library along with all its dependencies. Once the installation is complete, you can use the library in your PHP code.
Using PHP with MQTT
Connecting to the MQTT Broker
This article will use the free public MQTT broker provided by EMQX, which is created on the EMQX MQTT platform. The server access information is as follows:
- Broker: broker.emqx.io
- TCP Port: 1883
- SSL/TLS Port: 8883
Importing the Autoload File
Before using the php-mqtt/client library in your PHP code, you need to import Composer’s autoload file. Please add the following code to your PHP script:
require('vendor/autoload.php');

use \PhpMqtt\Client\MqttClient;
Setting MQTT Broker Connection Parameters
Set the MQTT broker connection address, port, and topic. At the same time, we call the PHP <span>rand</span> function to randomly generate the MQTT client ID.
$server   = 'broker.emqx.io';
$port     = 1883;
$clientId = rand(5, 15);
$username = 'emqx_user';
$password = 'public';
$clean_session = false;
$mqtt_version = MqttClient::MQTT_3_1_1;
Writing the MQTT Connection Function
Connect using the parameters above and set the connection parameters through <span>ConnectionSettings</span>, for example:
$connectionSettings = (new ConnectionSettings)
  ->setUsername($username)
  ->setPassword($password)
  ->setKeepAliveInterval(60)
  ->setLastWillTopic('emqx/test/last-will')
  ->setLastWillMessage('client disconnect')
  ->setLastWillQualityOfService(1);
Subscribing
The program subscribes to the topic <span>emqx/test</span> and configures a callback function for the subscription to handle received messages. Here, we print the topic and message obtained from the subscription:
$mqtt->subscribe('emqx/test', function ($topic, $message) {
    printf("Received message on topic [%s]: %s\n", $topic, $message);
}, 0);
Publishing
Construct a payload and call the <span>publish</span> function to publish messages to the <span>emqx/test</span> topic. After publishing, the client needs to enter a polling state to handle incoming messages and retransmission queues:
for ($i = 0; $i < 10; $i++) {
  $payload = array(
    'protocol' => 'tcp',
    'date' => date('Y-m-d H:i:s'),
    'url' => 'https://github.com/emqx/MQTT-Client-Examples'
  );
  $mqtt->publish(
    // topic
    'emqx/test',
    // payload
    json_encode($payload),
    // qos
    0,
    // retain
    true
  );
  printf("msg $i send\n");
  sleep(1);
}

// The client loop to process incoming messages and retransmission queues
$mqtt->loop(true);
Complete Code
The following is the complete PHP code for connecting, publishing, and subscribing to the MQTT broker:
<span>pubsub_tcp.php</span>
<?php

require('vendor/autoload.php');

use \PhpMqtt\Client\MqttClient;
use \PhpMqtt\Client\ConnectionSettings;

$server   = 'broker.emqx.io';
$port     = 1883;
$clientId = rand(5, 15);
$username = 'emqx_user';
$password = 'public';
$clean_session = false;
$mqtt_version = MqttClient::MQTT_3_1_1;

$connectionSettings = (new ConnectionSettings)
  ->setUsername($username)
  ->setPassword($password)
  ->setKeepAliveInterval(60)
  ->setLastWillTopic('emqx/test/last-will')
  ->setLastWillMessage('client disconnect')
  ->setLastWillQualityOfService(1);

$mqtt = new MqttClient($server, $port, $clientId, $mqtt_version);

$mqtt->connect($connectionSettings, $clean_session);
printf("client connected\n");

$mqtt->subscribe('emqx/test', function ($topic, $message) {
    printf("Received message on topic [%s]: %s\n", $topic, $message);
}, 0);

for ($i = 0; $i < 10; $i++) {
  $payload = array(
    'protocol' => 'tcp',
    'date' => date('Y-m-d H:i:s'),
    'url' => 'https://github.com/emqx/MQTT-Client-Examples'
  );
  $mqtt->publish(
    // topic
    'emqx/test',
    // payload
    json_encode($payload),
    // qos
    0,
    // retain
    true
  );
  printf("msg $i send\n");
  sleep(1);
}

$mqtt->loop(true);
Testing
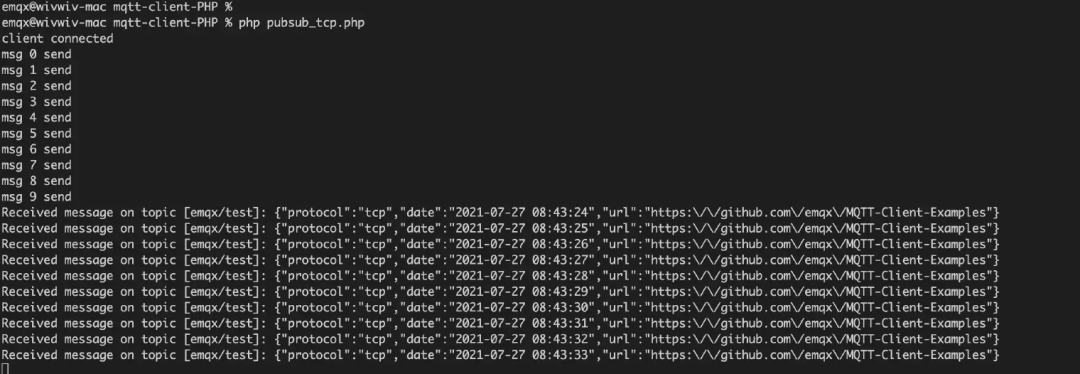
After running the MQTT message publishing code, we will see that the client connects successfully, and the messages have been published and received successfully:
php pubsub_tcp.php
This tutorial demonstrated how to connect to an MQTT broker, publish and subscribe to MQTT topics, and receive real-time messages using the php-mqtt/client library in PHP. These are the foundational steps for building powerful real-time applications with PHP and MQTT.