Monitoring and Tuning the Linux Network Stack: Receiving Data (1) – Network Device InitializationMonitoring and Tuning the Linux Network Stack: Receiving Data (2) – Interrupts and NAPIMonitoring and Tuning the Linux Network Stack: Receiving Data (3) – Monitoring Network DevicesMonitoring and Tuning the Linux Network Stack: Receiving Data (4) – Soft InterruptsMonitoring and Tuning the Linux Network Stack: Receiving Data (5) – Interrupt TuningMonitoring and Tuning the Linux Network Stack: Receiving Data (6) – Starting to Process Network DataMonitoring and Tuning the Linux Network Stack: Receiving Data (7) – Monitoring Network Data Processing and TuningMoving up the network stack with netif_receive_skb
Advancing packets through the network protocol stack using <span>netif_receive_skb</span>.
Continuing our previous discussion on <span>netif_receive_skb</span>, it is called in several places, with the two most common (which we have already discussed) being:
- Called in the
<span>napi_skb_finish</span>function if the packet will not be merged into an existing Generic Receive Offload (GRO) flow; - Called in the
<span>napi_gro_complete</span>function if the protocol layer indicates that it is time to refresh that flow.
Note:<span>netif_receive_skb</span> and its subsequent function calls run in the context of the soft interrupt handling loop. When using tools like <span>top</span>, you will see the time spent in this part counted as <span>sitime</span> or <span>si</span>.
<span>netif_receive_skb</span> first checks a system control (sysctl) value to determine whether the user requests timestamping of the packet before or after it enters the backlog queue. If this setting is enabled, the timestamp is recorded immediately before the packet enters the Receive Packet Steering (RPS) (and the CPU-affiliated backlog queue). If this setting is disabled, the timestamp is recorded after the packet enters the queue. If RPS is enabled, this method distributes the load of timestamping across multiple CPUs but introduces some latency.
Tuning: Timestamping Received (RX) Packets
You can tune when packets are timestamped after being received by adjusting a system control parameter called <span>net.core.netdev_tstamp_prequeue</span>:
Disabling timestamping of received packets by adjusting the system control parameter
$ sudo sysctl -w net.core.netdev_tstamp_prequeue=0
The default value for this parameter is 1. For the exact meaning of this setting, refer to the explanation in the previous section.
The netif_receive_skb Function
After handling the timestamping, the <span>netif_receive_skb</span> function takes different actions depending on whether the Receive Packet Steering (RPS) feature is enabled. We will start with the simpler case: RPS is disabled.
RPS Disabled (Default Setting)
If RPS is not enabled, the <span>__netif_receive_skb</span> function is called, which performs some logging work and then calls the <span>__netif_receive_skb_core</span> function to pass the data further into the protocol stack.
We will take a detailed look at how the <span>__netif_receive_skb_core</span> function works, but first, let’s examine the code execution path when RPS is enabled, as this path also calls the <span>__netif_receive_skb_core</span> function.
RPS Enabled
If RPS is enabled, after handling the timestamp options mentioned above, the <span>netif_receive_skb</span> function performs some calculations to determine which CPU’s backlog queue should be used. This is done by calling the <span>get_rps_cpu</span> function. Here is the code from the <span>net/core/dev.c</span> file:
cpu = get_rps_cpu(skb->dev, skb, &rflow);

if (cpu >= 0) {
  ret = enqueue_to_backlog(skb, cpu, &rflow->last_qtail);
  rcu_read_unlock();
  return ret;
}
<span>get_rps_cpu</span> considers the aforementioned Receive Flow Steering (RFS) and enhanced RFS (aRFS) settings to ensure that data is queued to the desired CPU’s backlog queue by calling the <span>enqueue_to_backlog</span> function.
The enqueue_to_backlog Function
This function first obtains a pointer to the <span>softnet_data</span> structure for the remote CPU, which contains a pointer to the <span>input_pkt_queue</span>. Next, it checks the length of the <span>input_pkt_queue</span> for the remote CPU. Here is the code from the <span>net/core/dev.c</span> file:
qlen = skb_queue_len(&sd->input_pkt_queue);
if (qlen <= netdev_max_backlog && !skb_flow_limit(skb, qlen)) {
First, the length of the <span>input_pkt_queue</span> is compared with <span>netdev_max_backlog</span>. If the queue length exceeds this value, the data will be discarded. Similarly, flow limits are checked, and if exceeded, the data will also be discarded. In both cases, the drop count in the <span>softnet_data</span> structure will increase. Note that this refers to the <span>softnet_data</span> structure of the CPU to which the data is about to be queued. Refer to the earlier section on <span>/proc/net/softnet_stat</span><code> to learn how to obtain drop counts for monitoring purposes.
<span>enqueue_to_backlog</span> is not called in many places. It is called during the processing of packets with RPS enabled and is also called from the <span>netif_rx</span> function. Most drivers should not use <span>netif_rx</span>, but should use <span>netif_receive_skb</span>. If you are not using RPS and your driver does not use <span>netif_rx</span>, then increasing the backlog queue length will not have any noticeable effect on the system, as it will not be utilized at all.
Note: You need to check the driver you are using. If it calls <span>netif_receive_skb</span> and you are not using RPS, then increasing <span>netdev_max_backlog</span> will not yield any performance improvement, as no data will enter the <span>input_pkt_queue</span>.
Assuming the <span>input_pkt_queue</span> is sufficiently small and the flow limit (which will be detailed below) has not been reached (or has been disabled), then the data can be queued. The logic here is a bit complex but can be summarized as follows:
- If the queue is empty: Check if NAPI on the remote CPU has been started. If not, check if an Inter-Processor Interrupt (IPI) has been queued to be sent. If not, queue an IPI and start the NAPI processing loop by calling
<span>____napi_schedule</span>. Then continue to queue the data. - If the queue is not empty, or the above operations have been completed, enqueue the data.
The code uses <span>goto</span> statements, which can be a bit difficult to follow, so read carefully. Here is the code from the <span>net/core/dev.c</span> file:
  if (skb_queue_len(&sd->input_pkt_queue)) {
enqueue:
         __skb_queue_tail(&sd->input_pkt_queue, skb);
         input_queue_tail_incr_save(sd, qtail);
         rps_unlock(sd);
         local_irq_restore(flags);
         return NET_RX_SUCCESS;
 }

/* Schedule NAPI for backlog device
  * We can use non atomic operation since we own the queue lock
  */
if (!__test_and_set_bit(NAPI_STATE_SCHED, &sd->backlog.state)) {
         if (!rps_ipi_queued(sd))
                 ____napi_schedule(sd, &sd->backlog);
 }
goto enqueue;
Flow Limiting
RPS (Receive Packet Steering) distributes the packet processing load across multiple CPUs, but a single large flow can monopolize CPU processing time, preventing smaller flows from being processed. Flow limiting is a feature that can be used to limit the number of packets from each flow queued to the backlog queue to a certain range. This helps ensure that even with larger flows pushing packets, smaller flows can still be processed.
The above <span>if</span> statement from <span>net/core/dev.c</span> checks for flow limiting by calling the <span>skb_flow_limit</span> function:
if (qlen <= netdev_max_backlog && !skb_flow_limit(skb, qlen)) {
This code checks if there is still space in the queue and whether the flow limit has not been reached. By default, flow limiting is disabled. To enable flow limiting, you must specify a bitmap (similar to the RPS bitmap).
RPS Flow Limiting
RPS allows multiple CPUs to share kernel receive processing work without introducing packet reordering. The downside of sending all packets from the same flow to the same CPU is that if the packet rates of different flows vary, it can lead to an unbalanced CPU load. In extreme cases, a single flow can dominate the traffic. This situation indicates a problem, especially in common server workloads with many concurrent connections, such as misconfigurations or denial-of-service attacks with spoofed source addresses.
Flow limiting is an optional feature of RPS that prioritizes smaller flows during CPU contention by slightly preemptively dropping packets from larger flows. This feature only takes effect when the target CPU of RPS or RFS is nearing saturation. Once the input packet queue for a CPU exceeds half of the maximum queue length (set by the system parameter net.core.netdev_max_backlog), the kernel begins to count the number of packets from each flow over the last 256 packets. When a new packet arrives, if the number of packets from a flow exceeds the set ratio (default is half), the new packet will be dropped. Packets from other flows will only be dropped when the input packet queue reaches netdev_max_backlog. When the input packet queue length is below the threshold, no packets will be dropped, so flow limiting does not directly cut off connections, allowing even large flows to maintain connections.
https://github.com/torvalds/linux/blob/v3.13/Documentation/networking/scaling.txt#L166-L188
Monitoring: Monitoring Packet Loss Due to Full Input Packet Queue or Flow Limiting
Refer to the earlier section on monitoring <span>/proc/net/softnet_stat</span><span>. The "dropped" field is a counter that increments each time data is dropped instead of being queued to the CPU's input packet queue.</span>
Tuning
Tuning: Adjusting <span>netdev_max_backlog</span><span> to Prevent Packet Loss</span>
Before adjusting this tuning parameter value, please review the notes in the previous section.
If you are using RPS, or if your driver calls the <span>netif_rx</span> function, increasing the value of <span>netdev_max_backlog</span> can help prevent packet loss during the <span>enqueue_to_backlog</span> process.
Example: Use the <span>sysctl</span> command to increase the backlog queue length to 3000.
$ sudo sysctl -w net.core.netdev_max_backlog=3000
The default value is 1000.
Tuning: Adjusting NAPI Weight for Backlog Queue Polling Loop
You can adjust the weight of the NAPI poller for the backlog queue by setting the <span>net.core.dev_weight</span> system parameter (sysctl). Adjusting this value determines the share of the overall budget that the backlog queue polling loop can occupy (see the earlier section on adjusting <span>net.core.netdev_budget</span><span>):</span>
Example: Use the <span>sysctl</span> command to increase the weight of the NAPI polling backlog queue processing loop.
$ sudo sysctl -w net.core.dev_weight=600
The default value is 64.
Remember, the backlog queue processing and the polling functions registered by the device driver run in the context of soft interrupts and are subject to overall budget and time constraints, as mentioned earlier.
Tuning: Enabling Flow Limiting and Adjusting Flow Limit Hash Table Size
Set the size of the flow limit table using the system control parameter (sysctl).
$ sudo sysctl -w net.core.flow_limit_table_len=8192
The default value is 4096.
This change only affects newly allocated flow hash tables. Therefore, if you want to increase the size of the table, you should do so before enabling flow limiting.
To enable flow limiting, you need to specify a bitmask in <span>/proc/sys/net/core/flow_limit_cpu_bitmap</span><span>, similar to the RPS bitmask, to indicate which CPUs have flow limiting enabled.</span>
Backlog Queue NAPI Poller
The backlog queue for each CPU accesses NAPI (New API) in the same way as the device driver. The system provides a polling function to handle packets in the context of soft interrupts. It also provides a weight, just like the device driver.
This NAPI structure is provided during the network system initialization. In the <span>net/core/dev.c</span> file, the following code is found in the <span>net_dev_init</span> function:
sd->backlog.poll = process_backlog;
sd->backlog.weight = weight_p;
sd->backlog.gro_list = NULL;
sd->backlog.gro_count = 0;
The backlog queue’s NAPI structure differs from the device driver’s NAPI structure in that its weight parameter is adjustable, while device drivers typically hard-code their NAPI weights to 64. We will learn how to adjust this weight using system control parameters (sysctl) in the tuning section below.
Processing the Backlog Queue (process_backlog)
<span>process_backlog</span> is a loop that runs until its weight (as described in the previous section) is exhausted or there is no more data in the backlog queue.
Each segment of data in the backlog queue is removed from the queue and passed to the <span>__netif_receive_skb</span> function. The code execution path after data reaches <span>__netif_receive_skb</span> is the same as described earlier when RPS is disabled. That is, <span>__netif_receive_skb</span> performs some logging work before calling <span>__netif_receive_skb_core</span> to pass the network data to the protocol layer.
<span>process_backlog</span> follows the same NAPI convention as the device driver: if not all weight is used, NAPI is disabled. As mentioned earlier, when calling <span>enqueue_to_backlog</span>, the polling loop is restarted by calling <span>____napi_schedule</span>.
This function returns the amount of work completed, and <span>net_rx_action</span> (described earlier) subtracts this amount from the budget (which can be adjusted via <span>net.core.netdev_budget</span><span> as mentioned earlier).</span>
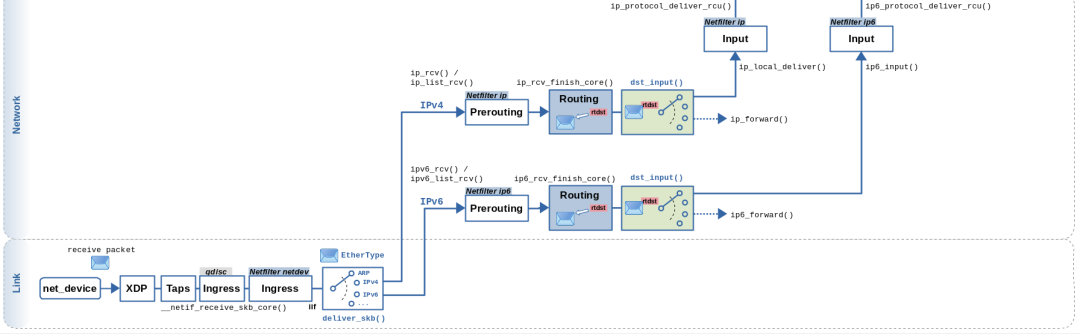
<span>__netif_receive_skb_core</span> Passes Data to Packet Capture Points and Protocol Layer
<span>__netif_receive_skb_core</span> is responsible for passing data to the protocol stack. Before doing this, it checks if there are any packet capture points installed to capture all incoming packets. A typical example is the <span>AF_PACKET</span> address family, which is usually accessed via the <span>libpcap</span> library.
If such a capture point exists, the data is first passed there before being passed to the protocol layer.
Packet Capture Point Passing
If a packet capture point is installed (usually implemented via <span>libpcap</span>), the packet will be passed to that capture point through the following code in <span>net/core/dev.c</span>:
list_for_each_entry_rcu(ptype, &ptype_all, list) {
  if (!ptype->dev || ptype->dev == skb->dev) {
    if (pt_prev)
      ret = deliver_skb(skb, pt_prev, orig_dev);
    pt_prev = ptype;
  }
}
If you want to understand the path of data in <span>pcap</span><span>, you can read the </span><code><span>net/packet/af_packet.c</span><span> file.</span>
Note: The capture points for packet capture tools like tcpdump or wireshark are located here.
Protocol Layer Passing
Once the packet capture point has processed the data, <span>__netif_receive_skb_core</span> passes the data to the protocol layer. It does this by extracting the protocol field from the data and traversing the list of delivery functions registered for that protocol type.
This can be seen in the <span>net/core/dev.c</span> file in the <span>__netif_receive_skb_core</span> function:
type = skb->protocol;
list_for_each_entry_rcu(ptype,
                &ptype_base[ntohs(type) & PTYPE_HASH_MASK], list) {
        if (ptype->type == type &&
            (ptype->dev == null_or_dev || ptype->dev == skb->dev ||
             ptype->dev == orig_dev)) {
                if (pt_prev)
                        ret = deliver_skb(skb, pt_prev, orig_dev);
                pt_prev = ptype;
        }
}
The above <span>ptype_base</span> identifier is defined in <span>net/core/dev.c</span> as a linked list hash table:
struct list_head ptype_base[PTYPE_HASH_SIZE] __read_mostly;
Each protocol layer uses a helper function called <span>ptype_head</span> to compute the hash table slot for a given entry and adds a filter to the corresponding linked list:
static inline struct list_head *ptype_head(const struct packet_type *pt)
{
        if (pt->type == htons(ETH_P_ALL))
                return &ptype_all;
        else
                return &ptype_base[ntohs(pt->type) & PTYPE_HASH_MASK];
}
Filters can be added to the list by calling the <span>dev_add_pack</span> function. This is how the protocol layer registers to receive network data delivery for its protocol type.
Now you know how network data travels from the network interface card to the protocol layer.
Protocol Layer Registration
Now that we understand how data is passed from the network device subsystem to the protocol stack, let’s look at how the protocol layer registers itself.
This blog post will analyze the IP protocol stack as an example, as it is a commonly used protocol relevant to most readers.
IP Protocol Layer
The IP protocol layer inserts itself into the <span>ptype_base</span> hash table so that the network device layer described earlier will pass data to it.
This process occurs in the <span>net/ipv4/af_inet.c</span> file in the <span>inet_init</span> function:
dev_add_pack(&ip_packet_type);
This line of code registers the IP packet type structure defined in the <span>net/ipv4/af_inet.c</span> file:
static struct packet_type ip_packet_type __read_mostly = {
        .type = cpu_to_be16(ETH_P_IP),
        .func = ip_rcv,
};
<span>__netif_receive_skb_core</span> will call <span>deliver_skb</span> (as mentioned earlier), and <span>deliver_skb</span> will call <span>func</span> (in this case, <span>ip_rcv</span>).
Source
https://blog.packagecloud.io/monitoring-tuning-linux-networking-stack-receiving-data