The history command is an indispensable and powerful tool in the daily use and management of Linux systems. It not only records the commands executed by the user but also helps us quickly review the operation history, troubleshoot issues, and even improve work efficiency to some extent. This article will start with the basic usage and gradually delve into advanced techniques and security management, guiding you to fully master the usage of the history command.
1. Basic Usage of the history Command
1.1 Viewing Historical Commands
The most basic usage is to directly input the history command, which will list all the commands executed by the current user in this login session and previous sessions, with each command preceded by a corresponding number. For example:

If you only want to view the most recent commands, you can add a number after history, such as history 3, which will display only the last 3 executed commands.

Additionally, when there are many historical commands, directly displaying the list may not be convenient for viewing. You can use the pipe symbol to combine the output of history with the less command, like history | less, allowing you to browse historical commands more conveniently using the paging and search functions of less. Pressing the q key will exit the less viewing mode.
1.2 Executing Historical Commands
Using the command number to execute historical commands is one of the convenient features of the history command. If you want to re-execute the command with number 148, simply input !148, and the system will execute the pwd command again.

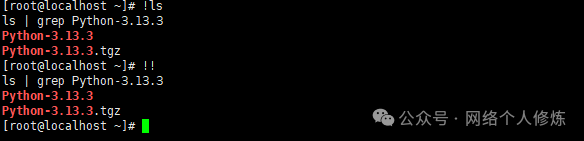
Additionally, you can use the ! followed by a string to execute the most recent command that starts with the specified string. For example, inputting !ls will execute the most recent command that starts with ls.
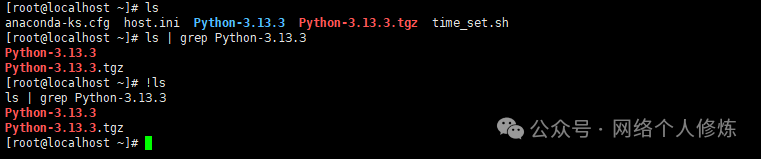
If you want to execute the previous command, a simpler way is to use !!. For example, if you previously executed ls -l, then inputting !! will effectively re-execute ls -l.
Moreover, there are some special usages, such as !$ which can reference the last parameter of the previous command. Suppose the previous command was cp file.txt /tmp, then inputting vim !$ would be equivalent to executing vim /tmp.
2. Customizing the Format of Historical Command Records
By default, the history command does not display time information, which can be inconvenient for operation tracing and auditing. By setting the HISTTIMEFORMAT environment variable, we can add timestamps to historical commands.
2.1 Temporary Setting
In the current session, inputting export HISTTIMEFORMAT=”%F %T “ will temporarily set the timestamp format. Here, %F represents the date in YYYY-MM-DD format, and %T represents the time in HH:MM:SS format. After setting, executing the history command again will change the output to:

The value of HISTTIMEFORMAT actually follows the strftime format string specification, and we can adjust it flexibly according to our needs. For example, if you only want to display up to the minute, you can set it to export HISTTIMEFORMAT=”%Y-%m-%d %H:%M “; if you want to use the day/month/year date format, you can set it to export HISTTIMEFORMAT=”%d/%m/%Y %H:%M:%S “.
2.2 Permanent Setting
If you want all logged-in users’ historical command records to include timestamps, you can edit the /etc/profile file and add the following at the end:
HISTTIMEFORMAT="%F %T "
After adding, execute source /etc/profile to make the configuration take effect.
If you only need it to take effect for the current user, you can write the above statement into ~/.bash_profile or ~/.bashrc.
3. Advanced Techniques for the history Command
3.1 Clearing Historical Commands
Using history -c can clear the historical command records of the current session, but this operation will not immediately delete the historical command file on disk (~/.bash_history). To completely delete historical command records, you can manually edit the ~/.bash_history file to remove its contents; or use history -w to overwrite the current in-memory historical command records to the disk file, and then perform the clearing operation. You can also directly clear the contents of the ~/.bash_history file using echo “” > ~/.bash_history.
⚠️Note: echo “” > ~/.bash_history will directly clear the contents of the ~/.bash_history file, deleting the historical command records from the disk level. However, in an already opened terminal session where commands have been executed, using the history command may still show the commands executed in the current session because these commands are still temporarily stored in memory and have not yet been written to disk. Only by reopening the terminal or executing history -w to write the in-memory commands to disk will the historical records show as empty.
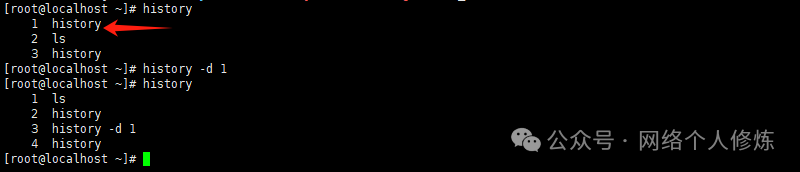
If you only want to delete a specific command by number, for example, to delete the command with number 1, you can use history -d 1.
3.2 Searching Historical Commands
When there are many historical command records, you can quickly search for historical commands using the Ctrl + R key combination. Pressing Ctrl + R will enter reverse search mode, and you can input keywords to find historical commands that contain those keywords. After finding the desired command, press Enter to execute it, and press Ctrl + G to exit the search mode.
Additionally, you can use the history command combined with grep for more flexible searching. For example, to find all historical commands containing nginx, you can use history | grep “nginx”, which will list all historical commands containing the nginx keyword along with their corresponding numbers.
3.3 Adjusting the Number of Historical Command Records
The system by default records a certain number of historical commands (usually 1000), and this number is controlled by the HISTSIZE environment variable.

If you want to increase or decrease the number of recorded historical commands, you can set it as follows:
# Temporary setting, set the record number to 1000export HISTSIZE=2000


# Permanent setting, edit ~/.bashrc file, add or modify this variable
echo "export HISTSIZE=2000" >> ~/.bashrc
source ~/.bashrc
In addition to HISTSIZE controlling the number of historical commands saved in memory, the HISTFILESIZE environment variable controls the maximum number of command entries saved in the historical file (such as ~/.bash_history). You can also adjust the value of HISTFILESIZE in a similar way. For example, to set the maximum number of command entries saved in the historical file to 2000, you can edit the ~/.bashrc file, add export HISTFILESIZE=2000, and then execute source ~/.bashrc to make the setting take effect.
⚠️Note, echo “export HISTSIZE=1000” >> ~/.bashrc and setting HISTSIZE in /etc/profile have significant differences.
The ~/.bashrc file is the user-specific Bash configuration file, and the HISTSIZE set in it only applies to that user, allowing multiple users to configure independently according to their needs without interference; while /etc/profile is the system-wide configuration file, and the HISTSIZE set in it applies to all users, and new users logging in will automatically apply that setting. Furthermore, if HISTSIZE is set in both files, the configuration in ~/.bashrc will override that in /etc/profile, reflecting the priority of user-specific configurations.
3.4 Other Useful Command Options and Techniques
- history -aThis command can write new commands from the current session into the historical file (default is ~/.bash_history). By default, the commands recorded by the history command are first stored in memory and are only written to the historical file at the end of the session. When we want to ensure that the executed commands are saved to the disk file in a long session to avoid losing command records due to unexpected exits, history -a is very useful. For example, when making important system configuration changes, executing history -a after completing each part of the operation can ensure that the historical records are promptly saved to disk.
- history -rIts function is to read the commands from the historical file into the current session’s historical command buffer. For example, when we manually modify the contents of the ~/.bash_history file and want the current session to immediately read the modified historical records, we can use history -r. This is very effective for recovering mistakenly deleted historical command records or integrating multiple historical file contents into the current session.
- history -sCan add a command to the historical command list, but this command will not actually be executed. For example, history -s “sudo apt update” will add sudo apt update to the historical records, but the system will not actually execute the update operation. This function is often used to supplement missing historical records or to pre-record planned commands.
- Historical Command Alias CombinationsBy combining the alias command, we can create more convenient historical command operations. For example, adding alias h=’history’ in the ~/.bashrc file allows you to quickly view historical commands by simply typing h; adding alias hg=’history | grep’ allows you to quickly search for historical commands containing nginx by using hg nginx, further improving operational efficiency.
4. History Command and Security Management
4.1 Hiding Operation Traces
In certain special scenarios, users may wish to hide their operation records. In this case, the set +o history command can be used to disable command history recording. However, this operation poses security risks and is often used to cover up illegal operation traces, which should be avoided in normal system management. If the system frequently executes set +o history, it is necessary to be alert to unauthorized access or malicious operations.

Correspondingly, when the history recording function is turned off, inputting set -o history can re-enable the history function, allowing the system to continue recording subsequent executed commands.

To prevent sensitive commands from being recorded in the history, you can also use the HISTIGNORE environment variable. By setting HISTIGNORE in the ~/.bashrc file, you can define a list of command patterns separated by colons, and commands matching these patterns will not be recorded in the history. For example, if you do not want to record ls, cd, and exit commands, you can add export HISTIGNORE=”ls:cd:exit” in ~/.bashrc and then execute source ~/.bashrc to make the setting take effect.
4.2 Auditing and Tracing
In multi-user shared servers or during system audits, historical command records with timestamps can clearly display the operation time and content, helping administrators trace the root of issues. At the same time, regularly backing up historical command files (~/.bash_history) and securely storing them can ensure that important operation records are not lost, providing strong evidence for post-audit. You can refer to previous articles on Linux historical command upgrades: Automatically recording time and login IP.
To enhance the reliability of historical records in auditing, you can also consider setting appropriate permissions for the historical record files. For example, setting the permissions of the ~/.bash_history file to be readable and writable only by the current user, using chmod 600 ~/.bash_history to modify permissions. This can prevent other users from casually viewing or tampering with the historical record files, ensuring the integrity and accuracy of audit data.
Reference Links
https://www.gnu.org/software/bash/manual/bash.html#index-history
-End-
If you find my sharing useful
[Like +Share+Follow
 ]
]