
# Introduction
In recent years, the Control Board (English name: mPython) has become increasingly popular in maker education. The Control Board integrates the high-performance dual-core chip ESP32, which has WiFi and Bluetooth connectivity, and is equipped with a rich set of sensors on the board. Most importantly, it is specifically designed for programming education in China, meeting the needs of domestic classrooms, and with a low price, more and more teachers involved in STEAM and maker education have started using it.
Various educational manufacturers and organizations in China have also launched programming software targeting the Control Board, such as Mind+, Mixly, and mPython. Most of these software are based on graphical programming, which is easy to use and can easily achieve many fun ideas, allowing students to experience endless creative joy. Based on these software, there are currently a large number of projects and courses about the Control Board available online.
However, software designed for popularizing teaching about the Control Board often has some functional limitations. Additionally, if one does not understand the core chip ESP32 well, it is inconvenient to transfer the knowledge learned. For example, there are many development boards designed using ESP32 available online; can the knowledge learned on the Control Board be applied to these ESP32 development boards?
Moreover, before coming into contact with the Control Board, most teachers involved in maker education would generally use the very popular Arduino, so can the programming knowledge learned on Arduino also be transferred to the Control Board?
In fact, this knowledge can all be transferred. Therefore, when I have time, I plan to share a series of tutorials on programming the Control Board (ESP32) using Arduino code: Mastering the Control Board (ESP32) Series, aiming to learn the programming of the ESP32 module from the perspective of the ESP32 chip and then apply it to the Control Board or other ESP32-based development boards, allowing everyone to learn by analogy.
In terms of hardware selection, this tutorial will focus on the Control Board, supplemented by some other ESP32-based learning development boards, such as NodeMCU-32S or DFRobot FireBeetle-ESP32; in terms of programming software selection, it will mainly use Arduino code programming, with some cases also sharing programs from graphical programming software like Mixly or Mind+ or mPython.
In fact, the ESP32 chip is an upgraded version of the ESP8266 chip, so in many cases, the code for both is compatible. Therefore, the code provided in this tutorial also aims to be as universal as possible. However, due to my limited level, there may inevitably be some omissions, so I hope everyone will provide criticism and suggestions for improvement so that we can progress together.
# Overview of ESP32
Before introducing the software, let’s briefly introduce the hardware. First, let’s take a look at the main control chip ESP32 behind the Control Board.
The ESP32 chip is another integrated WiFi microcontroller launched by the Chinese company Espressif after the ESP8266 chip. It has more powerful performance than the ESP8266 and can be used to develop more complex applications. The ESP32 chip or module has the following characteristics:
-
Processor: Tensilica LX6 dual-core processor (one core for high-speed connection; one core for independent application development)
-
Frequency: 32-bit dual-core processor, the CPU normal operating speed is 80 MHz, can reach up to 240 MHz
-
SRAM: 520KB, maximum support for 8 MB external SPI SRAM
-
Flash: maximum support for 16 MB external SPI Flash
-
WiFi Protocol: supports 802.11 b/g/n/d/e/i/k/r protocols, speed up to 150 Mbps
-
Frequency Range: 2.4~2.5 GHz
-
Bluetooth Protocol: supports Bluetooth v4.2 complete standard, including traditional Bluetooth (BR/EDR) and low-energy Bluetooth (BLE)
-
It also has rich peripheral interfaces: such as GPIO, ADC, DAC, SPI, I²C, I²S, UART, etc.
For specific details, you can check the functional block diagram produced by the official:
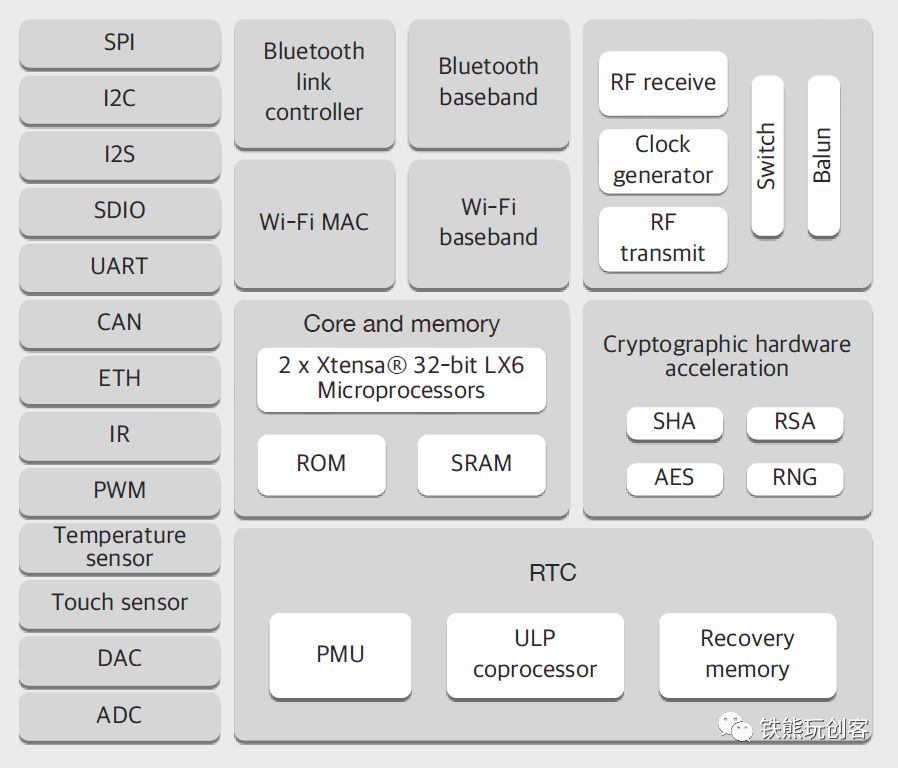
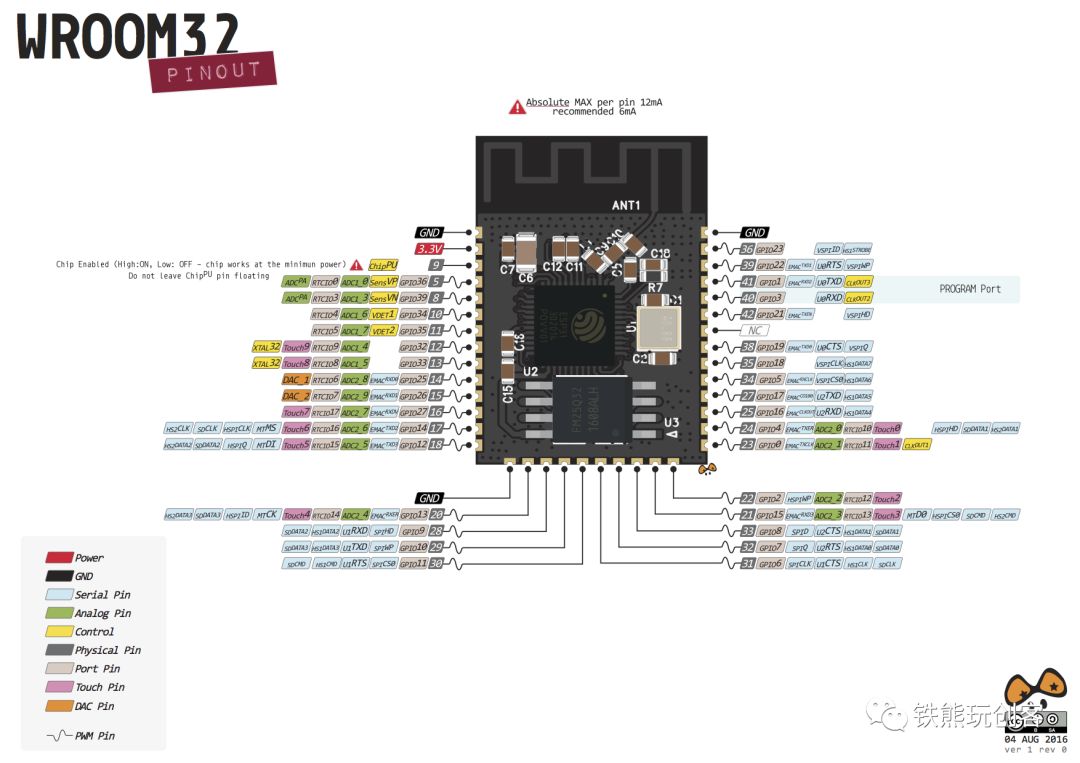
Interested readers can compare the hardware parameters of the Control Board on the official Wiki:
https://mpython.readthedocs.io/zh/master/board/hardware.html
Are these parameters similar to those of the Control Board based on the ESP32 chip? Additionally, the ESP32 pin diagram in the above image is actually identical to that of the Control Board.
In summary, the ESP32 chip mainly has advantages such as high performance, low power consumption, high integration, small size, and stable performance. It can be said that its performance is quite good, which is why it can support script languages like MicroPython that are relatively performance-intensive.
For more detailed parameters about the ESP32, you can refer to the official Espressif website:
https://www.espressif.com/zh-hans/products/hardware/esp32/overview
## Common ESP32 Development Boards
If you search for ESP32 on Taobao, you can see many development boards, as shown in the figure below. Besides the Control Board, how should we choose among these dazzling development boards?
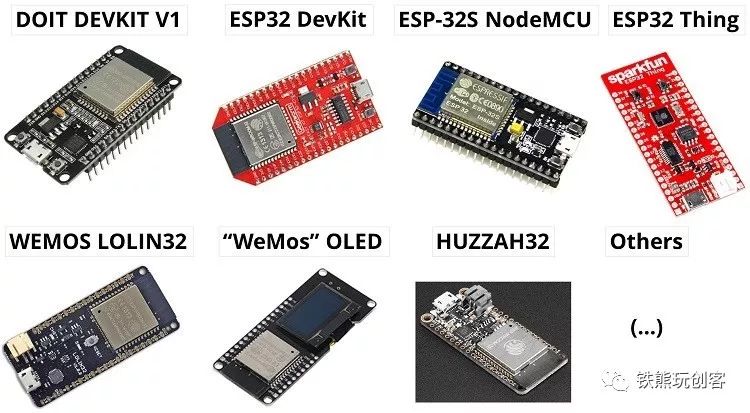
For this tutorial, these boards are actually quite similar, and everyone can choose freely. This tutorial mainly uses Control Board, FireBeetle-ESP32 produced by DFRobot, and NodeMCU-32S produced by Ai-Thinker for expansion. The Control Board is our main component for study, while FireBeetle-ESP32 and NodeMCU-32S are mainly used for explanation, making it easier for everyone to understand the underlying principles. In the projects covered in this tutorial, besides the Control Board, I will also select some projects to show how they run on other boards. The reason for choosing these three boards is that, on one hand, they are widely used in China with comprehensive Chinese materials; on the other hand, they all have corresponding expansion boards, making it convenient to connect various sensors and actuator modules during later studies.
The following image shows the front and back of the Control Board. For more detailed information, you can check the official help documentation of the Control Board: https://mpython.readthedocs.io/zh/master/
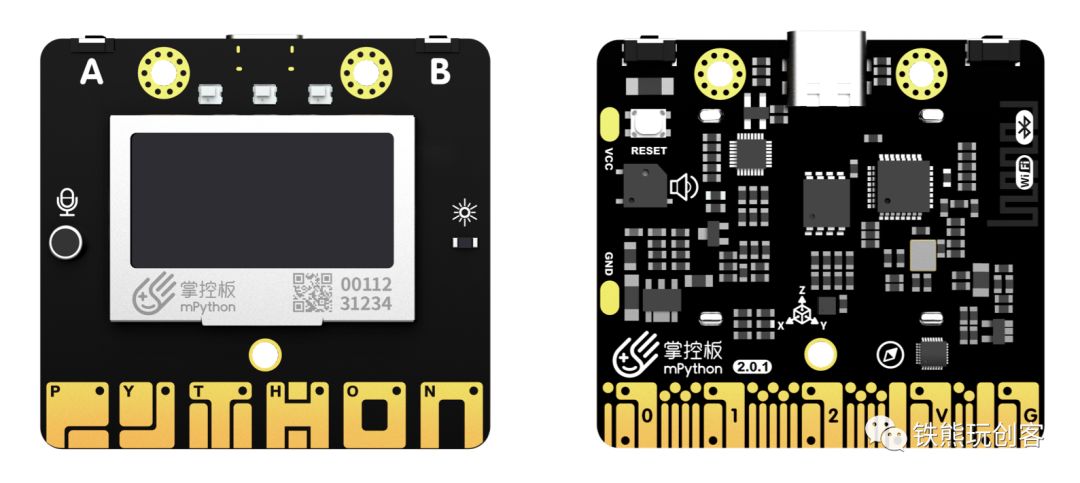
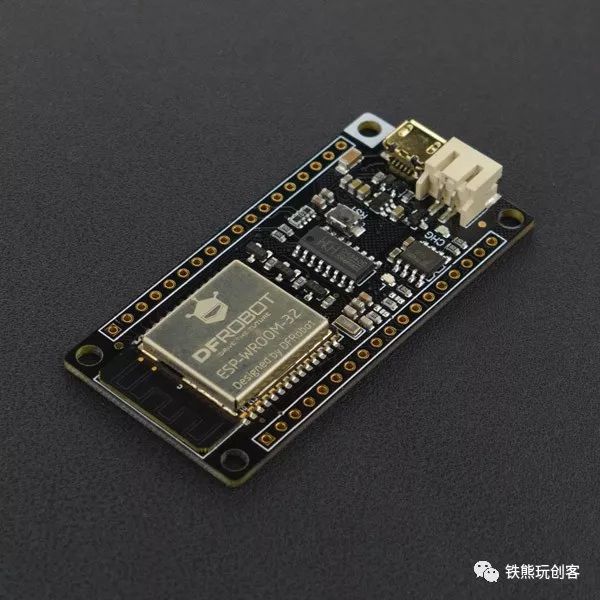
The following image shows the FireBeetle-ESP32 produced by DFRobot. For more detailed information, you can check the Wiki on the DFRobot official website: http://wiki.dfrobot.com.cn/index.php?title=(SKU:DFR0478)FireBeetle_Board-ESP32%E4%B8%BB%E6%9D%BF%E6%8E%A7%E5%88%B6%E5%99%A8V3.0
The following image shows the NodeMCU-32S development board produced by Ai-Thinker. For more detailed information, you can check the Wiki on Ai-Thinker’s official website:
https://wiki.ai-thinker.com/esp32/boards/nodemcu_32s
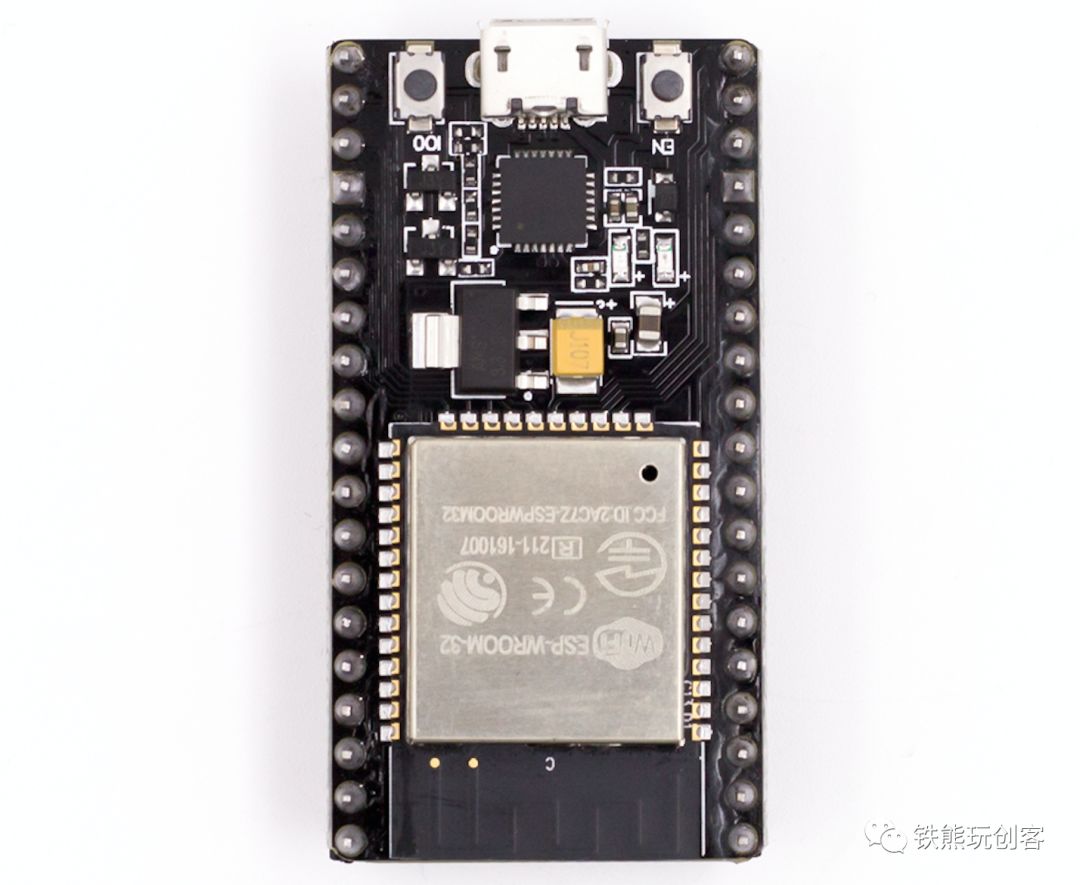
It is important to note that most ESP32 series development boards operate at 3.3V, and the USB port can input a maximum of 5V, so be careful to select the correct voltage during use to avoid damaging the board and causing danger. This will be emphasized again in the later chapters when specific wiring is discussed.
# Choosing a Programming Language
There are many ways to develop for the ESP32. Here are a few common ones:
-
The official Espressif ESP-IDF, which is the officially recommended development method that can maximize the performance of the ESP32, but it is not very convenient or efficient for development;
-
The official Arduino core for ESP32, which is easy to use and compatible with most Arduino programming syntax, leveraging the rich resources of the Arduino ecosystem;
-
The now very popular microPython, which is simple and powerful, with most programming syntax compatible with Python, and has great advantages in audio and video, image processing, and artificial intelligence due to its Python ecosystem;
-
Graphical programming, such as Mixly, Mind+, mPython X, etc., which are mainly based on Arduino or microPython modes at the bottom layer.
Currently, the most suitable for teachers in primary and secondary schools is mainly the Arduino mode and microPython mode. Since there are already many courses using microPython for the Control Board, this series of tutorials will mainly use Arduino IDE for learning.
# Software Preparation
To program the Control Board using Arduino software, some configuration is required. Here I provide two methods:
-
Using the built-in Arduino software of Mixly, which has the development environment pre-configured, is simple to use and suitable for beginners;
-
Using the Arduino board manager to configure the ESP32 (Control Board) development environment, suitable for those who like to tinker.
Here, I recommend the first method, using the built-in Arduino software of Mixly, but I will briefly introduce the installation methods for both.
## Using the Built-in Arduino of Mixly
The download address for Mixly is: https://mixly.readthedocs.io/zh_CN/latest/basic/02Installation-update.html
The installation method will not be elaborated on here, you can directly refer to the link above.
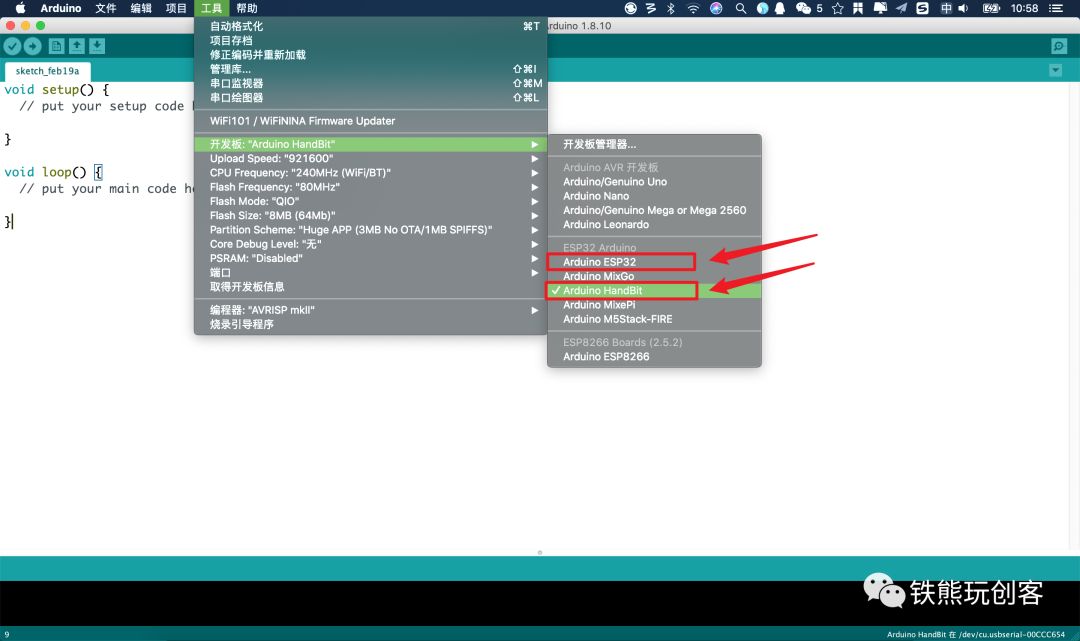
Since version v1.0, Mixly has been pre-configured with the programming environment for ESP32 (Control Board). Just open the built-in Arduino software of Mixly and select: Tools → Board → Arduino HandBit or Arduino ESP32. You can choose either Arduino ESP32 or Arduino HandBit. The Arduino ESP32 provides general programming modules for ESP32, while Arduino HandBit is just a further encapsulation of some functions specific to the Control Board. If you understand some of the technical principles behind the Control Board (or ESP32), you can choose any one. Of course, when using the Control Board, choosing Arduino HandBit will be slightly more convenient.
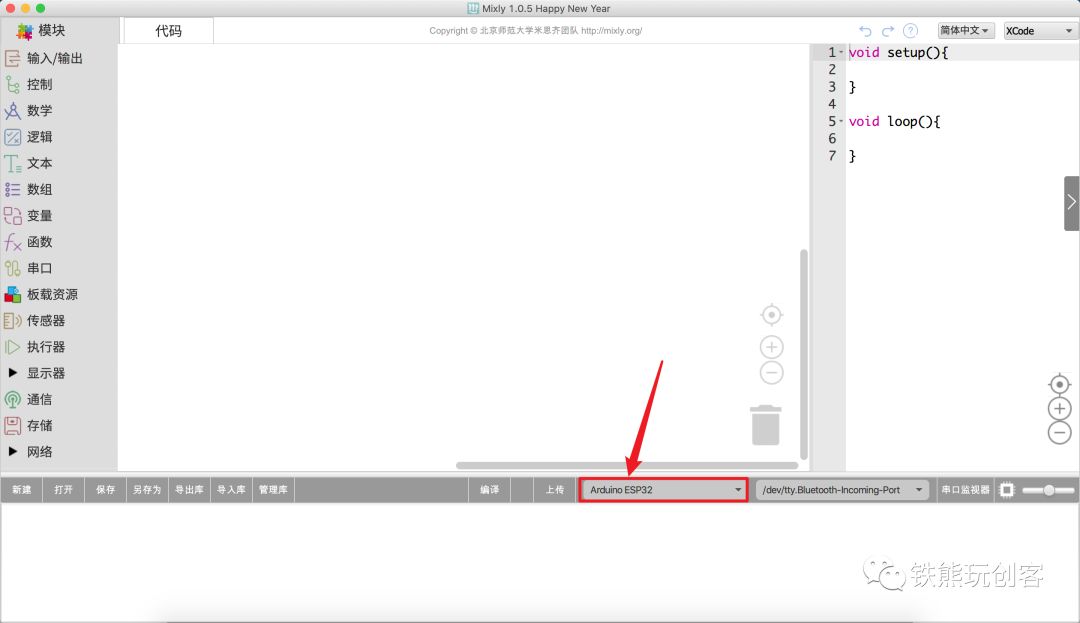
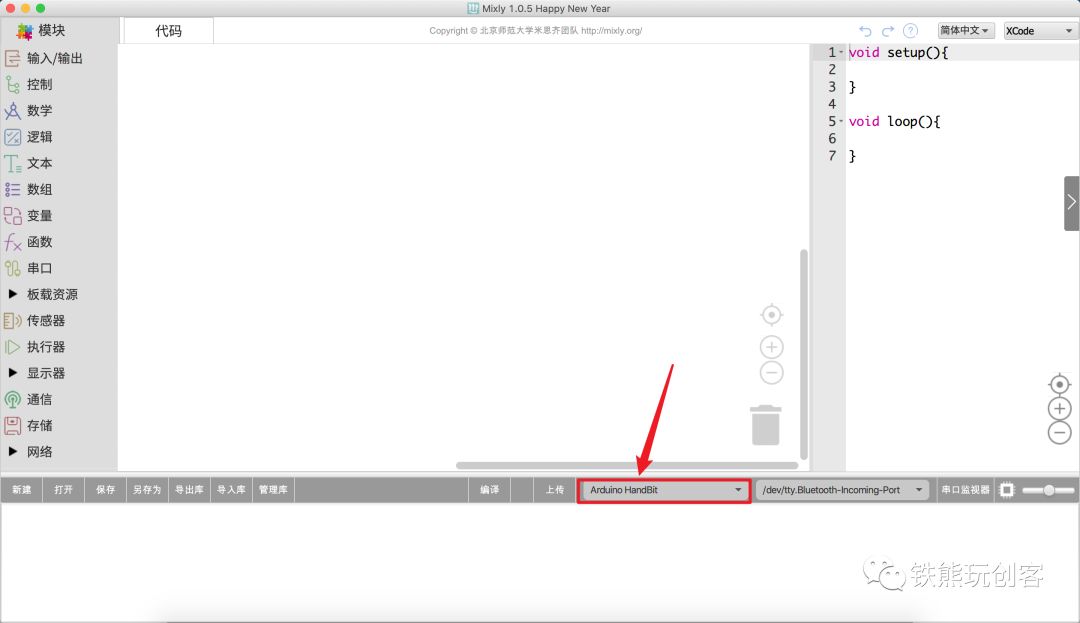
If you want to experience graphical programming with Mixly, just follow the two images below to select the development board.
## Configuring the Arduino Development Environment Yourself
To program the ESP32 or Control Board in Arduino, the initial preparation is slightly more complicated, but not difficult. The official also provides detailed tutorials. Here, I will introduce the configuration tutorial using Windows as an example; the process is basically the same for macOS or Linux systems, and will not be elaborated here.
First, install the latest version of Arduino IDE. The download link is:
https://www.arduino.cc/en/Main/Software
After downloading, open the Arduino software and click the menu: File → Preferences to open the Arduino settings interface.
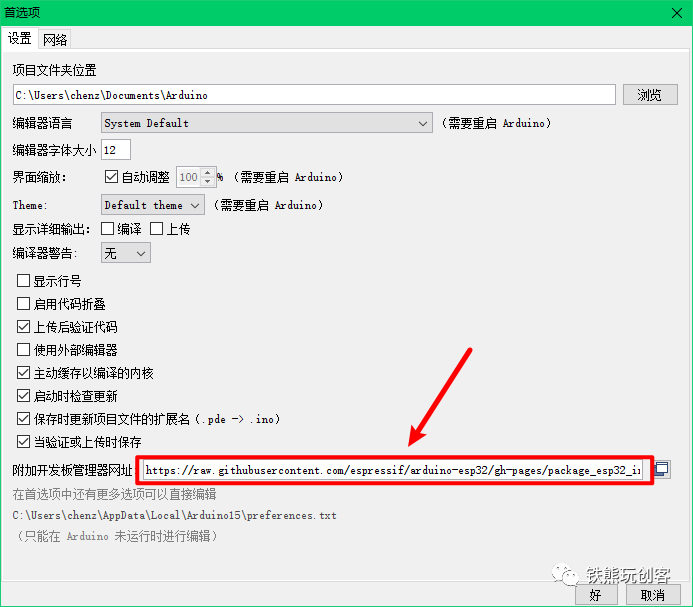
In the Arduino settings interface (Preferences), in the Additional Board Manager URLs field, enter:
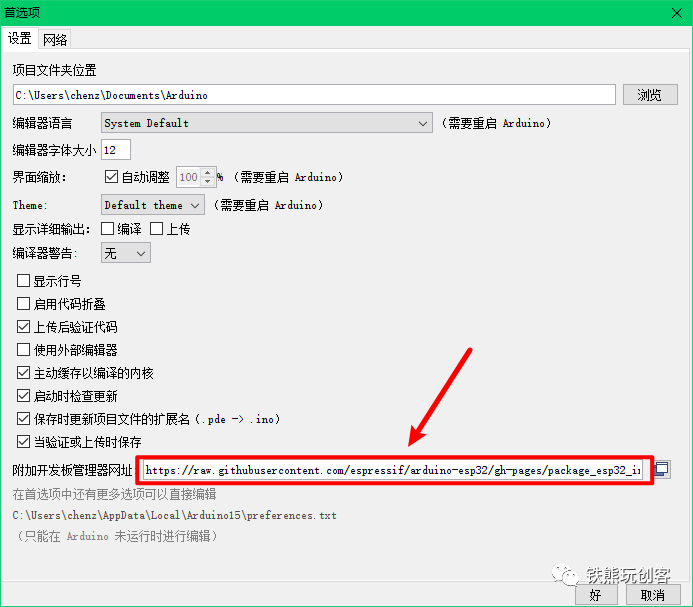
https://raw.githubusercontent.com/espressif/arduino-esp32/gh-pages/package_esp32_index.json
As shown in the figure below:
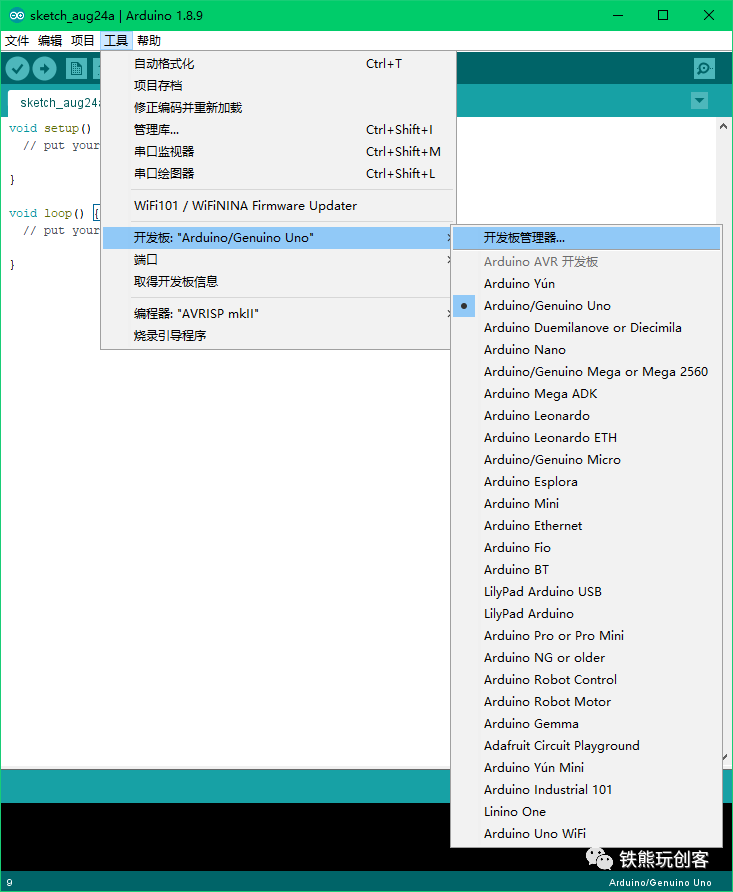
Then in the menu bar, click: Tools → Board → Board Manager to open the Board Manager interface.
In the Board Manager, search for esp32, and you will see esp32 by Espressif Systems. Click install in the lower right corner and wait for the installation to complete. This process may be slow depending on the network, so please be patient. If the installation fails, you can try reinstalling.
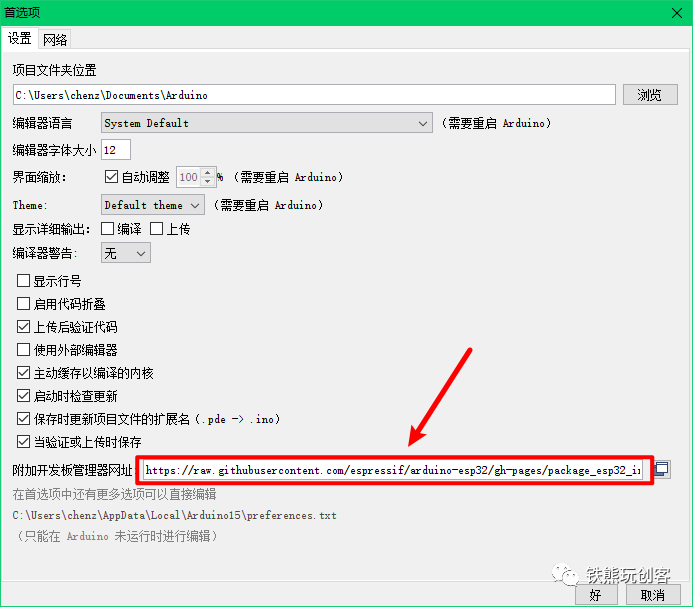
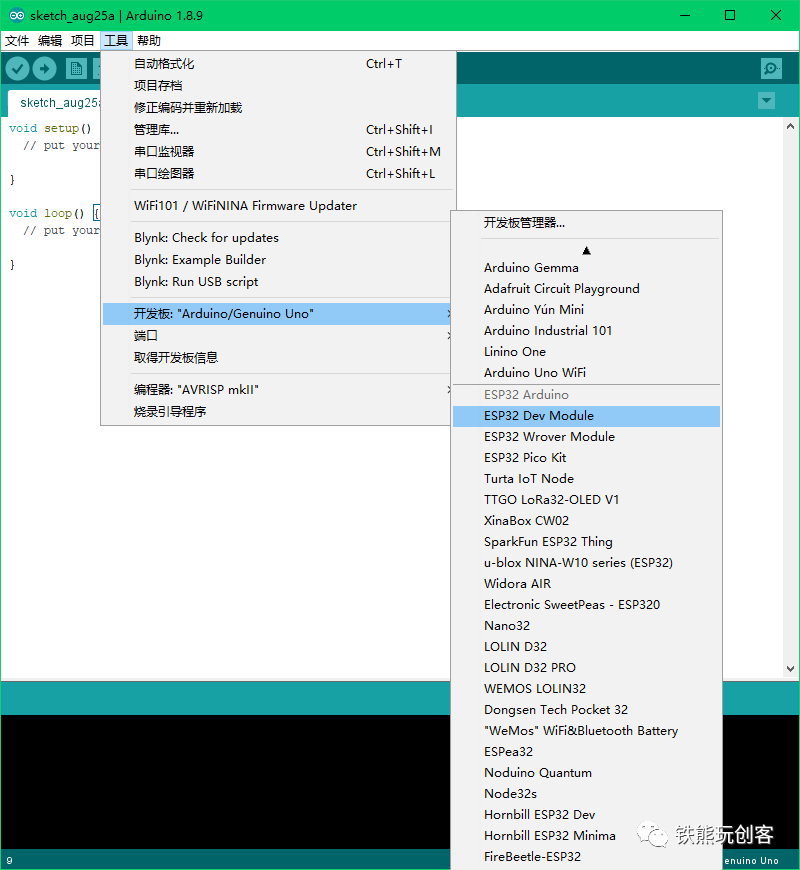
After successful installation, go to Tools → Board and you will see many options for ESP32 development boards, as shown in the figure below:
# Testing the Waters
All preparations have been completed. Let’s try writing and uploading the first program for the Control Board (ESP32) in Arduino mode.
Open the Arduino software, select ESP32 Dev Module in the development board, and enter the following program in the code editing area:
void setup() { Serial.begin(115200);} void loop() { Serial.println("Hello ESP32. Hello Arduino!"); delay(1000);}1. The development boards listed in the ESP32 Arduino list are all based on the ESP32 chip. Besides differences in pin definitions, other differences are not significant and can be ignored for beginner learning. You can choose any one; I recommend choosing ESP32 Dev Module.
2. If you are using the built-in Arduino software of Mixly, the options for development boards have been simplified, leaving only a few options. Readers can directly choose Arduino ESP32 or Arduino HandBit.
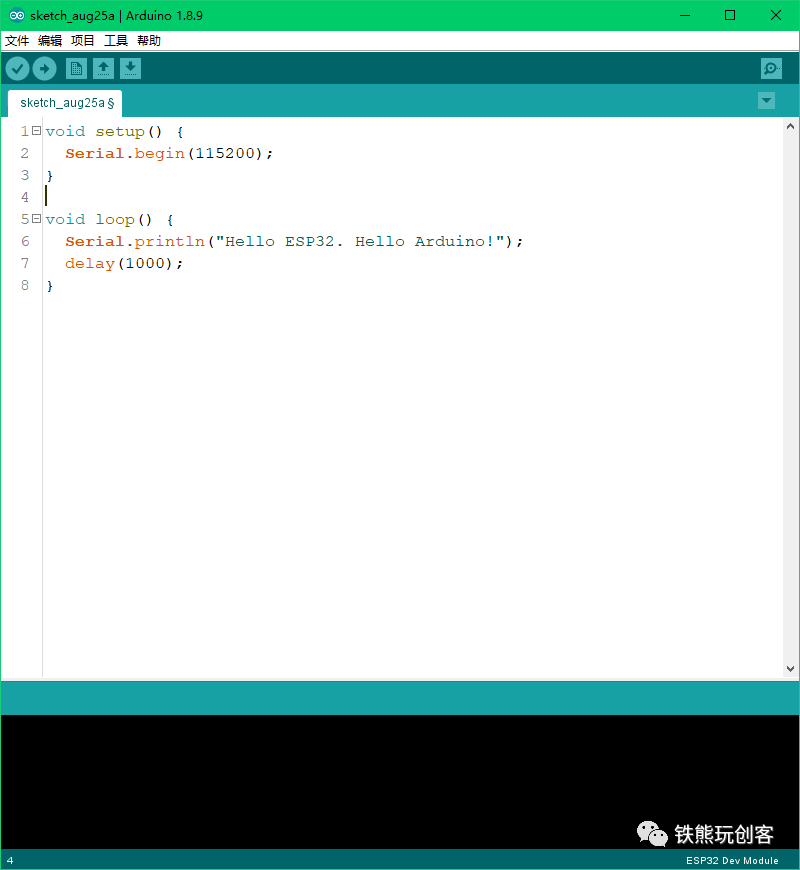
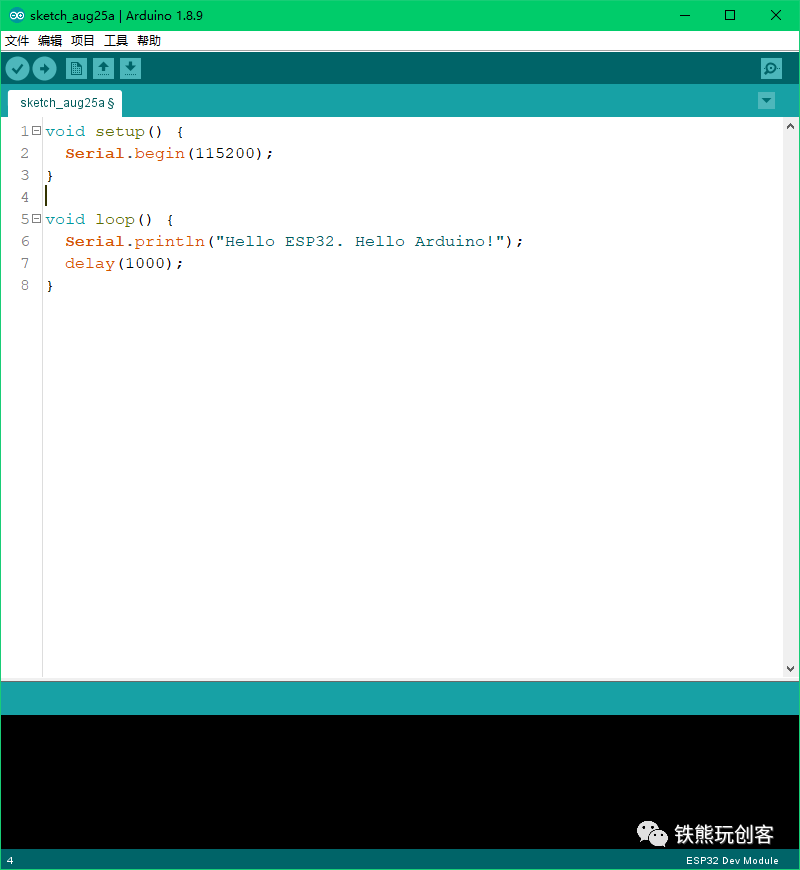
Then select the correct port number, click the upload button, and upload the program to the Control Board. Of course, you can also upload it to other development boards like FireBeetle-ESP32 or NodeMCU-32S to see if the effect is the same. When the Arduino software displays Leaving... Hard resetting via RTS pin…, it indicates that the upload was successful.
Then click the serial monitor in the upper right corner and set the corresponding baud rate to 115200 to see the output effect. This program mainly implements printing a line Hello ESP32. Hello Arduino! to the serial port every second. You can also modify the printed content in the program and upload it again to see the effect.
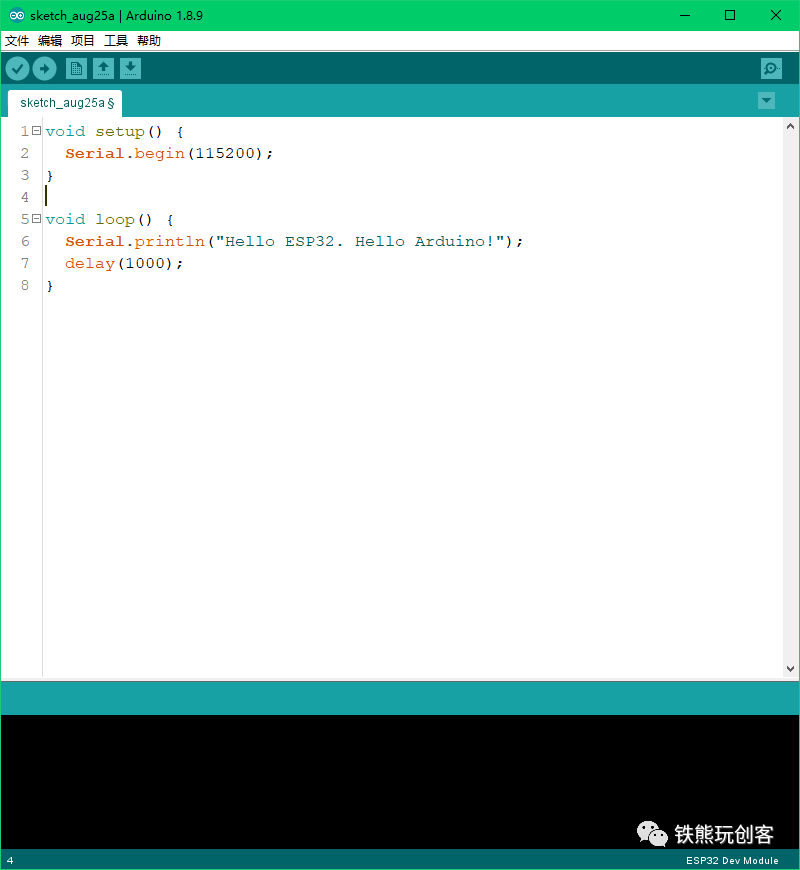
If the program output is correct, congratulations! You have officially started your journey of learning to use Arduino with the Control Board!
# Summary
In this chapter, we mainly learned the following content:
-
Basic knowledge of ESP32;
-
Familiarity with some common learning development boards based on ESP32;
-
Learning how to configure the ESP32 Control Board development environment in Arduino;
-
Writing the first Control Board program in Arduino mode.

I know you are watching!
