Hello everyone, I am Xiaokang.
In the previous article “Advanced CMake” , we introduced CMake’s generator expressions and code generation with custom commands, solving many tedious problems in development.
Today, we will continue to dive deeper and understand two heavyweight topics: package management installation configuration and best practices along with common issues.
Have you encountered these situations:
- You wrote an amazing library but don’t know how to let others use it elegantly;
- After sharing the project, others always complain about “missing dependencies”;
- You clearly configured CMakeLists.txt but still fall into some strange “pits”.
Don’t worry, this article will guide you step by step to solve these issues and remove the stumbling blocks on your development path!
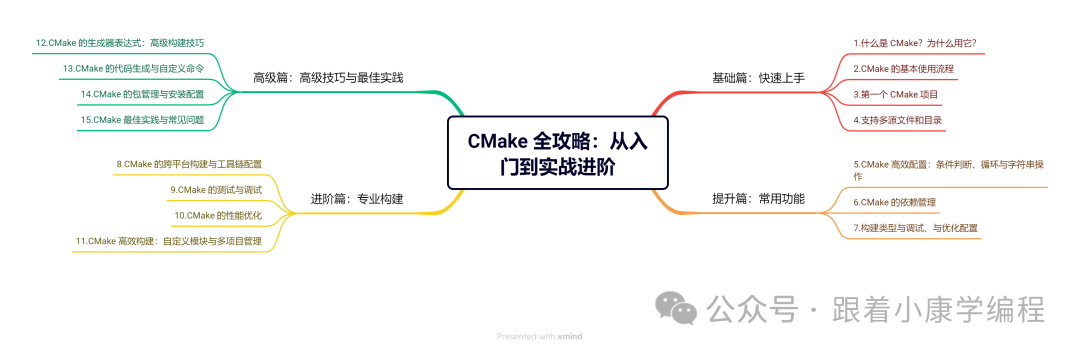
A mind map to help you quickly understand the whole picture of CMake:
Friendly Reminder: Creating original content is not easy. If you find this content helpful, don’t forget to like, share, or click “see” to support! Thank you very much! 🌟
14. CMake Package Management and Installation Configuration: Elegantly Distributing Your Library
Once you have written a library, the next step is to make it easy for others to use. This involves not only copying header files and library files but also how to automatically resolve dependencies and simplify the user’s usage process.
CMake provides powerful package management and installation configuration features. By effectively utilizing these mechanisms, you can implement a professional distribution scheme that allows others to find your library with <span>find_package()</span> in one click. So, let’s go through a practical example and explain how to complete a full installation configuration step by step.
Scenario Restoration: You Developed a Math Library
Assuming you have written a simple math library <span>MathLib</span> that can perform addition and subtraction. The code structure is as follows:
MathLib/
├── CMakeLists.txt         # Top-level CMake configuration file
├── include/
│   └── MathLib.h          # Header file
├── src/
│   └── MathLib.cpp        # Source file
└── main.cpp               # Example program (for testing)
The goal is simple:
- Package the library and header files into one place;
- Allow others to find and use your library with
<span>find_package(MathLib)</span>in one click; - Ensure that this library is smooth and free of pitfalls after installation.
1. Project Initialization: Write CMakeLists.txt
First, tell CMake that this is a library project and set the header file path:
cmake_minimum_required(VERSION 3.14)
project(MathLib VERSION 1.0.0)

# Define static library target
add_library(MathLib STATIC src/MathLib.cpp)

# Set header file path
target_include_directories(MathLib PUBLIC
    $   # Used during build
    $                    # Used after installation
)
Interpretation:
<span>add_library(MathLib STATIC src/MathLib.cpp)</span>: Tells CMake that we want to generate a static library named<span>MathLib</span>;<span>target_include_directories</span>: Sets the header file path.<span>BUILD_INTERFACE</span>indicates that the<span>include/</span>folder is used during the build phase;<span>INSTALL_INTERFACE</span>indicates that after installation, the library and header files will be copied to the user-specified installation path, such as /usr/local/include or a custom /path/to/install/include.
In simple terms, this way users can find the header files whether they are using them during development or after installation.
2. Installing Library and Header Files
Now the library can compile normally in the project, but to make it easier for others to use, we need to create an “installation package”. The goal of installation is to organize the library and header files and place them in a location that is easy for users to find.
In <span>CMakeLists.txt</span>, we need to add installation rules:
# Install library files
install(TARGETS MathLib
    EXPORT MathLibTargets          # Export target configuration
    ARCHIVE DESTINATION lib        # Install static library to lib directory
    LIBRARY DESTINATION lib        # Install dynamic library (if any) to lib directory
    RUNTIME DESTINATION bin        # Install executable (if any) to bin directory
    INCLUDES DESTINATION include   # Install header file path
)

# Install header files
install(DIRECTORY include/ DESTINATION include)
What does this code do?
1.<span>install(TARGETS MathLib ...)</span>
Here we define the installation rules for the library files, for example:
- The static library (
<span>libMathLib.a</span>) will be installed to the<span>lib/</span>directory; - If it is a dynamic library (
<span>libMathLib.so</span>), it will also be placed in the<span>lib/</span>; - Executable files (if any) will be placed in the
<span>bin/</span>; - The header file paths will also be exported for user convenience.
2.<span>install(DIRECTORY include/ DESTINATION include)</span>This line is straightforward: it copies the header files from the <span>include/</span> directory to the <span>include/</span> under the installation path.
Where is the installation path?
CMake will default to installing these files under a “root path” which is specified by the <span>--prefix</span> option when running the install command. For example, if you execute the following command:
cmake --install build --prefix /path/to/install
The final installation result will look like this:
/path/to/install/
├── lib/               # Library files
│   └── libMathLib.a
├── include/           # Header files
│   └── MathLib.h
Note:
<span>lib/</span>and<span>include/</span>are the relative paths defined by<span>install()</span>;<span>--prefix</span>specifies the installation root directory, and the final path is a combination of both.
After this step, the library and header files will be ready for distribution.
3. Generating Configuration Files
To allow users to find the library with <span>find_package(MathLib)</span>, we need to generate two configuration files:
- MathLibTargets.cmake: Automatically generated by CMake to record detailed information about the library; for example:
- Where the library file is located (
<span>libMathLib.a</span>or<span>libMathLib.so</span>); - Where the header file path is (
<span>include/MathLib.h</span>).
2. MathLibConfig.cmake: This file needs to be manually written, and its purpose is to include <span>MathLibTargets.cmake</span>. When the user calls <span>find_package(MathLib)</span>, CMake will first load <span>MathLibConfig.cmake</span>, and then find the detailed information about the library through it.
Add the following content in <span>CMakeLists.txt</span>:
# Export MathLibTargets.cmake
install(EXPORT MathLibTargets
    FILE MathLibTargets.cmake           # Name of the exported file
    NAMESPACE MathLib::                 # Namespace, users will access your library using MathLib::MathLib
    DESTINATION lib/cmake/MathLib       # Path where it will be installed
)

# Install MathLibConfig.cmake
install(FILES cmake/MathLibConfig.cmake DESTINATION lib/cmake/MathLib)
What does this code do?
<span>install(EXPORT MathLibTargets ...)</span>:
- Tells CMake to automatically generate a
<span>MathLibTargets.cmake</span>file; - The file will record the paths of the library, header files, and other information;
- Sets the namespace
<span>MathLib::</span>so users can use<span>MathLib::MathLib</span>to access your library.
<span>install(FILES ...)</span>:
- Installs the manually written
<span>MathLibConfig.cmake</span>file to the same directory as<span>MathLibTargets.cmake</span>; <span>MathLibConfig.cmake</span>serves to include<span>MathLibTargets.cmake</span>.
Then, create a new file named <span>MathLibConfig.cmake</span> in the <span>cmake/</span> directory with the following content:
# Load MathLibTargets.cmake
include("${CMAKE_CURRENT_LIST_DIR}/MathLibTargets.cmake")
Explain the code:
<span>${CMAKE_CURRENT_LIST_DIR}</span>: Indicates the directory where the current file (<span>MathLibConfig.cmake</span>) is located;<span>include(...)</span>: Loads<span>MathLibTargets.cmake</span>in the same directory, passing the detailed information about the library to CMake.
In simple terms, this file tells CMake where <span>MathLibTargets.cmake</span> is located.
Then, create a new file named <span>MathLibConfig.cmake</span> in the <span>cmake/</span> directory with the following content:
# Load MathLibTargets.cmake
include("${CMAKE_CURRENT_LIST_DIR}/MathLibTargets.cmake")
This file serves to load <span>MathLibTargets.cmake</span>, allowing users to find the target using <span>find_package(MathLib)</span>.
4. Handling Dependency Libraries
Sometimes, your library may depend on other libraries, such as Boost or OpenCV. To allow users to use your library without additional configuration for these dependencies, you can handle it in two steps:
1. Declare Dependencies in the Configuration File
Add the following content in <span>MathLibConfig.cmake</span>:
include(CMakeFindDependencyMacro)
find_dependency(Boost REQUIRED)  # Declare dependency on Boost
include("${CMAKE_CURRENT_LIST_DIR}/MathLibTargets.cmake")
Explain:
<span>include(CMakeFindDependencyMacro)</span>: Imports a macro specifically for declaring dependencies.<span>find_dependency(Boost REQUIRED)</span>: Tells CMake that<span>MathLib</span>depends on Boost.
When users call <span>find_package(MathLib)</span>, CMake will automatically attempt to load Boost.
2. Bind Dependencies on the Target
In the <span>CMakeLists.txt</span>, tell CMake that <span>MathLib</span> uses Boost:
target_link_libraries(MathLib PUBLIC Boost::Boost)
<span>PUBLIC</span>: Indicates that Boost is a public dependency of<span>MathLib</span>, and any target linking to<span>MathLib</span>(like the user’s program) will automatically inherit this dependency.
3. Final Effect
When users use your library in their own projects, they only need to write the following code:
find_package(MathLib REQUIRED)
target_link_libraries(MyApp PUBLIC MathLib::MathLib)
- CMake will automatically load
<span>MathLib</span>and its dependency Boost; - Users do not need to configure Boost separately, making the usage process very smooth!
5. How Users Can Use Your Library
5.1 Developer Installs the Library and Distributes It to Users
First, the developer (you) needs to run the installation command to organize the library and distribute it to users. Assuming you want to install it to <span>/path/to/install</span>:
cmake -S . -B build
cmake --install build --prefix /path/to/install
After executing this command, the installation result might look like this:
/path/to/install/
├── include/           # Header files
│   └── MathLib.h
├── lib/               # Library files
│   └── libMathLib.a
└── lib/cmake/MathLib/ # Configuration files
    ├── MathLibConfig.cmake
    └── MathLibTargets.cmake
This directory contains your library, header files, and configuration files. Users only need to get this directory to conveniently use it in their own projects.
5.2 How Do Users Get the Library?
This step is very important. Users can obtain your library in the following ways:
- The developer directly distributes the installation directory: You compress
<span>/path/to/install/MathLib</span>into a package (like<span>MathLib-1.0.0.zip</span>), and send it to users. After users unzip it, they can directly use this library. - The developer provides an installation package (generated by CPack): If you created a
<span>.zip</span>,<span>.deb</span>, or<span>.rpm</span>installation package with CPack, users can directly unzip it or install it through package management tools on their systems.
Next, users just need to configure the project to let CMake know where to find this library.
5.3 User’s CMakeLists.txt Configuration
Assuming the user’s project directory structure is as follows:
MyApp/
├── CMakeLists.txt       # User's CMake configuration
├── main.cpp             # User's code
The user needs to tell CMake where to find your library in their own <span>CMakeLists.txt</span>. The configuration is as follows:
cmake_minimum_required(VERSION 3.14)
project(MyApp)

# Specify the path of MathLib
list(APPEND CMAKE_PREFIX_PATH "/path/to/install")

# Find MathLib
find_package(MathLib REQUIRED)

# Define user's executable file
add_executable(MyApp main.cpp)
target_link_libraries(MyApp PRIVATE MathLib::MathLib)
What does this code do?
<span>list(APPEND CMAKE_PREFIX_PATH ...)</span>: This line is crucial! It tells CMake to look for<span>MathLib</span>in the<span>/path/to/install</span>directory. Without this line, CMake won’t know where your library is and will throw an error.<span>find_package(MathLib REQUIRED)</span>: This line will load the<span>MathLibConfig.cmake</span>file, which in turn loads your library target (<span>MathLibTargets.cmake</span>), configuring the paths.<span>target_link_libraries</span>: Finally, the user links their program<span>MyApp</span>with<span>MathLib</span>.
5.4 User Compiles the Project
The user can directly run the following commands to compile their project:
cmake -S . -B build  # Configure the project and generate build files in the build/ directory
cmake --build build  # Compile the project using the build/ directory's build files
These steps will complete:
- CMake will find
<span>MathLib</span>from the<span>CMAKE_PREFIX_PATH</span>; - Load the
<span>MathLibConfig.cmake</span>and the library’s target information; - Link the user’s program
<span>main.cpp</span>with your library, generating the executable file.
Let’s summarize:
Through the above steps, you have completed a professional library distribution scheme:
1. Install the Library and Header Files: Package the library files and header files into one place;
2. Generate Configuration Files: Allow others to automatically find it using <span>find_package(MathLib)</span>;
3. Simple for Users to Use: Just set the <span>CMAKE_PREFIX_PATH</span> and link the library.
After reading, don’t you think that CMake package management and installation configuration are not that difficult? Give it a try!
15. CMake Best Practices and Common Issues
CMake is a powerful tool, but if used carelessly, it can lead to pitfalls, especially when project scale increases or dependencies become complex. To make your use of CMake more efficient and reliable, here are some best practices and solutions to common issues, simple and clear, easy to get started!
Best Practices: Making Your CMake Project More Elegant
1. Clearly Specify Minimum Version Requirements
Always write <span>cmake_minimum_required</span> at the beginning of your <span>CMakeLists.txt</span> to specify the minimum version number.
cmake_minimum_required(VERSION 3.14)
- Why is this important? Different versions of CMake may have different features, and specifying the version can avoid inexplicable errors in lower version environments.
2. Clear Project Structure
Manage code, header files, third-party libraries, and build files separately, you can refer to the following structure:
MyProject/
├── CMakeLists.txt       # Top-level configuration file
├── src/                 # Source code
├── include/             # Header files
├── third_party/         # Third-party libraries
├── tests/               # Test code
└── cmake/               # Custom CMake modules
Suggestion: Use <span>include/</span> to manage public header files, and only place private code in <span>src/</span>. This way, when others use your project, they won’t be polluted by private implementations.
3. Use <span>target_*</span> Series Commands
Try to use <span>target_*</span> series commands (like <span>target_include_directories</span>, <span>target_link_libraries</span>) instead of global variables (like <span>CMAKE_CXX_FLAGS</span>). This ensures that configurations are target-independent and reduces interference.
# Recommended: Set options for each target separately
target_compile_options(my_target PRIVATE -Wall -Wextra)

# Not recommended: Directly modify global compiler options
set(CMAKE_CXX_FLAGS "${CMAKE_CXX_FLAGS} -Wall -Wextra")
4. Modular Management of Multiple Subprojects
If your project has multiple modules or subprojects, you can use <span>add_subdirectory()</span> to integrate them.
MyProject/
├── CMakeLists.txt         # Top-level CMake configuration
├── src/
│   ├── ModuleA/
│   │   ├── CMakeLists.txt
│   │   └── ...code...
│   ├── ModuleB/
│   │   ├── CMakeLists.txt
│   │   └── ...code...
Top-level CMake file:
cmake_minimum_required(VERSION 3.14)
project(MyProject)

# Add subprojects
add_subdirectory(src/ModuleA)
add_subdirectory(src/ModuleB)
Subproject CMake file:
add_library(ModuleA module_a.cpp)
target_include_directories(ModuleA PUBLIC ${CMAKE_SOURCE_DIR}/include)
5. Explicitly Set Standards (C++11/14/17/20, etc.)
Clearly specify the C++ standard to avoid relying on the compiler’s default settings.
set(CMAKE_CXX_STANDARD 17)
set(CMAKE_CXX_STANDARD_REQUIRED ON)
set(CMAKE_CXX_EXTENSIONS OFF)
This is required for almost all modern C++ projects.
6. Use <span>find_package</span> to Manage Dependencies
For third-party libraries, prefer using <span>find_package()</span> to let CMake automatically find and link the libraries:
find_package(Boost REQUIRED)
target_link_libraries(my_target PRIVATE Boost::Boost)
If there is no existing <span>find_package</span> configuration, you can use <span>FetchContent</span> to dynamically pull in:
include(FetchContent)
FetchContent_Declare(
    googletest
    GIT_REPOSITORY https://github.com/google/googletest.git
    GIT_TAG release-1.12.1
)
FetchContent_MakeAvailable(googletest)
7. Use <span>CMAKE_INSTALL_PREFIX</span> to Define Installation Paths
Do not hard-code paths
Writing hard-coded paths like below can lead to permission issues and inflexibility:
install(TARGETS MyLib DESTINATION /usr/local/lib)
install(DIRECTORY include/ DESTINATION /usr/local/include)
Recommended Writing:
Use relative paths, allowing users to customize the installation location via <span>CMAKE_INSTALL_PREFIX</span><span>:</span>
install(TARGETS MyLib DESTINATION lib)
install(DIRECTORY include/ DESTINATION include)
Users specify paths:
cmake -S . -B build -DCMAKE_INSTALL_PREFIX=/path/to/install
cmake --build build
cmake --install build
- Files will be installed to
<span>/path/to/install/lib</span>and<span>/path/to/install/include</span>. - More flexible, no need for admin permissions, and works well across platforms!
8. Define Installation Rules
Clearly define the installation paths for your libraries, header files, and configuration files to facilitate distribution and integration:
install(TARGETS my_library
    EXPORT MyLibraryTargets
    LIBRARY DESTINATION lib
    ARCHIVE DESTINATION lib
    INCLUDES DESTINATION include
)
9. Clearly Specify Build Types
- By default, CMake builds may not set a specific build type (Debug, Release, etc.).
- It is recommended to set a default build type in
<span>CMakeLists.txt</span>to avoid accidentally using an unoptimized build.
Example:
# Default build type is Release
if (NOT CMAKE_BUILD_TYPE)
    set(CMAKE_BUILD_TYPE "Release" CACHE STRING "Choose the build type" FORCE)
endif ()
- Users can set it via command line:
cmake -DCMAKE_BUILD_TYPE=Debug ..
10. Enable Unit Testing
Use CMake’s testing features (like <span>CTest</span>) to integrate testing frameworks like Google Test:
enable_testing()

# Add test executable
add_executable(my_test test.cpp)
target_link_libraries(my_test PRIVATE gtest gtest_main)

# Register test
add_test(NAME MyTest COMMAND my_test)
You can quickly run all tests using the <span>ctest</span> command:
ctest --output-on-failure
11. Use a Build Directory to Separate Build Files
Generating a separate <span>build</span> directory is one of CMake’s best practices. The core benefits are to keep the source directory clean and manage builds flexibly.
Why use a build directory?
- Clean source: All build files (like
<span>Makefile</span>, intermediate files) are in the<span>build</span>directory, keeping the source unpolluted. - Supports multiple build types: You can create
<span>build-debug</span>,<span>build-release</span>, etc., to manage debug and release versions separately. - Easy to clean: Deleting the
<span>build</span>directory allows for easy rebuilding without affecting the source.
How to use it?
mkdir build && cd build
cmake -S .. -B .
make
<span>-S ..</span>: Specifies the source directory.<span>-B .</span>: Specifies the build directory (current directory).
In summary, building projects with a <span>build</span> directory is clean, worry-free, and easy to manage. Always start with creating a <span>build</span> directory when using CMake!
12. Define Interface Libraries
If there are some header files without implementations (like interfaces or pure abstract classes), you can manage them using an <span>INTERFACE</span> library:
add_library(MyInterface INTERFACE)
target_include_directories(MyInterface INTERFACE ${CMAKE_SOURCE_DIR}/include)
Interface libraries (INTERFACE) are used to configure some common linking and compilation options, which may be used less in small projects but are common in large projects.
13. Provide Options to Users
Use <span>option()</span> to provide configurable feature switches, allowing users to use your project more flexibly.
Example:
option(ENABLE_TESTS "Enable building tests" ON)
if (ENABLE_TESTS)
  add_subdirectory(tests)
endif()
This way, users can control whether to build tests via the command line:
cmake -DENABLE_TESTS=OFF ..
14. Use <span>GNUInstallDirs</span> for Cross-Platform Installation
To adapt installation paths for different platforms, use the <span>GNUInstallDirs</span> module:
include(GNUInstallDirs)

install(TARGETS mylib
    ARCHIVE DESTINATION ${CMAKE_INSTALL_LIBDIR}
    LIBRARY DESTINATION ${CMAKE_INSTALL_LIBDIR}
    RUNTIME DESTINATION ${CMAKE_INSTALL_BINDIR}
    INCLUDES DESTINATION ${CMAKE_INSTALL_INCLUDEDIR})
This ensures your library installs correctly on Linux, Windows, and macOS.
15. Support Multi-Platform Toolchains
If your project needs to support multiple platforms (like Windows, Linux, and macOS) or requires cross-compilation (like building for embedded devices), correctly setting toolchain files is key.
- In cross-platform projects, ensure the toolchain file is correctly set. For example:
cmake -DCMAKE_TOOLCHAIN_FILE=path/to/toolchain.cmake ..
- Example toolchain file:
set(CMAKE_SYSTEM_NAME Linux)
set(CMAKE_C_COMPILER /usr/bin/arm-linux-gnueabihf-gcc)
set(CMAKE_CXX_COMPILER /usr/bin/arm-linux-gnueabihf-g++)
This makes it easy to support cross-compilation and multi-platform builds.
16. Optimize Build Time
Enable Parallel Builds
Use <span>make</span> or CMake commands to enable parallel builds:
cmake --build . -j$(nproc)
Build by Target
Only compile specified targets to avoid recompiling the entire project:
cmake --build . --target my_target
Common Problems and Solutions
1. Dependency Libraries Not Found
Problem: CMake reports <span>Could not find ...</span>.
Solution:
Ensure the paths of dependency libraries are correct. You can specify search paths using <span>CMAKE_PREFIX_PATH</span><span>:</span><pre><code class="language-plaintext">cmake -DCMAKE_PREFIX_PATH=/path/to/dependency -S . -B buildIf the dependency library is not installed, consider using
<span>FetchContent</span> to dynamically obtain it.
2. Confusion with Header File Paths
Problem: Header files cannot be found, or multiple modules have the same header file name.
Solution:
1. Use <span>target_include_directories</span> to explicitly specify header file paths:
By using <span>target_include_directories</span> to specify the header file paths for targets (like <span>my_target</span>), the compiler will know where to find the header files.
target_include_directories(my_target PRIVATE src/)
<span>PRIVATE</span>: Indicates that this header file path is only for the<span>my_target</span>itself and will not propagate to other targets.Applicable Scenario: If the header file is only used for implementation details and does not need to be exposed, use<span>PRIVATE</span>.
2. Best Practices for Shared Header Files:
If multiple modules (libraries) of the project need to share header files, you can place those header files in a common <span>include/</span> directory and mark the path with <span>PUBLIC</span>:
target_include_directories(my_target PUBLIC include/)
<span>PUBLIC</span>: Indicates that this path is used not only by<span>my_target</span>but will also propagate to other targets linked to<span>my_target</span>.
3. Cross-compilation Errors
Problem: CMake is using the host compiler instead of the cross compiler.
Solution:
- Specify the cross compiler using the toolchain file:
cmake -DCMAKE_TOOLCHAIN_FILE=path/to/toolchain.cmake -S . -B build
2. Specify the target system and compiler in the toolchain file:
set(CMAKE_SYSTEM_NAME Linux)
set(CMAKE_C_COMPILER arm-linux-gnueabihf-gcc)
4. Problem: Files Not Updated During Build
Problem: Files modified but not recompiled during the build.
Solution:
- Check if file dependencies are correct and ensure that
<span>add_custom_command</span>has all relevant files configured in<span>DEPENDS</span>. - If you manually modified generated files, clean the build directory and regenerate:
cmake --build . --clean-first
5. Linking Stage Cannot Find Symbols
Problem: Reports <span>undefined reference</span>. This usually occurs during the linking stage, indicating that the definitions of some symbols (function or variable implementations) cannot be found.
Solution:
- Ensure that the linked libraries include the implementation files.
- Check if
<span>add_library</span>correctly added the implementation files:
add_library(my_library src/my_library.cpp)
- Ensure that
<span>target_link_libraries</span>specifies this library:
target_link_libraries(my_target PRIVATE my_library)
2. Ensure the linking order is correct
In CMake, the order of linking libraries is important, especially for static libraries. If one library depends on another, the dependency must be placed after:
target_link_libraries(my_target PRIVATE my_library dependency_library)
6. Problem: Build Time Too Long
Problem: Long build time for large projects.
Solution:
- Enable parallel builds:
cmake --build . -j$(nproc) # Let CMake use all available CPU cores for parallel compilation.
2. Use <span>ccache</span> to cache compilation results:
set(CMAKE_CXX_COMPILER_LAUNCHER ccache)
7. Runtime Cannot Find Dynamic Libraries
Problem: The program cannot find the dynamic library at runtime, with errors like:
- Linux:
<span>error while loading shared libraries: libMyLib.so: cannot open shared object file</span> - Windows:
<span>DLL load failed</span> - macOS:
<span>dyld: Library not loaded: @rpath/libMyLib.dylib</span>
Reason: The dynamic library path is not correctly configured, and the operating system cannot find the dynamic library.
Solution:
1. Set Environment Variables:
- Linux/macOS: Use
<span>LD_LIBRARY_PATH</span>or<span>DYLD_LIBRARY_PATH</span>:
export LD_LIBRARY_PATH=/path/to/lib:$LD_LIBRARY_PATH
- Windows: Add the dynamic library path to the
<span>PATH</span>environment variable.
2. Use <span>RPATH</span>: Set runtime search paths in CMake:
set(CMAKE_INSTALL_RPATH "$ORIGIN")
Summary:
CMake is a powerful tool, but to use it well, you need some skills and experience.
- Package Management and Installation Configuration: The focus is on making your library easy to use and install. Write a good CMakeLists.txt, install the library, header files, and configuration files properly, then handle the dependency library issues, and finally provide users with a simple usage guide. This way, your library can be considered truly “elegant”.
- Best Practices: Remember a few key points, such as clearly specifying the minimum version, organizing the project structure reasonably, using
<span>target_*</span>to manage compile configurations, and clearly defining installation rules and build types. Don’t forget to support multiple platforms and optimize build times; these details can make your project look more professional. - Common Issues: Issues like dependencies not found, paths being mixed up, or cross-compilation errors ultimately come down to configuration not being in place. Check libraries, paths, variables, and system environments, and most issues can be resolved. Problems with linking symbols not found or long build times are often due to a lack of dependency management or optimization steps.
In a word, the essence of CMake is “specification” and “details”. As long as you follow the rules, you will encounter fewer pitfalls, and your efficiency will naturally improve!

END
Author: Xiaokang1998Source: Learning Programming with XiaokangCopyright belongs to the original author. If there is any infringement, please contact to delete..▍Recommended ReadingReview of My Commonly Used Embedded Development ToolsSomeone used DeepSeek to write a serial port assistant, then…Chuan Zhihui Jun opened a branch and is recruiting embedded developers with high salaries!→Click to follow, don’t get lost←