As a newcomer to embedded Linux, many questions arise during the learning process. How do I compile a driver program? How do I load it into the kernel? This article will introduce some basic operations for embedded Linux development, guiding you step by step to master the compilation of drivers, kernels, and applications.
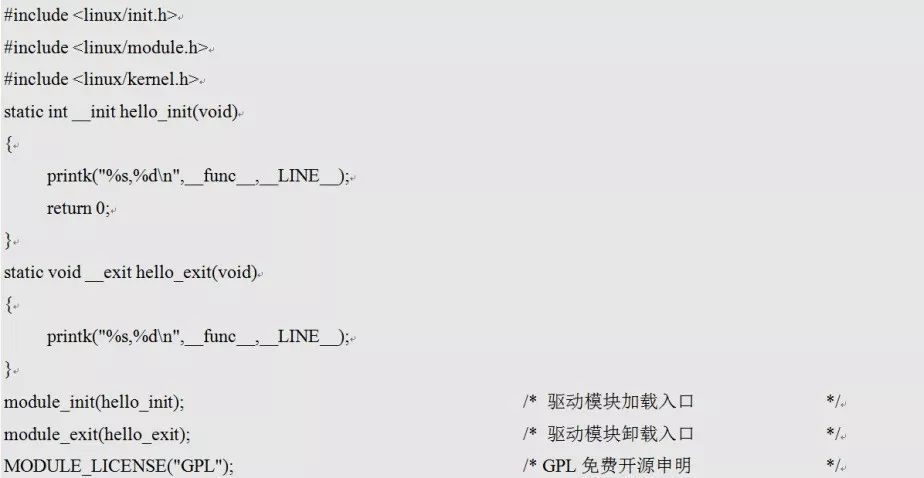
Little Wang is a beginner who just started with Linux. After reading some books on Linux drivers, he bought a Cortex-A9 ARM development board, ready to dive in. He wrote his first driver program named hellodrv.c, and the source code is as follows.

How does this driver program compile into a runnable program on the board? After some online research, Little Wang found out that he needed a cross-compilation toolchain. He found the cross-compilation tools from the CD documentation and correctly installed them as instructed.
1. Install Cross-Compilation Tools
1Write Makefile
The driver program written by Little Wang is hellodrv.c. To compile this driver as a module, he created a Makefile in the same directory. The Makefile is as follows.

2Driver Compilation
After some research, Little Wang found that there are mainly two ways to compile the driver. One is to modify the Makefile in the top-level directory of the kernel source code, and the other is to specify the architecture and cross-compilation tool in the compilation command.
1. Modify Makefile
For example, if the Linux kernel source directory is /home/vmuser/kernel-imx, open the Makefile in that directory and find the ARCH and CROSS_COMPILE statements, modifying them as shown below.

If the cross-compilation toolchain environment variable is not set, set CROSS_COMPILE to the absolute path of the cross-compilation toolchain as shown below.

After modifying, directly execute the make command to generate the hellodrv.ko file.
2. Specify in Compilation Command
Execute the following command to compile.

This method can also generate hellodrv.ko, but the driver needs to depend on the kernel to run, so Little Wang began the configuration and compilation of the Linux kernel.
2. Linux Kernel Configuration and Compilation
When compiling the kernel, the method of specifying the architecture and cross-compilation tool is the same as for compiling modules. After the above operations, Little Wang has become quite familiar. He also learned to set environment variables first before compiling.

Before the first configuration compilation, previous generated files need to be cleared. This can be done with the following command.

Next, configure the kernel. The kernel configuration can use one of the following commands.

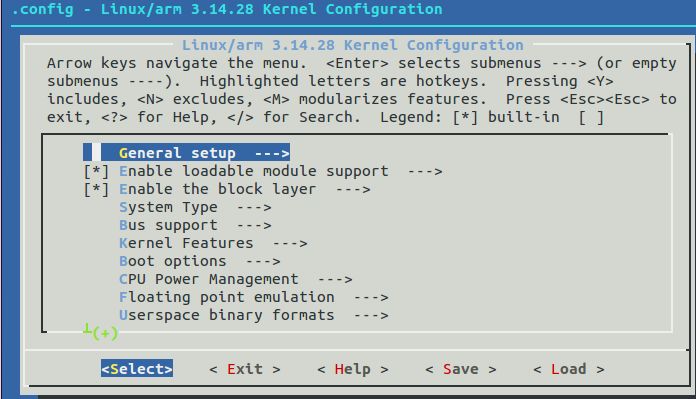
Among these four methods, it is recommended to use make menuconfig, which does not depend on QT or GTK+ and is very intuitive. After using the make menuconfig command, you will enter the interface shown in Figure 1, where you can trim the options you need to compile into the kernel according to your needs. For boolean options, press Y or N to decide whether to compile into the kernel. [*] indicates selected, and [] indicates unselected. For tristate options, you can choose Y, M, or N based on your needs, <* > indicates static compilation,

Figure 1 Kernel Configuration Interface
After configuration, select save and then exit. After configuration, a .config file will be generated, which saves the configuration information for the Makefile to use when compiling the kernel.
In the configuration interface, we configure the necessary functions and support for the corresponding device drivers as needed, and then compile the kernel and device tree. The commands for compiling the kernel and device tree are as follows.

To speed up compilation, you can add the “-j” option after the compilation command. For example, if the PC’s CPU has 4 cores, the compilation command would be as follows.

If you want to compile certain drivers as modules, use the following command.

For the corresponding development board, manufacturers generally have default configurations, which are located in the kernel source arch/arm/configs directory. For example, use the following default configuration.

If there is an existing .config file, you can load the existing .config configuration file using the following command.

After the kernel and device tree compilation is complete, zImage and the corresponding dtb files will be generated. Burn the image to the target board according to the manufacturer’s provided method.
3. Application Compilation and File Transfer
1Application Compilation
For example, the application file to be compiled is test.c, and it needs to be compiled to run on the ARM development board. The compilation command is as follows.

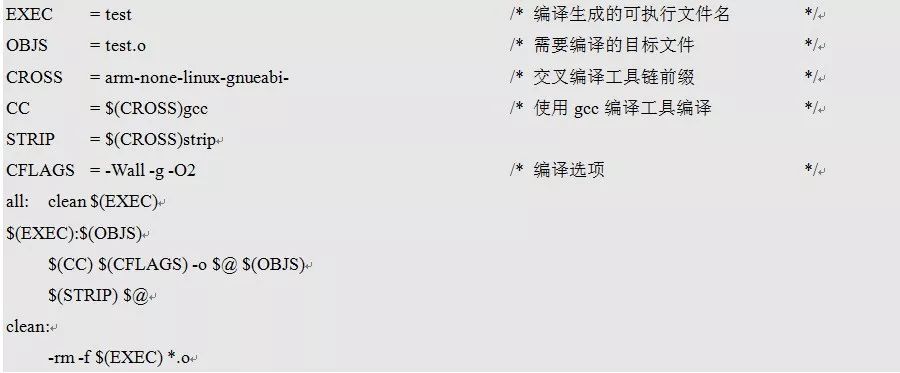
This is a very simple program and has only one file, so it can be compiled directly by entering the command. If the project is larger, this method is not advisable. Usually, a Makefile needs to be written for project management. A sample Makefile for the application is as follows.

After writing the Makefile, execute the make command to generate the target file test.
2File Transfer
The executable file generated by the compilation can be downloaded to the development board via TFTP, NFS, etc. For setting up TFTP and NFS servers on the PC, you can refer to related articles online, which will not be elaborated here.
1. NFS File Transfer
Connect the target board to the local area network or directly connect it to the PC host with a crossover cable, set the target board’s IP to be in the same subnet as the host, and then perform the remote mount operation. Place the files to be transferred in the NFS server directory on the PC. Execute the following operations on the development board.

Before performing remote mounting, it is best to first check network communication using the ping command. Only when the ping is successful can normal mounting be performed; otherwise, check the network. If the remote mount fails even when ping is successful, check the other settings on the host and target machine.
2. TFTP File Transfer
Place the files to be transferred in the TFTP server directory on the PC. The TFTP download command format is as follows.

For example: download the hellodrv.ko file from the TFTP server with IP 192.168.1.168, execute the following command in the current directory of the development board.

Using any of the above methods will copy the compiled driver module hellodrv.ko and the test application to the target board.
4. Loading and Removing Driver Modules
Execute the following command to dynamically load the driver module into the kernel.

Use the following command to view the loaded modules.

If you need to remove the module, use the following command.

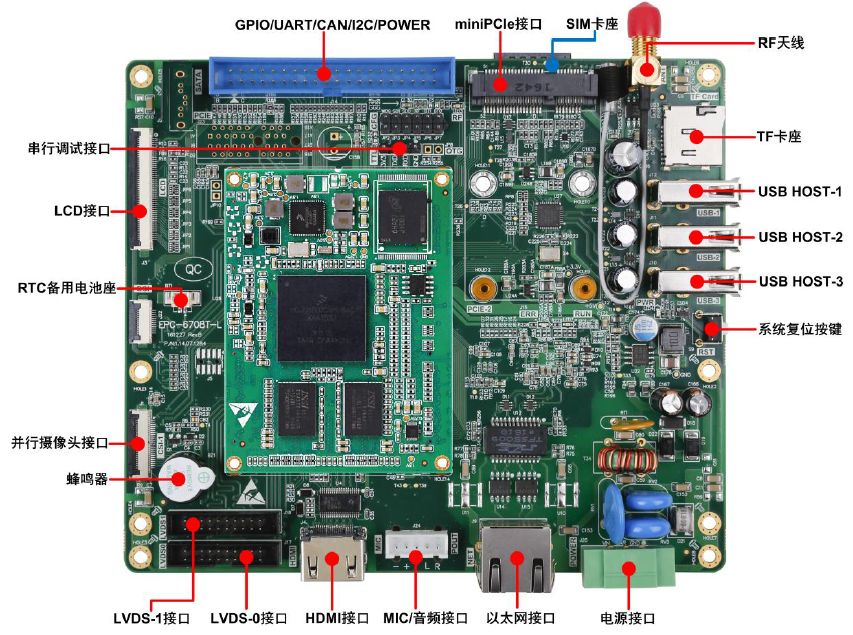
IoT9000A-LI is an ARM industrial control board developed by Guangzhou Zhiyuan Electronics Co., Ltd., based on the M6708-T series core board. The standard processor on the core board is i.MX 6U, Cortex™-A9 dual-core. The board integrates a large number of peripheral interfaces, including Gigabit Ethernet, audio, USB, HDMI, LVDS, LCD, miniPCIE, camera, CAN signal, UART signal, etc. The integrated multifunctional HD video engine can provide 1080P 60fps video decoding, 1080P 30fps video encoding, and includes a 2D, 3D graphics engine, meeting the rich graphics and high responsiveness requirements of next-generation applications such as consumer electronics, industrial, and automotive in-vehicle entertainment systems, as well as medical applications.

Figure 2 IoT9000A_LI Product Image
For related learning kits, click “Read Original” to learn more~
Zhiyuan Electronics Introduction
Guangzhou Zhiyuan Electronics Co., Ltd. was established in 2001 and is a nationally recognized high-tech certified enterprise, as well as the Guangdong Provincial Engineering Technology Research and Development Center for high-end industrial control measurement instruments.
Vision:To become a leading enterprise in the industrial Internet ecosystem
Using the “chip + AWorks software platform” to design high-value-added modules, boards, and high-end measuring instruments, connecting to the ZWS IoT cloud through wired and wireless interfaces for big data processing, forming an industrial Internet ecosystem.
Mission:To advance the process of China’s industrial Internet with leading technology
Values:Professionalism and Focus Achieve Dreams
