1. Preparation Materials
This article is the second part of “Remote Control of RGB Lights Based on MQTT”, focusing on the ESP32-S3 development board as the subsystem for RGB lights.
2. Development Environment Setup
This project uses vscode + Platformio as the development environment, so before starting development, you need to install vscode and the platformio plugin.
2.1 vscode
vscode is an IDE tool developed by Microsoft, supporting multiple programming languages through a plugin system. Due to its ease of use, it is very popular in front-end development. We also use vscode as our development environment for this project. The download link for vscode is as follows:
https://code.visualstudio.com/
2.2 platformio Plugin
2.2.1 Introduction to platformio
PlatformIO is a professional, open-source, cross-platform IoT development ecosystem. It is not standalone software but a core tool that is most commonly integrated into modern code editors as a plugin, such as Visual Studio Code and Atom.
PlatformIO has the following advantages:
- 1. Cross-platform support, operating systems: perfectly supports Windows, macOS, and Linux. You no longer have to worry about different development environments. It supports over 50 development platforms and more than 3500 development boards, from common Arduino UNO, ESP32, ESP8266, Raspberry Pi Pico, to professional STM32, Nordic nRF, etc., almost covering everything.
- 2. Powerful library management, built-in library manager: has a large official library registry where you can easily search, install, and manage libraries that your project depends on.
- 3. Unified build system, regardless of which development board you use, the compile command is unified as pio run.
- 4. Seamless debugging features, providing a powerful, integrated debugging experience. You can set breakpoints, step through code, and view variables and memory directly in VS Code without relying on other standalone debugging tools.
2.2.2 Installing the platformio Plugin
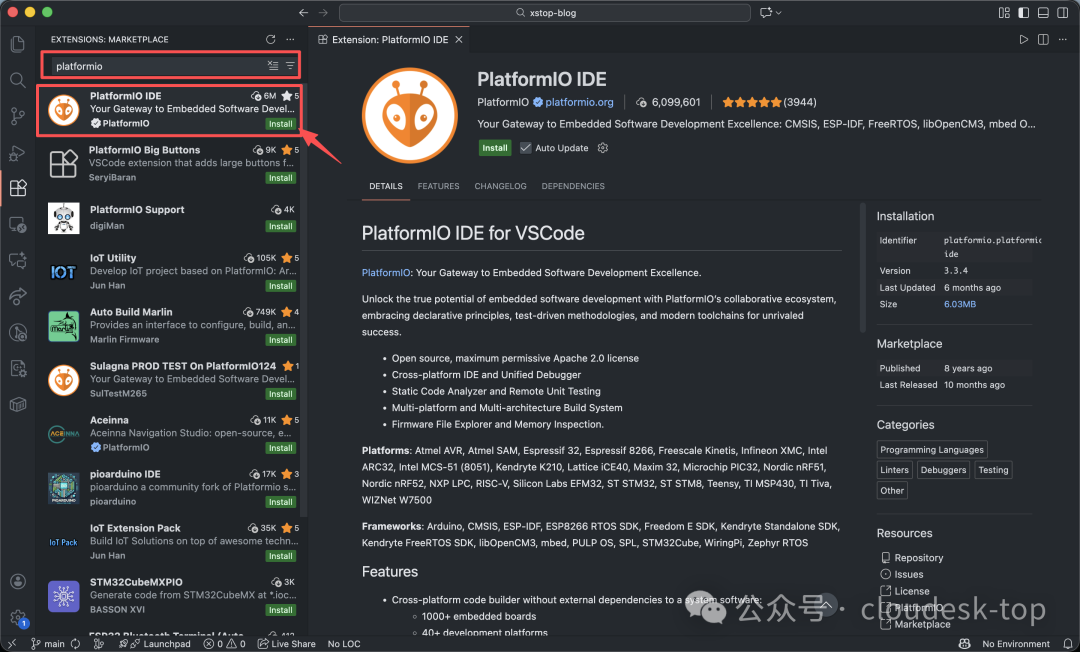
Open the plugin management interface in vscode, search for <span>platformio</span>, find the platformio plugin, and click <span>install</span> to install it:
3. Create a Project
After installing vscode and the platformio plugin, we can create a project through the platformio interface. The steps are as follows:
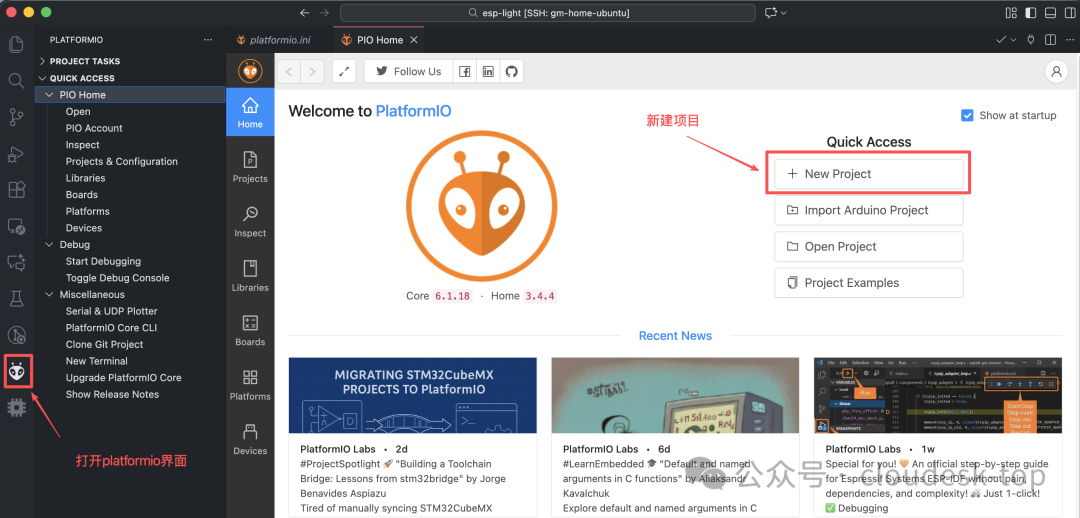
- 1. Open the platformio interface.
- 2. After opening PIO Home, click the “New Project” button in the upper right corner to create a project.
- 3. In the new project dialog, select a board that is similar to the one we are using: ESP32S3-R8N16 (4d_systems_esp32s3_gen4_r8n16)
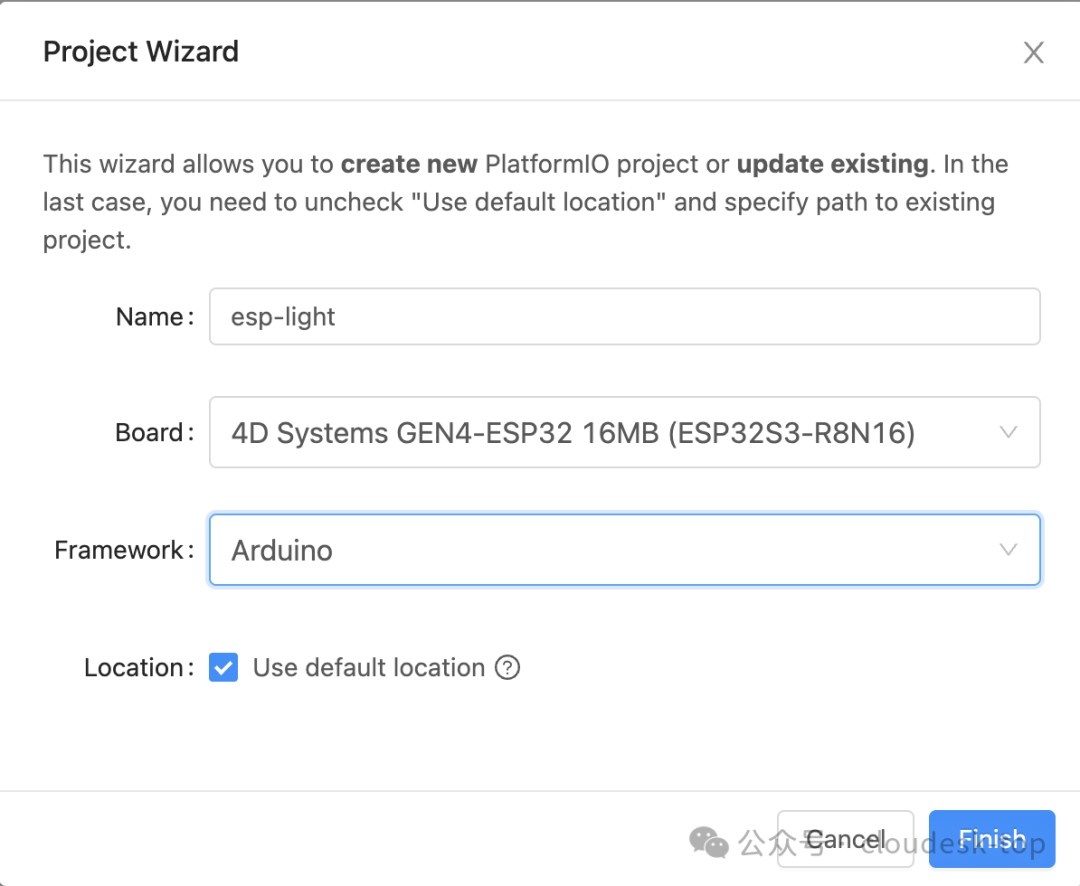
- 4. Click to confirm the creation of the project. The first time you use platformio, it will download the relevant Arduino framework and compilation toolchain, so please be patient while it downloads.
- 5. After the project is created, its structure is roughly as follows, where
<span>src</span>contains our source code, and<span>include</span>contains header files:
1
2
3
4
5
6
7
8
9
10
11
12
13
14
15
16
17
18


 <project-name>/
 ├── .pio/             # PlatformIO internal build and cache folder (usually ignored)
 ├── .vscode/          # VSCode workspace configuration files
 │   └── settings.json # (optional) stores project-specific VSCode configurations
 ├── .gitignore        # Git ignore file list
 ├── include/          # stores project-level header files (.h, .hpp) for use by all source files in the project
 │   └── my_header.h
 ├── lib/              # stores project private library files (Local Libraries)
 │   └── MyCustomLib/
 │       ├── src/
 │       │   └── MyCustomLib.cpp
 │       └── MyCustomLib.h
 ├── src/              # stores main source code (.c, .cpp, .ino, .h)
 │   └── main.cpp      # default or main entry file
 ├── test/             # stores unit test files (Unit Testing)
 │   └── test_main.cpp
 ├── platformio.ini    # !!! Core configuration file !!! Contains all project configurations including board, framework, library dependencies, etc.
 └── README.md
platformio.ini File Description
platformio.ini is the configuration file for platformio projects, where we can define the basic information of the project. <span>platformio.ini</span> uses the INI file format and mainly contains the following sections:
- •
<span>[platformio]</span>– PlatformIO core configuration - •
<span>[env]</span>– Global environment configuration (all environments inherit) - •
<span>[env:environment_name]</span>– Specific environment configuration
[platformio] Section Configuration Items
| Configuration Item | Description | Example Value |
|---|---|---|
<span>default_envs</span> |
Specifies the default environment to build | <span>uno</span>, <span>nodemcu-32s</span> |
<span>extra_configs</span> |
Includes other configuration files | <span>extra.ini</span>, <span>debug.ini</span> |
<span>description</span> |
Project description | <span>My IoT Project</span> |
<span>homepage</span> |
Project homepage | <span>https://github.com/...</span> |
Core Configuration Items for Environment
| Configuration Item | Description | Example Value |
|---|---|---|
<span>platform</span> |
Target platform | <span>espressif32</span>, <span>ststm32</span>, <span>atmelavr</span> |
<span>board</span> |
Development board model | <span>nodemcu-32s</span>, <span>uno</span>, <span>bluepill_f103c8</span> |
<span>framework</span> |
Development framework | <span>arduino</span>, <span>espidf</span>, <span>mbed</span>, <span>zephyr</span> |
<span>board_build.mcu</span> |
Specifies the MCU model | <span>esp32</span>, <span>stm32f103c8t6</span> |
<span>board_build.f_cpu</span> |
CPU frequency | <span>160000000L</span>, <span>72000000L</span> |
<span>board_build.variant</span> |
Development board variant | <span>nodemcu-32s</span>, <span>bluepill</span> |
Build Configuration Items
| Configuration Item | Description | Example Value |
|---|---|---|
<span>build_type</span> |
Build type | <span>release</span>, <span>debug</span> |
<span>build_flags</span> |
Compile flags | <span>-DDEBUG</span>, <span>-Og</span>, <span>-Wall</span> |
<span>build_unflags</span> |
Removed compile flags | <span>-Os</span>, <span>-std=gnu11</span> |
<span>src_dir</span> |
Source code directory | <span>src</span> |
<span>lib_dir</span> |
Library file directory | <span>lib</span>, <span>../libraries</span> |
<span>lib_deps</span> |
Project dependency libraries | <span>bblanchon/ArduinoJson</span>, <span>Wire</span> |
<span>lib_archive</span> |
Whether to create a library archive | <span>false</span>, <span>true</span> |
<span>lib_ld_mode</span> |
Linking mode | <span>chain+</span>, <span>deep</span>, <span>off</span> |
Upload Configuration Items
| Configuration Item | Description | Example Value |
|---|---|---|
<span>upload_protocol</span> |
Upload protocol | <span>serial</span>, <span>stlink</span>, <span>jlink</span>, <span>esptool</span> |
<span>upload_port</span> |
Upload port | <span>COM3</span>, <span>/dev/ttyUSB0</span> |
<span>upload_speed</span> |
Upload baud rate | <span>115200</span>, <span>9600</span> |
<span>upload_flags</span> |
Additional upload parameters | <span>--before=default_reset</span>, <span>--after=hard_reset</span> |
<span>upload_command</span> |
Custom upload command | <span>custom_upload.py</span> |
Debug Configuration Items
| Configuration Item | Description | Example Value |
|---|---|---|
<span>debug_tool</span> |
Debug tool | <span>jlink</span>, <span>stlink</span>, <span>cmsis-dap</span> |
<span>debug_init_break</span> |
Pause on startup | <span>tbreak setup</span>, <span>tbreak main</span> |
<span>debug_port</span> |
Debug port | <span>localhost:4242</span> |
<span>debug_speed</span> |
Debug speed | <span>5000</span> |
<span>debug_load_mode</span> |
Load mode | <span>always</span>, <span>modified</span> |
Serial Monitor Configuration Items
| Configuration Item | Description | Example Value |
|---|---|---|
<span>monitor_speed</span> |
Baud rate | <span>115200</span>, <span>9600</span> |
<span>monitor_port</span> |
Monitor port | <span>COM3</span>, <span>/dev/ttyUSB0</span> |
<span>monitor_dtr</span> |
DTR control | <span>1</span>, <span>0</span> |
<span>monitor_rts</span> |
RTS control | <span>1</span>, <span>0</span> |
<span>monitor_echo</span> |
Show echo | <span>yes</span>, <span>no</span> |
<span>monitor_raw</span> |
Raw mode | <span>yes</span>, <span>no</span> |
<span>monitor_encoding</span> |
Character encoding | <span>utf-8</span>, <span>hexlify</span> |
<span>monitor_filters</span> |
Output filters | <span>default</span>, <span>colorize</span>, <span>send_on_enter</span> |
Network Configuration Items
| Configuration Item | Description | Example Value |
|---|---|---|
<span>upload_port</span> |
Network upload port | <span>192.168.1.100:3232</span> |
<span>debug_port</span> |
Network debug port | <span>192.168.1.100:4242</span> |
<span>monitor_port</span> |
Network monitor port | <span>192.168.1.100:23</span> |
Hardware Configuration Items
| Configuration Item | Description | Example Value |
|---|---|---|
<span>board_build.ldscript</span> |
Link script | <span>eagle.flash.4m.ld</span>, <span>stm32f103c8t6.ld</span> |
<span>board_build.f_flash</span> |
Flash frequency | <span>40000000L</span>, <span>80000000L</span> |
<span>board_build.flash_mode</span> |
Flash mode | <span>dio</span>, <span>qio</span>, <span>dout</span> |
<span>board_upload.maximum_size</span> |
Maximum firmware size | <span>1048576</span>, <span>4194304</span> |
<span>board_upload.maximum_ram_size</span> |
Maximum RAM size | <span>32768</span>, <span>524288</span> |
Environment Variables and Conditional Configuration
1
2
3
4
5
6
7
8
9
10
11
12
13
14
15
16
17
18
19
20
21


; Multi-environment configuration example
[env]
platform = espressif32
framework = arduino

[env:debug]
board = nodemcu-32s
build_type = debug
build_flags = -DDEBUG -Og

[env:release]
board = nodemcu-32s
build_type = release
build_flags = -DRELEASE -Os

; Conditional configuration
[env:custom]
platform = ${sys.platform}
build_flags =
  -DVERSION=1.0.0
  -DBUILD_DATE="${datetime.date.today()}"
4. Install Third-party Dependencies
In this case, we need to implement an MQTT client while controlling the color of the WS2812B lights. Platformio provides a very powerful dependency management mechanism that allows developers to reuse third-party libraries developed by others.
4.1 platformio Plugin Library
Platformio provides a webpage for third-party plugin libraries, where we can search for third-party libraries: https://registry.platformio.org/
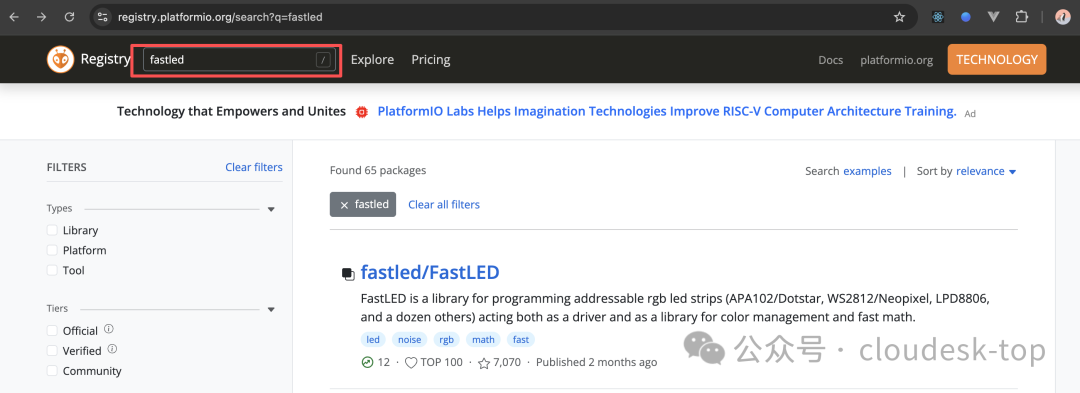
For example, in this project, we need to control the WS2812B RGB lights. We can search for <span>FastLED</span> on the plugin webpage, which supports a wide variety of light controls.
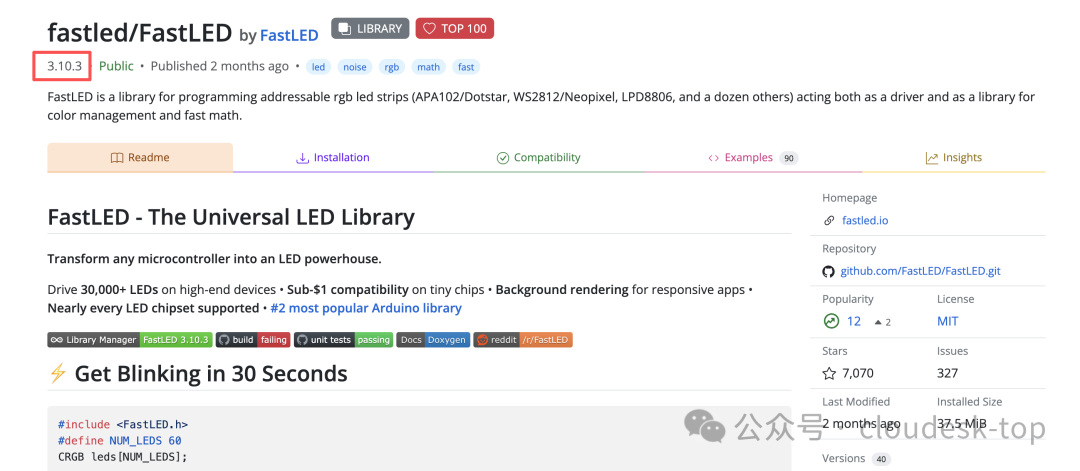
The latest version of FastLED is <span>3.10.3</span>, and we will use this version in our project.
4.2 Adding Dependencies
We only need to open the <span>platformio.ini</span> file in the root directory and add our dependencies under <span>lib_deps</span>.
1
2
3
4
5
6


...
framework = arduino
monitor_speed = 115200
lib_deps =
  fastled/FastLED@^3.10.3
...
After making the modifications, click save, and platformio will automatically download the dependencies for us. Once the download is complete, we can open the <span>.pio</span> folder in the root directory to see the downloaded dependencies:
1
2
3
4
5
6


<project-name>/
├── .pio/
│   └── libdeps/
│       ├── <target-name>/
│       │   └── FastLED/
└── ...
5. Implementing MQTT
For the implementation of the MQTT client, we use the <span>esp-mqtt</span> library, which is integrated into <span>arduinoespressif32</span>, so it can be used without additional declarations.
5.1 Creating a Client and Initiating a Connection
The core code for the function that implements the connection using this library:
1
2
3
4
5
6
7
8
9
10
11
12
13
14
15
16
17


void mqtt_app_start(void)
{
  // Define the configuration for the mqtt connection
  esp_mqtt_client_config_t mqtt_cfg = {};
  // Use the MAC address as the mqtt client's client id
  auto client_id = "eiot-" + MAC_ADDRESS;
  mqtt_cfg.credentials.client_id = client_id.c_str();
  // mqtt server address, we can define it using macros, which will be introduced later
  mqtt_cfg.broker.address.uri = CONFIG_BROKER_URL;

  // Create a client using the configuration
  mqtt_client = esp_mqtt_client_init(&mqtt_cfg);
  // Register the mqtt event handling callback function
  esp_mqtt_client_register_event(mqtt_client, (esp_mqtt_event_id_t)ESP_EVENT_ANY_ID, mqtt_event_handler, NULL);
  // Start the mqtt connection
  esp_mqtt_client_start(mqtt_client);
}
The above code mainly implements the following functions:
- 1. Create the client configuration
<span>mqtt_cfg</span>, and set which mqtt server to connect to and the client id to use. Each account can associate multiple client ids, similar to how a person can have multiple phones; in the mqtt protocol, the client id is used to uniquely identify each terminal. - 2. Use macros to define the mqtt server. Like most C language development environments, platformio supports macro definitions. We can define one or more macros in
<span>platformio.ini</span>, for example,<span>CONFIG_BROKER_URL</span>represents the address of the mqtt server:1 2 3 4 5 6 7 8 9 10 build_flags = -DARDUINO_USB_MODE=1 -DARDUINO_USB_CDC_ON_BOOT=0 ; LED light GPIO -DCONFIG_RGB_LED_PIN=48 ; Wi-Fi router and password -DCONFIG_NET_SSID="\"your-ssid\"" -DCONFIG_NET_PASSWORD="\"your-password\"" ; MQTT server -DCONFIG_BROKER_URL="\"mqtt://broker.emqx.io:1883\"" - 3. Register the mqtt event callback function
<span>esp_mqtt_client_register_event</span>. The mqtt client will generate multiple events during the connection process, and we can declare a function to receive the events generated by mqtt and take different actions based on different events. The supported mqtt events are as follows:
- •
<span>MQTT_EVENT_CONNECTED</span>, connected - •
<span>MQTT_EVENT_DATA</span>, data received - •
<span>MQTT_EVENT_DISCONNECTED</span>, disconnected - •
<span>MQTT_EVENT_ERROR</span>, error occurred - •
<span>MQTT_EVENT_SUBSCRIBED</span>, subscription successful - •
<span>MQTT_EVENT_PUBLISHED</span>, topic published successfully - •
<span>MQTT_EVENT_UNSUBSCRIBED</span>, unsubscription successful
5.2 Event Callback Function
The event callback function is used to capture different events within mqtt, so within the callback function, we need to perform different operations based on different events.
1
2
3
4
5
6
7
8
9
10
11
12
13
14
15
16
17
18
19
20
21
22
23
24
25
26
27
28
29
30
31
32
33
34


static void mqtt_event_handler(void *handler_args, esp_event_base_t base, int32_t event_id, void *event_data)
{
  auto sub_topic = getSubscribeTopic(MAC_ADDRESS);
  // Extract the event
  esp_mqtt_event_handle_t event = (esp_mqtt_event_handle_t)event_data;

  switch ((esp_mqtt_event_id_t)event_id)
  {
  case MQTT_EVENT_CONNECTED:
    // Successfully connected to the mqtt server
    Serial.println("MQTT_EVENT_CONNECTED");
    // Execute subscription
    esp_mqtt_client_subscribe(mqtt_client, sub_topic.c_str(), 0);
    Serial.printf("subscribe topic %s\n", sub_topic.c_str());
    break;
  case MQTT_EVENT_DATA:
    // Data received
    Serial.println("MQTT_EVENT_DATA");
    printf("TOPIC=%.*s\r\n", event->topic_len, event->topic);
    printf("DATA=%.*s\r\n", event->data_len, event->data);
    OnReceiveData(event);
    break;
  case MQTT_EVENT_DISCONNECTED:
    // Connection disconnected
    Serial.println("MQTT_EVENT_DISCONNECTED");
    break;
  case MQTT_EVENT_ERROR:
    // Error
    Serial.println("MQTT_EVENT_ERROR");
    break;
  default:
    break;
  }
}
- 1.
<span>MQTT_EVENT_CONNECTED</span>, connection success event. When the mqtt connects to the server broker, we need to execute the subscription operation to subscribe to the device’s downlink message topic, so that when the app publishes the downlink message topic, we can receive that message on the esp32. - 2.
<span>MQTT_EVENT_DATA</span>, data event, which is the callback when a message publisher publishes a downlink message and the subsystem receives the message. Here we can parse the downlink data; in this example, we need to parse the downlink control command and convert it to control the RGB light. - 3.
<span>MQTT_EVENT_DISCONNECTED</span>, mqtt connection disconnected. No special handling is done here, just outputting a log to notify the user that the mqtt connection is disconnected. - 4.
<span>MQTT_EVENT_ERROR</span>, an error occurred in mqtt, and here we also just output a log.
6. Control Protocol Parsing
In the previous article, we defined a communication protocol encoded in json format. In the esp32, we need to implement json decoding and encoding operations. Like mqtt, the <span>arduinoespressif32</span> framework library also integrates a json parsing library <span>json_parser</span>
Sample format of control commands:
1
2
3
4
5
6
7
8
9
10


{
    "command": "light",
    "payload": {
        "r": 96,
        "b": 255,
        "g": 0,
        "i": 0,
        "a": 100
    }
}
The core code for using <span>json_parser</span> to parse the above json:
1
2
3
4
5
6
7
8
9
10
11
12
13
14
15


// Create a json parsing context
jparse_ctx_t ctx;
// Parse the downlink topic event data
int ret = json_parse_start(&ctx, event->data, event->data_len);
// Get the payload field
ret = json_obj_get_object(&ctx, "payload");
int i, a, r, g, b;
// Read i, which is the index of the led light
ret = json_obj_get_int(&ctx, "i", &i);
// Read r value, which is the red value
ret = json_obj_get_int(&ctx, "r", &r);
// Read g value, which is the green value
ret = json_obj_get_int(&ctx, "g", &g);
// Read b value, which is the blue value
ret = json_obj_get_int(&ctx, "b", &b);
- 1. First, we need to define a json parsing context.
- 2. Read the property field values. If we need to read nested properties, we need to repeatedly call get_object to enter the nested properties:
- •
<span>json_obj_get_object</span>gets the object, and the context becomes the current property value being read. For example, calling<span>json_obj_get_object(&ctx, "payload")</span>will point the current pointer to the payload property, and subsequent read operations will read the properties under the payload node. - •
<span>json_obj_leave_object</span>returns to the previous level of the current node. - •
<span>json_obj_get_int</span>reads an int integer. - •
<span>json_obj_get_bool</span>reads a boolean variable. - •
<span>json_obj_get_float</span>reads a float. - •
<span>json_obj_get_string</span>reads a string. - •
<span>json_arr_get_array</span>reads an array.
7. RGB Light Control
After completing the above steps, we can implement the subscription of downlink control data. Next, we need to receive control commands and convert them to control the RGB light. The ESP32S3 development board integrates a WS2812B RGB light, which is an intelligent control LED light source that integrates the control circuit and RGB chip in a single 5050 package component. It contains intelligent digital port data latching and signal shaping amplification drive circuits.
7.1 WS2812B Control Principle
7.1.1 WS2812B Data Format
24-bit data: Each WS2812B requires 24 bits of data (in GRB order).
- • High 8 bits: Green brightness (G7-G0)
- • Middle 8 bits: Red brightness (R7-R0)
- • Low 8 bits: Blue brightness (B7-B0)
7.1.2 WS2812B Cascading
WS2812B can achieve single-wire cascading communication, which is core to its unique protocol design and internal signal shaping forwarding technology. The following timing diagram can help you intuitively understand how data is transmitted between the light beads:
LED3LED2LED1MCULED3LED2LED1MCUData transmission phase latches the first 24 bits of data, shapes and forwards subsequent data latches the first 24 bits of data, shapes and forwards subsequent data latches the received 24 bits of data reset and display phase all light beads update the display simultaneously sends 24 bits of data (LED1's GRB) continues to send 24 bits of data (LED2's GRB) continues to send 24 bits of data (LED3's GRB) forwards subsequent 48 bits of data forwards the last 24 bits of data sends RESET signal (>50μs low level)7.2 Implementing WS2812B Control
After understanding the control principle of WS2812B, we need to implement how to control the RGB light. With the powerful dependency management of platformio, we can use a mature third-party RGB light control library, such as <span>FastLED</span>, to quickly implement RGB light control.
1
2
3
4
5
6
7
8
9
10
11
12
13
14
15
16
17
18
19
20
21
22
23
24
25
26
27
28
29
30
31
// Define the number of LEDs
define LED_NUM_LEDS (1)
// Define the GPIO pin for LED control, using the macro from platformio.ini
#define LED_GPIO CONFIG_RGB_LED_PIN
// LED light type
#define LED_TYPE WS2812B
// LED light color byte order
#define LED_COLOR_ORDER GRB
// LED light brightness level
#define LED_BRIGHTNESS 128
// Define the LED light group
static CRGB leds[LED_NUM_LEDS];
// Initialize led
void setupLED(){
FastLED.addLeds<LED_TYPE, LED_GPIO, LED_COLOR_ORDER>(leds, LED_NUM_LEDS).setCorrection(TypicalLEDStrip);
FastLED.setBrightness(LED_BRIGHTNESS);
FastLED.clear();
FastLED.show();
}
// Set the RGB color value of a specific led light
// r - red
// g - green
// b - blue
// a - brightness
void setRGB(uint8_t i, uint8_t r, uint8_t g, uint8_t b, uint8_t a){
leds[i] = CRGB(r & 0xff, g & 0xff, b & 0xff);
leds[i].nscale8_video(a & 0xff);
FastLED.show();
}
- 1. First, we need to define an LED array, as FastLED allows us to control multiple LED lights. Since our development board only has one LED light, the array element format is
<span>1</span>. In the future, we will develop an enhanced version using multiple RGB lights, and we can simply modify the LED light count macro to achieve expansion. - 2. The parameters for controlling the RGB values and brightness are also quite intuitive; we just need to create a
<span>CRGB</span>structure and assign it to the specified index of the LED array. - 3. Finally, call the
<span>show</span>method to display the corresponding color.
For the complete subsystem code, please check the GitHub repository
https://github.com/enix223/esp-light