Introduction to CMake
1. Overview of CMake
CMake is a project build tool that is cross-platform. Other popular project build tools include Makefile (which builds projects using the Make command).
Most IDEs integrate make, such as: nmake for VS, GNU make for Linux, and qmake for Qt. If you write a makefile by hand, you will find that
makefiles typically depend on the current compilation platform, and writing a makefile can be quite labor-intensive, making it easy to make mistakes when resolving dependencies.
CMake addresses these issues by allowing developers to specify the entire compilation process for a project, automatically generating localized makefiles and project files based on the compilation platform. Finally, users only need to run make to compile, so CMake can be seen as a tool for automatically generating makefiles. The compilation process is as follows:
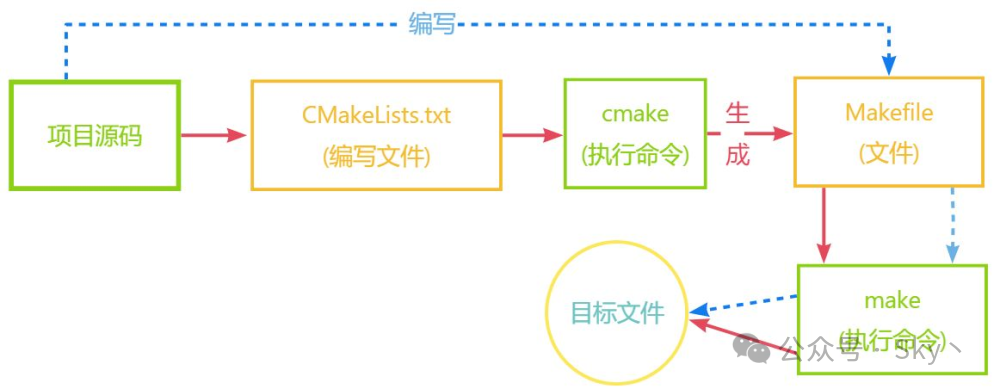 1. The blue dashed line represents the makefile project build process.
2. The red solid line indicates the process of building the project using cmake.
CMake has the following advantages:
Cross-platform
Ability to manage large projects
Simplifies the compilation and build process as well as the programming process
Extensible: You can write specific modules for CMake to expand its functionality.
2. Using CMake
2.1 Installing CMake
1. Download CMake from the official website: Download CMake. Choose the appropriate installation package based on your system environment.
Double-click to install it to the corresponding path, and add the bin path to the environment variables.
After installation, enter cmake --version in the cmd. If version information is displayed, the installation was successful.
2. Download MinGW from the following address: MinGW.
After downloading the installation package, double-click to open it and install the C/C++ compiler and mingw32-make.
After installation, rename mingw32-make.exe in the bin directory of the MinGW installation directory to make.exe. Add this path to the system environment variables.
In the cmd window, enter gcc -v and make -v; if the corresponding version numbers appear, the installation is successful.
2.2 Using CMake
1. Comments
CMake uses # for line comments, which can be placed anywhere, and #[[]] for block comments.
2. Single Directory Project Test
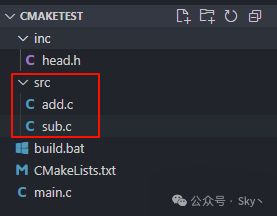
The project directory contains the following files:
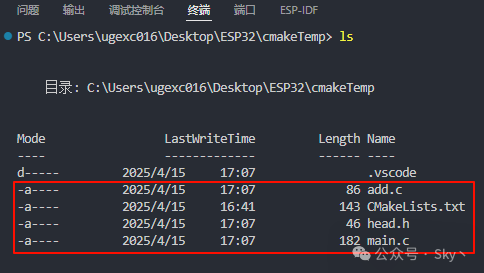
1. Source file writing:
#include <stdio.h>
#include "head.h"
int main() {
    int a = 5;
    int b = 10;
    printf("a = %d, b = %d\n", a, b);
    printf("a+b = %d\n", add(a, b));
    return 0;
}
#include <stdio.h>
#include "head.h"
int add (int a, int b) {
    return a+b;
}
#pragma once
extern int add (int a, int b);
2. Writing the CMakeLists.txt file
# Minimum required version of CMake
cmake_minimum_required(VERSION 3.1)
# Project information
project(demo)
# Specify the target to generate
add_executable(app main.c add.c)
The CMakeLists.txt consists of commands, comments, and whitespace, where commands are case-insensitive. Commands consist of a command name, parentheses, and parameters separated by spaces.
In this example, the commands in the CMakeLists.txt file are explained as follows:
cmake_minimum_required: Specifies the minimum version of CMake to use (this command is optional; if omitted, there may be warnings).
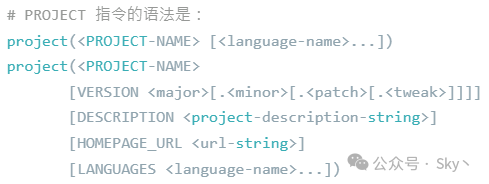
project: Defines the project name and can specify the project version, description, homepage, and supported languages. If these are not needed, you can ignore them and just specify the project name.
add_executable: Defines that the project generates an executable program; the source files can be one or more, separated by spaces or semicolons.
# Style 1
add_executable(app main.c;add.c)
# Style 2
add_executable(app main.c add.c)
3. Executing CMake commands
Create a new build folder, then enter the build folder and use the cmake command, as shown in the figure below:
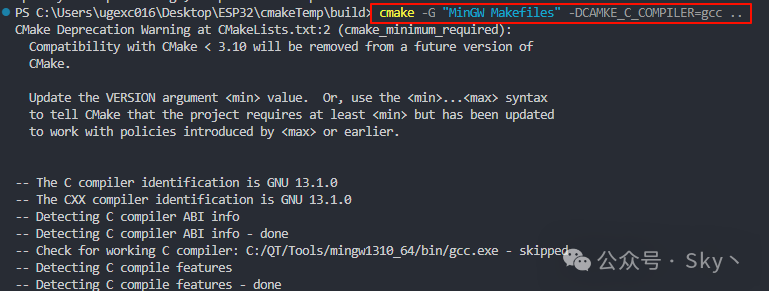
-G specifies the specific generator type; MinGW indicates the generator for Windows, while Unix indicates the generator for Unix or Linux environments.
DCMAKE_C_COMPILER indicates the C code compilation tool, and DCMAKE_CXX_COMPILER indicates the C++ code compilation tool.
“..” indicates to look for the “CMakeLists.txt” in the parent directory, equivalent to “../”.
For detailed information about generators, refer to the manual:
https://cmake.org/cmake/help/latest/manual/cmake-generators.7.html#manual:cmake-generators(7)
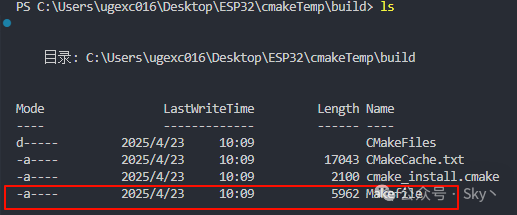
A corresponding Makefile will be generated in the build folder, as shown in the figure below:
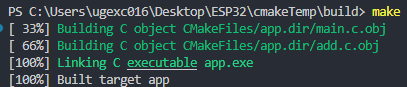
4. Execute the make command
Executing make in the build folder will generate the corresponding app.exe executable program, as shown in the figure below:
3. Multi-directory Multi-file Project Test
Most project source files contain multiple directory files to achieve functional code layering.
The project directory is shown in the figure below:
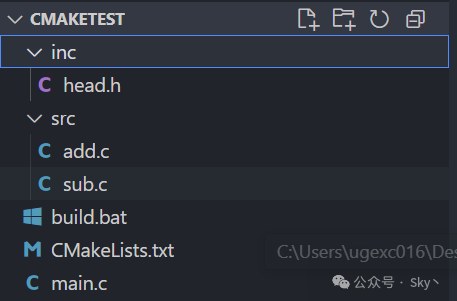
The src folder contains the corresponding .c files for the functions, and the inc folder contains the header files.
1. Defining variables in CMake
To define a variable in CMake, use set.

VAR: Variable name VALUE: Variable value
2. Specify the output path
In CMake, use the macro EXECUTABLE_OUTPUT_PATH to specify the output path for the executable program:

If the subdirectory in that path does not exist, it will be created automatically without manual creation.
If the executable program generation path uses a relative path ./xxx/xx, then ./ corresponds to the directory where the makefile is located.
3. Searching for files
If there are many source files in the project, you can use the aux_source_directory command or the file command to search for files when writing the CMakeLists.txt file.
The aux_source_directory command can find all source files in a specified path, with the command format as follows:

dir: The directory to search
variable: The variable to store the list of source files found in the dir directory
The file command searches for all source files, with the command format as follows:

GLOB: Generates a list of all files that meet the conditions found in the specified directory and stores it in a variable. For example:

In CMake, to set the directories to include, you can use the include_directories command:

The complete content of the CMakeLists.txt file is as follows:
cmake_minimum_required(VERSION 3.0)
project(test)
# Add a variable pointing to main.c
set(MAIN main.c)
# Specify the output path for the executable program
set(EXECUTABLE_OUTPUT_PATH ${PROJECT_SOURCE_DIR}/build/bin)
# Include header files
include_directories(${PROJECT_SOURCE_DIR}/inc)
# Include source files
#aux_source_directory(${PROJECT_SOURCE_DIR}/src SRC_LIST)
file(GLOB SRC_LIST ${PROJECT_SOURCE_DIR}/src/*.c)
add_executable(app ${SRC_LIST} ${MAIN})
The content of the build.bat script in the project is as follows:
:: Delete the build folder, “/S” means recursive deletion, “/Q” means silent. You can check the specific functions of the parameters by executing “help rmdir” in cmd.
rmdir /S /Q build
mkdir build
cd build
:: -G specifies the specific generator type; MinGW indicates Windows, Unix indicates the generator for Unix or Linux environments.
:: For detailed information about generators, refer to the manual:
https://cmake.org/cmake/help/latest/manual/cmake-generators.7.html#manual:cmake-generators(7)
:: DCMAKE_C_COMPILER indicates the C code compilation tool, DCMAKE_CXX_COMPILER indicates the C++ code compilation tool;
:: “..” indicates to look for “CMakeLists.txt” in the parent directory, equivalent to “../”.
cmake -G “MinGW Makefiles” -DCMAKE_C_COMPILER=gcc -DCMAKE_CXX_COMPILER=g++ ..
:: After CMake generates the makefile file and specifies the C/C++ source compilation tools, use the make command to compile the project defined by the makefile.
make
pause
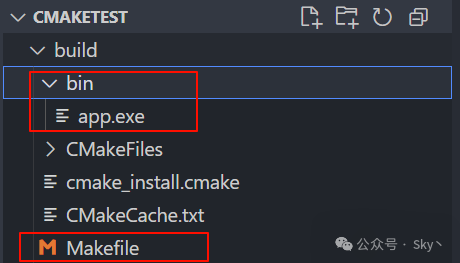
Running the build.bat script completes the program compilation, resulting in:
4. Creating Dynamic or Static Libraries
In CMake, to create a static library, the command is as follows:

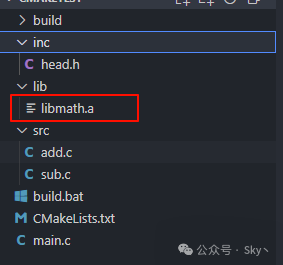
The static library name consists of three parts: lib + library name + .a; for example, the following directory needs to compile the source files in the src directory into a static library:
Based on the above directory structure, the specific content of CMakeLists.txt is as follows:
cmake_minimum_required(VERSION 3.0)
project(test)
# Include header files
include_directories(${PROJECT_SOURCE_DIR}/inc)
# Specify the output path for the static library
set(LIBRARY_OUTPUT_PATH ${PROJECT_SOURCE_DIR}/lib)
# Include source files
file(GLOB SRC_LIST ${PROJECT_SOURCE_DIR}/src/*.c)
# Generate static library
add_library(math STATIC ${SRC_LIST})
The corresponding static library file will be generated as follows:
To create a dynamic library in CMake, the command is as follows:

Using the above directory as an example, simply modify the CMakeLists.txt file:
cmake_minimum_required(VERSION 3.0)
project(test)
# Include header files
include_directories(${PROJECT_SOURCE_DIR}/inc)
# Specify the output path for the dynamic library
set(LIBRARY_OUTPUT_PATH ${PROJECT_SOURCE_DIR}/lib)
# Include source files
file(GLOB SRC_LIST ${PROJECT_SOURCE_DIR}/src/*.c)
# Generate dynamic library
add_library(math SHARED ${SRC_LIST})
5. Including Library Files
1. Linking Static Libraries
In CMake, the command to link static libraries is as follows:
link_libraries(static [static...])Parameter 1: Specifies the name of the static library to link (the full name libxxx.a or the name xxx after removing the prefix lib and suffix .a).
Parameter 2: The names of other static libraries to link.
2. Linking Dynamic Libraries
The command to link dynamic libraries is as follows:
target_link_libraries(target [item...]...)target: Specifies the name of the file to load the library (this file can be a source file/dynamic library/static library/executable file).
PRIVATE|PUBLIC|INTERFACE: Access permissions for the dynamic library, default is PUBLIC.
If there are no dependencies between the dynamic libraries, no settings are needed; there is no difference among the three, and generally, you can use the default PUBLIC.
The linking of dynamic libraries is transitive. If dynamic library A links to dynamic libraries B and C, and dynamic library D links to dynamic library A, then dynamic library D also links to dynamic libraries B and C and can use the methods defined in dynamic libraries B and C.
target_link_libraries(A B C)
target_link_libraries(D A)
PUBLIC: Libraries after public will be linked to the preceding target, and their symbols will also be exported for third-party use.
PRIVATE: Libraries after private will only be linked to the preceding target and will not be visible to third parties.
INTERFACE: Libraries introduced after interface will not be linked to the preceding target, only their symbols will be exported.
The linking of dynamic libraries is completely different from that of static libraries:
Static libraries are packaged into the executable program during the linking phase, so when the executable program starts, the static library is loaded into memory.
Dynamic libraries are not packaged into the executable program during the linking phase. When the executable program starts and calls a function from the dynamic library, the dynamic library is loaded into memory.
Therefore, when specifying the dynamic libraries to link in CMake, the command should be written after the executable file is generated.
2.3 Basic CMake Commands
1. Log Commands
In CMake, you can display a message to the user using the command called message:

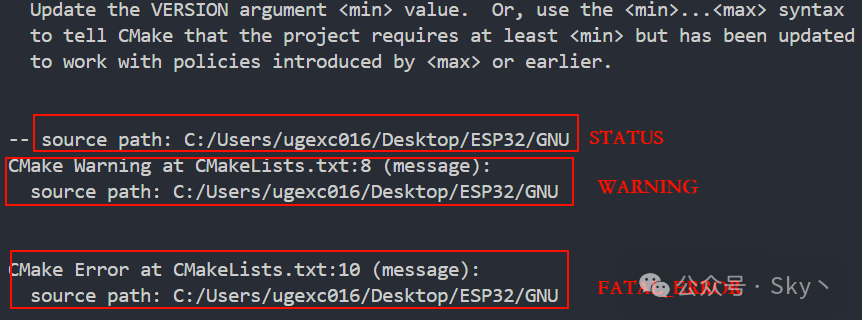
(none): Important message
STATUS: Very important message
WARNING: CMake warning, will continue execution
AUTHOR_WARNING: CMake warning (dev), will continue execution
SEND_ERROR: CMake error, will continue execution but skip the generation step
FATAL_ERROR: CMake error, terminates all processing.
CMake’s command tool displays STATUS messages on stdout and all other messages on stderr. CMake’s GUI displays all messages in its log area. As shown below:
# Minimum required version of CMake
cmake_minimum_required (VERSION 2.8)
# Project information
project (demo)
message(STATUS “source path: ${PROJECT_SOURCE_DIR}”)
message(WARNING “source path: ${PROJECT_SOURCE_DIR}”)
message(FATAL_ERROR “source path: ${PROJECT_SOURCE_DIR}”)
2. Variable Operations
In CMake syntax, there are two methods to append variables: set/list.
Using set to concatenate, the corresponding command format is as follows:

The above command actually concatenates all strings from the second parameter onward and stores the result in the first parameter.
If the first variable parameter originally has data, it will overwrite the original data. For example:
cmake_minimum_required(VERSION 3.0)
project(test)
set (TEMP "hello,cmake")
file(GLOB SRC_LIST ${PROJECT_SOURCE_DIR}/src/*.c)
# Append (concatenate)
set(SRC_LIST ${SRC_LIST} ${TEMP})
message(STATUS "message: ${SRC_LIST}")
Using list for string concatenation, the corresponding command format is as follows:

For the list command, its functionality is more powerful than set; string concatenation is just one of its sub-functions.
APPEND indicates data addition, and the parameters following it are the same as for set; for example:
cmake_minimum_required(VERSION 3.0)
project(test)
set (TEMP "hello,cmake")
file(GLOB SRC_LIST ${PROJECT_SOURCE_DIR}/src/*.c)
# Append (concatenate)
list(APPEND SRC_LIST ${SRC_LIST} ${TEMP})
message(STATUS "message: ${SRC_LIST}")
The list command for string removal has the following command format:

For example:
cmake_minimum_required(VERSION 3.0)
project(test)
set (TEMP "hello,cmake")
file(GLOB SRC_LIST ${PROJECT_SOURCE_DIR}/src/*.c)
# Remove previous log
message(STATUS "message: ${SRC_LIST}")
# Remove sub.c
list(REMOVE_ITEM SRC_LIST ${PROJECT_SOURCE_DIR}/src/sub.c)
# Remove log after
message(STATUS "message: ${SRC_LIST}")
There are other functionalities for the list command, as follows:
1. Get the length of the listlist(LENGTH list length)
LENGTH: The sub-command LENGTH is used to read the length of the list
Current operation list: The list being operated on
New variable: A new variable to store the length of the list
2. Read the elements at specified indices in the list, multiple indices can be specified
list(GET list [element…])
Current operation list: The list being operated on
Element: The index of the list element
Starting from 0, the element at index 0 is the first element in the list; indices can also be negative, where -1 indicates the last element in the list, -2 indicates the second to last element, and so on.
If the index (whether positive or negative) exceeds the length of the list, an error will occur.
Output: A new variable that stores the return result of the specified index element, which is also a list.
3. Join the elements in the list with a delimiter (string) to form a string
list (JOIN list glue output)
Current operation list: The list being operated on
Glue: The specified delimiter (string)
Output: A new variable that stores the returned string
4. Check if a specified element exists in the list; if not found, return -1
list(FIND list value output)
Current operation list: The list being operated on
Value: The element to search for in the list
Output: A new variable
If the element exists in the list, it returns the index of the element in the list; if not found, it returns -1.
5. Append elements to the list
list (APPEND list [element…])
6. Insert several elements at a specified position in the list
list(INSERT list element_index element [element…])
7. Insert elements at the 0 index position of the list
list (PREPEND list [element…])
8. Remove the last element from the list
list (POP_BACK list [out-var…])
9. Remove the first element from the list
list (POP_FRONT list [out-var…])
10. Remove specified elements from the list
list (REMOVE_ITEM list value [value…])
11. Remove elements at specified indices from the list
list (REMOVE_AT list index [index…])
12. Remove duplicate elements from the list
list (REMOVE_DUPLICATES list)
13. Reverse the list
list(REVERSE list)
14. Sort the list
list (SORT list [COMPARE compare] [CASE case] [ORDER order])
COMPARE: Specifies the sorting method. The following values are available:
STRING: Sorts in alphabetical order, which is the default sorting method.
FILE_BASENAME: If it is a series of path names, it will use basename for sorting.
NATURAL: Sorts in natural number order.
CASE: Indicates whether the sorting is case-sensitive. The following values are available:
SENSITIVE: Sorts in a case-sensitive manner, which is the default value.
INSENSITIVE: Sorts in a case-insensitive manner.
ORDER: Indicates the sorting order. The following values are available:
ASCENDING: Sorts in ascending order, which is the default value.
DESCENDING: Sorts in descending order.