Installing the Raspberry Pi 4B+ system~ First, let’s compare 32-bit and 64-bit:

The main reasons for the official push for 64-bit operating systems are twofold. Many closed-source applications are only compatible with arm64, while open-source applications have not been fully optimized for armhf. Additionally, from a performance perspective, the advantages of the A64 instruction set will become more apparent in the future.
Moreover, there is a theoretical issue where 32-bit pointers only allow you to address 4GB of memory. On the Raspberry Pi 4, using ARM Large Physical Address Extension (LPAE), you can access up to 8GB of memory, but any process is limited to accessing only 3GB (1GB of virtual address space is reserved for the kernel). Few processes require more memory than this. Fortunately, Chromium may be the most memory-intensive application in Raspberry Pi OS, generating a process for each tab. However, certain use cases would benefit from being able to allocate the full 8GB of memory from a single Raspberry Pi 4 process.

I am actually using an older version of

The new version can also use the old camera stack

64-bit system supported boards

Recent download volumes

Download the official imager
Username: pi with password: raspberryDefault account credentials

UPS

Boards

Look at this

This one has three pins

What is CC?


The function of the CC line seems to be a fully functional USB

Interface definition

Interface definition

Another one

Because it is a differential signal, each signal line requires two signal wires and one shield ground wire.
From the diagram, HDMI has a total of 3 TMDS differential signals, which are 1-3, 4-6, 7-9, corresponding to the RGB or YUV video components (transmitted in TMDS format), and audio signals are also transmitted within these 3 signals, along with horizontal (H) and vertical (V) signals (to accommodate CRT displays).
Pin 10-12 is the clock signal used for high-speed signal synchronization.
Pin 13 is CEC (Consumer Electronics Control), used for transmitting control signals, making it convenient to control multiple devices with one remote control; it is a reserved pin but not mandatory to use.
Pin 14 is a reserved pin, initially undefined, but after HDMI 1.4, it became an Ethernet signal pin that can be used for general data transmission.
Pins 15 and 16 are DDC, mainly used for mutual recognition between the display and output devices, allowing for plug-and-play.
Pin 17 is the ground for CEC and DDC. This shows that CEC and DDC are single-ended signals and cannot be very fast.
Pin 18 is +5V power supply, providing power support for certain devices (such as HDMI to VGA converters).
Pin 19 is for hot-plug detection. It can be seen that HDMI supports hot-plugging, but it should still be avoided as much as possible because the quality of HDMI cables and devices varies.

You can use the remote control to control the device

Actually, there are two

IO, serial port + power
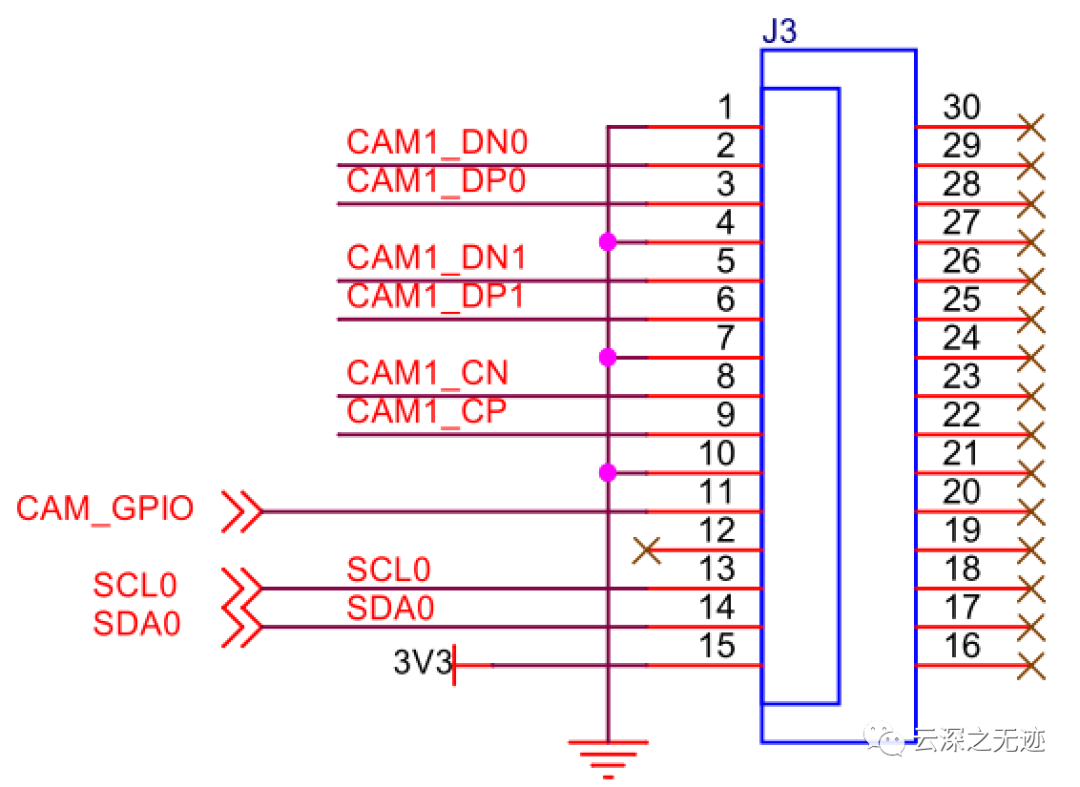
Camera port

DVP

Headphone jack, I’m really drunk, just PWM pin
Ah, I lost the draft later… let’s leave it at that
Author: SasugaSetsuna https://www.bilibili.com/read/cv390622 Source: bilibilihttps://datasheets.raspberrypi.com/rpi4/raspberry-pi-4-reduced-schematics.pdfhttps://downloads.raspberrypi.org/imager/imager_1.7.2.exehttps://rpi-imager-stats.raspberrypi.com/https://downloads.raspberrypi.org/raspios_oldstable_armhf/images/raspios_oldstable_armhf-2022-04-07/2022-04-04-raspios-buster-armhf.img.xzDownload links
https://www.raspberrypi.com/software/operating-systems/