Click the blue text above to follow “Wang Yujie Blog”

Introduction
I recently bought a Raspberry Pi 4 with 4GB RAM and installed the official operating system Raspbian. Today I successfully ran an ASP.NET Core 3.0 application. Let’s see how it was done!
ARM32 or ARM64?
It should be noted that currently the ARM64 version of the .NET Core runtime or SDK cannot run on the Raspberry Pi 4. Although the CPU of the Raspberry Pi 4 supports 64-bit, its official operating system Raspbian is not 64-bit. Other third-party operating systems have not yet been updated to support Raspberry Pi 4. Therefore, if you want to run .NET Core 3.0 on Raspberry Pi 4, the only option is ARM32.
Preparation
Required: Internet connection to download .NET Core 3.0 runtime and SDK
Optional: VS / VSCode for developing sample projects
Update the Raspbian system
sudo apt-get update
sudo apt-get upgrade
It is recommended to prepare a monitor or VNC connection for your Raspberry Pi so that you can test your ASP.NET Core website in the last step without worrying about port and network settings.
Download .NET Core 3.0 SDK and Runtime
Open https://dotnet.microsoft.com/download/dotnet-core/3.0 on your computer and find the Linux section under ARM32 version of SDK and Runtime. Click to open, and a Direct Link will be displayed on the page. These two links are what we will use to download the latest SDK and runtime on Raspbian.
Currently, these two links are:
.NET Core 3.0 SDK (Linux/ARM32)
https://download.visualstudio.microsoft.com/download/pr/8ddb8193-f88c-4c4b-82a3-39fcced27e91/b8e0b9bf4cf77dff09ff86cc1a73960b/dotnet-sdk-3.0.100-linux-arm.tar.gz
ASP.NET Core 3.0 Runtime (Linux/ARM32)
https://download.visualstudio.microsoft.com/download/pr/e9d4b012-a877-443c-8344-72ef910c86dd/b5e729b532d7b3b5488c97764bd0fb8e/aspnetcore-runtime-3.0.0-linux-arm.tar.gz
Use wget on your Raspberry Pi to download these two files
wget https://download.visualstudio.microsoft.com/download/pr/8ddb8193-f88c-4c4b-82a3-39fcced27e91/b8e0b9bf4cf77dff09ff86cc1a73960b/dotnet-sdk-3.0.100-linux-arm.tar.gz
wget https://download.visualstudio.microsoft.com/download/pr/e9d4b012-a877-443c-8344-72ef910c86dd/b5e729b532d7b3b5488c97764bd0fb8e/aspnetcore-runtime-3.0.0-linux-arm.tar.gz
Install .NET Core 3.0 SDK and Runtime
Create a new directory, such as dotnet-arm32, and extract the downloaded files into it.
mkdir dotnet-arm32
tar zxf aspnetcore-runtime-3.0.0-linux-arm.tar.gz -C $HOME/dotnet
tar zxf dotnet-sdk-3.0.100-linux-arm.tar.gz -C $HOME/dotnet
So far, you can only execute .NET commands in dotnet-arm32. To allow the dotnet command to run anywhere, you need to create an environment variable pointing to the dotnet-arm32 folder.
export DOTNET_ROOT=$HOME/dotnet-arm32
export PATH=$PATH:$HOME/dotnet-arm32
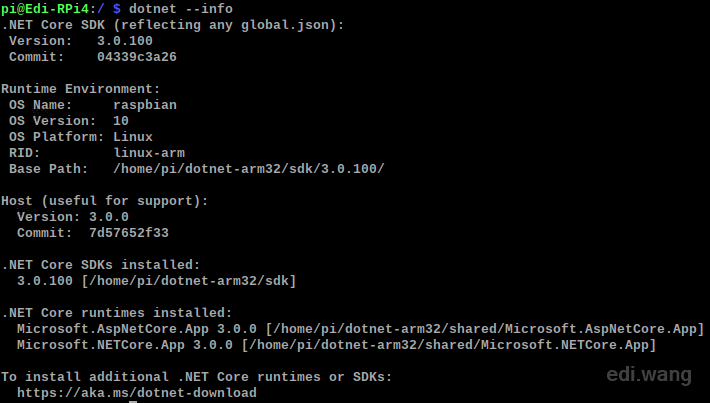
Now you can run dotnet –info to test it:
Create .NET Core Program in Raspbian
Now that we have the SDK, we don’t need to use another computer to develop and publish applications. We can do it directly on the Raspberry Pi.
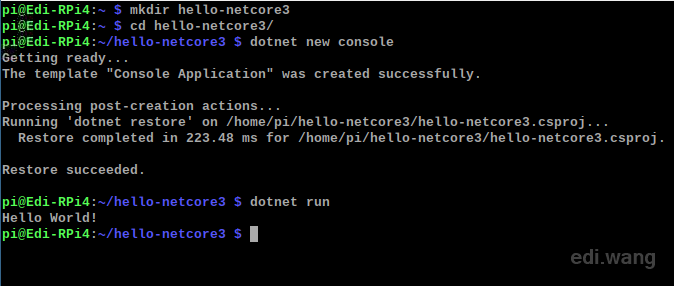
mkdir hello-netcore3
cd hello-netcore3/
dotnet new console
Once the project is created and NuGet is restored, you can use the dotnet run command to execute the program.
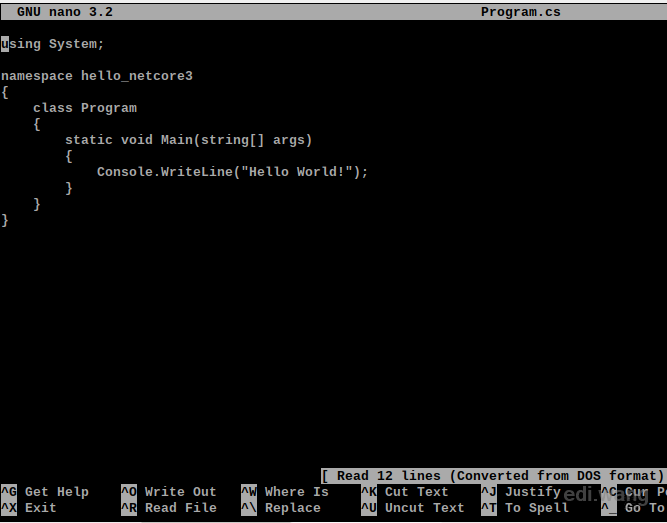
You can even use nano as an editor
sudo nano Program.cs
Deploy and Run ASP.NET Core Website
In a more realistic scenario, without an IDE on Raspbian, you cannot develop complex .NET Core applications. We usually develop and test our applications on the computer first, and then publish them to the Raspberry Pi to run.
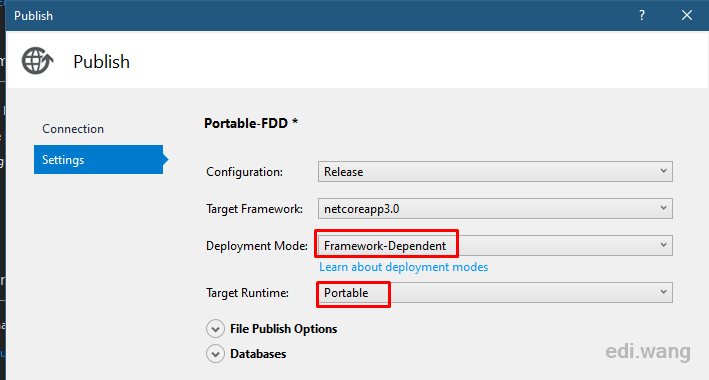
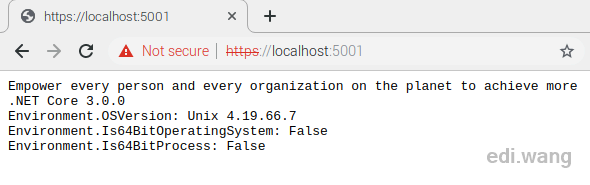
To run an ASP.NET Core application, you first need to publish it. For example, from Visual Studio 2019, I have an empty ASP.NET Core application that outputs more information after modifying Startup.cs.
await context.Response.WriteAsync($”Empower every person and every organization on the planet to achieve more{Environment.NewLine}” + $”.NET Core {Environment.Version}{Environment.NewLine}” + $”Environment.OSVersion: {Environment.OSVersion}{Environment.NewLine}” + $”Environment.Is64BitOperatingSystem: {Environment.Is64BitOperatingSystem}{Environment.NewLine}” + $”Environment.Is64BitProcess: {Environment.Is64BitProcess}”, Encoding.UTF8);
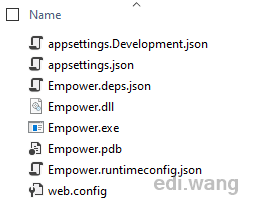
Use FDD + Portable to publish. Since we have already installed the native runtime on our Raspberry Pi, there is no need to use linux-arm as the RID to publish. Portable can run.
Copy the published directory to the Raspberry Pi
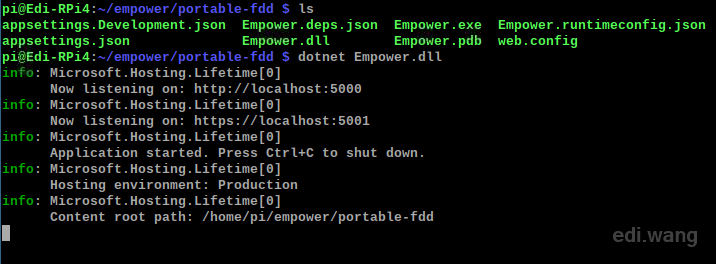
Now, you can run your ASP.NET Core website with dotnet dllname.dll

Want Docker?
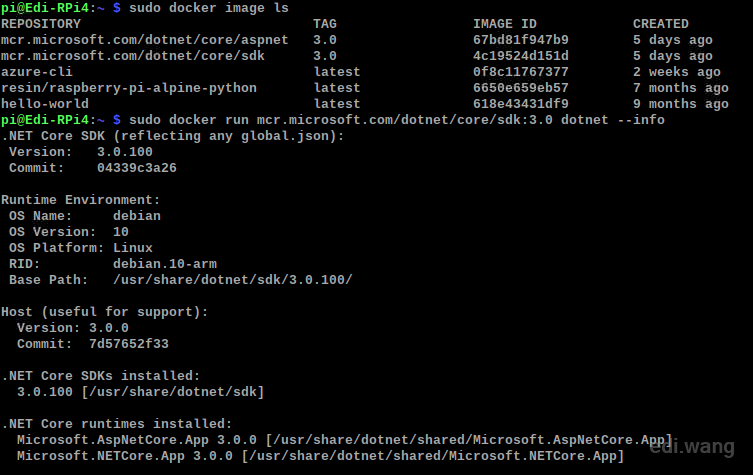
You can download the official .NET Core 3.0 ARM32 runtime and SDK from Docker Hub. If you, like me, installed Docker on the Raspberry Pi, you can directly run it:

Reference document: https://www.hanselman.com/blog/InstallingTheNETCore2xSDKOnARaspberryPiAndBlinkingAnLEDWithSystemDeviceGpio.aspx
