
1. Introduction
Friends who have played with Linux, are you envious of the Linux omnipotent serial port Shell command console? If the low-end MCU of STM32F series that you made also has this control interaction capability, how many troubles would it save for debugging/maintenance and configuration, such as starting/stopping debugging or self-check mode, printing debugging information, configuring system parameters, transferring files, etc. Many friends can achieve these functions with their excellent programming skills. Here I propose my solution for communication.
This platform (xc_shell) has the following performance characteristics:
-
A large amount of main code, independent of specific hardware, strong portability, and few code files.
-
Only occupies CPU resources when processing user input commands, and the code can be trimmed to 1KB SRAM and 4KB Flash;
-
Users can very flexibly add command script files written according to templates, with strong custom expansion capabilities.
-
Supports both operating system and non-operating system application scenarios.
-
Supports Ymodem file transfer protocol
-
Supports opening Flash sectors as parameter areas, which can achieve local/remote upgrades.
-
Practical LED signal management, can select output 65535 virtual signal lights to 1 physical LED light, very useful for debugging timing and status
-
Has basic LED management, debugging mode settings, command help instructions, reset instructions, and other basic functions.
The more functions, the more complex the design. In order to clarify the code, I will first explain the basic implementation principles of the above functions and provide a minimal source code project.
2. xc_shell Platform Introduction
2.1 How to Achieve Hardware Independence
By analogy with Linux, it is found that the hardware interface of the device is often virtualized as a file (driver), while the Linux kernel is completely unrelated to the hardware system in any byte, and different platforms have different drivers. Therefore, the serial port driver of this xc_shell also adopts a similar idea:
1) The serial port driver is described by a structure, so you only need to point to this TTYx_HANDLE structure object in xc_shell.c to connect the serial port (tty) hardware with the kernel. Smart friends might think, if I virtualize a TTY object according to this structure for the development board with network, wouldn’t it be possible to achieve a network remote console! This is indeed possible!
2) Of course, the implementation of multi-TTY serial port interface switching and other functions is just a matter of a pointer and the callback handling exchange in step 2.
3) When the user uses api_TxdFrame or api_TxdByte in “bsp_ttyX.c”, it will drive the specific MCU’s serial port to send data out. After receiving a frame of data, if the user sets the inj_RcvFrame callback processing method, the user’s callback processing will be executed in the interrupt.
/*---------------------*
*     Function Definition
*----------------------*/
typedef void    (*pvFunDummy)(void);

//Input a whole line, output logic
typedef void    (*pvFunVoid) (void);
typedef void    (*pvFunBool) (bool     bVal);
typedef void    (*pvFunChar) (uint8_t  cVal);
typedef void    (*pvFunShort)(uint16_t sVal);
typedef void    (*pvFunWord) (uint32_t wVal);

//Input a whole line, output logic
typedef bool    (*pbFunVoid) (void);
typedef bool    (*pbFunBool) (bool     bVal);
typedef bool    (*pbFunChar) (uint8_t  cVal);
typedef bool    (*pbFunShort)(uint16_t sVal);
typedef bool    (*pbFunWord) (uint32_t wVal);

//Input integer pointer, output logic
typedef bool    (*pbFun_pVoid) (void * pVoid);
typedef bool    (*pbFun_pChar) (uint8_t  * pStr);
typedef bool    (*pbFun_pShort)(uint16_t * pShor);
typedef bool    (*pbFun_pWord) (uint32_t * pWord);

//Input data frame, output logic
typedef bool    (*pbFun_Buffx)(void * pcBuff, uint16_t len );
typedef bool    (*pbFun_Bytex)(uint8_t * pcByte, uint16_t len );
/*---------------------*
*    TTYx Handle Structure
*----------------------*/
typedef struct TTYx_HANDLE_STRUCT
{
    const char  * const name;       //Driver name
    const uint16_t      rxSize;     //Receive size
    const uint16_t      txSize;     //Send size

    //------------------------------------------------------
    //step1: User API
    const pvFunWord     init;           //Initialization.
    const pbFun_Bytex   api_TxdFrame;   //Send data frame. (Send frame)
    const pbFunChar     api_TxdByte;    //Send data byte

    //------------------------------------------------------
    //step2: Inject callback function
    pbFun_Bytex         inj_RcvFrame;   //(ISR)Receive data frame. (Receive frame)
    pvFunDummy          inj_TxdReady;   //(ISR)Send complete callback

    //------------------------------------------------------
    //step3: Receive callback function
    struct TTYx_HANDLE_STRUCT * pvNext; //Connect to the next instruction
}TTYx_HANDLE;
-
Injectable command scripts (CLI) implementation
The command CLI is also a structure object:
/*---------------------*
*       CLI Command
*----------------------*/
typedef struct
{
 const char * const  pcCmdStr;     //Command string (can only be lowercase letters)
 const char * const  pcHelpStr;     //Command description, must end with:"\r\n". For example:"help: Returns a list\r\n".
 const pFunHook      pxCmdHook;     //Pointer to the callback function, return true on success, otherwise return 0;
 uint8_t             ucExpParam;     //Expected number of command parameters
 const MEDIA_HANDLE *phStorage;      //Pointer to storage medium, fill NULL if none
}Cmd_Typedef_t;
Friends may use many custom CLI commands, such as the command for this network card:
const Cmd_Typedef_t CLI_WizMsg=
{
    //Identify keywords
    .pcCmdStr   = "wiz",
    //Help content
    .pcHelpStr  =
    "[WIZ controls]\r\n"
 " wiz help\r\n"
 " wiz rd info\r\n"
 " wiz reset\r\n"
 " wiz wr ip <D0>.<D1>.<D2>.<D3>\r\n"
 " wiz wr mask <D0>.<D1>.<D2>.<D3>\r\n"
 " wiz wr way <D0>.<D1>.<D2>.<D3>\r\n"
 " wiz wr mac <H0>-<H1>-<H2>-<H3>-<H4>-<H5>\r\n"
 " wiz wr port <udp> <bak> <vol> <pic>\r\n"
 " wiz wr sip <D0>.<D1>.<D2>.<D3> <port>\r\n"
 " wiz wr cip <D0>.<D1>.<D2>.<D3> <port>\r\n"
 " wiz load default\r\n"
 "[WIZ Test mode]\r\n"
 " wiz loop open\r\n"
 " wiz loop close\r\n"
 "\r\n",

 //Processing function
 .pxCmdHook  = &Shell_WIZ_Service,        //See actual function

 //Attached data
 .ucExpParam = 0,

  #ifdef SHELL_USE_YMODEM
    //Storage medium
    .phStorage  = NULL,
  #endif
};
/*---------------------*
*       CLI Linked List Node
*----------------------*/
Cmd_List_t  WizList   = { &CLI_WizMsg,   NULL,}; //Shell command head
For example, entering “wiz wr ip 192.168.1.250\r\n” will work.
3. Environment Preparation
3.1 Hardware Development Environment
-
One STM32F103 series development board, with USART1 interface. -
One USB to serial cable.
3.2 Software Development Environment
-
MDK4.72 or above -
SecureCRT serial super terminal
3.3 Software Configuration
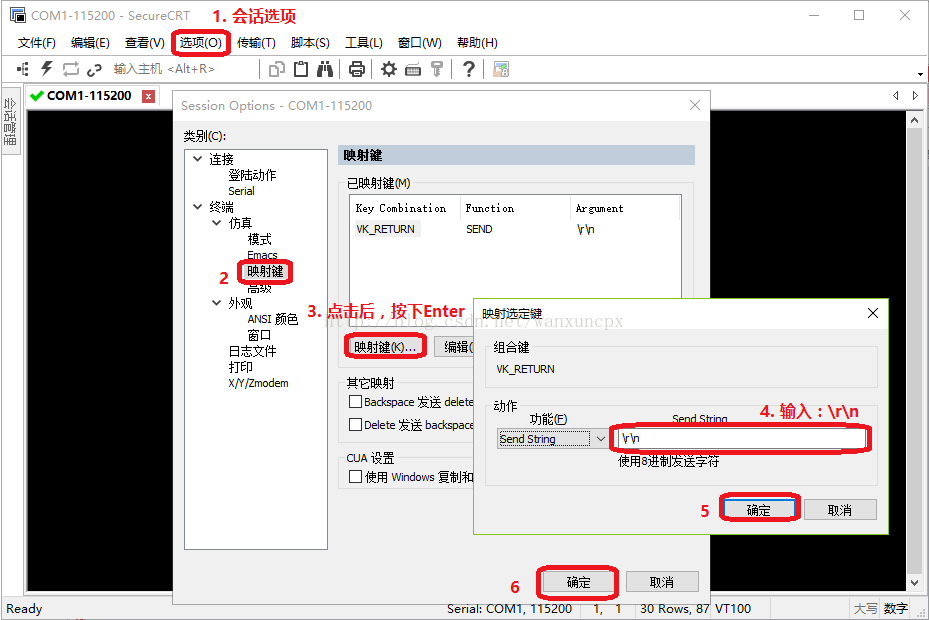
In xc_shell, use “/r/n” as the command terminator, while SecureCRT pressing Enter does not input “/r/n”, so it needs to set as shown below: In addition, select [Local Echo] in “Terminal”/Simulation/Advanced
4. Code Introduction
4.1 Directory Structure
□ XC_SHELL
├──┬── BSP_LIB    BSP library, hardware-related driver replacement
│  ├──── bsp_ledx.c   Basic LED driver
│  └──── bsp_tty0.c   Debug serial port driver
│
├──┬──MDK-ARM     Project files
│  └──── Project.uvproj
│
├──┬──SHELL_CFG   SHELL configuration header files
│  └──── user_eval.h
│
├──┬──SHELL_CORE  SHELL kernel files
│  ├──── xc_shell.c   SHELL kernel file
│  ├──── xc_ymodem.c  Ymodem transfer protocol (default off, enabled in xc_shell.h)
│  ├──── xc_iap.c     Flash IAP operation, requires bsp_flash.c driver support
│  └──── shell_iap.c  shell's user script template
│
├──┬──SHELL_INC   SHELL header files
│  ├──── bsp_type.h   Driver structure definition
│  ├──── xc_shell.h   SHELL header files
│  └──── xconfig.h    Hardware-independent configuration files
│
├──┬──STM32F10x_StdPeriph_Lib_V3.5.0  STM32 standard peripheral library
│  └──── ......
│
└──┬──USER        User files
   ├─ .....
   └──── main.c        main file
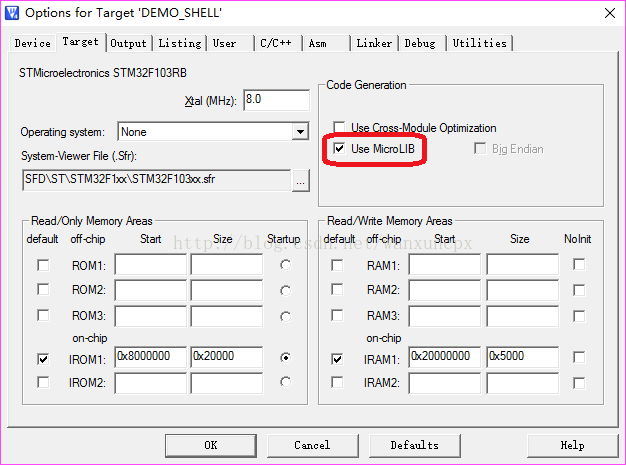
4.2 Project Setting Points
1) Set to use the micro-library:
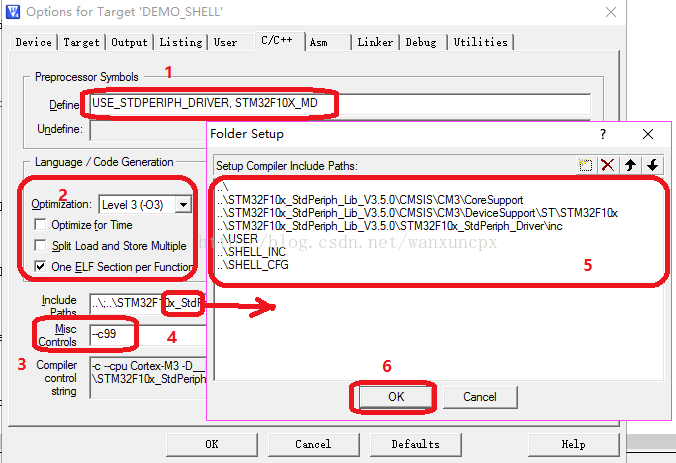
2) Configure includes and paths, pay attention to use the “–c99” standard, as shown
3) Compile the project, burn the program to the development board after no error warnings.
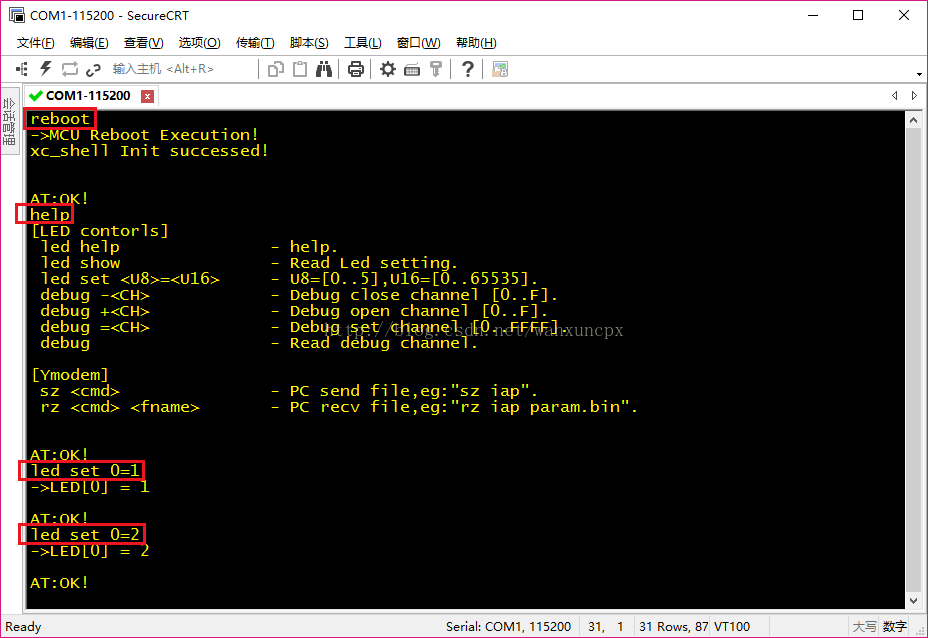
4.3 Final Effect
By entering the following commands, the SHELL platform will reply with relevant information. Among them, entering “led set 0=1” will assign signal 1 to physical LED0; entering “led set 0=2” will assign signal 2 to physical LED0. Thus, when users write program code, they have many LED signals available, which is very useful for debugging timing.
5. Add Your Own Command Script
5.1 Source Code Example
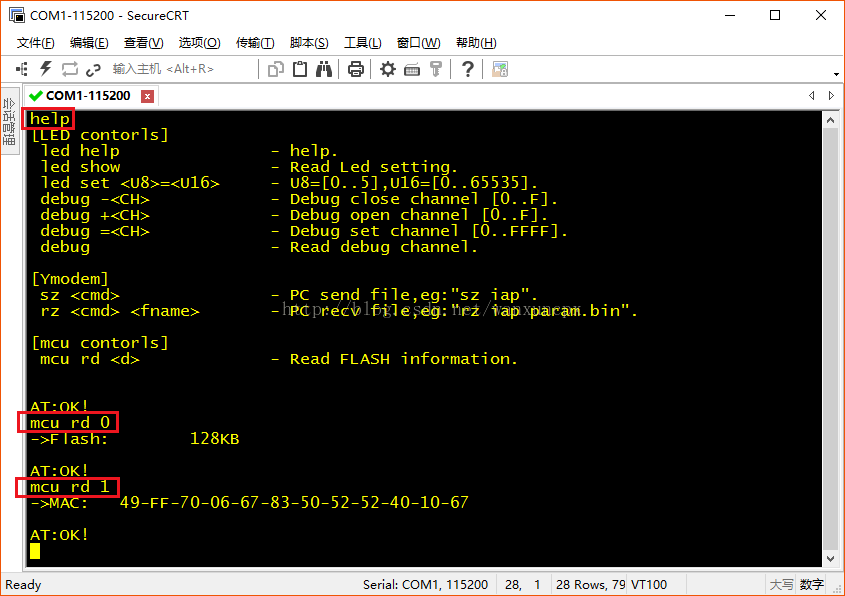
Suppose I want to write my own command script to read the key information of the MCU, with the keyword “mcu”, and the file named shell_mcu.c; when entering “mcu rd 0”, it displays the FLASH size of the MCU, and entering “mcu rd 1” reads the unique ID information of the MCU. The source code of shell_mcu.c:
/*********************************Copyright (c)*********************************
**
**                                FIVE Working Group
**
**---------------------------------File Info------------------------------------
** File Name:               shell_mcu.c
** Last modified Date:      2017/9/17 15:13:57
** Last Version:            V1.0
** Description:             shell test
**
**------------------------------------------------------------------------------
** Created By:              wanxuncpx
** Created date:            2017/9/17 15:14:08
** Version:                 V1.0
** Descriptions:            none
**------------------------------------------------------------------------------
** HW_CMU:                  STM32F103
** Libraries:               STM32F10x_StdPeriph_Lib_V3.5.0
** version                  V3.5
*******************************************************************************/

/*****************************************************************************/
更新说明:
/*****************************************************************************/

/*****************************************************************************/
*********************************  Compile Control ********************************
*******************************************************************************/
#define MCU_SHELL               //Comment out to shield iap shell function

#include "xc_shell.h"       //Shell support file, includes bool, uint8_t... and serial data transmission operations
/*****************************************************************************/
********************************* File Reference Section ********************************
*******************************************************************************/
/*---------------------*
*     Module Driver Reference
*----------------------*/
//#include "net_w5500.h"

#ifdef MCU_SHELL
/*****************************************************************************/
********************************** Shell Instance **********************************
*******************************************************************************/
/*---------------------*
*      CLI Command Service
*----------------------*/
extern bool Shell_MCU_Service(void * pcBuff, uint16_t len );

/*---------------------*
*       CLI Structure
*----------------------*/
const Cmd_Typedef_t CLI_McuMsg=
{
    //Identify keywords
    "mcu",

    //Help content
 "[mcu controls]\r\n"
 " mcu rd <d>\t\t- Read FLASH information.\r\n"
 "\r\n",

 //Processing function
 &Shell_MCU_Service,

 //Attached data
 0,
  #ifdef SHELL_USE_YMODEM
    //Storage medium
    NULL,
  #endif
};

/*---------------------*
*     CLI Linked List Node (Output)
*----------------------*/
Cmd_List_t  McuList  = {&CLI_McuMsg      ,NULL}; //IAP command linked list

/*****************************************************************************/
********************************* Function Declaration *********************************
*******************************************************************************/
/*****************************************************************************/
 Function Function: STM32F103 control function
/ Modification date: 2015/7/14 20:22:02
/ Input parameters: none
/ Output parameters: none
/ Usage: takes about 10s
*******************************************************************************/
static bool FLASH_ioctl(uint8_t cmd,void * param)
{
    #define UID_ADDR            0x1FFFF7E0  //Flash capacity register, value corresponds to KB unit
    #define MAC_ADDR            0x1FFFF7E8  //Unique ID of MCU, a total of 12 bytes
    #define UID_SIZE            2           //Bytes of UID
    #define MAC_SIZE            12          //Bytes of MAC

    //step1: Check parameters
    if(!param)return false;

    //step2: Process data
    switch(cmd){
      case 0 : {       //Get FLASH's UID
        uint16_t * ptDst = (uint16_t *)((uint32_t)param+1);

        *ptDst = *(uint16_t *)UID_ADDR;
        *(uint8_t  *)param =  UID_SIZE;
        return true;
      }
      case 1 : {       //Get chip's MAC address
        uint32_t * ptDst = (uint32_t *)((uint32_t)param+1);
        uint32_t * ptSrc = (uint32_t *)MAC_ADDR;

        *ptDst++ = *ptSrc++;
        *ptDst++ = *ptSrc++;
        *ptDst++ = *ptSrc++;
        *(uint8_t  *)param = MAC_SIZE;
        return true;
      }
      default:return false;
    }
}

/*****************************************************************************/
 Function Function: File system Shell command processing
/ Modification date: 2013/9/10 19:04:15
/ Input parameters: Input current program version
/ Output parameters: none
/ Usage: none
*******************************************************************************/
bool Shell_MCU_Service(void * pcBuff, uint16_t len )
{
    uint8_t    *ptRxd;          //Used for receiving command processing
    int         i;
    uint16_t    retval;
    uint8_t     buff[32];

    //Process command
    //--------------------------------------------------------------------------
    ptRxd = (uint8_t *)pcBuff;

    if(StrComp(ptRxd,"rd ")) //Read FLASH information
    {
        int wval;

        if(1 != sscanf((void *)ptRxd,"%*s%d",&wval) )return false;
        if( wval>2 )return false;
        if(0==wval) {
            FLASH_ioctl(0,buff);
            retval = *(uint16_t *)(buff+1) ;
            printf("->Flash:\t%dKB\r\n",retval);
            return true;
        }
        else if(1==wval) {
            FLASH_ioctl(1,buff);
            printf("->MAC:\t ");
            for(i=0; i<buff[0]-1; i++){printf("%02X-",buff[i+1]);}
            printf("%02X\r\n",buff[i+1]);
            return true;
        }
        else return false;
    }
    else if(StrComp(ptRxd,"help\r\n"))      //Command help
    {
        shell_SendStr((void *)CLI_McuMsg.pcHelpStr);
        return true;
    }
    else return false;
}

/*****************************************************************************/
***********************************   END  ************************************
#endif
5.2 Implementation Steps
1) Add this file to the project.
2) In main.c, use extern to reference McuList, the source code is:
/*---------------------*
*     Shell Command Linked List
*----------------------*/
extern Cmd_List_t  McuList;
3) In main.c initialization, add:
//----------------------------------------------------------
//step1: shell initialization
shell_Init(115200,ledx_cfg);        //Initialize shell interface
CLI_AddCmd(&McuList);     //Add module commands to the linked list
4) Compile the project file.
5) Download to the development board to see the new supported CLI commands in the terminal:
Source:https://dablelv.blog.csdn.net/article
