LEGO is truly a source of joy for adults, as it not only allows for imaginative constructions of houses and buildings but also aids in the creation of precision instruments, making it a favorite among countless geeks!
Previously, someone built a parts sorting machine with LEGO, eliminating the hassle of categorizing LEGO pieces. This time, another LEGO enthusiast, Yuksel Temiz, a researcher at IBM in Zurich, has DIYed a high-precision electric microscope using LEGO, Arduino (an open-source electronics platform), and Raspberry Pi to photograph microfluidic chips from various angles!
This is a perfect blend of work and hobby, truly impressive. Netizens commented: “Even after watching, I wouldn’t know how to do it, and if I tried, it would end up a mess.”
Yuksel’s choice to DIY the microscope was not a spur-of-the-moment decision.
On one hand, IBM Zurich has a tradition of developing microscopes. In 1981, Gerd Binnig and Heinrich Rohrer invented the scanning tunneling microscope here.
As a DIY enthusiast, Yuksel naturally wanted to follow in the footsteps of his research institute, aiming to create a modular electric microscope valued at $300.
Moreover, Yuksel indeed needed a custom microscope for his research, as capturing images of microfluidic chips is incredibly challenging!
One Person’s Creation Saves the Whole Team: This Microscope Works Better Than Store-Bought!
Because chips are generally large, standard microscopes cannot capture the entire image. However, Yuksel’s research team requires a standard microscope to discern fine features that ordinary cameras cannot resolve.
Yuksel also researched papers from other research groups, and it was clear that everyone faced this challenge: the need for a more refined instrument capable of multi-angle photography of chips.
With this goal in mind, Yuksel took some of his spare time to redesign a multifunctional laboratory instrument that could capture macro photos from nearly any angle.
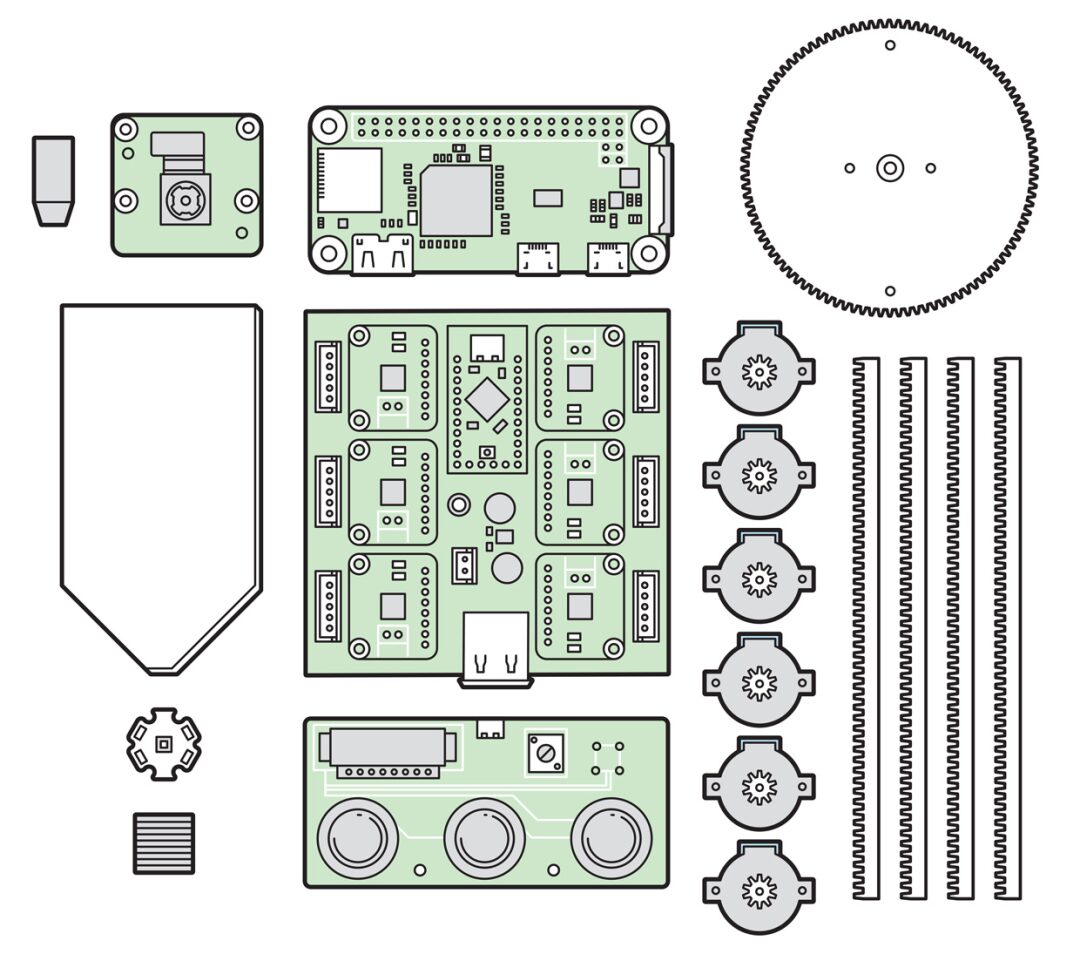
Illustration: James Provost
The design of the imaging microscope utilized a lot of technology and materials, including LEGO for the main structural components and 3D-printed gears and frames to drive its moving parts. The stepper motors, which achieve precise movement, are driven by a motor driver board and controlled by an Arduino board. The Raspberry Pi Zero and Pi camera module are used for image capture.
The initial design included custom control boards and parts printed on a high-resolution printer, but before public release, the microscope was redesigned to be assembled with off-the-shelf boards and parts that could be printed on lower-cost, lower-resolution printers.
Yuksel’s first prototype was a Raspberry Pi camera module mounted on a platform, capable of moving in three-dimensional space using a linear stepper motor from an old CD drive. The Raspberry Pi camera was an ideal choice because it allows manual adjustment of key parameters such as ISO settings and exposure time.
Behind-the-Scenes of the Creation Process: Finding the Best Shooting Angle After Repeated Adjustments!
IEEE Spectrum reported on Yuksel’s process of repeated adjustments during the creation.
Yuksel carefully removed the plastic casing that fixed the lens, exposing the CMOS image sensor, and designed a clever mechanism to move the lens back and forth, allowing for high-magnification macro photography. This device worked well for a while, but it was fragile. Yuksel accidentally broke the lens mechanism several times and damaged the image sensor due to moving parts exceeding their limits.
So he decided to take another approach: completely remove the lens from the Pi camera; then, take the objective lens from a low-cost USB microscope and mount it on another CD linear drive, allowing the objective lens to move back and forth along the optical axis of the Pi camera; and finally, use LEGO to create a casing to protect the exposed sensor of the camera.
However, the outcome of this attempt was that, aside from the high price of the linear module used in the microscope, there were no results. The travel distance of the CD drive was too short, still unable to achieve a wide range of magnification.
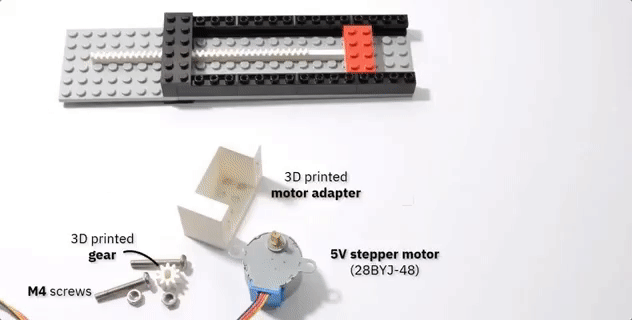
Subsequently, Yuksel switched to a lead screw mechanism used in 3D printers. He did not use the commonly used 8mm diameter screws, shafts, and bearings, but instead used 3mm diameter components to ensure the device’s compactness. Additionally, moving the objective lens would cause issues with stray light, so he decided to replace it with a moving camera sensor.
He built a platform that allowed the object to move and rotate along the x-axis and y-axis. Ultimately, six micro stepper motors with gearboxes were used to achieve platform movement, tilt the microscope, adjust its distance from the object, and focus the image.
 Illustration: James Provost
The angle is perfect!
Since chips are usually made of highly reflective or transparent materials, evenly lighting the chips is also crucial.
The LEGO microscope can place samples under uniform illumination provided by an LED backlight module. The samples can move back and forth, left and right, and can also rotate to find the desired angle. The main body of the microscope can tilt up and down and adjust its distance and focus from the sample to provide different levels of magnification [bottom]. By moving the lensless camera module inside the LEGO casing, the focus can be adjusted by changing the distance to the bottom of the casing.
Yuksel mentioned that he often designs his own Arduino control boards for compact devices. This time, he designed a control board measuring 18×18 mm, using an ATtiny84 microcontroller and a DRV8834 stepper motor driver. The image quality with this configuration is surprisingly good, capable of capturing beautiful images of chips, checking micron-level features, and even serving as a digital goniometer to measure contact angles.
Initially, this project was for a specific need, but Yuksel clearly realized that this could be a multifunctional photography system that anyone could assemble and use at home or school.
Open-Source Assembly Instructions: Hoping DIY Enthusiasts Can Enjoy the Fun of Creation
Yuksel’s leaders at IBM supported him in making the assembly instructions public, which is quite charitable. Just with LEGO, a 3D printer, and a Raspberry Pi, one can create a microscope for scientific research, which can save a lot of research funding.
However, when he began preparing the instructions, he was troubled by several issues.
He built the device using a state-of-the-art 3D printer and a fully equipped mechanical workshop. Additionally, the small stepper motors used are expensive and not readily available at general hobby electronics stores. Programming the ATtiny84 with a dedicated ISP programmer is certainly not as easy as programming a commercially available Arduino board with a USB interface.
Thus, Yuksel returned to the drawing board and redesigned everything using readily available components, such as using Adafruit’s Arduino control board and stepper motor driver, as well as the 28BYJ-48 stepper motor, which can be found for a few dollars anywhere. He also replaced the LED matrix light source with a more easily homemade and lower-cost version.
Afterward, he bought an LED backlight module from Adafruit for $3, which came with a high-power LED. The intensity is slightly lower than the original LED matrix, but the uniformity is quite good for both reflected and transmitted light microscopes. For the new linear actuator, Yuksel combined LEGO’s “sliding” pieces with the rack and pinion linkage he designed using FreeCAD’s gear toolbox, and printed them using his personal Creality Ender 3 printer. The newly designed device performs as well as the previous one, even better.
The instructions have been written on GitHub, and interested students can go check it out~
GitHub link:
https://github.com/IBM/MicroscoPy
This device may still have many areas for improvement, Yuksel hopes this prototype can inspire others to try new and better ideas.
So, can it replace laboratory microscopes? Perhaps not, but this microscope provides a great solution for schools with limited funding, which is why the assembly instructions are open-source, as it is hoped that everyone can easily access it and enjoy the process.
https://researcher.watson.ibm.com/researcher/view.php?person=zurich-YTE
https://spectrum.ieee.org/geek-life/hands-on/build-a-sophisticated-microscope-using-lego-3d-printing-arduinos-and-a-raspberry-pi
Source: IEEE Spectrum
IEEE Spectrum
“Technology Review”
Official WeChat Public Platform


