Question:Examples of Arduino Sleep Mode
I decided to write my own examples to demonstrate how to put the Arduino into sleep mode. You might wonder, what’s the need for this? The answer is: if your project is powered by batteries, this setting can be very useful. Putting the Arduino into sleep mode reduces current consumption, thereby extending the runtime of the project without frequently changing batteries. This is also true for many IoT projects, as the microcontroller or external devices do not need to run continuously.
Examples of Arduino Sleep Mode
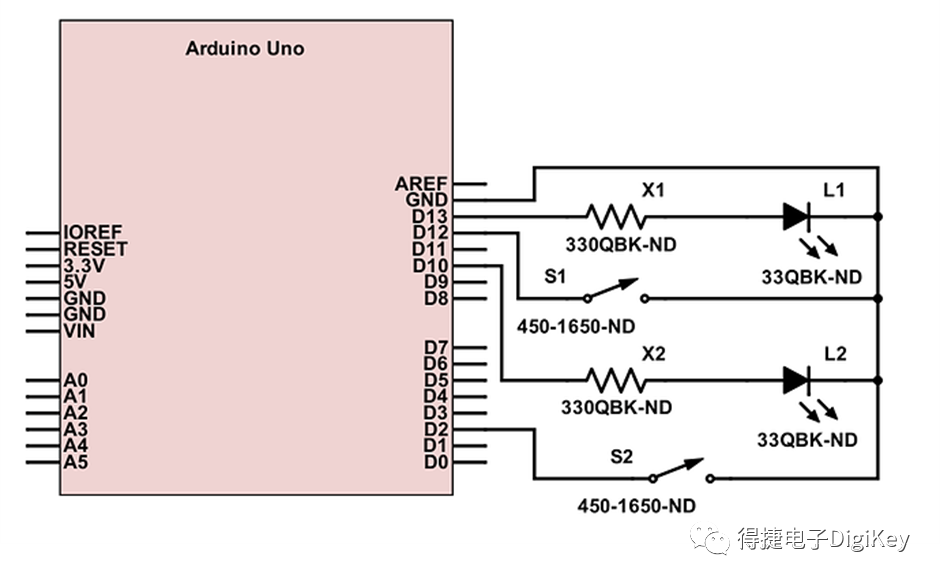
In the startup example code, we used two buttons and two LEDs to show when the board is awakened and when the interrupt button is pressed. When the board is awakened, the LED connected to pin 13 will start blinking. Pressing the button connected to pin 11 will put the Arduino into sleep mode, and the LED on pin 13 will stop blinking. To wake the board up, simply press the button connected to pin 2. When this button is pressed, the LED connected to pin 10 will light up to indicate that the interrupt has been activated.
Link to Scheme-It Schematic
https://www.digikey.com/schemeit/project/arduino-uno-7FSP1FG40120/
Adding Real-Time Clock to Wake Arduino
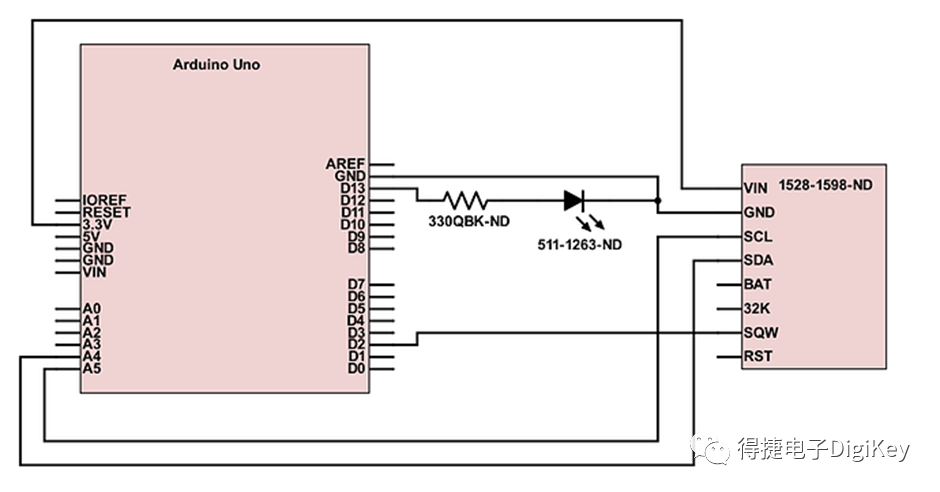
Next, we will add an RTC (instead of a button) to control the sleep mode and wake-up of the Arduino. I am using the component 1528-1598-ND from Adafruit for this project. The main reason for choosing it is that it comes with a built-in interrupt. I originally used the DS1307 breakout board, but I quickly found that it does not support interrupts, making it unsuitable for this project. I also downloaded some libraries for this project.
Here are the links to the .zip library files I downloaded:
https://github.com/PaulStoffregen/Time——Arduino Timing Library
https://github.com/JChristensen/DS3232RTC——For DS3231, includes reminders needed to wake Arduino
-
Add RTC
-
RTC Wiring Diagram
Link to Scheme-It Schematic:
https://www.digikey.com/schemeit/project/arduino-uno-rtc-sleep-TKBAG6G400UG/
Adding Soil Moisture Sensor
and Temperature/Humidity Sensor
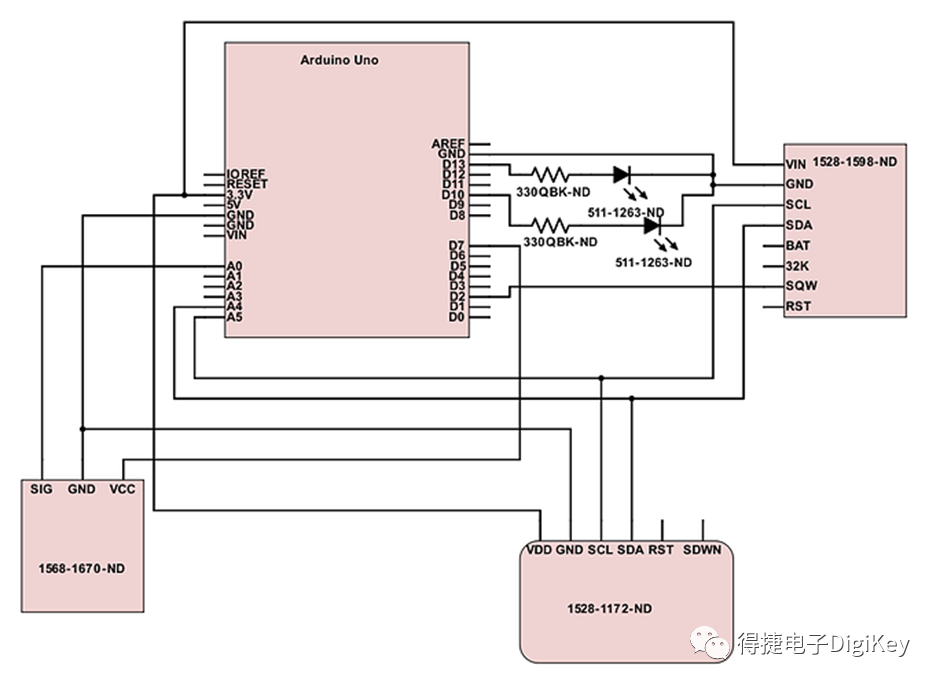
To demonstrate the use of such sensors, I decided to create a standalone monitoring system. For this, I will use a soil moisture probe (1568-1670-ND) and a temperature/humidity sensor (1528-1172-ND). The program now needs to check the soil moisture content and temperature. I decided to omit the humidity function in this code draft, but it can be added back with just a few lines of code.
The monitoring system will check to ensure that the soil moisture does not drop too low. If the moisture content falls below a certain level, the system will activate a water pump or solenoid valve. In this case, I will use an LED as an indicator instead of a water pump or solenoid valve.
For this code draft, you need to install the MPL115A2 library, which can be installed via the Manage Libraries Button (found under the Include Library in the Sketch Menu), or you can find the zip file at the following link:https://github.com/adafruit/Adafruit_MPL115A2
Add Temperature / Humidity Sensor and Soil Moisture Sensor Code
RTC and Sensor Wiring Diagram
Link to Scheme-It Schematic: https://www.digikey.com/schemeit/project/arduino-uno-rtc-and-sensors-sleep-0FCQKUG4006G/
For more technical information about Arduino, please check out the following on techForum:
-
Examples of Functions for Arduino Uno
-
How to Choose IR, UV, and Visible Light Emitters Suitable for Arduino
-
Easy Implementation of PWM in Arduino
-
Arduino Socket Replacement
-
Arduino Expansion Boards
Search on WeChat for “digikey” or “得捷电子 to follow our official WeChat and register as a member, receive engineering tips weekly, earn points, exchange gifts, and enjoy benefits
↙
Click below “Read the original” for more
Let me know you are watching yo