If you want to process data at high speed, you need to be familiar with Single Board Computers (SBCs). These computers typically run on Android and Linux operating systems.
Orange Pi is a computer that offers good technical features at a reasonable price. This series includes different types of such computers, one of which is the Orange Pi 3G-IoT-A development board. As the name suggests, this development board is designed for IoT applications, as it has various connectivity options including WiFi, Bluetooth, and GSM 3G networks.
This article will guide you through the process of installing the Ubuntu Linux operating system on the Orange Pi 3G-IoT-A.
Ubuntu is an operating system that provides a user-friendly interface and a variety of software applications. These features make Ubuntu an excellent choice for both beginners and experienced users. Whether you are a tech enthusiast, a developer, or just looking to upgrade your device, this tutorial will guide you through the entire installation process.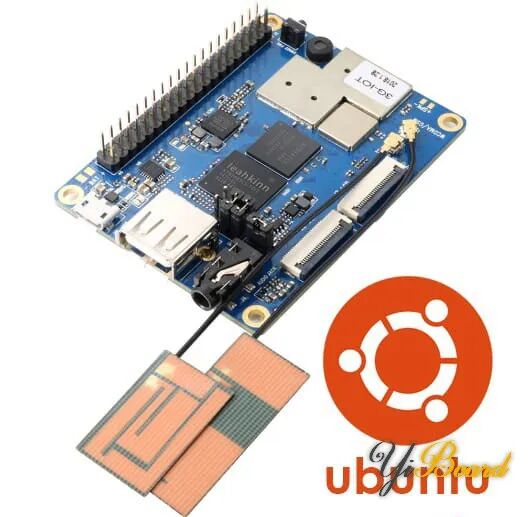
Overview of Orange Pi 3G-IoT Hardware
The Orange Pi 3G-IOT-A is an open-source single board computer that can run Android 4.4 and Linux. The board differs from other Raspberry Pi models in that it has a SIM card slot for 3G communication.
As you can guess from the name, the primary application of the Orange Pi 3G-IOT-A is the Internet of Things (IoT).
This development board is equipped with a MediaTek MT6572 processor, 256 MB DDR2 RAM, and 512 MB of EMMC type main memory.
The Orange Pi 3G-IOT-A also features various ports, such as a SIM card slot, microSD memory slot, FPC camera connector, display, 3.5 mm audio jack, USB Host, and Micro USB.
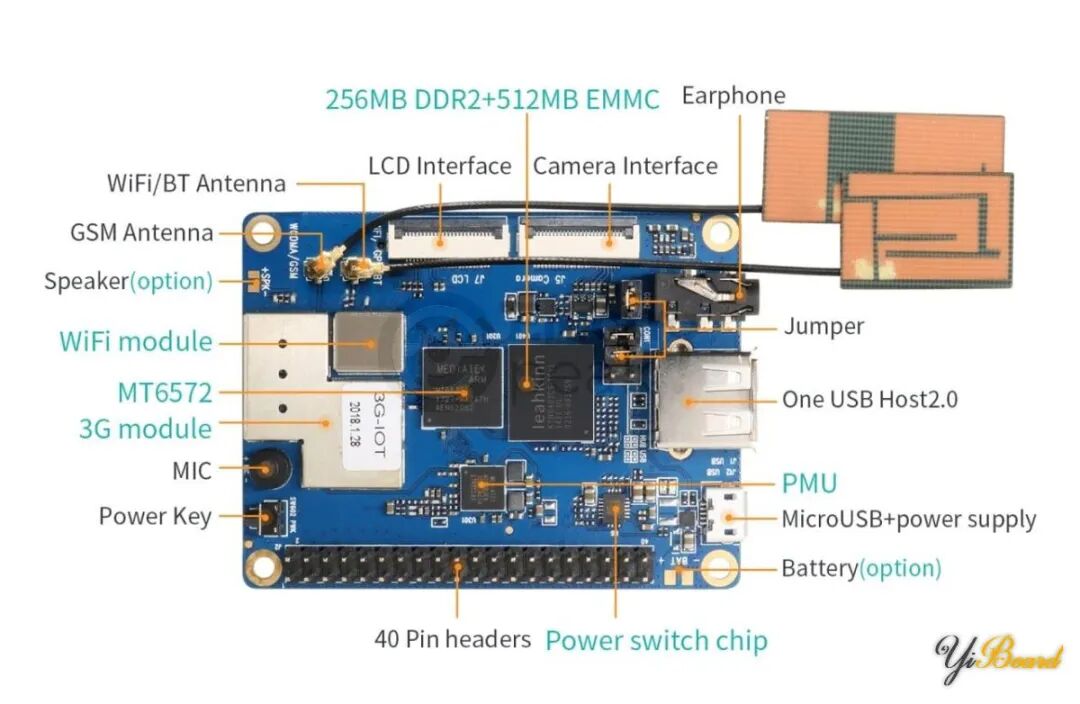
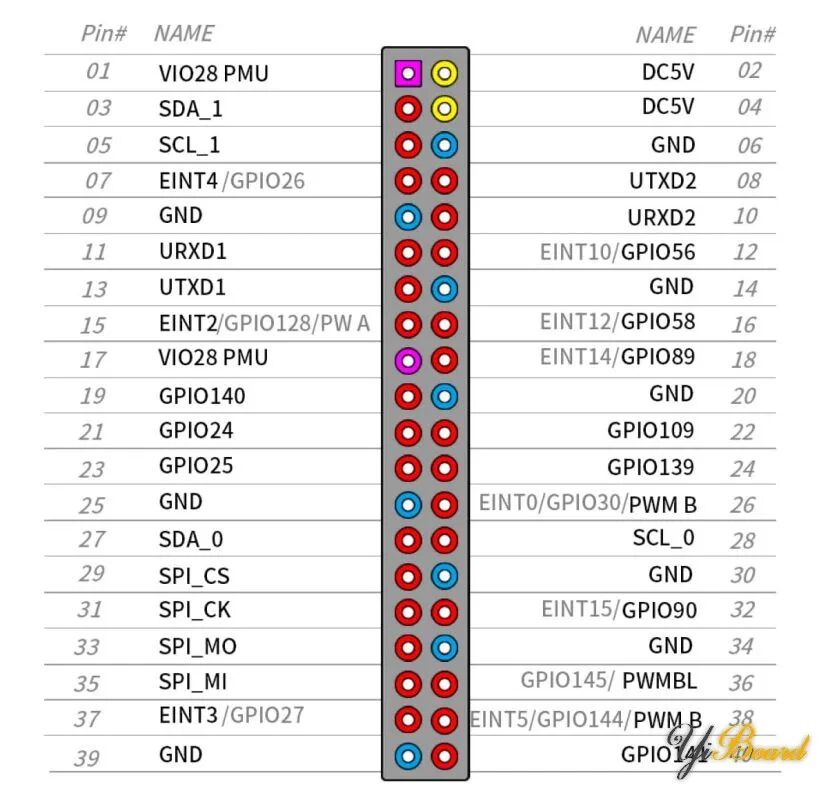
Additionally, the side of the development board is embedded with a 40-pin GPIO, as shown in the image below.
Preparing and Installing Ubuntu on Orange Pi 3G IoT
To install Ubuntu, first prepare the Orange Pi development board by following these steps.
Step 1: Jumper Settings
Remove the CON2 jumper from the board, as shown below.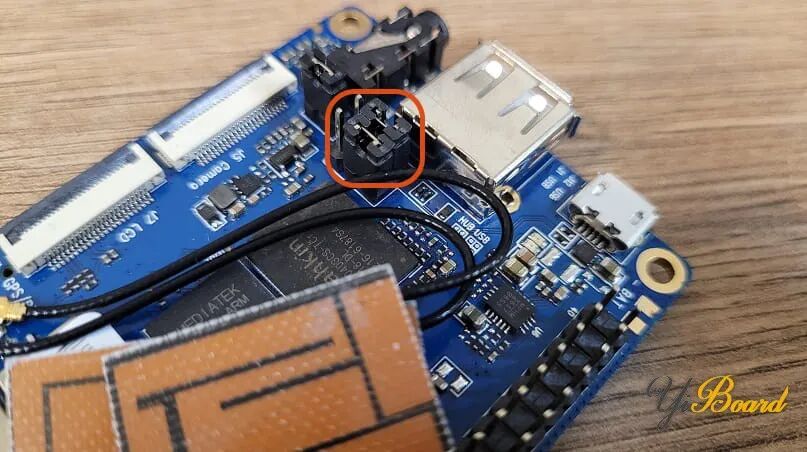
Place the CON1 jumper in the position shown below.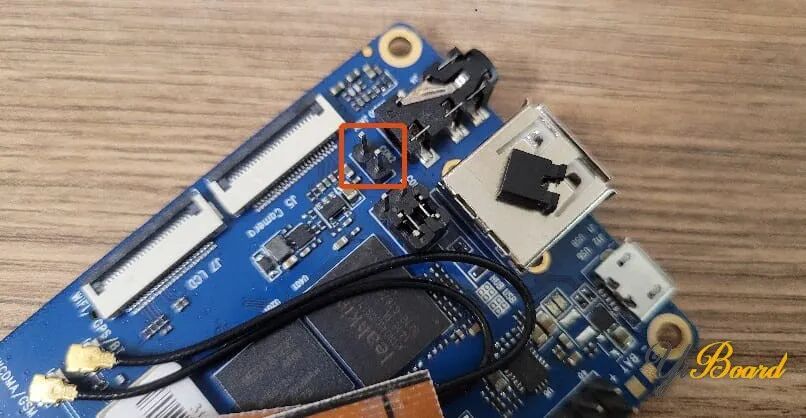
Step 2: Prepare the microSD Card
Connect the microSD card to your computer and run the SD card formatting software. As shown below, first select your memory card, check the box, and then click Format.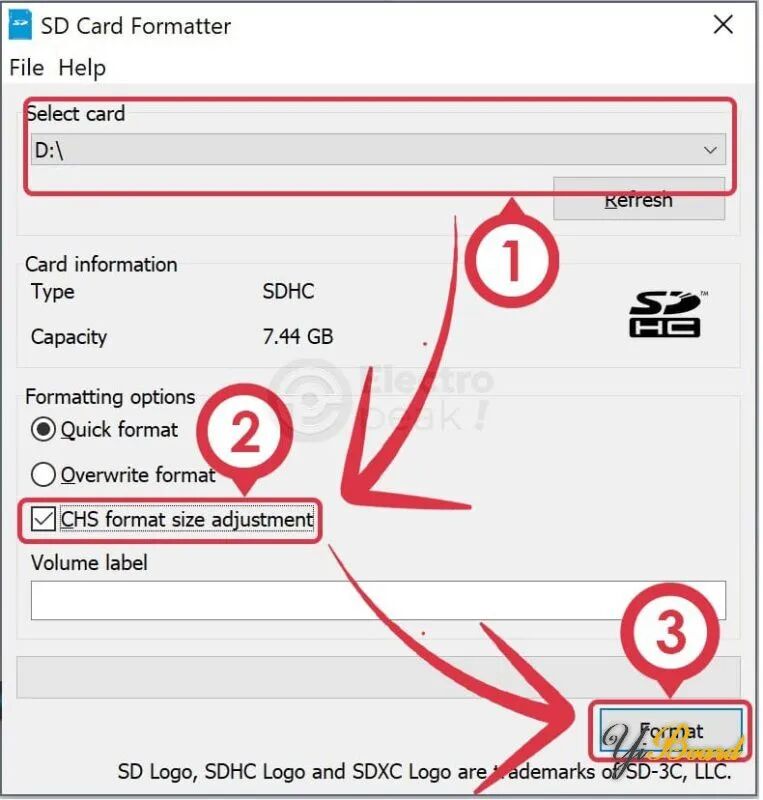
After formatting the memory card, run the “win32 disk imager”.
Extract the operating system files downloaded from this link. Now, as shown below, select the storage card and click the icon to choose the rootfs.img file from the extracted files. Finally, click “Write” to write the image file to the microSD card.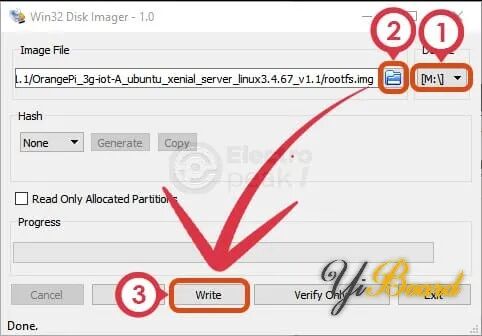
Step 3: Install MediaTek Drivers
Run the driver installation file downloaded from this link. After completing the installation process, go to the installation folder and run the dpinst64.exe or dpinst.exe file (depending on your operating system) from the following path:C -> Program Files -> MediaTek->SP Driver->drv
Step 4: Install Linux Firmware on Orange Pi 3G-IoT-A
First, extract the SP Flash Tool software downloaded from this link and run the flash_tool.exe file.
In the options menu, click “Option…”. Next, click “Connection” and follow the steps shown in the image below.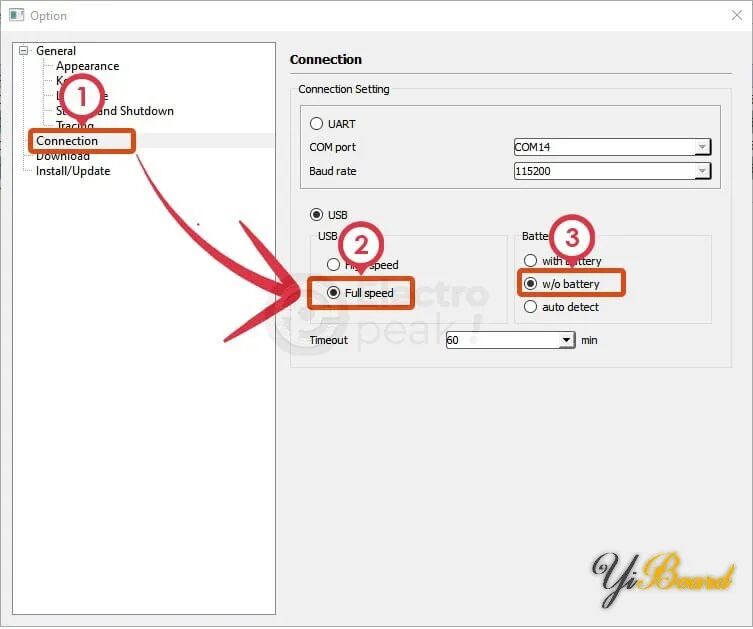
Now, on the main page, click “Choose” in the “Download-Agent” section, and select the MTK_AllInOne_DA.bin file from the SP Flash Tool software folder.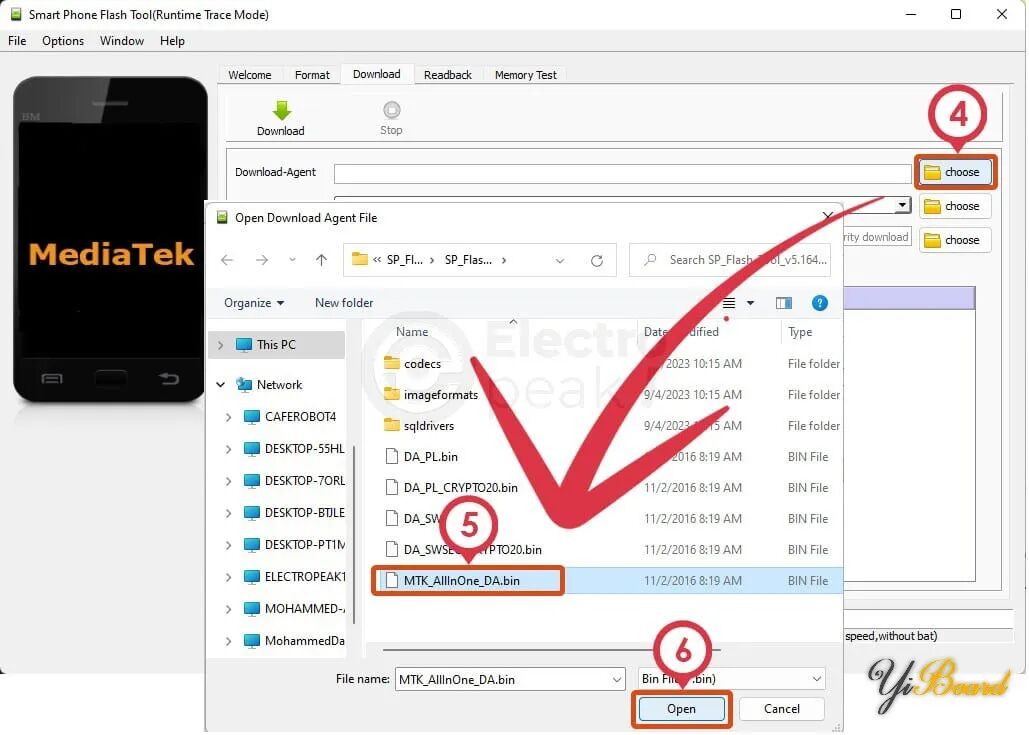
Additionally, in the Scatter-loading File section, click “Choose” and open the MT6572_Android-scatter.txt file from the operating system folder.
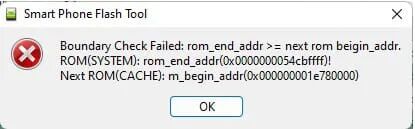
Here, you will see an error message as shown below. Click OK.
Finally, after selecting the “Format All + Download” option, click the Download button.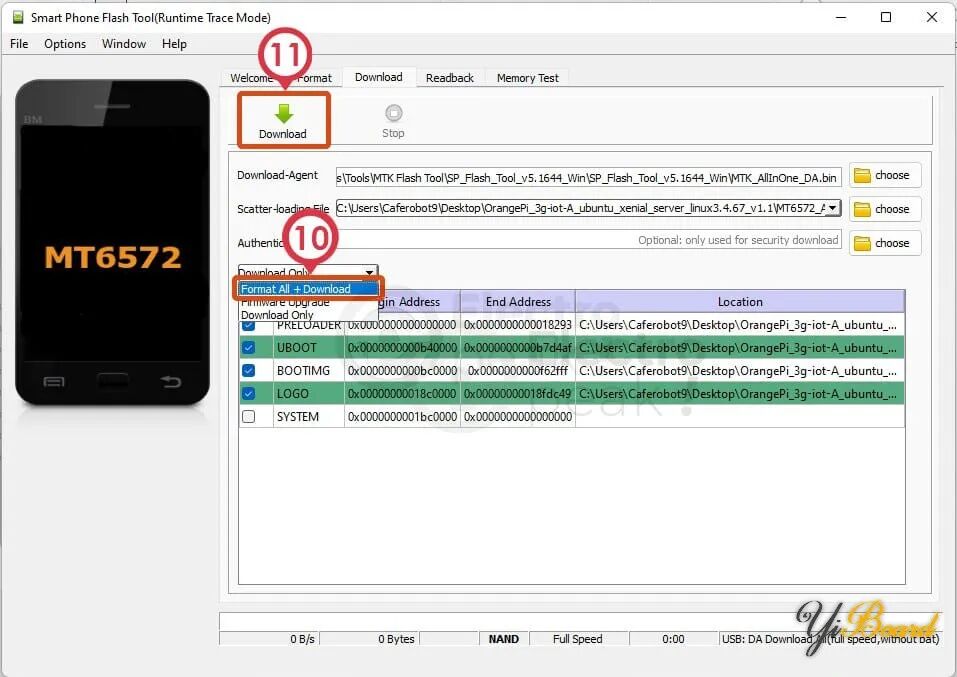
Now, the firmware has been installed on the Orange Pi 3G-IoT-A board.
Step 5: Install Linux and View the Process on the Serial Port
Now, the development board is ready to install the Linux operating system.
Insert the storage card with the operating system image written into the board’s memory slot.
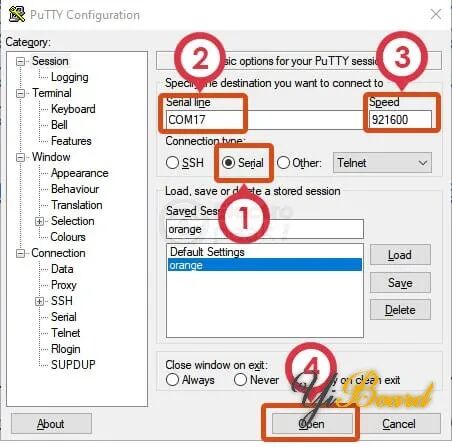
Next, connect the GND and RXD pins of the USB-TTL converter to pins 9 and 13 (GND and UTXD1) of the Orange Pi development board, and run the Putty program.
Follow the steps shown in the image below.
Connect the power to the Orange Pi. After a moment, the operating system will begin to install, and you will see the image below. Here, the system will prompt you to enter a username and password. After that, connect the TX pin of the USB-TTL converter to pin 11 of the Orange Pi and enter the username root and the default password orangepi.

You have successfully installed the Linux operating system on the Orange Pi 3G-IoT-A development board!
For more content, please click“Read the Original” 》》