This article is a featured post from the KSY Forum by author ID: fengzhidian
The author has recently researched several smart home devices, which have fewer open ports and are generally unable to obtain debugging permissions from the network side. Gaining local debugging permissions on the device has become an important step in the current offensive and defensive landscape. This article mainly documents the process of obtaining local permissions through serial port access and firmware modification.
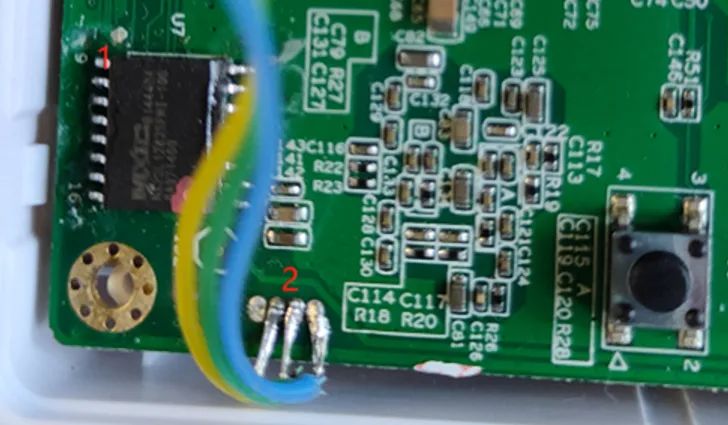
The device shown in the figure below has the flash chip at position 1 and the serial debugging interface at position 2. Using a serial cable for serial detection, the interfaces on the main board are connected one by one, followed by using a multimeter to test the levels and finally determining the serial line sequence. This step has been shared by many colleagues, so I won’t elaborate on it here. Next, I will mainly introduce the process of obtaining local shell permissions and setting up the debugging environment.
Figure 1 Device mainboard flash and serial location
2. Obtaining Local Permissions
This section mainly introduces three steps: serial detection, reading firmware, and modifying firmware. These three experimental steps allow the device to run the modified firmware and successfully execute local shell and telnetd services.
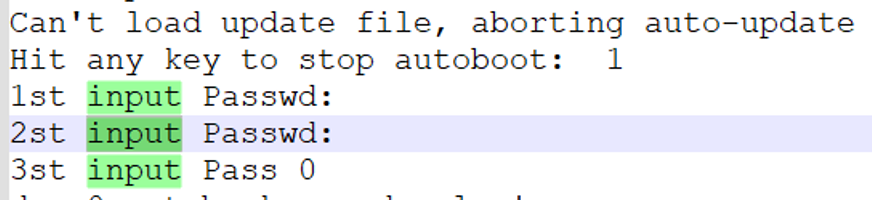
After connecting the device with a serial cable, it displays (none) login, requiring a login. Since the password is unknown, local root access cannot be gained temporarily.
Figure 2 Local prompt login
When attempting to change the uboot startup parameters, a password is set for uboot.
Figure 3 Prompt to enter password before entering uboot command line
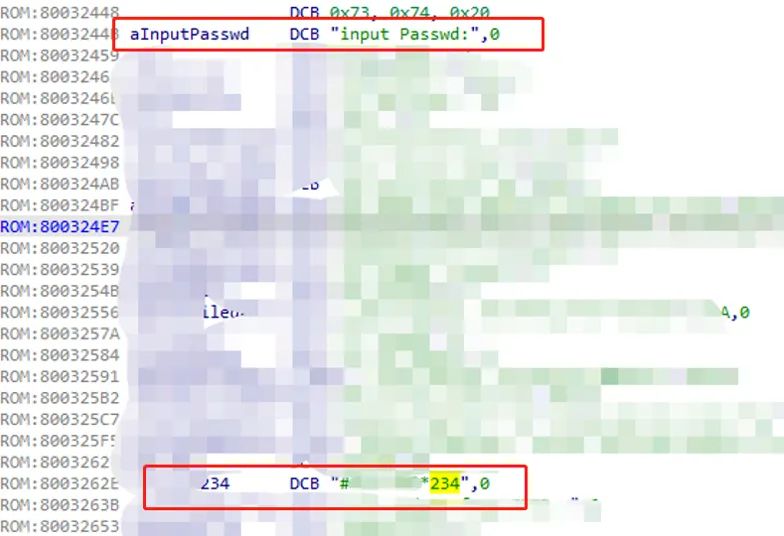
After attempting to extract uboot, a password was found, but entering it into uboot does not allow login, and there is currently no way to boot the specified firmware through uboot in a short time.
Figure 4 Hardcoded string after uboot reverse engineering
In summary, obtaining local permissions directly through the serial port is quite difficult; the time cost of reverse engineering uboot is significant, so we decided to modify the firmware on the flash to gain access.
The hardware uses Norflash, which makes processing firmware relatively easy. The tools used this time are as follows:
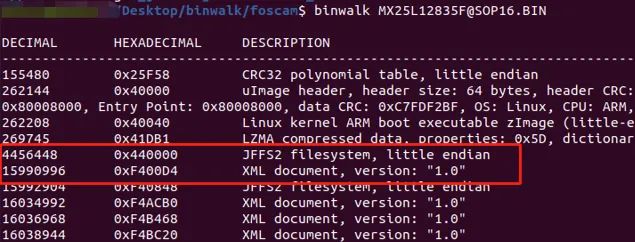
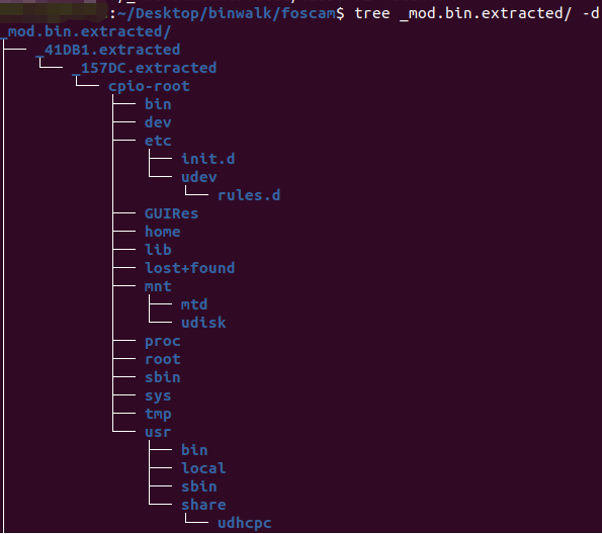
After reading the firmware with the programmer, it can be directly unpacked into the file system using binwalk for static analysis of the firmware.
Figure 5 Binwalk output of firmware structure
The structure from Binwalk appears to have some recognition errors. After examining around 0xF40000, we can confirm that the area from 0x440000 to 0xF40000 is the JFFS2 filesystem partition (not 0xF400D4).
Figure 6 Firmware 0xF40000 location
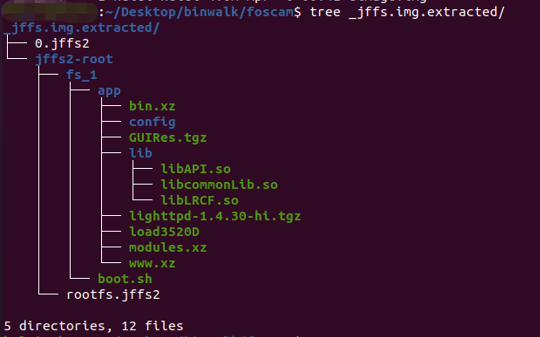
Using the dd command to split the firmware, the filesystem files in that area can be unpacked with binwalk to obtain the following filesystem contents.
Figure 7 JFFS filesystem content
By using binwalk to unpack the entire firmware, we can obtain the root filesystem directory as shown below:
Figure 8 Root filesystem structure
Searching for ‘boot.sh’ in the root filesystem confirms that boot.sh will start on boot.
Figure 9 Boot startup boot.sh
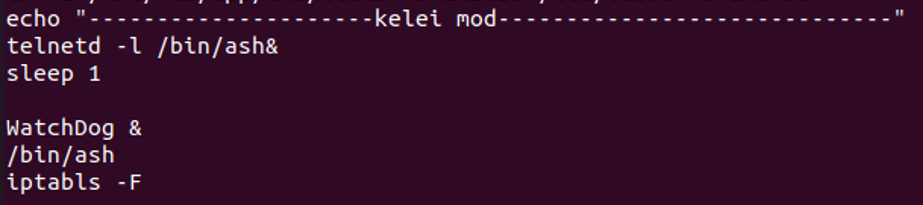
This means that the JFFS2 filesystem is loaded into memory as an MTD partition, mounted, and started in the startup script ‘S90init’. We only need to modify this script and start telnetd and the serial shell.
From the above experiments, we know that modifying boot.sh allows the execution of local commands. The following content should be added to boot.sh.
Figure 10 Firmware modification content
Next, we will repack the firmware. The main steps are as follows:
Ø Repack the modified firmware directory into a file system of the same format rootfs.jffs2.
Ø Create a full ‘ff’ file system out1024.bin.
Ø Fill rootfs.jffs2 into out1024.img.
Ø Fill out1024.img back into the original firmware.
The corresponding commands are as follows:
Figure 11 Commands corresponding to firmware modification
Using the programmer to burn the firmware, I won’t elaborate on the use of the programmer here. After restarting the device, it was found that the device started the modified script:
Figure 12 Modified firmware takes effect
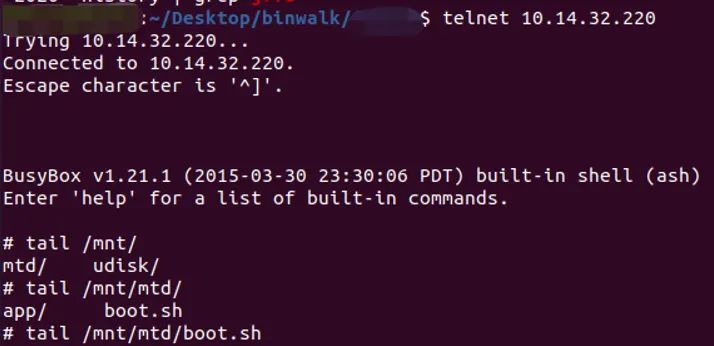
Telnet also successfully connects to the shell:
Figure 13 Successful telnet shell connection
This section introduces two aspects: the NFS service setup process and the cross-compilation environment setup process. Through these two processes, we expanded the local running storage space and established a debugging environment for software processes.
Having local permissions, but the device does not have much space for us to use, as shown below.
Figure 14 Device self-space usage status
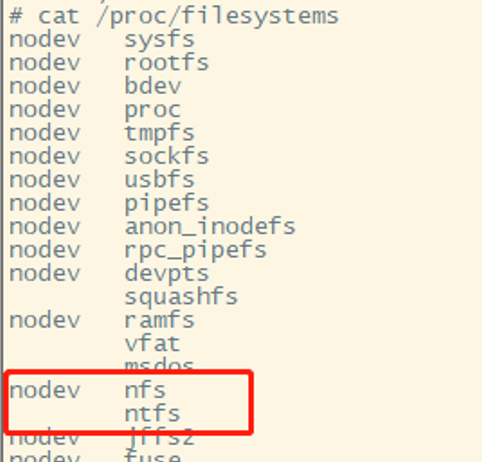
Check /proc/filesystems to confirm that the device has the module for NFS service mounting. Using NFS service external hard drives to locally execute gdbserver or tcpdump is a good choice.
Figure 15 Filesystems file content
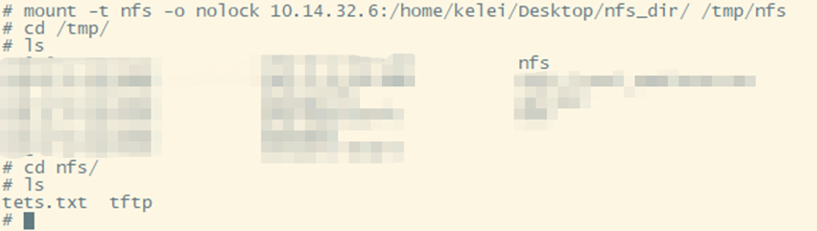
After setting up the NFS service locally, let the service host and the device be on the same subnet, allowing remote mounting of the NFS service to the local device, thus solving the problem of insufficient local space. Specifically, as shown below.
Figure 16 Successfully mounted remote hard drive
Figure 17 Mounted remote hard drive to expand capacity
3.2 Cross-compilation Environment
3.2.1 Determine the Cross-compiler
A full disk search for ‘arm-‘ yields the following information, confirming that the cross-compilation tool is arm-none-linux-gnueabi-4.4.0_ARMv5TE, as shown in the figure below. Its download address can be found online.
Figure 18 Determining the cross-compiler
Figure 19 Online search for cross-compiler link
The process of building the cross-compilation environment is simply decompressing and adding PATH to the system, which will not be elaborated here. Next, we will try compiling gdbserver.
3.2.2 Cross-compiling gdbserver
From the figure showing the online search for the cross-compiler link, it can be seen that the version of the cross-compiler dates back to August 2012. Here, we choose gdb-7.6.1 from around 2013 for compilation, as it is less likely to encounter errors.
The termcap library that gdb depends on is not in the cross-compilation environment. Download termcap-1.3.1.tar.gz and cross-compile it, then copy the generated libtermcap.a to the lib directory of the cross-compilation environment to successfully compile gdbserver. The command to compile gdbserver is as follows:
./configure –host=arm-none-linux-gnueabi –target=arm-none-linux-gnueabi CC=arm-none-linux-gnueabi-gcc
This command is run in both the gdb root directory and the gdb/gdbserver directory to generate the cross-compiled gdb and gdbserver. The compiled files are copied to the nfs shared directory:
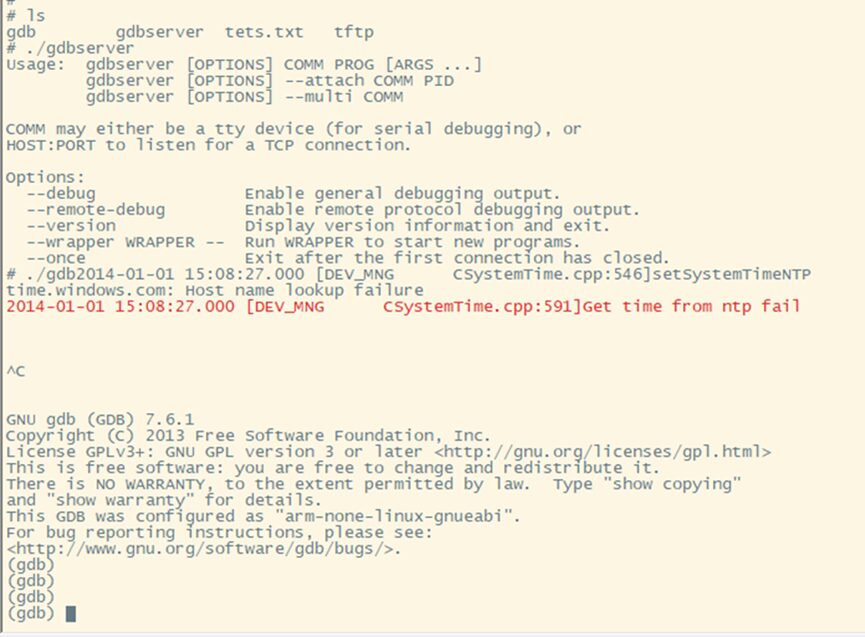
Figure 20 Copying gdb and gdbserver to the shared directory
Figure 21 Successfully executing gdbserver and gdb on the device
Figure 22 gdbserver successfully attached to the process
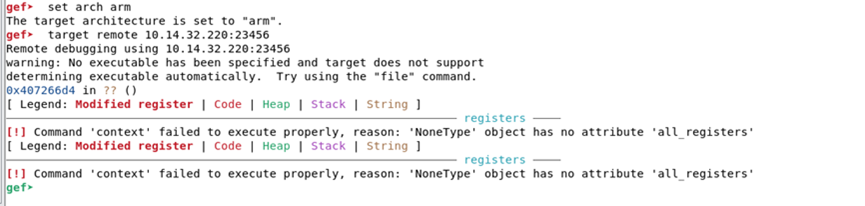
Figure 23 Establishing debugging connection
There were some issues when establishing the connection at the end. The watchdog killed the process, and future debugging will need to bypass the watchdog, which will not be elaborated here.
Figure 24 Watchdog killed the debugging process
This article shares the simple firmware analysis, firmware modification, and debugging environment setup process of embedded products by documenting part of the research process on smart home devices. It is hoped that it will be helpful for readers’ security research.
Due to the special nature of existing devices, these methods are just one feasible way to achieve the stage goal. For example, firmware can also be burned using uboot’s tftp function, and DIY firmware can also be loaded through uboot, etc. These functions are relatively simple, but ultimately it still involves writing data to flash and reading the data from the flash area into memory before starting the process, so there is not much necessity for a separate article. Interested students can communicate separately.
KSY ID: fengzhidian
https://bbs.pediy.com/user-home-871632.htm
*This article is original by KSY Forum fengzhidian, please indicate the source if reprinted from KSY community
# Previous Recommendations
1. Analysis of a New Variant QakBot Trojan
2. [VNCTF2022] Interesting PHP Reproduction
3. Analyzing a Simple Intermediate Android Problem
4. Understanding the Kerberos Protocol from Basics to Advanced
5. Tiger Symbol Network Security Track 2022-pwn-vdq-WP Problem Analysis
6. Setting Up a Private Lumen Server for IDA