
OpenWrt router allows public IPv6 access to home NAS devices. This tutorial covers setting up Alibaba Cloud dynamic DNS for external IPv6 domain access to your NAS at home, configuring the OpenWrt router, and accessing home computers and NAS devices via IPv6. Today, I spent my time tinkering with this router instead of updating my website. Previously, I bought a “JD Cloud Wireless Treasure 1st Generation” router for 70 yuan and flashed it with the Padavan firmware, successfully enabling IPv6 public access to home NAS.
However, there is a frustrating issue: Padavan cannot access Baidu Cloud when IPv6 is enabled on the computer; it requires disabling IPv6 in the network settings and only using IPv4 to access Baidu Cloud. This is too troublesome for someone like me who needs both. Therefore, I started tinkering with the OpenWrt firmware, re-flashing the JD Cloud Wireless Treasure 1st Generation to the OpenWrt system.
1. Change Optical Modem to Router PPPoE Dial-up Internet
First, note that most households now use an integrated device from the ISP that combines the optical modem and router, which handles both dialing and Wi-Fi. If you want to switch to PPPoE dial-up, you need the super administrator account + password for the optical modem, not the admin account password on the back of the modem, as that won’t work.
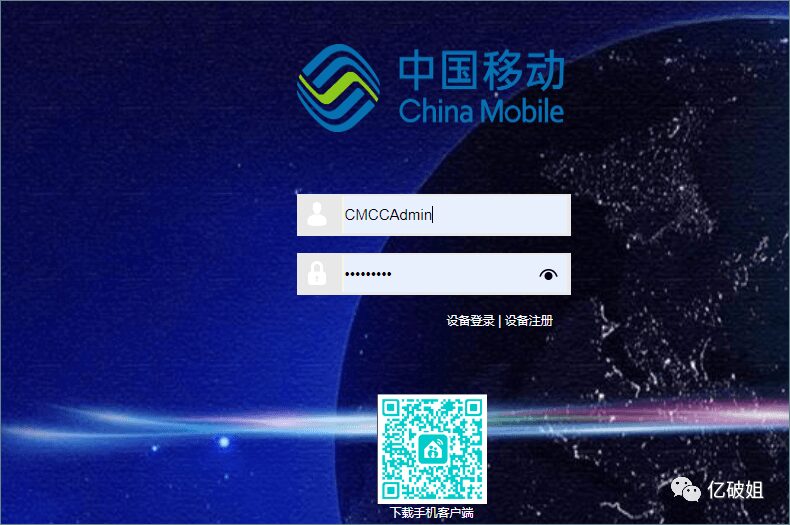
To obtain the super administrator account + password, call your ISP’s customer service and report a broadband issue, requesting a technician to come for repairs. Once they arrive, directly ask for the super administrator account + password. Even if you mention wanting to change to PPPoE dial-up, they may not understand. Many technicians may not be willing to give you the super admin credentials; just state that you need it for a purpose. Remember, they might provide you with a default super admin account password, so try logging in with that. My mobile broadband’s super admin password is not the default; after installing broadband, the optical modem automatically resets the password randomly. This issue took me several days to resolve, as the technician insisted that the provided credentials were correct.
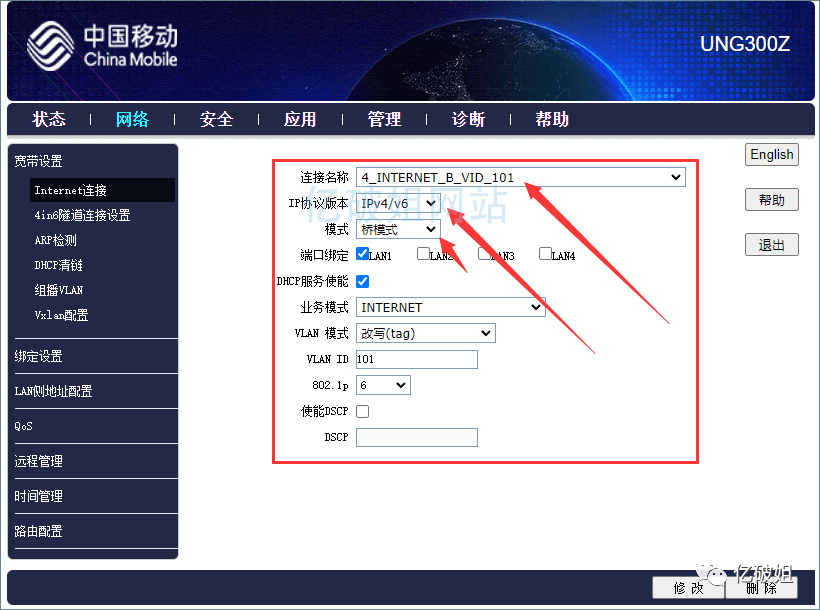
Once you have the password, you can change some parameters on the optical modem, which is crucial. Remember the VID_101; the codes vary by region.
After changing it as shown above, you can use the router to dial into the internet. Everyone should search for tutorials on Baidu to solve many issues; I also referenced various sources. Don’t be rigid; understand how to adapt.
Changing the optical modem to PPPoE dial-up does not affect IPTV TV playback; the IPTV TV can still be plugged into the original interface of the optical modem.
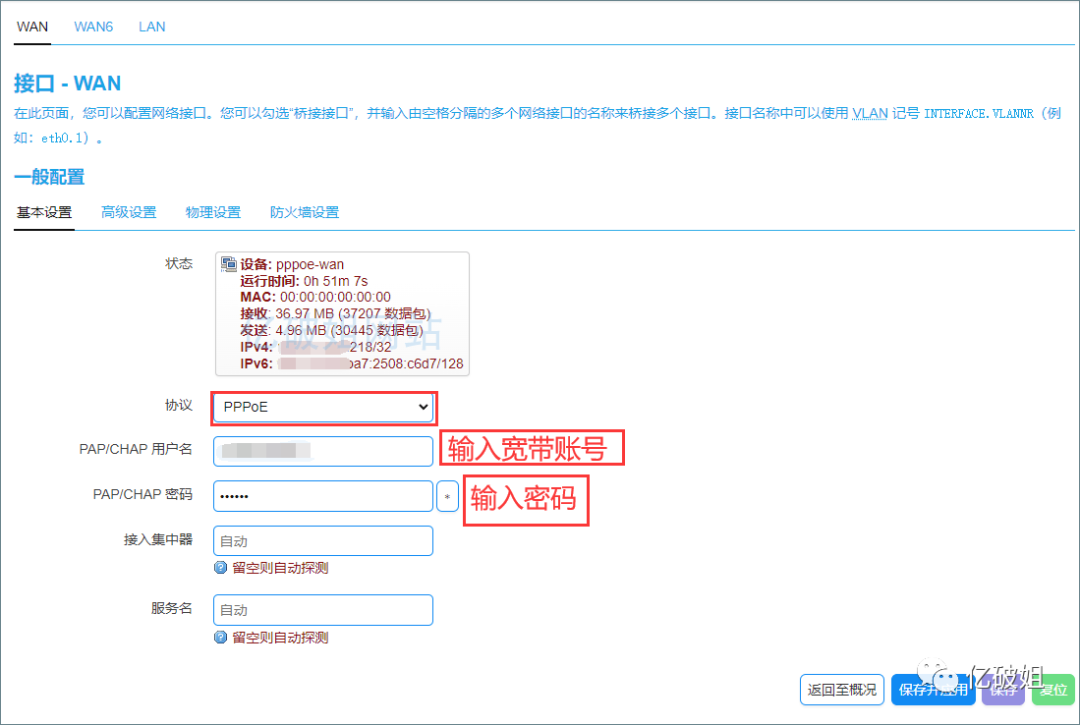
2. Basic WAN Interface Settings
After flashing the JD Cloud Wireless Treasure 1st Generation with OpenWrt firmware, the first issue I faced was not knowing where to use PPPoE dial-up. I mistakenly tried to use the LAN port to dial twice before realizing I needed to use the WAN port for dialing. For detailed information, see the images below.
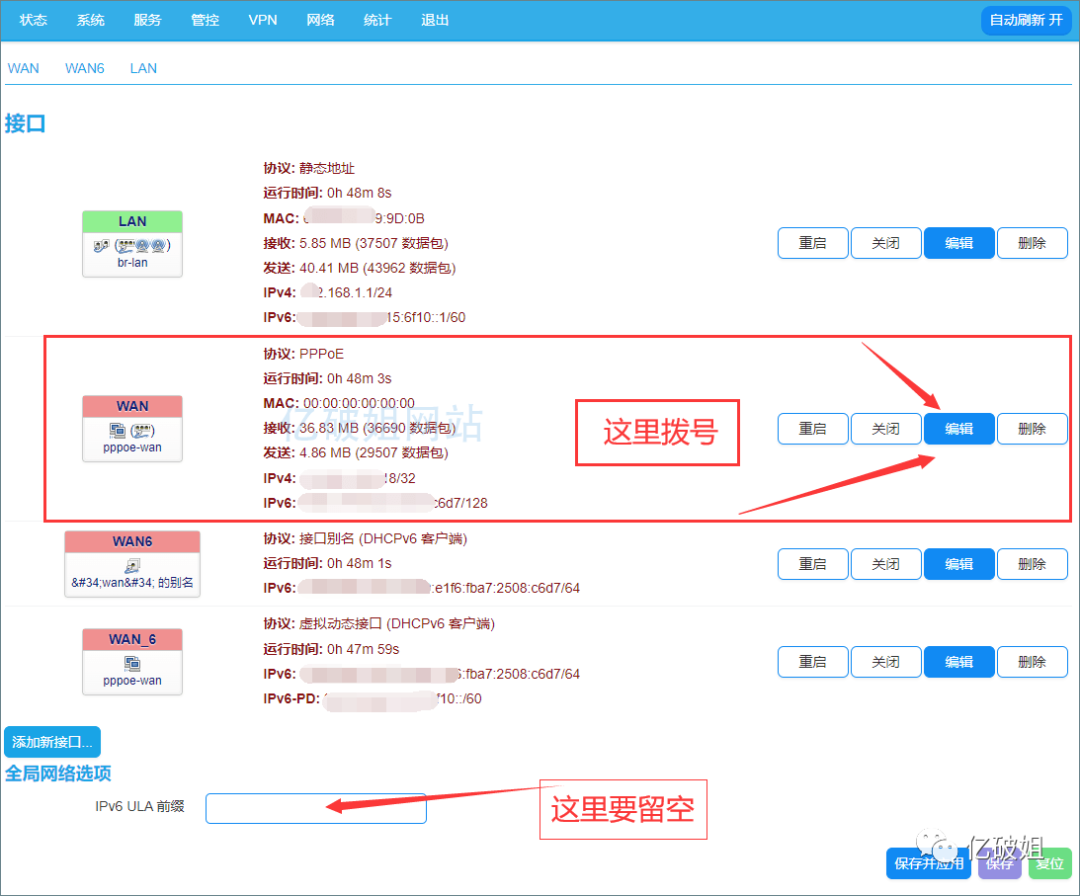
For the WAN interface, go to Network —> Interfaces —> WAN —> Advanced Settings, and uncheck “Use built-in IPv6 management”. The rest of the physical settings can remain default, and set up the firewall as needed.
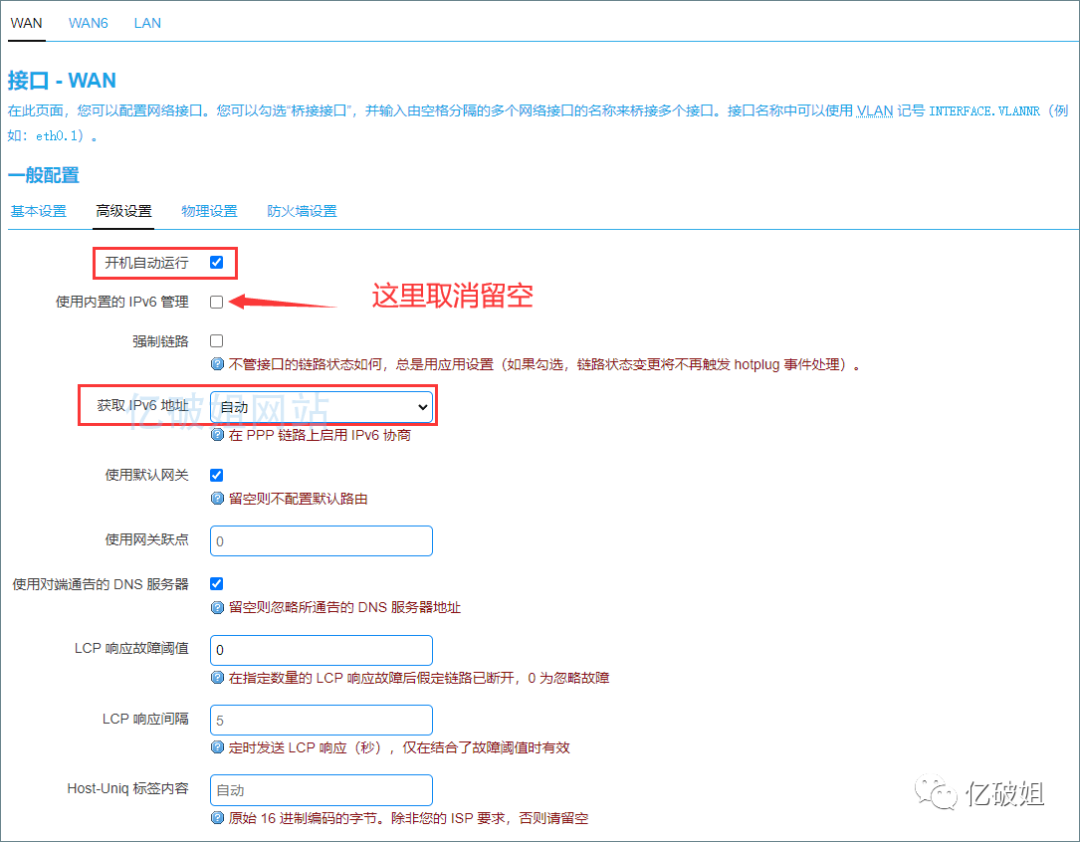
Finally, click apply and save.
3. LAN Interface Settings
Go to Network —> Interfaces —> LAN —> Advanced Settings, check “Use built-in IPv6 management”, set the router advertisement service to “Hybrid mode”, disable DHCPv6 service, disable NDP proxy, and check “Always advertise default route”.
If you have access issues, I suggest going to LAN —> Advanced Settings and uncheck “Use built-in IPv6 management”.
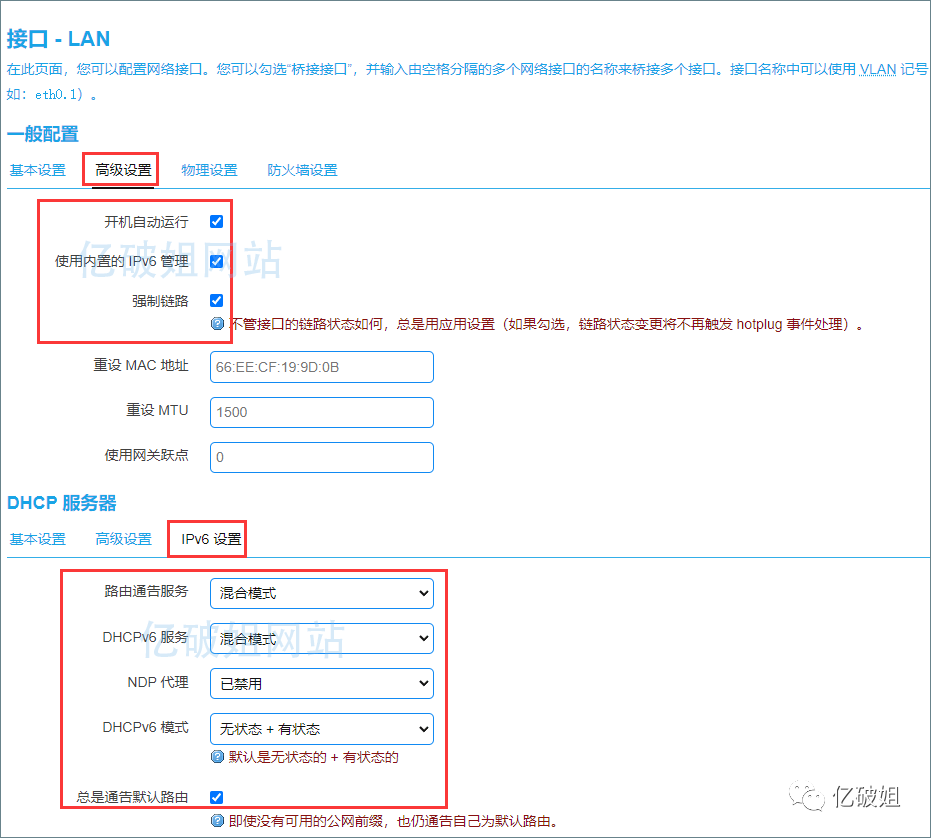
Finally, click apply and save.
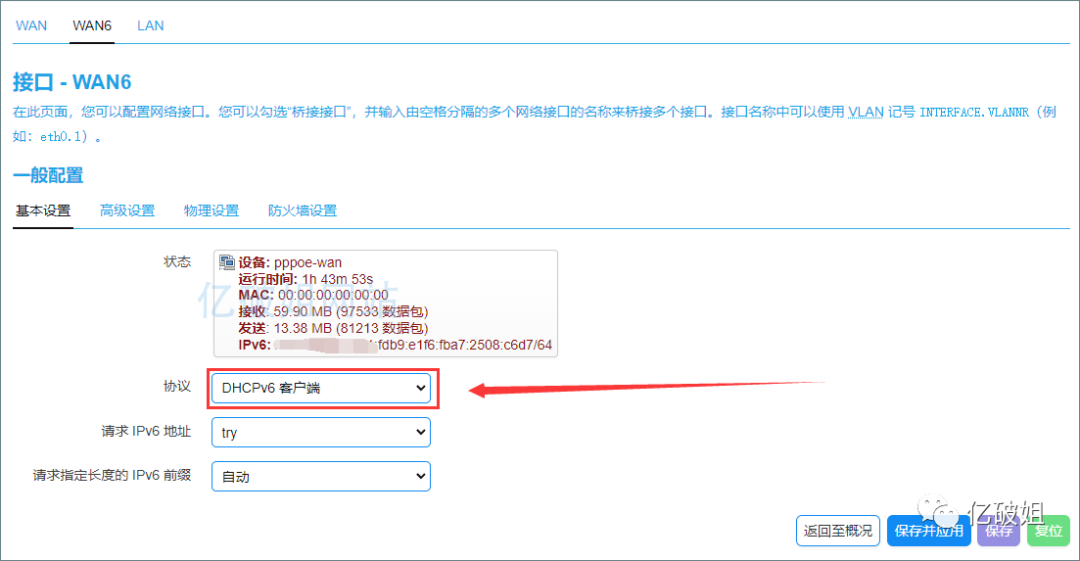
4. WAN6 Interface Settings
In the general settings, select the protocol as “DHCPV6 Client”.
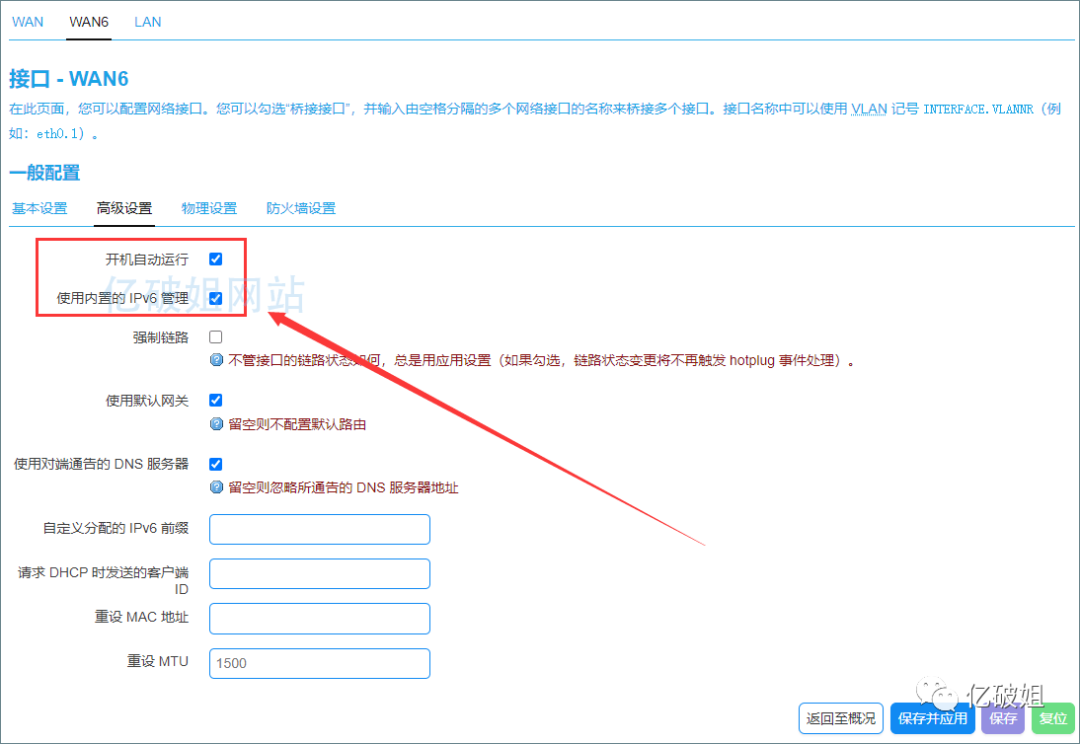
In the WAN6 “Advanced Settings”, make sure to check “IPV6 management”.
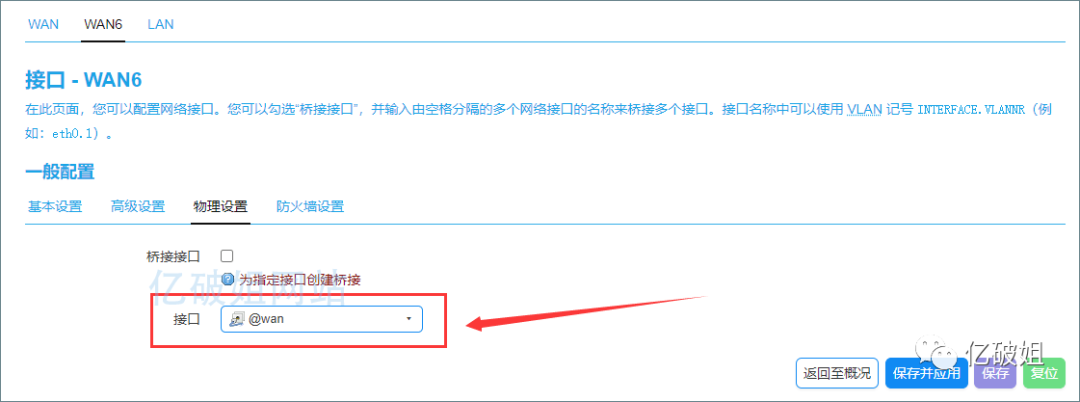
For physical settings, select the @WAN option. If this option is not available, you can input it manually.
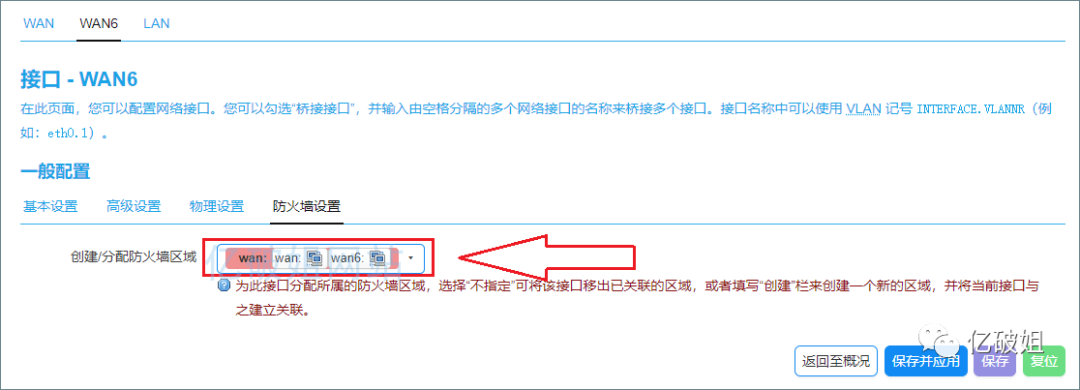
Finally, in the firewall settings, make sure to select both the wan and wan6 interfaces. I have already set this up by default.
Finally, click apply and save.
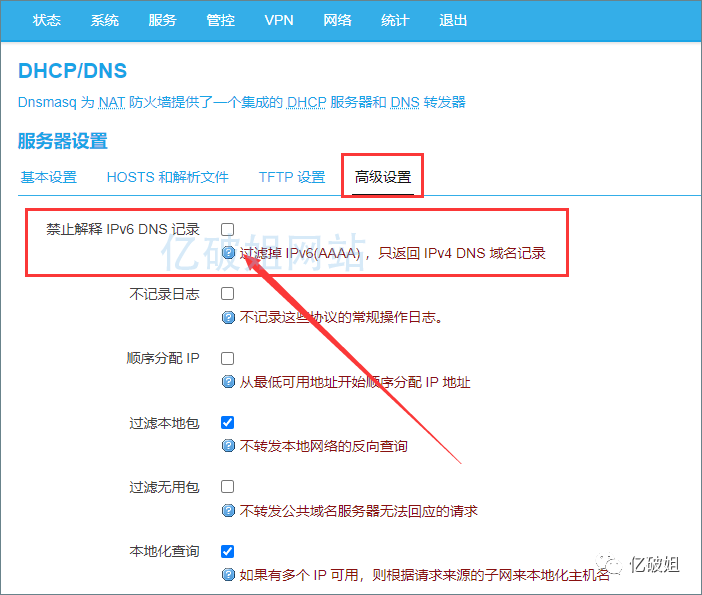
5. DHCP/DNS Server Settings
Network — DHCP/DNS — Advanced Settings — uncheck “Prohibit resolving IPv6 DNS records”.
Finally, click apply and save.
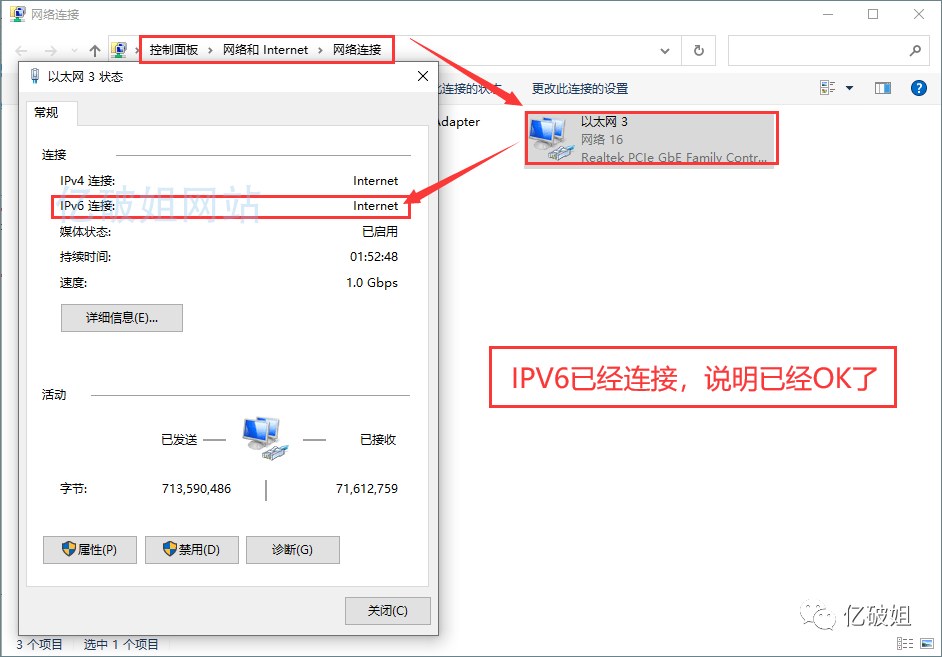
After saving, restart the router. Go to Control Panel > Network and Internet > Network Connections > click on the current network connection to check if IPv6 is successfully connected, indicating that our router’s IPv6 configuration is complete.
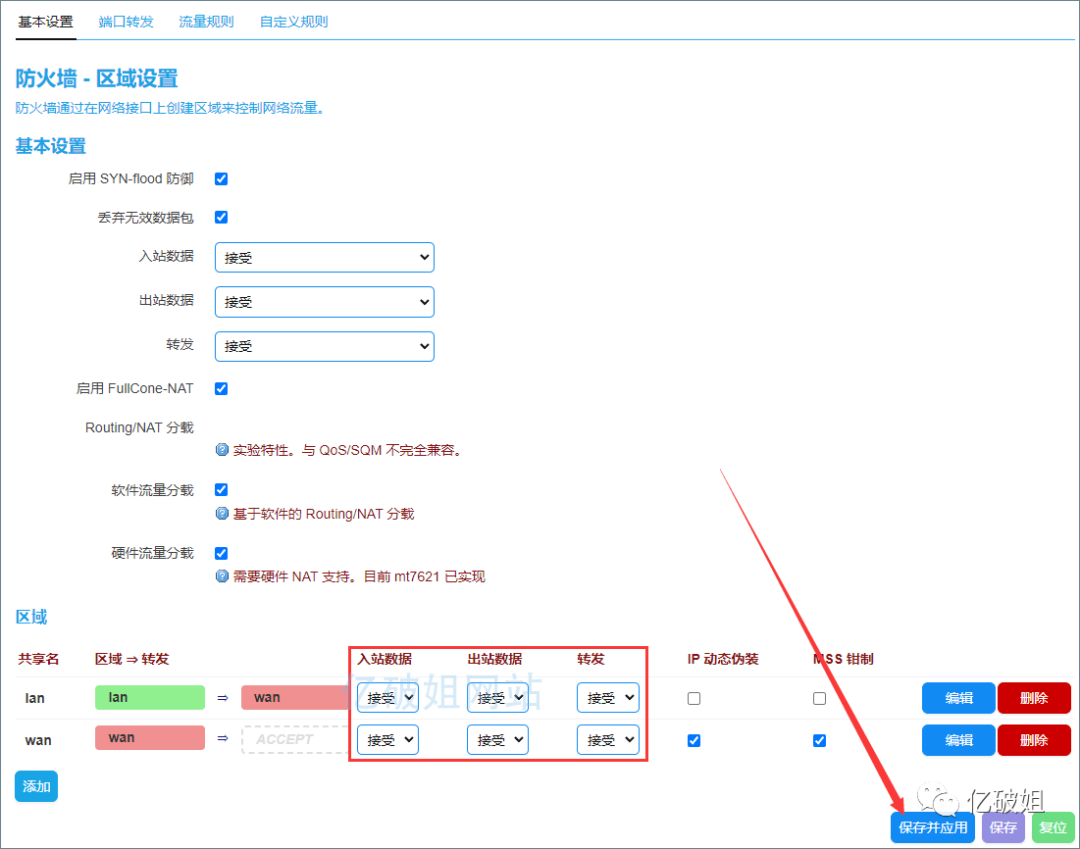
6. Firewall Settings for External Access
In the basic firewall settings, after modifying the settings as described above, you may still be unable to access the IPv6 external network (most likely you won’t be able to access it). You need to modify the IPv6 firewall settings to allow access to resolve this.
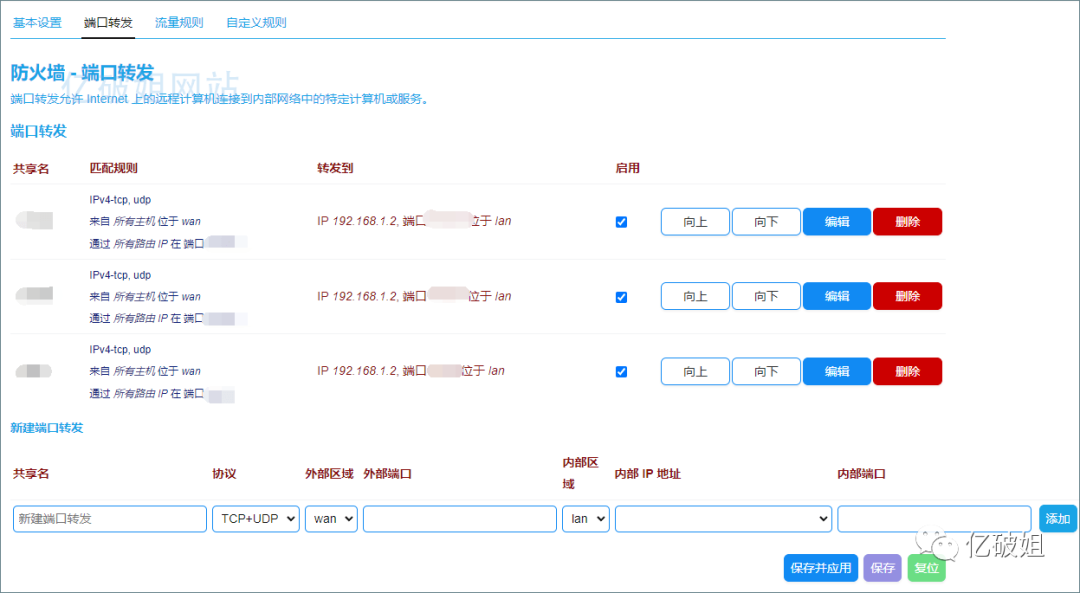
Set up port forwarding in the firewall to allow external access to your NAS Synology.
7. Using DDNS to Resolve IPv6 for Domain Access to Synology NAS
Since we mentioned using DDNS to resolve IPv6 for domain access, we first need to purchase a domain name. Domains are available from Alibaba Cloud, Baidu Cloud, Tencent Cloud, etc. It’s best to buy a short domain of 4-6 characters, which is easier to remember. I won’t demonstrate how to purchase a domain here.
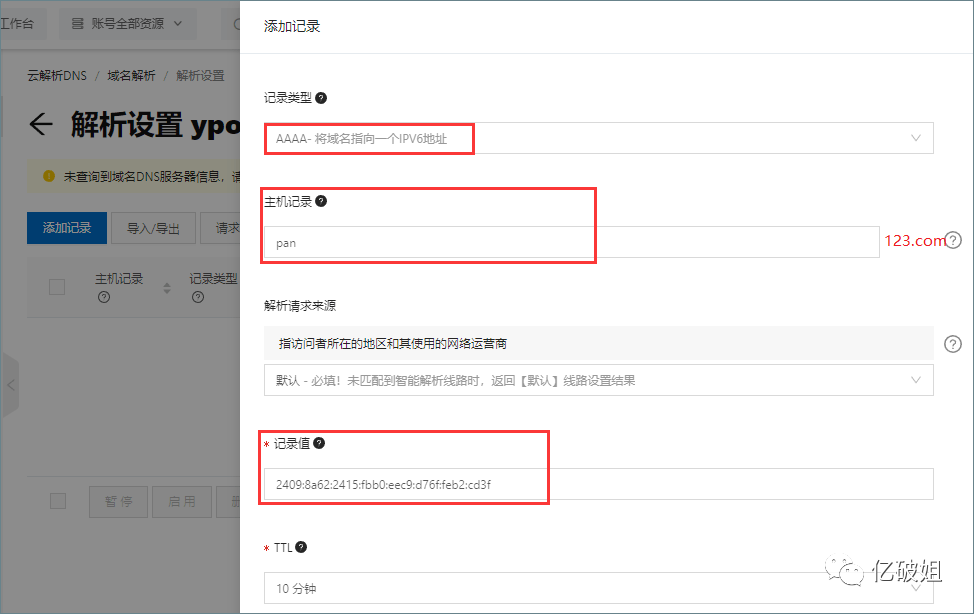
Taking Alibaba Cloud as an example, we select “Resolution Settings” and first add a record. Choose record type: AAAA for IPv6 address, then fill in your domain information. Once added, it should show “Status Normal” for it to work properly.
Return to our NAS Synology and install the docker plugin. After installing docker, search for “ddns-go” in the registry.
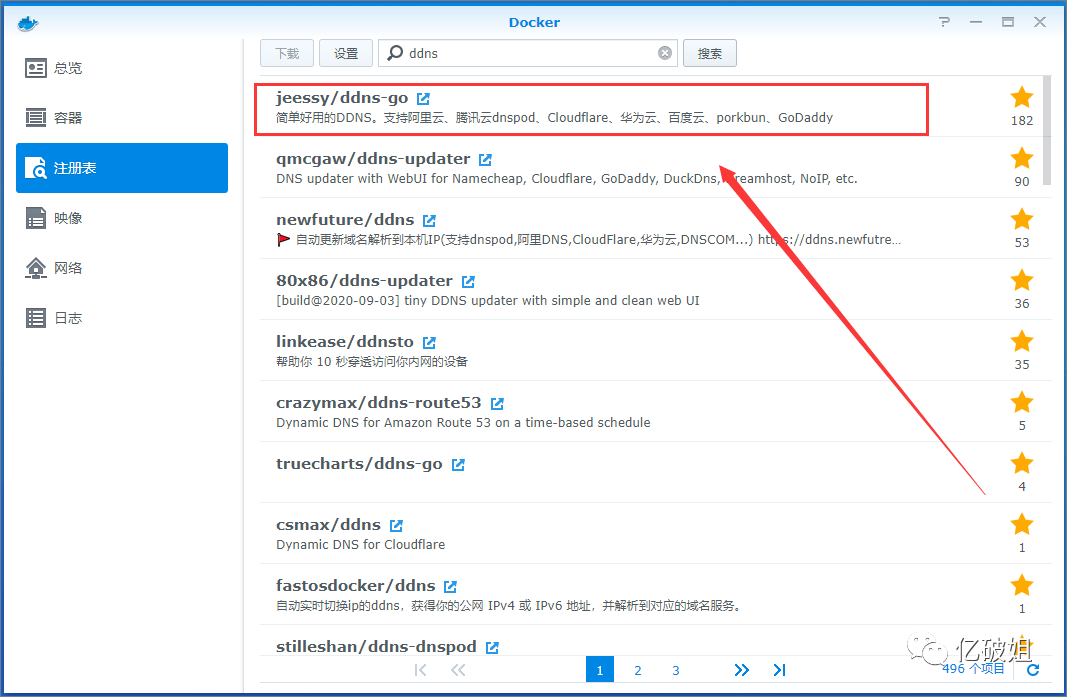
Select it from the images and choose to start the installation of DDNS.
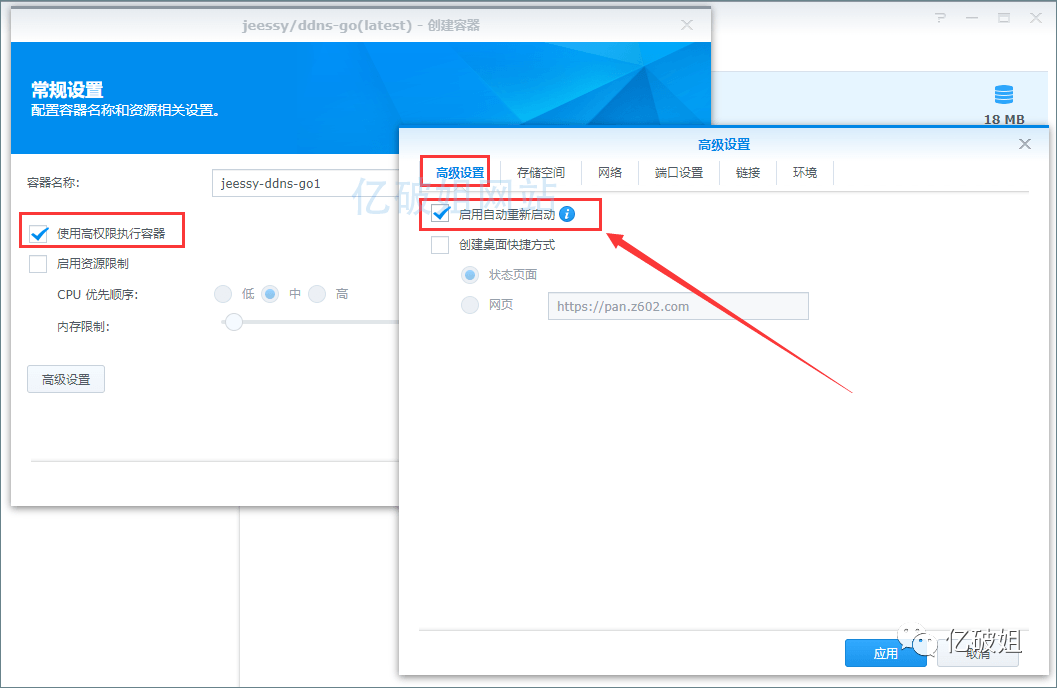


After completing the above settings, run the ddns-go container, and you can log in to the container configuration using the Synology IP plus port 9876. For example, my address is 192.168.1.2:9876. After logging into the ddns service backend, fill in the following information. In the Alibaba Cloud service, fill in the AccessKey ID and Secret. This acts as the account and password for the Alibaba Cloud DDNS service.


In the dropdown menu, remove the IPv4 settings, enable IPv6, and fill in the domain name you have set up.

After successfully resolving DDNS-GO, we can try to log in to the Synology NAS using the domain name. Logging in via domain name is very convenient; there’s no need to worry about the IPv6 changing after the router restarts, as DDNS-GO checks the resolved IPv6 address every 10 seconds and updates it to your domain name accordingly. Therefore, accessing via domain name is a long-term solution.
Logging into the Synology NAS via IPv6 completely eliminates the complexities of internal network penetration, speed limitations, and various paid options. Currently, all major ISPs in the country support IPv6, and obtaining a public IPv6 address is not difficult. The key is that the router must support firewall settings. As long as firewall settings can be configured, you can easily access the Synology or QNAP NAS using the IPv6 address.
Q: Do I have to use a Padavan or OpenWrt firmware router to access the public IPv6?
A: That is not the case. Most home routers cannot allow firewall rules, so without that, public IPv6 access is impossible. However, a few routers can do this. As long as there are firewall settings, you can enable port mapping, DMZ, UPNP, etc. If you want to achieve public IPv6 access, generally, you only need to enable DMZ for your NAS without needing other port mappings or UPNP operations.
Q: What is port mapping?
A: Port mapping is mapping a port on a host in the internal network to a port on an external host, providing the corresponding service. When a user accesses this port on the external IP, the server automatically maps the request to the corresponding internal machine.
Q: What is a DMZ host?
DMZ stands for