Author: Darius
https://juejin.cn/post/7203180003471081531
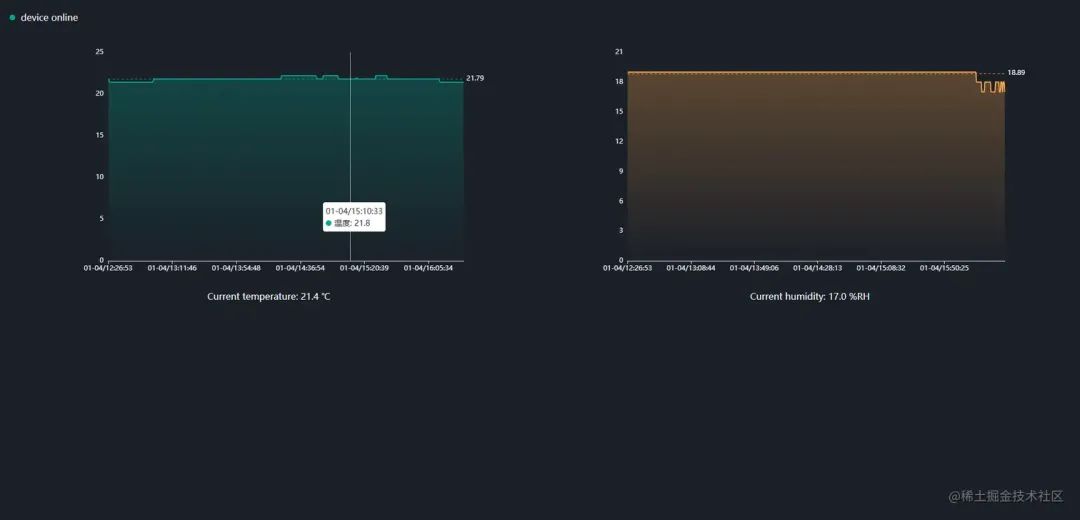
The above image is an online temperature and humidity visualization project that I worked on for a week. It allows viewing the temperature and humidity trends for the past day and updates the current temperature and humidity in real-time.
This article may contain knowledge curses.
Overview and Basic Explanation
The technologies used in this project are:
-
Frontend: jq, less, echarts, mqtt.js -
Backend: eggjs, egg-emqtt -
Database: mysql -
Server: emqx (mqtt broker) -
Hardware: -
Board: wemos D1 R2 (designed based on Arduino Uno R3, equipped with esp8266 wifi module) -
Debugging Tools: mqttx, Arduino IDE v2.0.3 using Arduino C for development
Necessary Knowledge:
-
nodejs (eggjs framework) can be business-oriented -
mysql can write basic insert and query statements -
basic understanding of C language syntax -
understanding of mqtt protocol operation -
basic understanding of Arduino development boards or any other circuit boards
Let’s briefly introduce the above knowledge points:
-
For students who have never learned backend development, I recommend a full-stack project for your reference: vue-xmw-admin-pro[1], this project uses Frontend VUE, Backend eggjs, mysql, redis, which is very helpful for full-stack learning.
-
For mysql, you only need to know the simplest insert and query statements. In this project, it would actually be more suitable to use mongodb, but I used mysql for convenience.
-
Even if you don’t know the basic syntax of C language, you can quickly learn it within an hour, knowing how to define variables, functions, and return values.
-
MQTT (Message Queuing Telemetry Transport) is a network protocol (long connection, meaning that besides the client actively communicating with the server, the server can also actively initiate communication with the client). It is also based on TCP/IP, suitable for low-power hardware devices, and is a message protocol based on the publish/subscribe paradigm. A concrete example is as follows:

When a client wants to publish a message, the diagram roughly looks like this:
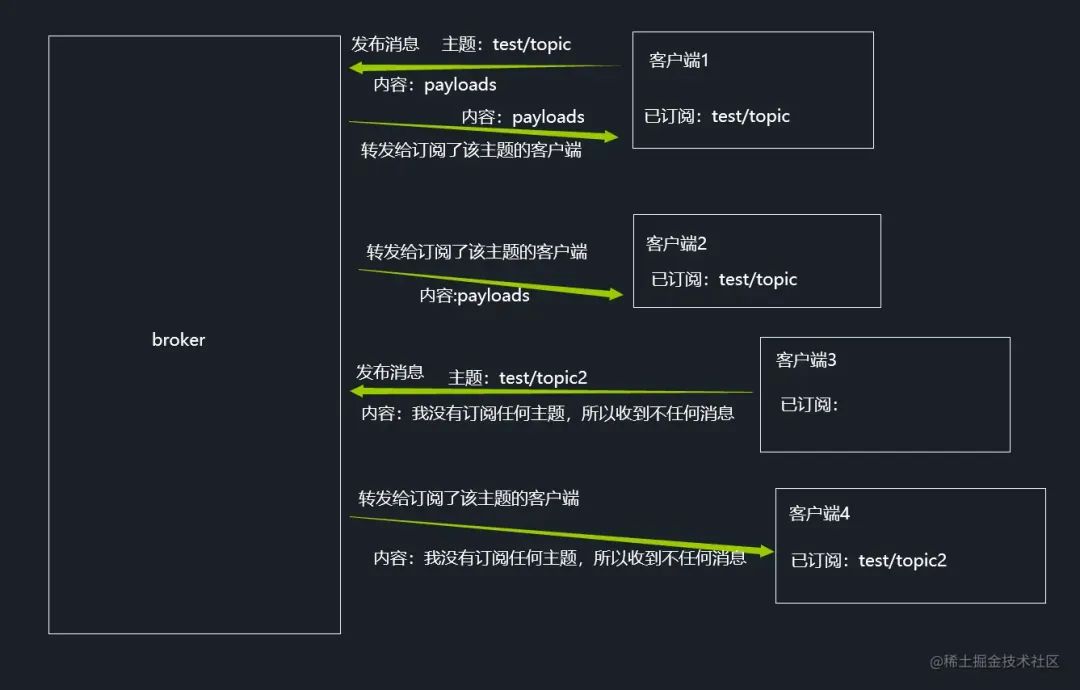
From the above diagram, we can see that when a client goes online after verification, it also needs to subscribe to a topic. When a certain client publishes a message to a topic, only the clients subscribed to that topic will receive the broker’s forwarding.
For example: you, I, and he report our names and student IDs to the guard (broker), and the guard agrees to let us play in the guard room for a while. The guard room has countless blackboards (topics), and we can each request the guard: if someone writes on a certain blackboard, please inform me. The guard will remember each person’s request. For example, when you write something on a blackboard (you send a message to a certain topic), everyone who requested to be informed will be informed about what you wrote (if you also requested to be informed, then it includes yourself).
-
The development board can be programmed, and the program can use simple code to control the high and low levels of a certain pin or read the data from a certain pin.
Getting Started
-
Purchase wemos d1 development board and DHT11 temperature and humidity sensor, totaling 19.3 yuan. -
Use Arduino IDE (hereinafter referred to as IDE) to program wemos d1, you need to download esp8266 dependencies. Refer to: Installing esp8266 SDK on Arduino IDE[2] -
In the IDE menu, select: File > Preferences > Other Board Manager URLs, enter: arduino.esp8266.com/stable/pack…[3], you can also change it to Chinese. -
Install ch340 driver, refer to: Installing CH340 driver on win10[4], it has been tested to work on win11 as well. -
Use a micro-usb cable to connect the computer and the development board, in the IDE menu, choose: Tools > Board > esp8266 > LOLIN(WEMOS) D1 R2 & mini. -
Select the port, press win+x, open Device Manager, check which port your ch340 is on, and select the corresponding port in the IDE. -
When the IDE shows LOLIN(WEMOS) D1 R2 & mini on comXX at the bottom right, the connection is successful. -
Open the IDE menu: File > Examples > esp8266 > blink, at this time the IDE will open a new window, click the upload button in the upper left corner, and wait for the upload to complete. When the light on the board blinks, it indicates that the environment, settings, and board are all fine, and you can start programming. If there is an error, then there must be an issue with one of the steps. I believe you can find out what the problem is based on the error message. If you really can’t find the problem, then you may have bought a defective board (the failure rate is quite high).
The wemos d1 pin has a 3.3v power output and three or more GND grounding ports. When installing the DHT11 sensor component, the positive pole needs to be plugged into the 3.3v port, the negative pole into the GND port, and the data line into any digital input port, for example, D5 (the PIN value of D5 is 14, which will be used later).
To use the DHT11 sensor, you need to install the library: DHT sensor library by Adafruit, which can be searched and installed directly in the library management on the left side of the IDE.
Below is a simple example of obtaining DHT11 data. If everything is normal, the serial monitor will output temperature and humidity data every second.
#include "DHT.h"  // This is a dependency or library, or it can also be called a driver
#include "string.h"
#define DHTPIN 14      // DHT11 data pin connected to D5 pin D5 pin's PIN value is 14
#define DHTTYPE DHT11  // Define DHT11 sensor
DHT dht(DHTPIN, DHTTYPE);  // Initialize sensor

void setup() {
  Serial.begin(115200);
  // wemos d1's baud rate is 115200
  pinMode(BUILTIN_LED, OUTPUT); // Set an output LED
  dht.begin();  // Start the sensor
}

char* getDHT11Data() {
  float h = dht.readHumidity();  // Get humidity value
  float t = dht.readTemperature(); // Get temperature value
  static char data[100];
  if (isnan(h) || isnan(t)) {
    Serial.println("Failed to read from DHT sensor!");
    sprintf(data, "Temperature: %.1f, Humidity: %.1f", 0.0, 0.0); // If any value is missing, return two 0.0 directly, so we know the sensor may have a problem
    return data;
  }
  sprintf(data, "Temperature: %.1f, Humidity: %.1f", t, h); // If normal, get the values, I concatenate them into a sentence
  return data;
}

void loop() {
  char* data = getDHT11Data(); // Get sensor values here
  Serial.println("got: " + String(data));  // Print topic content
  delay(1000); // Delay one second for each loop
}
Continue
At this point, if you are using a regular Arduino Uno R3 board, you can finish here.
After obtaining the data, you can do some other things based on the data, such as turning on the relay connected to the D6 pin, which controls a humidifier.
If you are like me and using a wifi-enabled board, you can continue to follow along.
We will continue with step-by-step operations:
Device Side:
-
Import the esp8266 library (already mentioned the installation process above).
#include "ESP8266WiFi.h"
-
Install the mqtt client library, directly search for PubSubClient in the library store, download the one by Nick O’Leary, and once downloaded:
#include "PubSubClient.h"
-
At this point, all library files have been installed and imported.
-
Set the wifi ssid (i.e., name) and password, for example:
  char* ssid = "2104";
  char* passwd = "13912428897";
-
Try to connect to wifi.
    WiFiClient espClient;
    int isConnect = 0;
    void connectWIFI() {
      isConnect = 0;
      WiFi.mode(WIFI_STA);  // Not sure what this means, just write it as is.
      WiFi.begin(ssid, passwd); // Try to connect.
      int timeCount = 0;  // Attempt count.
      while (WiFi.status() != WL_CONNECTED) { // If not connected, continue looping.
        for (int i = 200; i <= 255; i++) {
          analogWrite(BUILTIN_LED, i);
          delay(2);
        }
        for (int i = 255; i >= 200; i--) {
          analogWrite(BUILTIN_LED, i);
          delay(2);
        }
        // The above two loops take about 200ms, just to control the LED blinking, you can choose not to write this.
        Serial.println("wifi connecting......" + String(timeCount));
        timeCount++;
        isConnect = 1; // Each time we need to set the connection status code, only set to 0 when not connected.
        // digitalWrite(BUILTIN_LED, LOW);
        if (timeCount >= 200) {
          // If not connected after 40000 milliseconds, stop trying to connect.
          isConnect = 0; // Set status code to 0.
          break;
        }
      }
      if (isConnect == 1) {
        Serial.println("Connect to wifi successfully!" + String("SSID is ") + WiFi.SSID());
        Serial.println(String("mac address is ") + WiFi.macAddress());
        // digitalWrite(BUILTIN_LED, LOW);
        analogWrite(BUILTIN_LED, 250); // Set LED to stay on, 250 brightness is just right for me.
        settMqttConfig();  // Try to connect to the mqtt server, detailed code in the next step.
      } else {
        analogWrite(BUILTIN_LED, 255); // Set LED to stay off, don’t ask me why 255 is off, because my light is off at high level.
        // If wifi connection fails, wait one minute and reconnect.
        delay(60000);
      }
    }
-
Try to connect to mqtt.
      const char* mqtt_server = "larryblog.top";  // This is my server, by the time you read this article, it may already be down, because my server will expire in 11 days.
      const char* TOPIC = "testtopic";            // Set the information topic.
      const char* client_id = "mqttx_3b2687d2";   // client_id cannot be duplicated, can be named arbitrarily, similar to your nickname.
      PubSubClient client(espClient);
      void settMqttConfig() {
        client.setServer(mqtt_server, 1883);  // Set the MQTT server and the port used, 1883 is the default MQTT port.
        client.setCallback(onMessage);  // Set the receiving function, when messages come in from the subscribed topic, this function will be invoked.
        Serial.println("try connect mqtt broker");
        client.connect(client_id, "wemos", "aa995231030");  // The last two parameters are username and password.
        client.subscribe(TOPIC); // Subscribe to the topic.
        Serial.println("mqtt connected");  // If everything is normal, it will connect successfully.
      }
      // Receiving function.
      void onMessage(char* topic, byte* payload, unsigned int length) {
        Serial.print("Message arrived [");
        Serial.print(topic);  // Print topic information.
        Serial.print("]:");
        char* payloadStr = (char*)malloc(length + 1);
        memcpy(payloadStr, payload, length);
        payloadStr[length] = '\0';
        Serial.println(payloadStr);  // Print topic content.
        if (strcmp(payloadStr, (char*)"getDHTData") == 0) {
          char* data = getDHT11Data();
          Serial.println("got: " + String(data));  // Print topic content.
          client.publish("wemos/dht11", data);
        }
        free(payloadStr);  // Free memory.
      }
-
Send messages.
client.publish("home/status/", "{device:client_id,'status':'on'}");
// Note that this sends a message to another topic, the message content indicates that the device is online. When other clients (such as the web end) subscribe to this topic, they will receive this message.
At this point, the code on the board is basically written, and the complete code is as follows:
#include "ESP8266WiFi.h"
#include "PubSubClient.h"
#include "DHT.h"
#include "string.h"
#define DHTPIN 14      // DHT11 data pin connected to D5 pin
#define DHTTYPE DHT11  // DHT11 sensor
DHT dht(DHTPIN, DHTTYPE);

char* ssid = "2104";
char* passwd = "13912428897";
const char* mqtt_server = "larryblog.top";
const char* TOPIC = "testtopic";            // Subscription information topic.
const char* client_id = "mqttx_3b2687d2";
int isConnect = 0;
WiFiClient espClient;
PubSubClient client(espClient);
long lastMsg = 0;
void setup() {
  Serial.begin(115200);
  // Set WiFi to station mode
  connectWIFI();
  pinMode(BUILTIN_LED, OUTPUT);
  dht.begin();
}
char* getDHT11Data() {
  float h = dht.readHumidity();
  float t = dht.readTemperature();
  static char data[100];
  if (isnan(h) || isnan(t)) {
    Serial.println("Failed to read from DHT sensor!");
    sprintf(data, "Temperature: %.1f, Humidity: %.1f", 0.0, 0.0);
    return data;
  }
  sprintf(data, "Temperature: %.1f, Humidity: %.1f", t, h);
  return data;
}
void connectWIFI() {
  isConnect = 0;
  WiFi.mode(WIFI_STA);
  WiFi.begin(ssid, passwd);
  int timeCount = 0;
  while (WiFi.status() != WL_CONNECTED) {
    for (int i = 200; i <= 255; i++) {
      analogWrite(BUILTIN_LED, i);
      delay(2);
    }
    for (int i = 255; i >= 200; i--) {
      analogWrite(BUILTIN_LED, i);
      delay(2);
    }
    // The above two loops take about 200ms.
    Serial.println("wifi connecting......" + String(timeCount));
    timeCount++;
    isConnect = 1;
    if (timeCount >= 200) {
      isConnect = 0;
      break;
    }
  }
  if (isConnect == 1) {
    Serial.println("Connect to wifi successfully!" + String("SSID is ") + WiFi.SSID());
    Serial.println(String("mac address is ") + WiFi.macAddress());
    analogWrite(BUILTIN_LED, 250);
    settMqttConfig();
  } else {
    analogWrite(BUILTIN_LED, 255);
    delay(60000);
  }
}
void settMqttConfig() {
  client.setServer(mqtt_server, 1883);
  client.setCallback(onMessage);
  Serial.println("try connect mqtt broker");
  client.connect(client_id, "wemos", "aa995231030");
  client.subscribe(TOPIC);
  Serial.println("mqtt connected");
}
void onMessage(char* topic, byte* payload, unsigned int length) {
  Serial.print("Message arrived [");
  Serial.print(topic);
  Serial.print("]:");
  char* payloadStr = (char*)malloc(length + 1);
  memcpy(payloadStr, payload, length);
  payloadStr[length] = '\0';
  Serial.println(payloadStr);
  if (strcmp(payloadStr, (char*)"getDHTData") == 0) {
    char* data = getDHT11Data();
    Serial.println("got: " + String(data));
    client.publish("wemos/dht11", data);
  }
  free(payloadStr);
}
void publishDhtData() {
  char* data = getDHT11Data();
  Serial.println("got: " + String(data));
  client.publish("wemos/dht11", data);
  delay(2000);
}
void reconnect() {
  Serial.print("Attempting MQTT connection...");
  // Attempt to connect
  if (client.connect(client_id, "wemos", "aa995231030")) {
    Serial.println("reconnected successfully");
    client.subscribe(TOPIC);
  } else {
    Serial.print("failed, rc=");
    Serial.print(client.state());
    Serial.println(" try again in 5 seconds");
    delay(5000);
  }
}
void loop() {
  if (!client.connected() && isConnect == 1) {
    reconnect();
  }
  if (WiFi.status() != WL_CONNECTED) {
    connectWIFI();
  }
  client.loop();
  publishDhtData();
  long now = millis();
  if (now - lastMsg > 2000) {
    lastMsg = now;
    client.publish("home/status/", "{device:client_id,'status':'on'}");
  }
  delay(1000);
}
Server
The operations just now may have left people puzzled. I believe everyone has a vague understanding of the mqtt operations above, but that’s okay. Through the server-side settings, you will understand the mqtt mechanism more thoroughly.
We need to deploy the mqtt broker on the server, which is the message center server of mqtt.
Search for emqx online, click EMQX: Large-scale distributed IoT MQTT message server[5], this is a software with a visual interface, and the interface is incredibly beautiful, the operation is very smooth, and the function is quite powerful, it is basically without any mental burden to use. Click to download immediately and choose the version suitable for your server system:
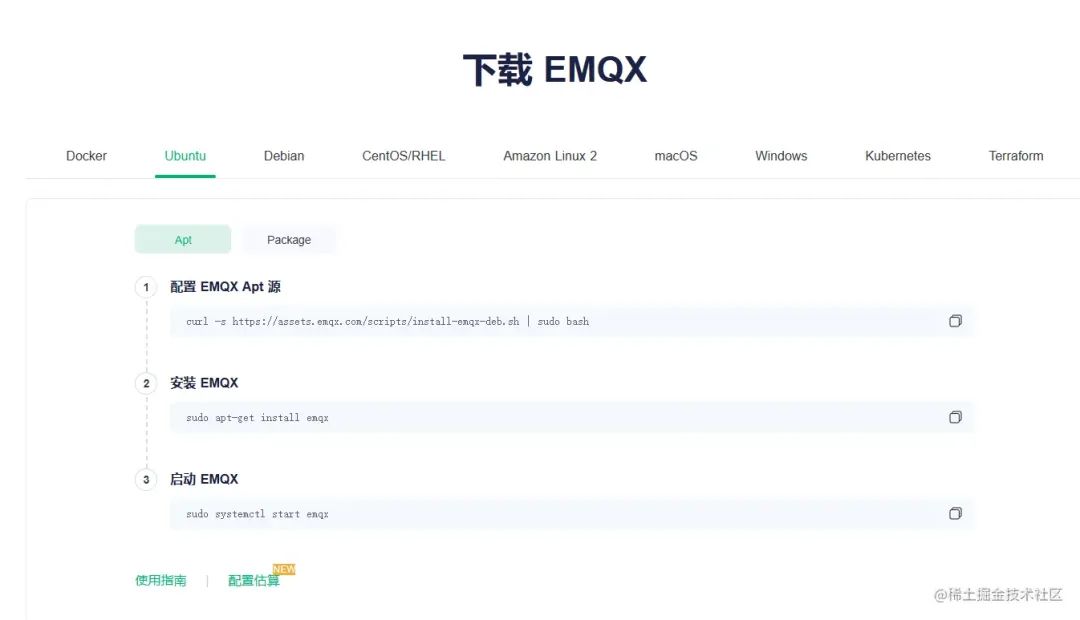
Here I will illustrate using Ubuntu and Windows as examples, and I believe other systems are similar.
On Ubuntu, it is recommended to use apt to download, just follow the steps in the above image. If you encounter other issues midway, please solve them yourself.
-
sudo ufw status to check the open ports. Generally, you will only see a few ports that you have opened manually, or only ports 80 and 443. -
sudo ufw allow 18083. This port is used by the emqx dashboard. After opening this port, you can access the emqx dashboard console from the external network.
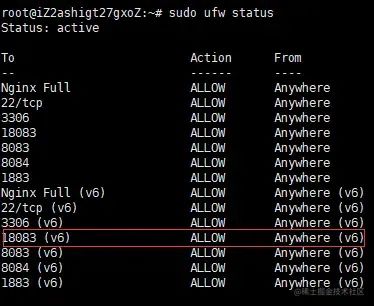 When you see the interface as shown in the image, it indicates that it has been successfully opened.
On Windows, directly download the installation package, upload it to the server, and double-click to install.
-
Open “Advanced Security Windows Defender Firewall”, click Inbound Rules > New Rule. -
Click Port > Next. -
Click TCP, Specific local ports, enter 18083, and click Next. -
Keep clicking Next until the last step, enter a name, it is recommended to enter emqx.
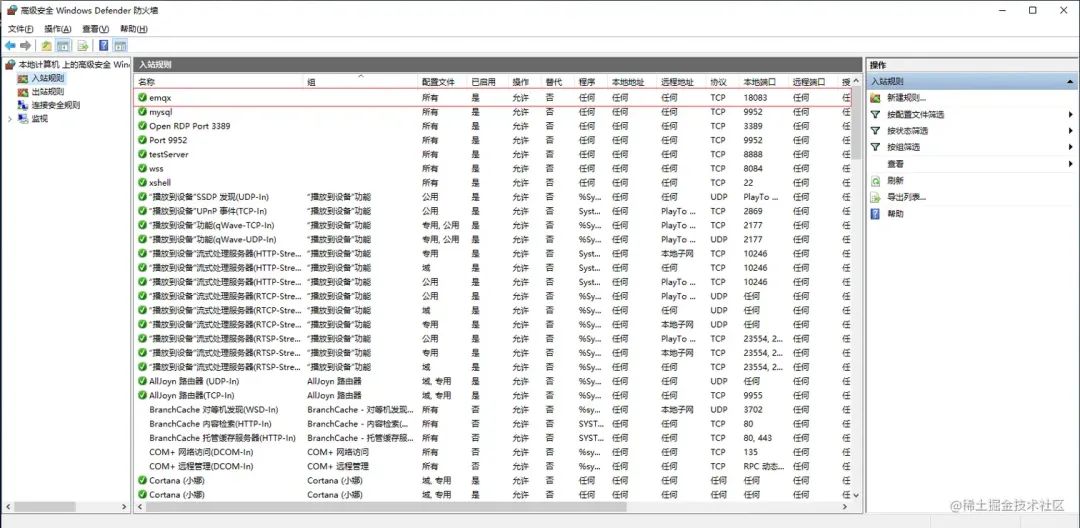
When you see the interface shown in the image, it indicates that you have configured it successfully.
After completing the server-side program installation and firewall port configuration, we need to configure the security policy in the server backend. Here I will take Alibaba Cloud as an example:
If you are using an ECS cloud host, click Instance > Click your server name > Security Group > Configure Rules > Manually Add.
Just add this:

If you are using a lightweight server, click Security > Firewall > Add Rule, it is similar to ECS settings.
After completion, you can try to access your emqx control panel in the local browser.
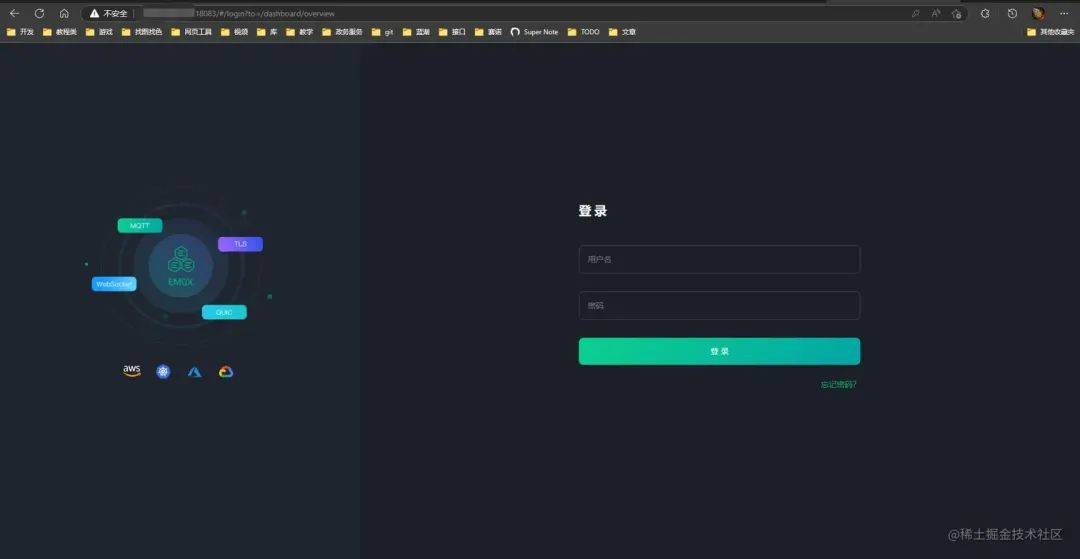
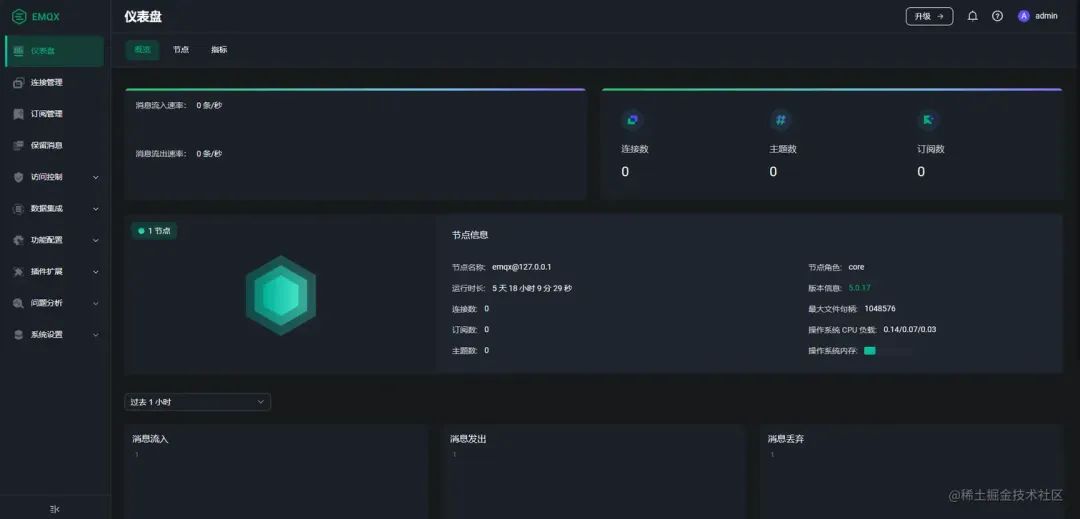
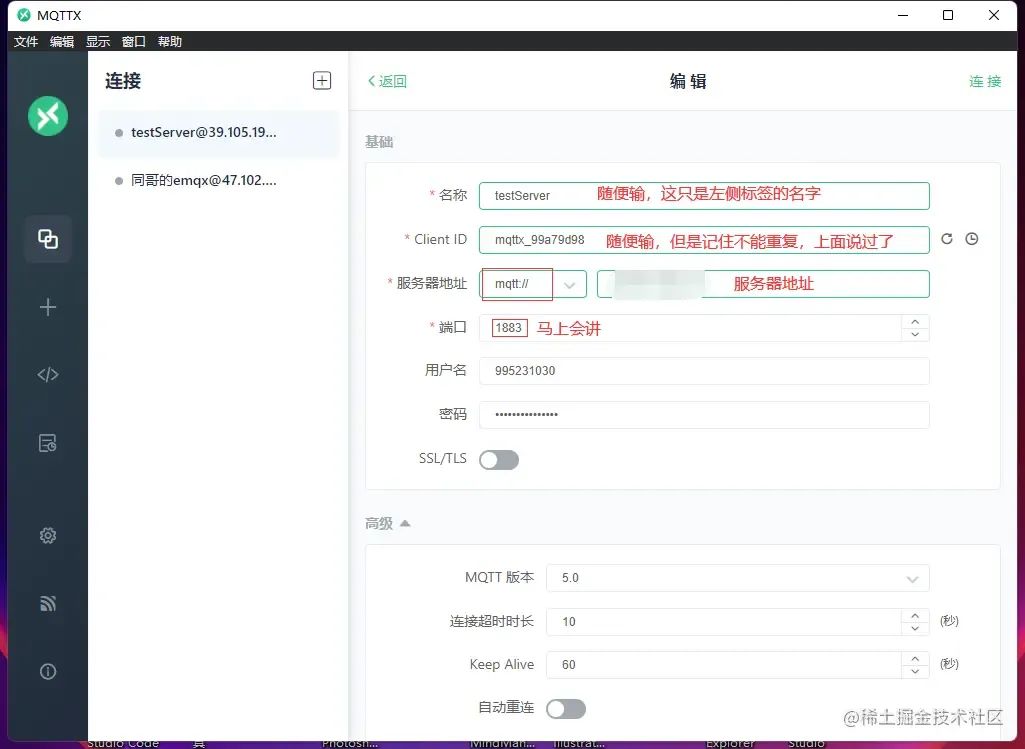
Directly enter the domain name:18083, the initial username is admin, the initial password is public. After logging in, you will see the following interface:
Next, you need to configure the client login name and password. For example, the username and password written in the device above are set in this system.
Click Access Control > Authentication > Create, then just keep clicking Next until completion, and you will see the following interface:
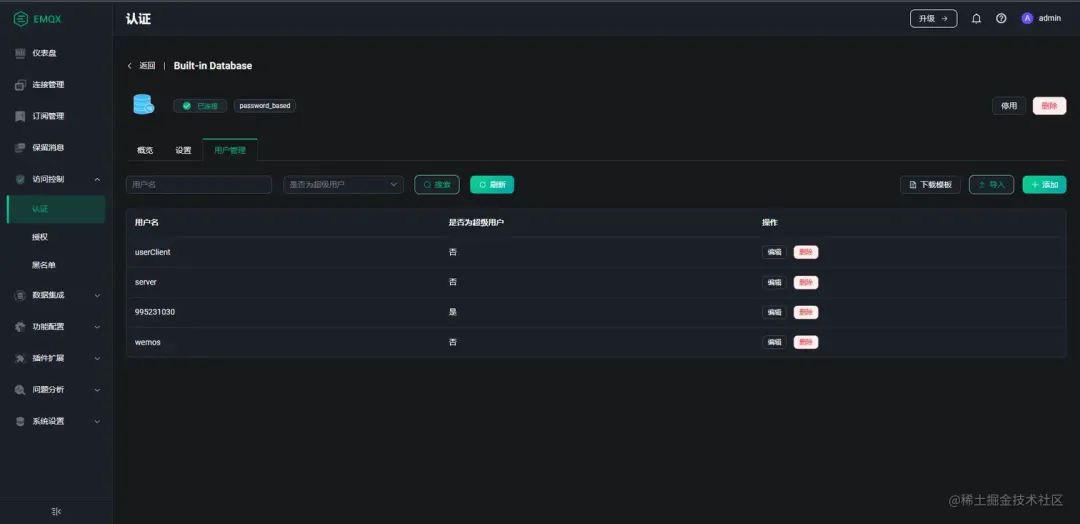
Click User Management to add users. The username and password are both customizable. These usernames and passwords can be assigned to the device side, client side, server side, and testing side. You can refer to my configuration.

userClient is prepared for use on the frontend page, server is for backend use, and 995231030 is my personal reserved super user, wemos is for the device, that is, the username and password input when the device connects.
At this point, the emqx control panel configuration is complete.
Download mqttx to test and try to connect.
Click to connect, and you will find that it cannot connect at all…
Because port 1883 (the default mqtt port) is also not open, of course, the method to open it is the same as how to open port 18083.
At the same time, it is also recommended to open:
-
1803 websocket[6] default port. -
1804 websockets default port. -
3306 mysql default port.
The last four ports will all be used.
Once you have completed the opening, try connecting to the broker using mqttx again, and you will find that it can connect.
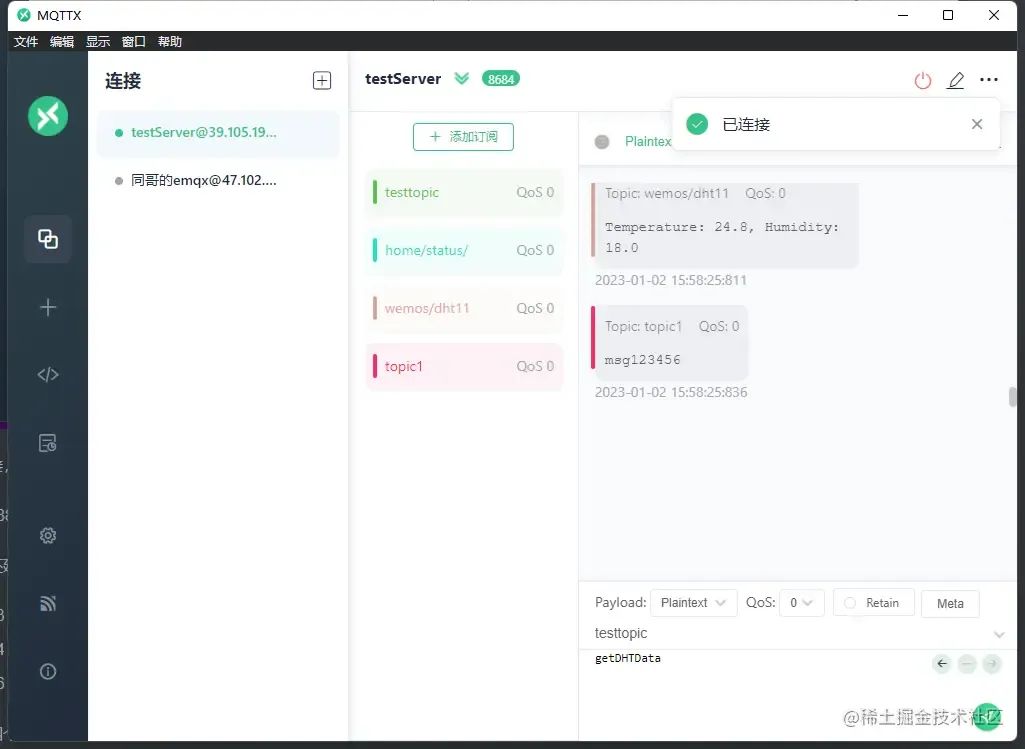
The functionality of this page is also easy to understand. We add a subscription on the left side, and the messages of that topic will appear in the chat box on the right side.
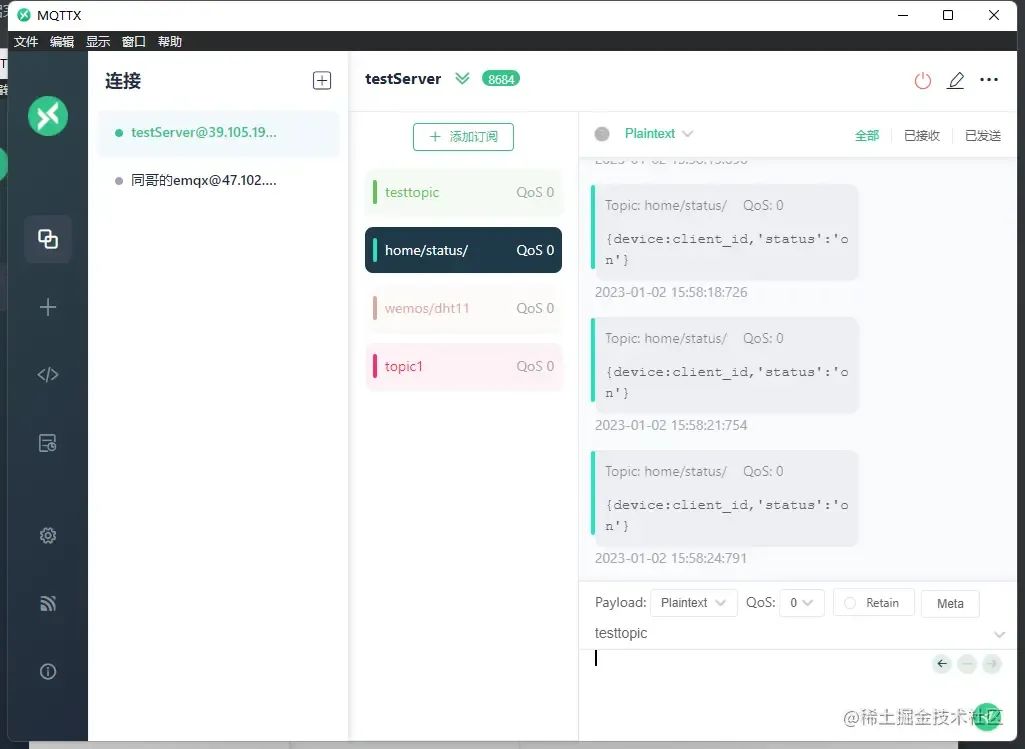
If you remember, in the device code above, we send a device online prompt to home/status/ every second in the loop. We are now receiving that message here.
When you see these messages, it indicates that your device, server, and emqx control panel have all been successfully run.
Frontend and Backend as well as Database
Frontend
There is no need to say much about the frontend. We use echarts to display data. Due to the small volume, we do not use any framework, directly using jq and echarts to implement. Here we mainly discuss how the frontend connects to mqtt.
First, import the mqtt library.
<script src="https://cdn.bootcdn.net/ajax/libs/mqtt/4.1.0/mqtt.min.js"></script>
Then set the connection parameters.
  const options = {
    clean: true, // true: clear session, false: retain session
    connectTimeout: 4000, // timeout
    clientId: 'userClient_' + generateRandomString(),
    // The frontend client may be relatively numerous, so we generate a random 6-character letter and number as clientId to ensure it does not repeat.
    username: 'userClient',
    password: 'aa995231030',
  }
   function generateRandomString() {
    let result = '';
    let characters = 'ABCDEFGHIJKLMNOPQRSTUVWXYZabcdefghijklmnopqrstuvwxyz0123456789';
    let charactersLength = characters.length;
    for (let i = 0; i < 6; i++) {
      result += characters.charAt(Math.floor(Math.random() * charactersLength));
    }
    return result;
  }
Connect.
  // const connectUrl = 'mqtt://larryblog.top/mqtt'  Of course, you can use the mqtt protocol, but you may encounter ssl cross-domain issues. If you do not use https, you can ignore this. Just use mqtt directly.
  const connectUrl = 'wss://larryblog.top/mqtt' // Note that nginx is used for forwarding here, which will be discussed later.
  const client = mqtt.connect(connectUrl, options)
Since there is not much code on the frontend, I will paste it directly.
html:
index.html
<!DOCTYPE html>
<html lang="en">

<head>
  <meta charset="UTF-8">
  <meta http-equiv="X-UA-Compatible" content="IE=edge">
  <meta name="viewport" content="width=device-width, initial-scale=1.0">
  <link rel="stylesheet/less" href="./style.less">
  <link rel="stylesheet" href="//at.alicdn.com/t/c/font_3712319_bzaequy11dn.css">
  <script src="https://cdn.bootcdn.net/ajax/libs/less.js/4.1.3/less.js"></script>
  <title>wemos d1 test</title>
</head>

<body>
  <div class="app" id="app">
    <div id="deviceStatus">
      <span class="statusLight"></span>
      <span id="statusText">Loading device status</span>
      <!-- <span class="iconfont icon-xinxi"></span> -->
    </div>
    <div class="container">
      <div class="Temperature">
        <div id="echartsViewTemperature"></div>
        <span>Current temperature:</span>
        <span id="Temperature">loading...</span>
      </div>
      <div class="Humidity">
        <div id="echartsViewHumidity"></div>
        <span>Current humidity:</span>
        <span id="Humidity">loading...</span>
      </div>
    </div>
  </div>
</body>
<script src="./showTip.js"></script>
<script src="https://cdnjs.cloudflare.com/ajax/libs/moment.js/2.29.4/moment.min.js"></script>
<script src="https://libs.baidu.com/jquery/2.0.0/jquery.min.js"></script>
<script src="https://cdn.bootcdn.net/ajax/libs/mqtt/4.1.0/mqtt.min.js"></script>
<script src="https://cdn.staticfile.org/echarts/4.7.0/echarts.js"></script>
<script src="./echarts.js?v=1.0.0"></script>
<script src="./mqttController.js"></script>

</html>
mqttController.js
// const mqtt = require('mqtt')
$(document).ready(() => {
  // Welcome to request my open interface. When the device is not online, the latest 2000 pieces of data will be returned.
  $.post("https://larryblog.top/api", {
    topic: "getWemosDhtData",
    skip: 0
  },
    (data, textStatus, jqXHR) => {
      setData(data.res)
      // console.log("line:77 data==> ", data)
    },
  );
  const options = {
    clean: true, // true: clear session, false: retain session.
    connectTimeout: 4000, // timeout.
    clientId: 'userClient_' + generateRandomString(),
    username: 'userClient',
    password: 'aa995231030',
  }
  let timer;
  let isShowTip = 1;
  const connectUrl = 'wss://larryblog.top/mqtt';
  const client = mqtt.connect(connectUrl, options);
  client.on('connect', (error) => {
    console.log('Connected:', error);
    toast.showToast("Broker Connected");
    timer = setTimeout(onTimeout, 3500);
    client.subscribe('wemos/dht11', function (err) {
      if (!err) {
        client.publish('testtopic', 'getDHTData');
      }
    });
    client.subscribe('home/status/');
    client.publish('testtopic', 'Hello mqtt');
  });
  client.on('reconnect', (error) => {
    console.log('Reconnecting:', error);
    toast.showToast(3, "reconnecting...");
  });
  client.on('error', (error) => {
    console.log('Connection failed:', error);
    toast.showToast(2, "connection failed");
  });
  client.on('message', (topic, message) => {
    switch (topic) {
      case "wemos/dht11":
        const str = message.toString();
        const arr = str.split(", "); // Split the string.
        const obj = Object.fromEntries(arr.map(s => s.split(": "))); // Convert to object.

        document.getElementById("Temperature").innerHTML = obj.Temperature + " ℃";
        optionTemperature.xAxis.data.push(moment().format("MM-DD/HH:mm:ss"));
        optionTemperature.xAxis.data.length >= 100 && optionTemperature.xAxis.data.shift();
        optionTemperature.series[0].data.length >= 100 && optionTemperature.series[0].data.shift();
        optionTemperature.series[0].data.push(parseFloat(obj.Temperature));
        ChartTemperature.setOption(optionTemperature, true);

        document.getElementById("Humidity").innerHTML = obj.Humidity + " %RH";
        optionHumidity.xAxis.data.push(moment().format("MM-DD/HH:mm:ss"));
        optionHumidity.xAxis.data.length >= 100 && optionHumidity.xAxis.data.shift();
        optionHumidity.series[0].data.length >= 100 && optionHumidity.series[0].data.shift();
        optionHumidity.series[0].data.push(parseFloat(obj.Humidity));
        ChartHumidity.setOption(optionHumidity, true);
        break;
      case "home/status/":
        $("#statusText").text("device online");
        deviceOnline();
        $(".statusLight").removeClass("off");
        $(".statusLight").addClass("on");
        clearTimeout(timer);
        timer = setTimeout(onTimeout, 3500);
        break;
    }
  });

  function deviceOnline() {
    if (isShowTip) {
      toast.showToast(1, "device online");
    }
    isShowTip = 0;
  }

  function setData(data) {
    for (let i = data.length - 1; i >= 0; i--) {
      let item = data[i];
      optionTemperature.series[0].data.push(item.temperature);
      optionHumidity.series[0].data.push(item.humidity);
      optionHumidity.xAxis.data.push(moment(item.updateDatetime).format("MM-DD/HH:mm:ss"));
      optionTemperature.xAxis.data.push(moment(item.updateDatetime).format("MM-DD/HH:mm:ss"));
    }
    ChartTemperature.setOption(optionTemperature);
    ChartHumidity.setOption(optionHumidity);
  }

  function onTimeout() {
    $("#statusText").text("device offline");
    toast.showToast(3, "device offline");
    isShowTip = 1;
    document.getElementById("Temperature").innerHTML = "No data";
    document.getElementById("Humidity").innerHTML = "No data";
    $(".statusLight").removeClass("on");
    $(".statusLight").addClass("off");
  }

  function generateRandomString() {
    let result = '';
    let characters = 'ABCDEFGHIJKLMNOPQRSTUVWXYZabcdefghijklmnopqrstuvwxyz0123456789';
    let charactersLength = characters.length;
    for (let i = 0; i < 6; i++) {
      result += characters.charAt(Math.floor(Math.random() * charactersLength));
    }
    return result;
  }
});
showTip.js is a package I published on npm, which can be downloaded via npm if needed.
style.less
* {
  padding: 0;
  margin: 0;
  color: #fff;
}

.app {
  background: #1b2028;
  width: 100vw;
  height: 100vh;
  display: flex;
  flex-direction: column;
  overflow: hidden;

  #deviceStatus {
    display: flex;
    align-items: center;
    gap: 10px;
    padding: 20px;

    .statusLight {
      display: block;
      height: 10px;
      width: 10px;
      border-radius: 100px;
      background: #b8b8b8;

      &.on {
        background: #00a890;
      }

      &.off {
        background: #b8b8b8;
      }
    }
  }

  .container {
    width: 100%;
    height: 0;
    flex: 1;
    display: flex;

    @media screen and (max-width: 768px) {
      flex-direction: column;
    }

    >div {
      flex: 1;
      height: 100%;
      text-align: center;

      #echartsViewTemperature,
      #echartsViewHumidity {
        width: 80%;
        height: 50%;
        margin: 10px auto;
      }
    }
  }
}
echarts.js is a file I wrote myself, please do not learn from my naming method, as it is a bad example.
let optionTemperature = null;
let ChartTemperature = null;
$(document).ready(() => {
  setTimeout(() => {
    // waiting
    ChartTemperature = echarts.init(document.getElementById('echartsViewTemperature'));
    ChartHumidity = echarts.init(document.getElementById('echartsViewHumidity'));
    // Specify the configuration items and data for the chart.
    optionTemperature = {
      textStyle: {
        color: '#fff'
      },
      tooltip: {
        trigger: 'axis',
        backgroundColor: '#fff',
        textStyle: {
          color: "#333",
          align: "left"
        },
      },
      xAxis: {
        min: 0,
        data: [],
        boundaryGap: false,
        splitLine: {
          show: false
        },
        axisLine: {
          lineStyle: {
            color: '#fff'
          }
        }
      },
      yAxis: {
        splitLine: {
          show: false
        },
        axisTick: {
          show: false
        },
        axisLine: {
          show: false,
          lineStyle: {
            color: '#fff'
          }
        }
      },
      grid: {
        left: '10%',
        right: '5%',
        bottom: '5%',
        top: '5%',
        containLabel: true,
      },
      series: [{
        name: 'Temperature',
        type: 'line',
        smooth: true,
        symbol: 'none',
        data: [],
        itemStyle: {
          color: '#00a890'
        },
        areaStyle: {
          color: {
            type: 'linear',
            x: 0,
            y: 0,
            x2: 0,
            y2: 1,
            colorStops: [{
              offset: 0,
              color: '#00a89066' // 0% color
            }, {
              offset: 1,
              color: '#00a89000' // 100% color
            }],
            global: false
          }
        },
        hoverAnimation: true,
        label: {
          show: false,
        },
        markLine: {
          symbol: ['none', 'none'],
          data: [{
            type: 'average',
            name: 'Average',
          },],
        },
      }]
    };
    optionHumidity = {
      textStyle: {
        color: '#fff'
      },
      tooltip: {
        trigger: 'axis',
        backgroundColor: '#fff',
        textStyle: {
          color: "#333",
          align: "left"
        },
      },
      xAxis: {
        min: 0,
        data: [],
        boundaryGap: false,
        splitLine: {
          show: false
        },
        axisTick: {
          alignWithLabel: true,
        },
        axisLine: {
          lineStyle: {
            color: '#fff'
          }
        }
      },
      yAxis: {
        splitLine: {
          show: false
        },
        axisTick: {
          show: false
        },
        axisLine: {
          show: false,
          lineStyle: {
            color: '#fff'
          }
        }
      },
      grid: {
        left: '5%',
        right: '5%',
        bottom: '5%',
        top: '5%',
        containLabel: true,
      },
      series: [{
        clipOverflow: false,
        name: 'Humidity',
        type: 'line',
        smooth: true,
        symbol: 'none',
        data: [],
        itemStyle: {
          color: '#ffa74b'
        },
        areaStyle: {
          color: {
            type: 'linear',
            x: 0,
            y: 0,
            x2: 0,
            y2: 1,
            colorStops: [{
              offset: 0,
              color: '#ffa74b66' // 0% color
            }, {
              offset: 1,
              color: '#ffa74b00' // 100% color
            }],
            global: false
          }
        },
        hoverAnimation: true,
        label: {
          show: false,
        },
        markLine: {
          symbol: ['none', 'none'],
          data: [{
            type: 'average',
            name: 'Average',
          },],
        },
      }]
    };

    // Use the specified configuration items and data to display the chart.
    ChartTemperature.setOption(optionTemperature);
    ChartHumidity.setOption(optionHumidity);
  }, 100)
});
When you see this, you should be able to display every message sent by your board on your frontend page, but it is still far from the dense data shown in the first image. I am not keeping the page open for a day; instead, I am using the backend and database to store part of the data.
Backend
The backend is divided into two parts: one is the nodejs backend program, and the other is the nginx proxy. Here, I will first discuss the proxy since the frontend connection requires going through this proxy.
nginx
If you are not using an https connection, you can skip this section and directly use the unencrypted mqtt protocol. If you have your own domain name and have applied for an ssl certificate, you can refer to my nginx configuration, which is as follows:
http {
    sendfile on;
    tcp_nopush on;
    tcp_nodelay on;
    keepalive_timeout 65;
    types_hash_max_size 2048;
    include /etc/nginx/mime.types;
    default_type application/octet-stream;

    ##
    # SSL Settings
    ##
    server {
    listen 80;
    server_name jshub.cn;
    # Redirect requests to https
    rewrite ^(.*)$ https://$host$1 permanent;
    }
    server {
        listen 443 ssl;
                server_name jshub.cn;
                location / {
                    root /larryzhu/web/release/toolbox;
                    index index.html index.htm;
                    try_files $uri $uri/ /index.html;
                }
     location /mqtt {
           proxy_pass http://localhost:8083;
           proxy_http_version 1.1;
           proxy_set_header Upgrade $http_upgrade;
           proxy_set_header Connection "upgrade";
         }
        # SSL protocol version
        ssl_protocols TLSv1.2;
        # Certificate
        ssl_certificate /larryzhu/web/keys/9263126_jshub.cn.pem;
        # Private key
        ssl_certificate_key /larryzhu/web/keys/9263126_jshub.cn.key;
        # ssl_ciphers ECDHE-ECDSA-AES256-GCM-SHA384:ECDHE-RSA-AES256-GCM-SHA384;
        # ssl_ciphers AES128-GCM-SHA256:AES256-GCM-SHA384:AES128-SHA256;

        # No relation to False Start, this item is disabled to reduce packet capture interference.
        # ssl_session_tickets off;

        # return 200 "https ok \n";
  }
Note that this is only part of the configuration; do not overwrite your entire configuration.
If you do not know how to use nginx, it means you do not need to configure ssl and can directly use the mqtt protocol.
Backend Program Part
Here, I will take the egg.js framework as an example.
First, you need to download the egg.js plugin egg-emqtt, which can be downloaded directly using npm. For detailed configuration and activation methods, refer to MQTT Series Practice II Using mqtt in EGG[7].
The methods in the above tutorial are not comprehensive; you can download my example and write it accordingly. Due to the complexity of the content, the address is: gitee.com/zhu_yongbo/…[8].
It also contains methods for connecting to the mysql database, including my server address, mysql open port, username, and password. My server has less than ten days left until expiration, so anyone who sees my article can do whatever they want with my server; there is no important data.
mysql
For mysql, you only need one library and one table to complete all the work.
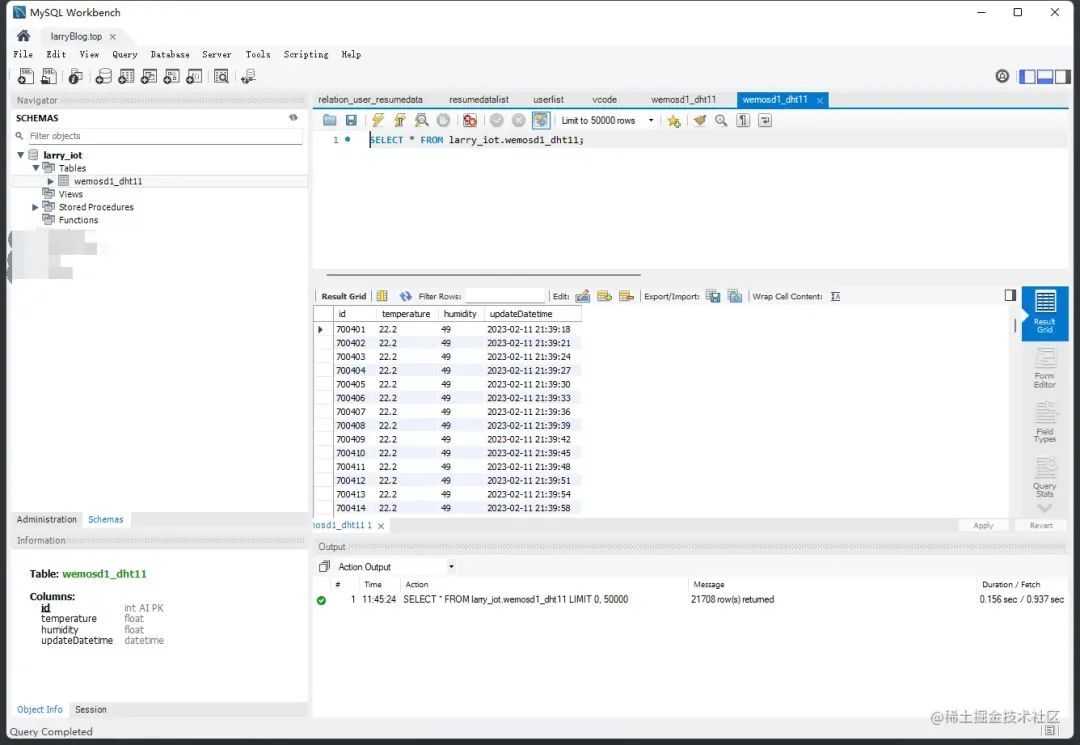
As shown in the figure, it is not complicated; you can create the database by imitating mine.
One point is quite important. Since mysql is not suitable for storing too large amounts of data, and our data is relatively repetitive, you might consider using a compression algorithm or adding an event (to check if the data volume exceeds a certain value each time you insert). For example, my board has accumulated about 700,000 records after running normally for a few days (one record every two seconds). If I hadn’t set up an insert event, this volume of data would have significantly affected query speed.
You can imitate my event, and the statement is as follows:
DELIMITER $$
CREATE TRIGGER delete_oldest_data
AFTER INSERT ON wemosd1_dht11
FOR EACH ROW
BEGIN
    -- If the data volume exceeds 43200 (one day's worth of data at two-second intervals), call the stored procedure to delete the oldest record.
    IF (SELECT COUNT(*) FROM wemosd1_dht11) > 43200 THEN
        CALL delete_oldest();
    END IF;
END$$
DELIMITER ;

-- Create stored procedure
CREATE PROCEDURE delete_oldest()
BEGIN
    -- Delete the oldest record
    delete from wemosd1_dht11 order by id asc limit 1
END$$
DELIMITER ;
By the way: this is what chatGPT taught me, and I only made a small modification.
This method will delete data with smaller ids, which will cause the id to grow larger and larger. The benefit is that you can see how many records have accumulated. However, if you do not want the id to accumulate, you can choose to reset the id. For specific methods, it is recommended to consult chatGPT.
Conclusion
At this point, we have completed the connectivity of the frontend, backend, and device sides.
Let’s summarize how the data comes to our view step by step:
First, the wemos d1 development board reads the temperature and humidity values from the DHT11 sensor. Then the development board broadcasts the data to a certain topic via mqtt. Both our frontend and backend subscribe to this topic, and the backend stores the processed data into mysql. The frontend directly displays it using echarts. When the frontend starts, it can also query historical data from the backend program, such as the first 8000 records. The subsequent changes are provided by the online development board, and we get a real-time temperature and humidity online display screen that can also see historical data.
If you think this is impressive, please give me a thumbs up.
References
vue-xmw-admin-pro: https://link.juejin.cn?target=https%3A%2F%2Fgitee.com%2FCyan-Xmw%2Fvue-xmw-admin-pro
[2]Installing esp8266 SDK on Arduino IDE: https://link.juejin.cn?target=https%3A%2F%2Farduino.me%2Fa%2Fesp8266
[3]arduino.esp8266.com/stable/pack…: https://link.juejin.cn?target=http%3A%2F%2Farduino.esp8266.com%2Fstable%2Fpackage_esp8266com_index.json
[4]Installing CH340 driver on win10: https://link.juejin.cn?target=https%3A%2F%2Fblog.csdn.net%2FCreatorGG%2Farticle%2Fdetails%2F108860116
[5]EMQX: Large-scale distributed IoT MQTT message server: https://link.juejin.cn?target=https%3A%2F%2Fwww.emqx.io%2Fzh
[6]websocket: https://link.juejin.cn?target=https%3A%2F%2Fcn.bing.com%2Fsearch%3Fq%3Dwebsocket%26FORM%3DAWRE
[7]MQTT Series Practice II Using mqtt in EGG: https://juejin.cn/post/6844903735408214024
[8]gitee.com/zhu_yongbo/…: https://link.juejin.cn?target=https%3A%2F%2Fgitee.com%2Fzhu_yongbo%2Fmqttineggjs